

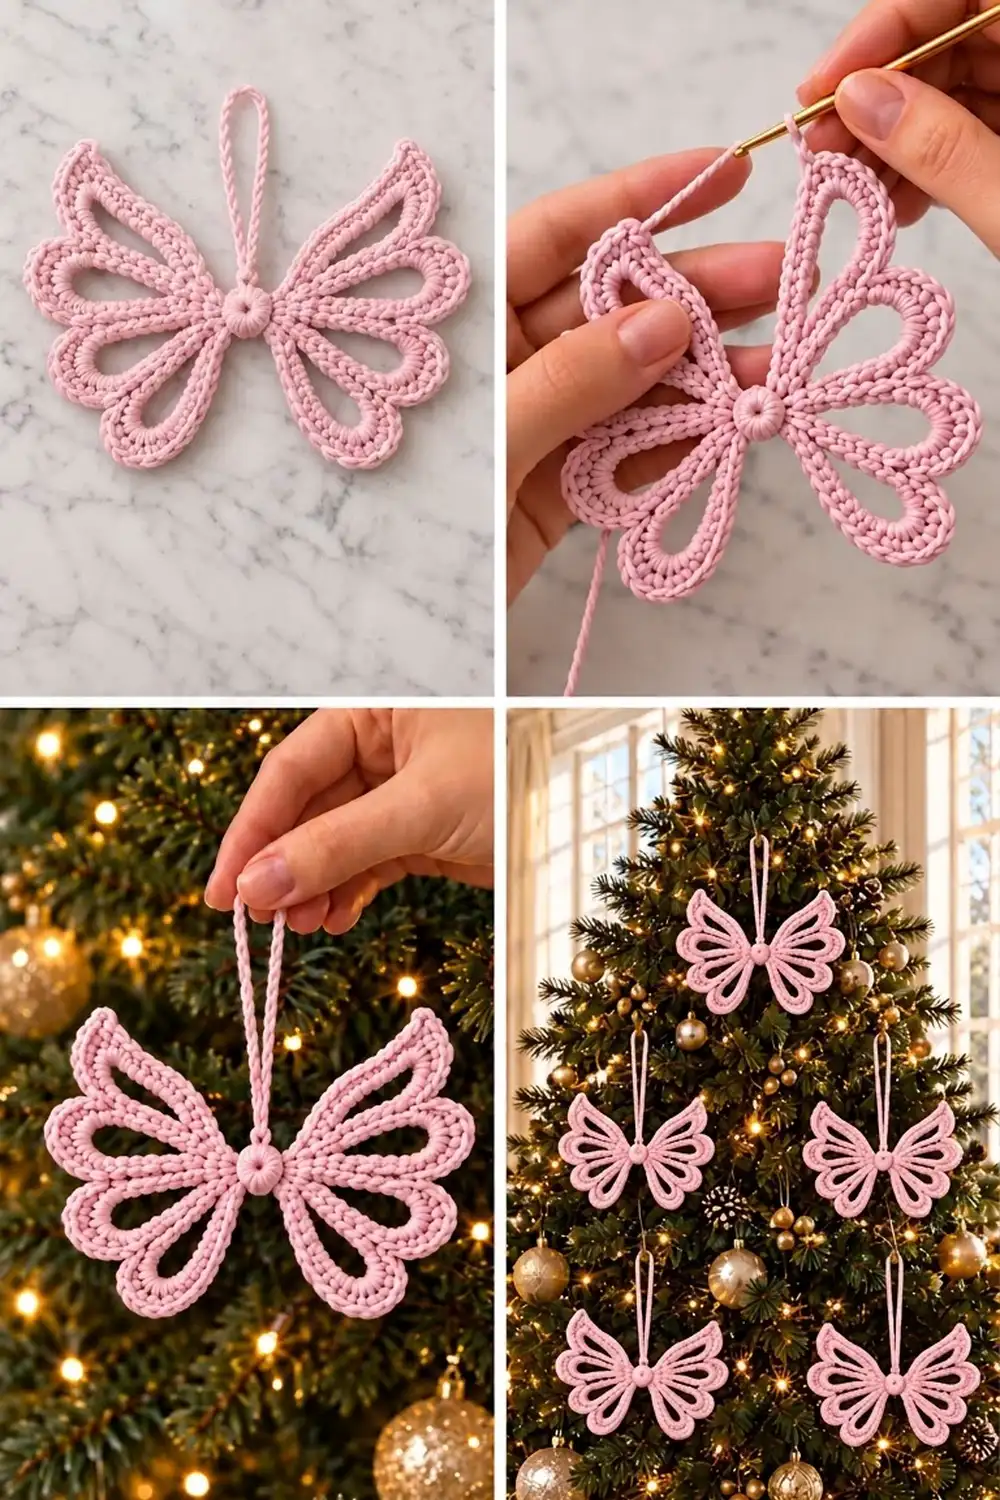
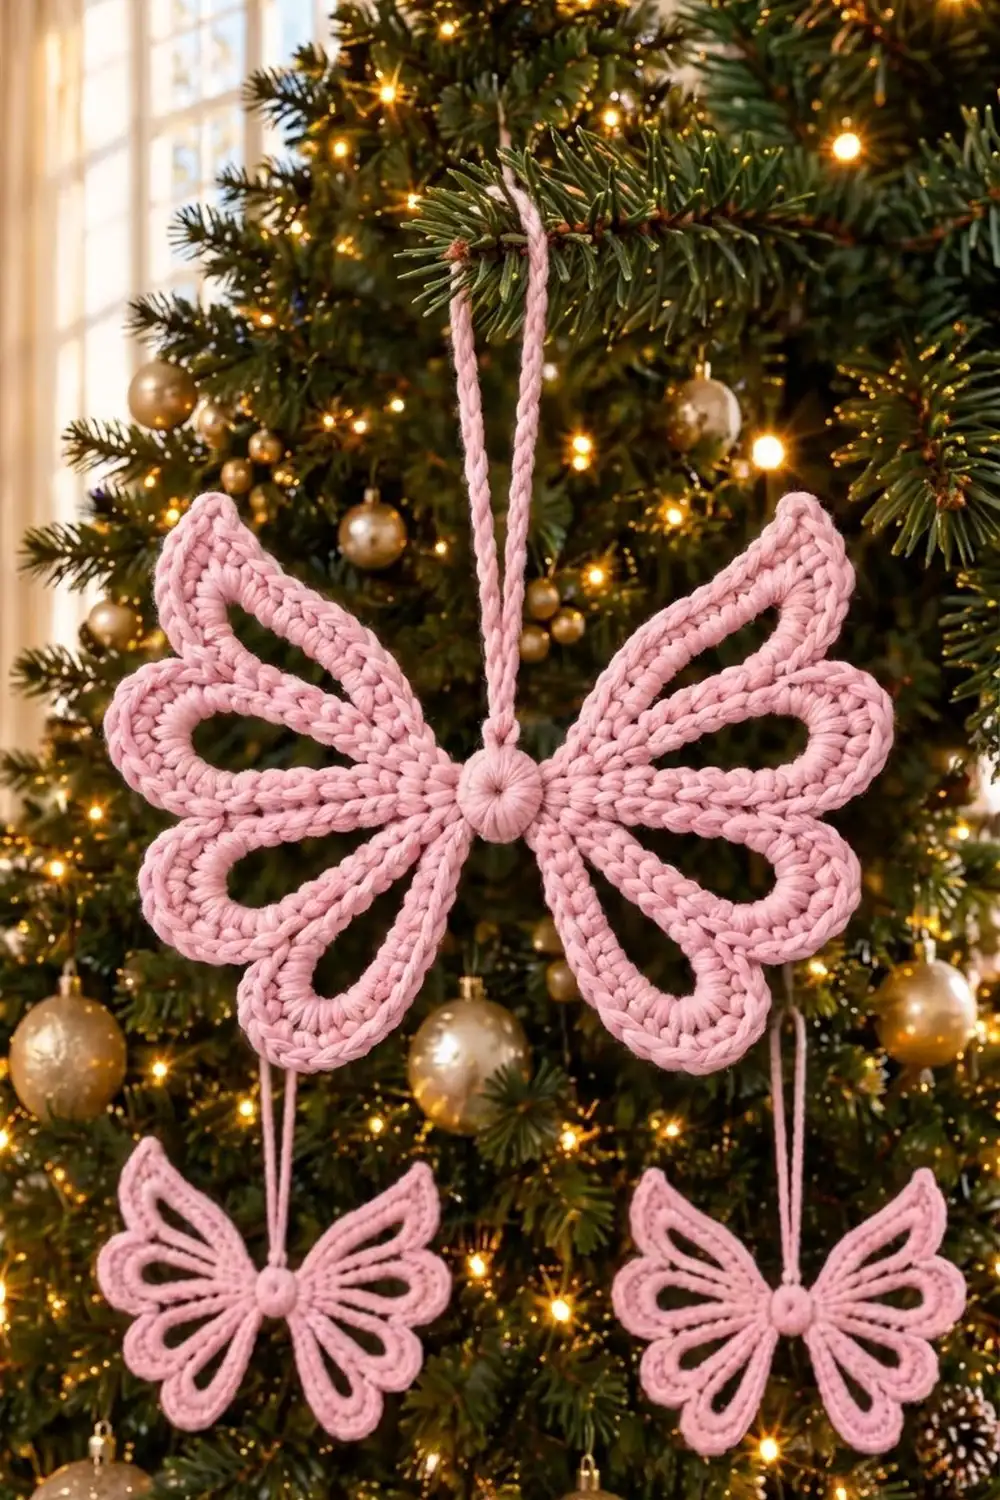
The Sugarplum Butterfly is a small, airy ornament in one soft shade of blush pink. Its four wings are made from six open teardrop loops around a tiny raised center, and a slim chain loop at the top lets you hang it. Laid flat, it looks like lace. On a tree, light shines through its openings.
This is a single-piece design. You work it in the round from the center outward, with no sewing and no separate motifs. The finished ornament measures about 5½ in (14.0 cm) wide and 3¾ in (9.5 cm) tall, not counting the hanging loop.
The pattern uses US crochet terms. The fabric is mostly single crochet, worked firmly so the wings keep their shape.
Here’s how it’s built: you make a small center disk, chain six long loops in three different lengths, and cover each loop with single crochet. Then one shaping edge round sharpens the upper wing tips and rounds the lower wings. A chain hanging loop finishes it off.
Finished Size and Construction
- Finished size: 5½ in (14.0 cm) wide × 3¾ in (9.5 cm) tall
- Hanging loop: about 2¼ in (5.7 cm) tall
- Skill level: Easy (advanced beginner)
- Terminology: US crochet terms
- Yarn weight: DK (weight 3), cotton or cotton blend
- Hook: 3.5 mm (US E-4)
- Number of pieces: 1
- Layout: one butterfly with 3 loops on each side of the center (upper, middle and lower)
- Piece size before border: 5 in (12.7 cm) wide × 3¼ in (8.3 cm) tall
- Border depth: 1 round of sc, about ¼ in (0.6 cm) on every edge
Materials
Yarn advice: Choose a smooth DK cotton or cotton blend. Cotton gives crisp stitch definition and holds the open loops flat. Fluffy or very stretchy acrylic tends to make the wings droop. A light, slightly dusty pink matches the original look.
- Blush pink, DK weight: 10 g, about 23 m (25 yd)
This amount includes a margin of about 20%. One ornament uses about 8 g, so the extra covers your test piece and any ripping back.
Tools:
- 3.5 mm (US E-4) crochet hook
- Tapestry needle
- Stitch markers (2–3)
- Scissors
- Ruler or tape measure
- Blocking mat or folded towel and rust-proof pins
- Optional: spray starch or fabric stiffener
Abbreviations (US Terms)
- ch – chain
- sc – single crochet
- sc2tog – single crochet 2 together
- sl st – slip stitch
- st(s) – stitch(es)
- sp – space
- BLO – back loop only
- MR – magic ring
- ( ) – work everything inside the parentheses into the same stitch
Special stitch – tip (sc, ch 2, sc): Work 1 sc, ch 2 and 1 sc into the same stitch. This makes the sharp point at the top of each upper wing.
Gauge and Checkpoints
Gauge: 20 sc and 22 rows = 4 in (10.2 cm) in sc with a 3.5 mm hook. That’s 5 sc per 1 in (2.5 cm).
Because the piece is small, the easiest gauge test is the ornament itself. Make one first, check it at each checkpoint, and adjust before making more.
Checkpoints:
- After Round 2: the center disk is ¾ in (1.9 cm) across.
- After Round 4: the piece is 5 in (12.7 cm) wide × 3¼ in (8.3 cm) tall when lying flat.
- After Round 5 (border): the piece is 5½ in (14.0 cm) wide × 3¾ in (9.5 cm) tall.
- Hanging loop: about 2¼ in (5.7 cm) tall.
If your piece is too big: go down to a 3.25 mm or 3 mm hook, or chain more tightly in Round 3. Loose chains make the loops long and floppy.
If your piece is too small: go up to a 3.75 mm or 4 mm hook. Make sure you aren’t pulling the chain loops tight while you work Round 4.
If the wings cup: your stitches in Rounds 4 and 5 are too tight. Loosen your tension, or go up half a hook size for those two rounds only.
Pattern
The center is the butterfly’s body. Every loop starts from it, so keep the first two rounds neat and firm.
Center Disk
Round 1: Make a MR. Ch 1 and work 6 sc into the ring. Pull the ring tight. Sl st to the first sc. (6 sc)
Round 2: Ch 1, then work 2 sc in each st around. Sl st to the first sc. (12 sc)
Checkpoint: the disk is ¾ in (1.9 cm) across and lies flat.
Number the 12 stitches of Round 2 from 1 to 12. Stitch 1 will be the top center of the butterfly. Put a marker in stitch 1 if that helps.
Wing Loops
Work this round in BLO. The unused front loops of Round 2 stay on the surface and form the small raised ring around the center.
Round 3: Ch 1. Working in BLO only:
- sc in st 1, sc in st 2 (top)
- (sc, ch 22, sc) in st 3 (first upper loop)
- (sc, ch 16, sc) in st 4 (first middle loop)
- (sc, ch 14, sc) in st 5 (first lower loop)
- sc in st 6, sc in st 7, sc in st 8 (bottom)
- (sc, ch 14, sc) in st 9 (second lower loop)
- (sc, ch 16, sc) in st 10 (second middle loop)
- (sc, ch 22, sc) in st 11 (second upper loop)
- sc in st 12 (top)
Sl st to the first sc. (18 sc + 6 ch-loops)
Count check: each of the 12 stitches gets 1 sc, and each of the 6 loop stitches gets a second sc. That makes 12 + 6 = 18 sc.
Make sure no chain loop is twisted. Each one should lie flat as a long teardrop. The top center now has 3 plain sc (sts 12, 1 and 2), and so does the bottom center (sts 6–8).
Covering the Loops
In this round you work the sc into the chain spaces, not into the chains themselves. Push the stitches together as you go so they pack evenly around each loop.
Where two loops meet, the 2 sc between them are joined with sc2tog. This pinches each valley and keeps the openings separate.
Round 4: Ch 1.
- sc in each of the first 2 sc (top: 2)
- sc in the next sc (base of first upper loop: 1)
- 28 sc in the ch-22 sp (28)
- sc2tog over the next 2 sc (valley: 1)
- 20 sc in the ch-16 sp (20)
- sc2tog over the next 2 sc (valley: 1)
- 18 sc in the ch-14 sp (18)
- sc in the next sc (base of first lower loop: 1)
- sc in each of the next 3 sc (bottom: 3)
- sc in the next sc (base of second lower loop: 1)
- 18 sc in the ch-14 sp (18)
- sc2tog over the next 2 sc (valley: 1)
- 20 sc in the ch-16 sp (20)
- sc2tog over the next 2 sc (valley: 1)
- 28 sc in the ch-22 sp (28)
- sc in the next sc (base of second upper loop: 1)
- sc in the last sc (top: 1)
Sl st to the first sc. (146 sts)
Count check: 2 + 1 + 28 + 1 + 20 + 1 + 18 + 1 + 3 + 1 + 18 + 1 + 20 + 1 + 28 + 1 + 1 = 146.
Checkpoint: lay the piece flat. It should be 5 in (12.7 cm) wide and 3¼ in (8.3 cm) tall. The upper loops point up and outward, the middle loops point sideways, and the lower loops droop down and outward.
Border
The border is one shaping round. It adds the final ¼ in (0.6 cm) to every edge, makes the pointed upper wing tips, and rounds out the middle and lower wings.
Border gauge: the same as the body, 5 sc per 1 in (2.5 cm). One round of sc adds about ¼ in (0.6 cm) to each edge, so the width and height each grow by ½ in (1.3 cm).
Round 5: Ch 1.
- sc in each of the first 2 sts (top: 2)
- sc in the next st (1)
- First upper wing (28 sts): sc in next 11, 2 sc in next st, tip in next st, 2 sc in next st, sc in next 14 (31 sc + ch-2 tip)
- sl st in the valley st (1)
- First middle wing (20 sts): sc in next 8, 2 sc in each of next 4, sc in next 8 (24 sc)
- sl st in the valley st (1)
- First lower wing (18 sts): sc in next 7, 2 sc in each of next 4, sc in next 7 (22 sc)
- sc in the next st (1)
- sc in each of the next 3 sts (bottom: 3)
- sc in the next st (1)
- Second lower wing (18 sts): sc in next 7, 2 sc in each of next 4, sc in next 7 (22 sc)
- sl st in the valley st (1)
- Second middle wing (20 sts): sc in next 8, 2 sc in each of next 4, sc in next 8 (24 sc)
- sl st in the valley st (1)
- Second upper wing (28 sts): sc in next 14, 2 sc in next st, tip in next st, 2 sc in next st, sc in next 11 (31 sc + ch-2 tip)
- sc in the next st (1)
- sc in the last st (top: 1)
Sl st to the first sc. (168 sts: 164 sc + 4 sl st, plus 2 ch-2 tips)
Why the math works: Round 4 has 146 sts. Round 5 is a trim round: you work 1 stitch into each of those 146 stitches and add extra stitches only on the curves:
- each upper wing: +1 (2 sc in a st) + 1 (tip) + 1 (2 sc in a st) = +3
- each middle wing: 4 increases = +4
- each lower wing: 4 increases = +4
That’s 3 + 4 + 4 = 11 per side, or 22 for both sides, so the total is 146 + 22 = 168 sts. The top center, the bottom center and the 4 valleys get no increases. They stay pinched in, which keeps the butterfly’s waist.
The tips sit in the 13th stitch of the first upper wing and the 16th stitch of the second upper wing. Those are mirror positions (28 − 13 + 1 = 16), so both points face up and outward evenly.
Checkpoint: the piece is now 5½ in (14.0 cm) wide and 3¾ in (9.5 cm) tall.
Hanging Loop
Don’t fasten off after Round 5.
- Ch 36.
- Sl st into the same top-center stitch where you joined Round 5. This closes the loop.
- Sl st into the back bump of each of the 36 ch, all the way around the loop. This doubles the cord and gives it the same braided look as the edge.
- Sl st into the top-center stitch again. Fasten off and leave a 6 in (15.2 cm) tail.
The loop should stand about 2¼ in (5.7 cm) tall. Weave in all ends on the back, running each one through several stitches in opposite directions.
Final Blocking
Blocking turns the loops into crisp, even wings.
- Dampen. Mist the ornament with water, or dip it and roll it in a towel. It should be damp, not dripping.
- Pin the center. Put one pin through the center disk to hold it in place.
- Set the size. Pin the two upper tips so the piece is 5½ in (14.0 cm) wide. Pin the bottom edge so it is 3¾ in (9.5 cm) tall.
- Open the loops. Put a pin inside each of the 6 openings and ease them into smooth teardrops. Each pair of matching loops should have the same shape.
- Shape the edges. Pin around the middle and lower wings so the curves are round, and nudge each valley slightly toward the center.
- Straighten the hanging loop. Lay it straight up from the top center.
- Stiffen (optional). For a firmer ornament, spray it with starch or brush on diluted fabric stiffener now.
- Dry fully. Leave it pinned until completely dry, usually 6–12 hours.
Final Quality-Control Checklist
- The finished size is 5½ in (14.0 cm) × 3¾ in (9.5 cm).
- Stitch counts are right: Round 2 has 12 sc, Round 3 has 18 sc and 6 loops, Round 4 has 146 sts and Round 5 has 168 sts.
- The raised ring of front loops shows clearly around the center.
- No chain loop is twisted.
- Both upper wings have a sharp point at the outer top.
- The two halves are mirror images.
- All 4 valleys and the top and bottom centers are pinched in.
- The hanging loop is centered and about 2¼ in (5.7 cm) tall.
- All ends are woven in and can’t be seen from the front.
Troubleshooting
A loop is twisted. Before you start Round 4, check each chain. If one is twisted, rip back to it and chain it again.
One side is bigger than the other. Check that you chained exactly 22, 16 and 14 on both sides. Even one extra chain is easy to see.
The openings close up. Your tension is too tight, or you worked extra sc into a space. Stick to the exact counts and relax your hands.
The wings ruffle. Your chains are too short for the stitches packed into them. Chain more loosely, or go up one hook size for Round 3 only.
The tips are blunt. Make sure each tip has a full ch 2, and pin it out sharply when blocking.
The center isn’t raised. Round 3 must be worked in BLO. If you used both loops, the front ridge won’t form.
Care
Hand wash in cool water with mild soap, press the water out in a towel, and lay it flat in shape to dry. If you used stiffener, apply it again after washing.
Final Notes
The ornament follows one simple measurement chain. After Round 2, the center disk is ¾ in (1.9 cm) across. In Round 3, three loop lengths per side (ch 22, ch 16 and ch 14) set the wing shape. Covering the loops in Round 4 gives 146 sts and a piece 5 in (12.7 cm) wide × 3¼ in (8.3 cm) tall. The border round adds 22 sts for 168 in total, plus ¼ in (0.6 cm) on each edge, for a finished size of 5½ in (14.0 cm) × 3¾ in (9.5 cm). A 2¼ in (5.7 cm) hanging loop completes the piece.
Check your measurements at each stage, keep your chains even, and block with care. You’ll end up with a light, lacy butterfly that looks lovely on a tree, on a gift or in a window.
Happy crocheting!