

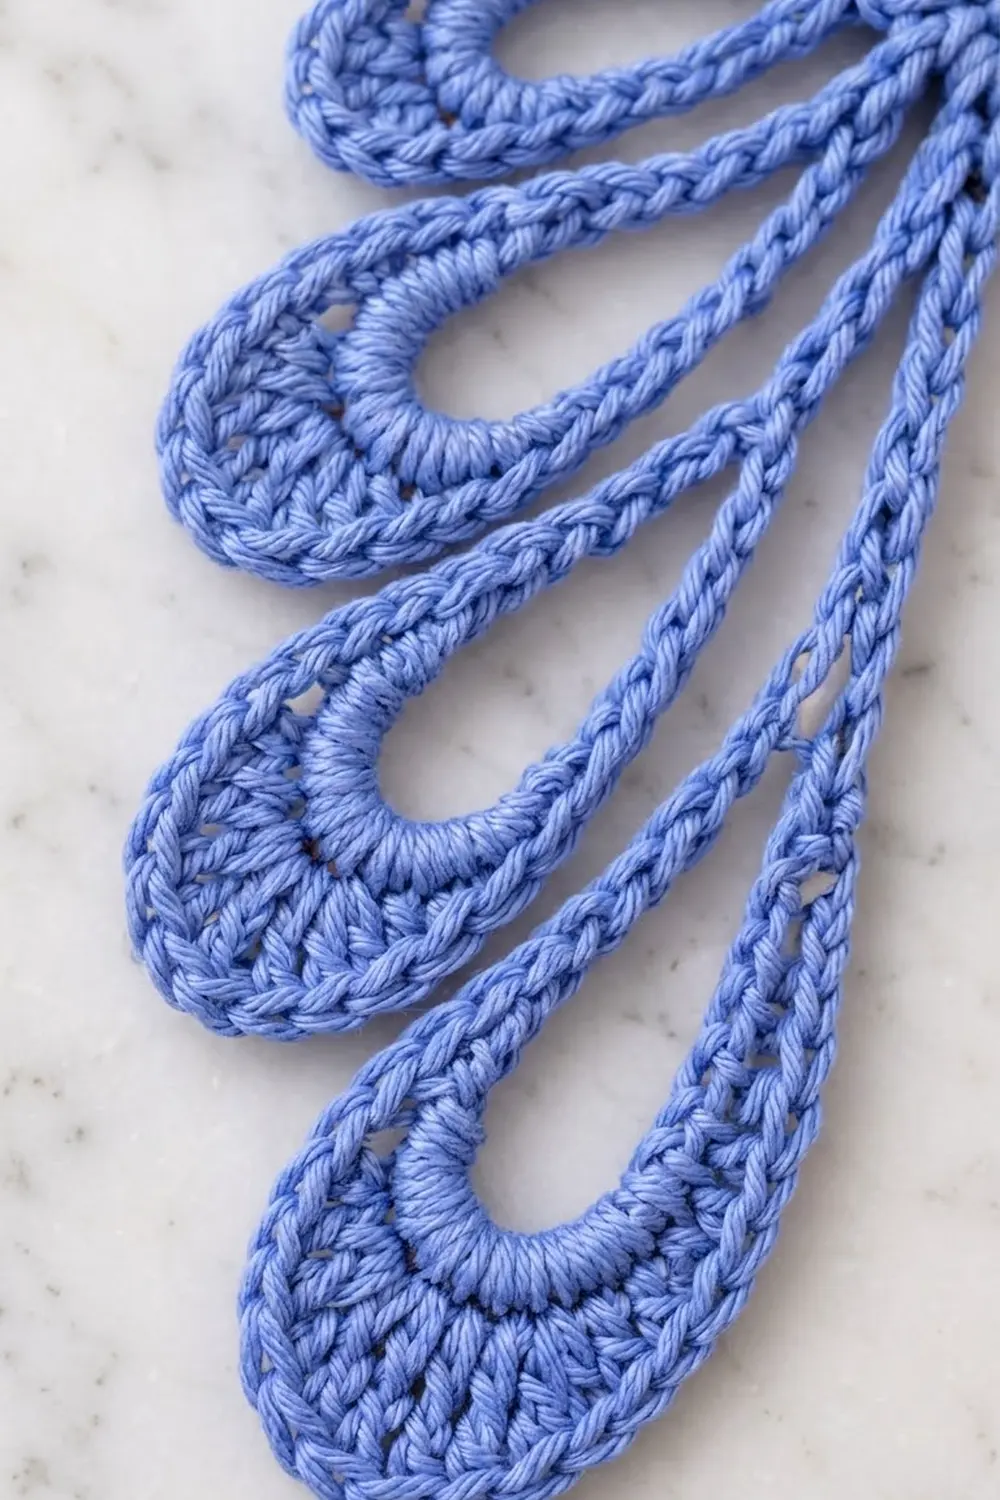
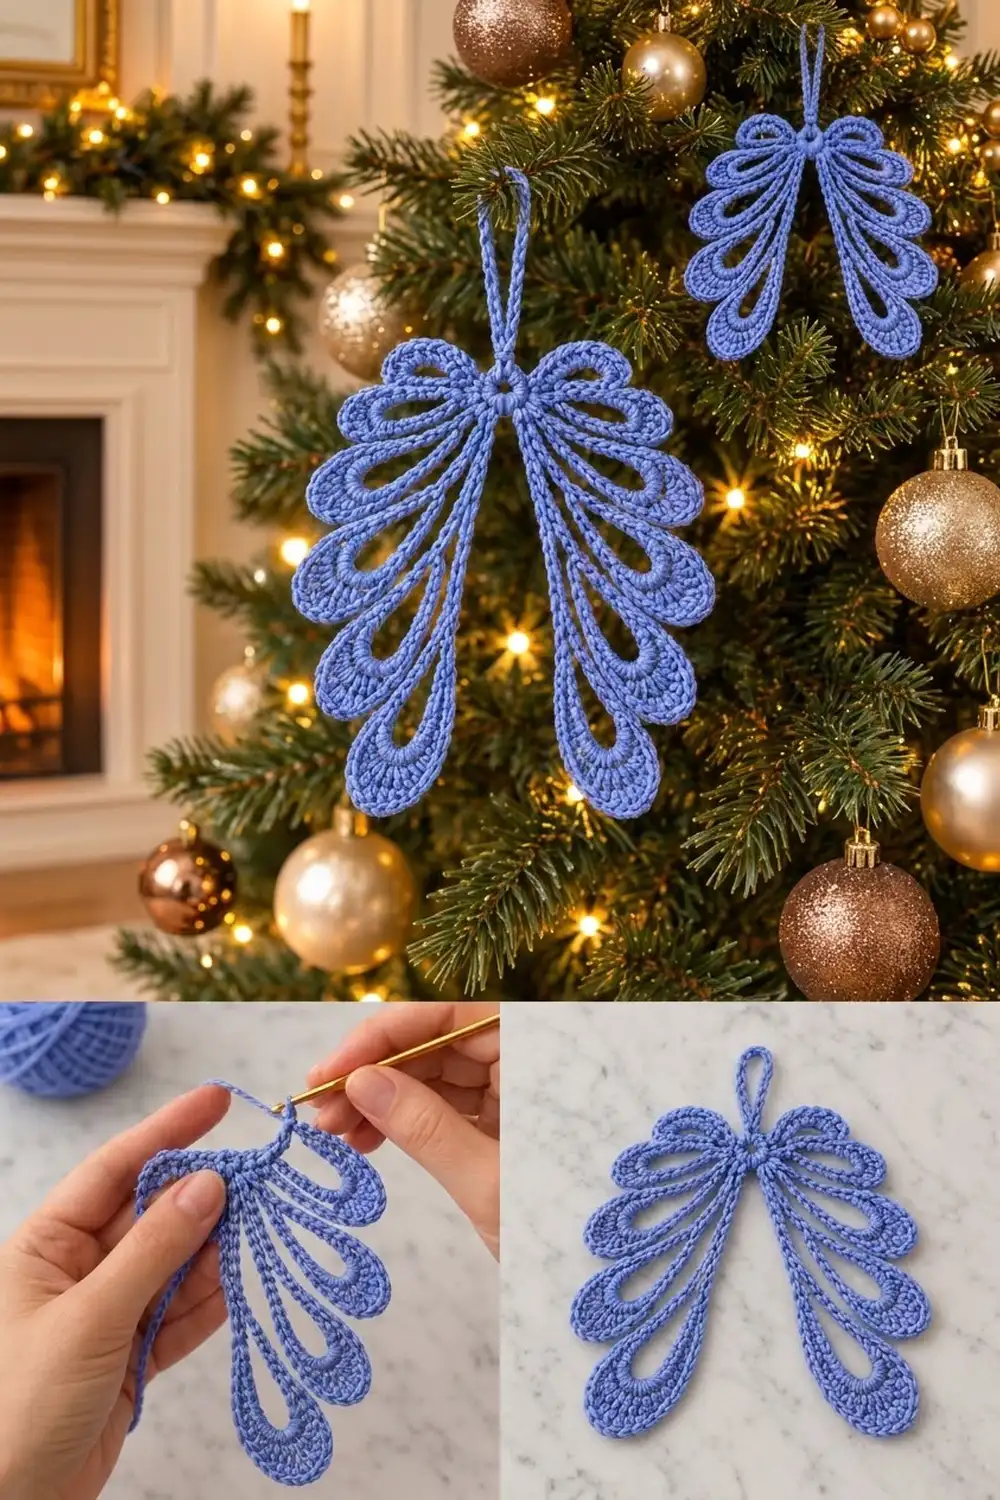
These wings start from a single ring at the center. Four slender teardrop feathers fan out on each side. The top pair curls up like the loops of a bow, and the lower feathers fall in longer and longer sweeps. A firm corded edge outlines every feather, and each rounded tip is weighted with a soft crescent of taller stitches.
The sample is worked in one periwinkle blue cotton, which looks calm and wintry against gold lights and green branches. The style is lacy but bold. Each feather is open in the middle, so the ornament still reads clearly from across the room.
The finished ornament measures 5 in (12.7 cm) wide by 5.5 in (14.0 cm) tall, plus a 1.75 in (4.4 cm) hanging loop. This pattern uses US crochet terms throughout.
The construction is simple and continuous. You make a small ring, then make each feather by chaining a long loop and filling it with stitches worked over the chain. A slip-stitch path carries you around the ring between feathers, and a final round of crab stitch gives the rope-like edge. There is no sewing and only two yarn ends.
Finished Size and Construction
- Finished size: 5 in (12.7 cm) wide x 5.5 in (14.0 cm) tall, excluding the hanging loop
- Hanging loop: 1.75 in (4.4 cm) long
- Skill level: Easy-Intermediate
- Terminology: US crochet terms
- Yarn weight: Sport weight (#2) mercerized cotton
- Hook: 2.5 mm
- Number of pieces: 1 (single ornament, worked in one piece)
- Layout: Center ring with 4 feathers per side, mirrored; hanging loop at top center
- Piece size before border: 4.75 in (12.1 cm) x 5.25 in (13.3 cm)
- Border depth: 0.125 in (0.3 cm) on every edge, one round of crab stitch
Materials
Yarn: Use a smooth, mercerized sport-weight cotton. Cotton holds the teardrop shapes crisply and takes starch well. Avoid fuzzy or very stretchy yarns, because the long stems will droop and the corded edge will lose its definition.
- Periwinkle blue: 12 g / 36 m (39 yd) per ornament
Quantities include a margin of about 30% for your gauge swatch and yarn ends. One ornament actually uses about 9 g.
Tools:
– 2.5 mm crochet hook
– Tapestry needle
– Scissors
– 2 stitch markers
– Blocking board or foam mat
– Rust-proof pins
– Spray starch or fabric stiffener (optional but recommended)
– Ruler or measuring tape
Abbreviations (US Terms)
- ch – chain
- sl st – slip stitch
- sc – single crochet
- hdc – half double crochet
- dc – double crochet
- st(s) – stitch(es)
- sp – space
- rev sc – reverse single crochet (crab stitch)
Special stitch – Reverse single crochet (crab stitch): With the right side facing, work from left to right (right to left if you are left-handed). Insert the hook into the next stitch to the right, yarn over, pull up a loop, then yarn over and pull through both loops on the hook. This makes a twisted, rope-like ridge.
Working over the loop: Throughout this pattern, “work over the loop” means you insert the hook into the open center of the chain loop, not into individual chains. The stitches wrap around the chain and can be slid along it to space them evenly.
Gauge and Checkpoints
Gauge: 24 sc = 4 in (10.2 cm). Chain gauge: 7 ch = 1 in (2.5 cm).
Gauge decides how long every feather is, so test before committing. Work the ring and one F4 feather (the longest) as your sample. Measure it, then decide whether to keep it as the start of your ornament or pull it out.
Checkpoints:
– After Round 1: the ring is 0.6 in (1.5 cm) across.
– F1 (top feather): 2 in (5.1 cm) from the ring edge to the tip.
– F2: 2.6 in (6.6 cm) from the ring edge.
– F3: 3.1 in (7.9 cm) from the ring edge.
– F4 (longest feather): 3.7 in (9.4 cm) from the ring edge.
– After Round 2: 4.75 in (12.1 cm) wide x 5.25 in (13.3 cm) tall, gently flattened.
– After the border and blocking: 5 in (12.7 cm) x 5.5 in (14.0 cm).
Too big? If F4 is longer than 3.9 in (9.9 cm), go down to a 2.25 mm hook. Your chains are probably loose, so chain more firmly.
Too small? If F4 is shorter than 3.5 in (8.9 cm), go up to a 2.75 mm hook.
Small differences of up to 0.25 in (0.6 cm) across the full width are fine for an ornament.
Pattern
Round 1: Center Ring
Ch 5, sl st in the first ch to form a ring.
Rnd 1: Ch 1, 16 sc in the ring, sl st in the first sc to join. (16 sc)
Number the stitches mentally from 1 to 16, with sc 1 being the joining stitch. Sc 1 sits at top center (where the hanging loop goes), and sc 9 sits at bottom center. Place a marker in sc 1 and another in sc 9.
Checkpoint: The ring is 0.6 in (1.5 cm) across and has a small open center.
How to Work a Feather
Every feather follows the same method:
- From the current ring stitch, ch the stated number.
- Sl st in the same ring stitch. This makes a long, closed chain loop.
- Working over the loop, work the stated sequence of stitches. Start up one side of the loop, go around the tip, and come back down the other side.
- Sl st in the same ring stitch to close the feather.
The sc along each side create the two parallel corded lines of the stem. The hdc ease the height up, and the dc packed around the tip build the thicker crescent at the rounded end. Because the stitches are worked over the chain, the center of the feather stays open as a slim teardrop.
Feather sizes:
- F1 (top bow feather): ch 22. Over the loop: 8 sc, 2 hdc, 10 dc, 2 hdc, 8 sc. (30 sts)
- F2: ch 30. Over the loop: 11 sc, 2 hdc, 12 dc, 2 hdc, 11 sc. (38 sts)
- F3: ch 38. Over the loop: 14 sc, 2 hdc, 14 dc, 2 hdc, 14 sc. (46 sts)
- F4 (longest feather): ch 46. Over the loop: 17 sc, 2 hdc, 16 dc, 2 hdc, 17 sc. (54 sts)
Tip: Before you close each feather, slide the stitches along the chain so the sc sit snugly side by side and the dc fan evenly around the curve. Don’t leave bare chain showing at the tip.
Round 2: Feathers
You’ll work around the ring with sl sts, making each feather at its anchor stitch. The two wings are called Wing A (sc 2–8) and Wing B (sc 10–16). The anchors are mirror images of each other across the line from sc 1 to sc 9.
Rnd 2:
– Sl st in sc 2, sl st in sc 3. Work F1 in sc 3.
– Sl st in sc 4, sl st in sc 5. Work F2 in sc 5.
– Sl st in sc 6, sl st in sc 7. Work F3 in sc 7.
– Sl st in sc 8. Work F4 in sc 8.
– Sl st in sc 9 (bottom center), sl st in sc 10. Work F4 in sc 10.
– Sl st in sc 11. Work F3 in sc 11.
– Sl st in sc 12, sl st in sc 13. Work F2 in sc 13.
– Sl st in sc 14, sl st in sc 15. Work F1 in sc 15.
– Sl st in sc 16, sl st in sc 1.
Stitch count per wing: 30 + 38 + 46 + 54 = 168 sts.
Total feather stitches: 168 x 2 = 336 sts.
The two F4 feathers sit only two ring stitches apart (sc 8 and sc 10), with sc 9 between them. That close spacing is what makes the longest feathers hang almost parallel beside the center line.
Hanging Loop
Still at sc 1: ch 24, sl st in sc 1. Work 26 sc over the loop, then sl st in sc 1. (26 sc)
The 26 sc are packed firmly over 24 chains so the loop becomes a stiff cord that holds its shape.
Checkpoint: The loop measures 1.75 in (4.4 cm) from the ring to the top of the loop. Lay the piece flat: it should be about 4.75 in (12.1 cm) wide x 5.25 in (13.3 cm) tall.
Do not fasten off.
Border: Crab-Stitch Edging
Border gauge: 1 rev sc per stitch adds 0.125 in (0.3 cm) to every edge it covers.
The border runs around every feather but skips the hanging loop. You work backward from where Round 2 ended, which is the natural direction for crab stitch.
Rnd 3: Ch 1. Do not turn. Working left to right:
– Sl st in sc 16, sl st in sc 15. Work 1 rev sc in each of the 30 sts of F1 (Wing B). Sl st in sc 15.
– Sl st in sc 14, sl st in sc 13. Work 1 rev sc in each of the 38 sts of F2. Sl st in sc 13.
– Sl st in sc 12, sl st in sc 11. Work 1 rev sc in each of the 46 sts of F3. Sl st in sc 11.
– Sl st in sc 10. Work 1 rev sc in each of the 54 sts of F4. Sl st in sc 10.
– Sl st in sc 9, sl st in sc 8. Repeat for Wing A: 54 rev sc in F4 (then sl st in sc 8), sl st in sc 7, 46 rev sc in F3 (then sl st in sc 7), sl st in sc 6 and sc 5, 38 rev sc in F2 (then sl st in sc 5), sl st in sc 4 and sc 3, 30 rev sc in F1 (then sl st in sc 3).
– Sl st in sc 2, sl st in sc 1. Fasten off.
Counts per side:
– Wing B: 30 + 38 + 46 + 54 = 168 rev sc
– Wing A: 30 + 38 + 46 + 54 = 168 rev sc
– Total: 336 rev sc
The slip stitches on the ring are travel stitches only and are not counted as border stitches.
Why the math works: The border places exactly 1 rev sc on top of each of the 336 feather stitches, so nothing is added or skipped anywhere. Along the stems, the sc sit close together and the crab stitch forms a tight rope. At the tips, the dc tops are spread farther apart around the curve. Crab stitch naturally lies a little wider than sc, so one per stitch fills that wider spacing without ruffling. The border adds 0.125 in (0.3 cm) on each side, taking the piece from 4.75 in (12.1 cm) to 5 in (12.7 cm) wide and from 5.25 in (13.3 cm) to 5.5 in (14.0 cm) tall.
Weave in both ends along the back of a stem, not through the ring, so the center hole stays clean.
Final Blocking
- Wet the ornament fully in cool water, then press it gently in a towel until it is just damp.
- Lay it right side up on the blocking mat.
- Pin the center ring in place first, keeping the hole open with a pin through the middle.
- Pin both F1 feathers curling up and outward like bow loops. Each tip should sit about 1 in (2.5 cm) above the ring center.
- Pin the F2 and F3 feathers fanning outward and down. Space the tips evenly so the full width is 5 in (12.7 cm).
- Pin the F4 feathers hanging almost straight down beside the center line. The ornament should measure 5.5 in (14.0 cm) from the top of the F1 tips to the bottom of the F4 tips.
- Open each teardrop slightly with a pin inside the tip so the center gap shows.
- Check both wings against each other with a ruler, then spray with starch or brush on fabric stiffener.
- Let it dry completely, at least 12 hours, before unpinning.
Final Quality-Control Checklist
- Ring is 0.6 in (1.5 cm) across with an open center.
- Each wing has 4 feathers with 30, 38, 46, and 54 stitches.
- Both wings are mirror images, with matching feather lengths.
- Each feather tip shows a dense dc crescent and an open teardrop center.
- Crab stitch runs continuously around all 8 feathers, 336 rev sc in total.
- Hanging loop is 1.75 in (4.4 cm) long, firm, and centered at sc 1.
- Finished size is 5 in (12.7 cm) x 5.5 in (14.0 cm).
- Ends are woven invisibly into the stems.
- Ornament hangs straight without tilting.
Troubleshooting
Feather tip ruffles: You may have too many dc for your tension. Remove 2 dc from the tip and add 1 sc to each side to keep the count.
Bare chain shows at the tip: Slide the stitches toward the tip before closing, or tighten your chain so the loop is shorter.
Stems twist: Make sure the chain isn’t twisted before you sl st it back into the ring. Blocking will also straighten mild twisting.
Ornament hangs crooked: Check that the hanging loop is in sc 1 and that the two wings carry the same counts. A missing stitch on one side shifts the balance.
Center hole closes up: Your ring stitches are too tight. Work Round 1 a little looser, or start with ch 6 instead of ch 5.
Crab stitch looks flat: Twist the hook slightly downward as you pull up each loop to bring out the corded look.
Care
Hand wash in cool water, press out the moisture in a towel, and re-block flat. Re-starch if needed. Store flat or hanging so the feathers don’t crush.
Final Notes
The measurement chain is short and easy to check:
1. The ring measures 0.6 in (1.5 cm).
2. The four feathers measure 2 in (5.1 cm), 2.6 in (6.6 cm), 3.1 in (7.9 cm), and 3.7 in (9.4 cm).
3. Before the border, the ornament measures 4.75 in (12.1 cm) x 5.25 in (13.3 cm).
4. One round of crab stitch adds 0.125 in (0.3 cm) on every edge, for a finished size of 5 in (12.7 cm) x 5.5 in (14.0 cm).
If your stitch counts stay at 168 per wing and your F4 checkpoint is right, every other measurement follows.
Make one, check it against the photo, and then make a whole flock for the tree. They also work well as gift toppers.
Happy crocheting!