

This curtain panel is made from rows of open butterfly motifs in soft blush pink. Each butterfly has a small center ring, a looped antenna, a slip-stitched body and two lacy wings. The wings are built from stacked double crochet rows trimmed with chain arcs.
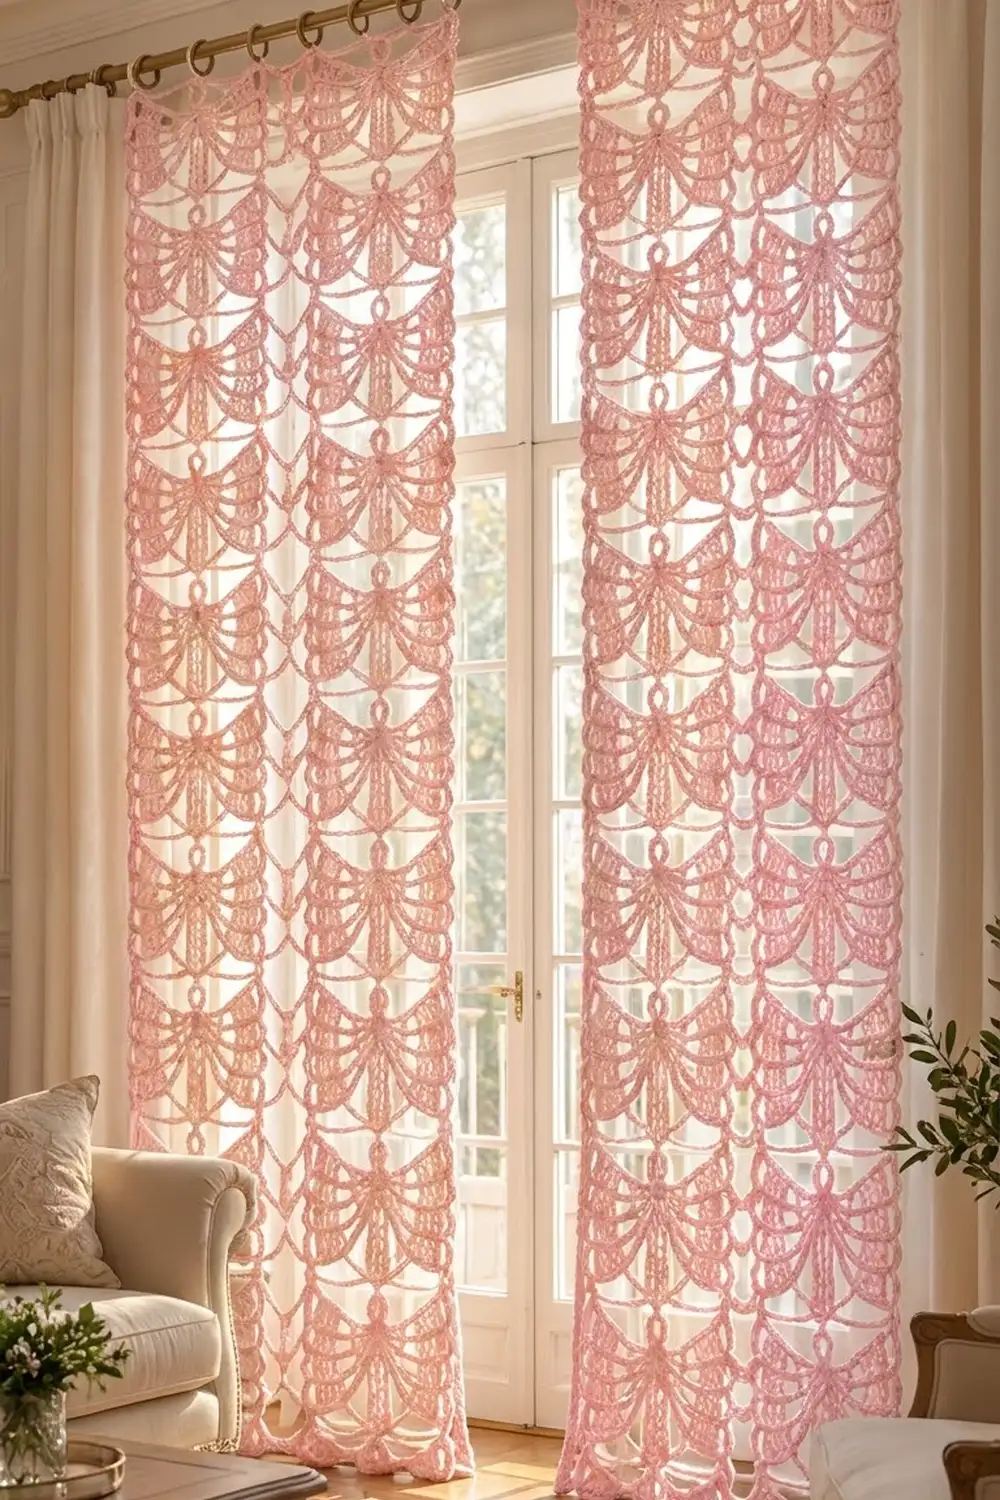
The style is light and romantic. When the panels hang in a window, the gaps between the butterflies let daylight through, so the fabric reads as lace rather than a solid curtain. One color keeps it calm and elegant.
The pattern uses US crochet terms. One finished panel measures 18 in wide x 62 in tall (45.7 x 157.5 cm). Make two for a pair.
Here is how it’s built. You crochet two wings, then join them with a center that has spokes, an antenna and a body. Twenty motifs are tacked together in a grid that’s 2 motifs wide and 10 tall. Three border rounds then square up the edges and give you a firm top edge for curtain clips.
Finished Size and Construction
- Finished panel: 18 x 62 in (45.7 x 157.5 cm)
- Skill level: Intermediate
- Terminology: US
- Yarn weight: Worsted (#4), cotton or cotton blend
- Hook: 5.0 mm (H-8)
- Number of pieces: 20 motifs per panel
- Layout: 2 motifs across x 10 motifs down
- Motif size (blocked): 8 x 6 in (20.3 x 15.2 cm)
- Size before border: 16 x 60 in (40.6 x 152.4 cm)
- Border depth: 1 in (2.5 cm) on every side
Materials
Yarn: Use a smooth worsted cotton or cotton-acrylic blend in pale pink. Cotton keeps its shape when it hangs and blocks crisply. Avoid fuzzy yarns, because they blur the chain arcs.
- Blush Pink: 200 g / 380 m (about 416 yd) per panel, or 400 g / 760 m (about 831 yd) for a pair
This is roughly 7 g / 13 m per motif plus about 30 g / 60 m for the border. The quantities include a margin of about 15% for gauge swatches and differences in tension.
Tools:
– 5.0 mm (H-8) crochet hook
– Tapestry needle
– Stitch markers (at least 4)
– Measuring tape
– Blocking mats and rust-proof pins
– Spray bottle
– 7 curtain ring clips per panel
Abbreviations (US Terms)
- ch – chain
- sl st – slip stitch
- sc – single crochet
- dc – double crochet
- dc2tog – double crochet 2 together
- st(s) – stitch(es)
- sp – space
- RS – right side
Special stitch: dc2tog. Yarn over and insert the hook in the next st. Yarn over, pull up a loop, then yarn over and draw through 2 loops. Repeat in the following st. Yarn over and draw through all 3 loops on the hook.
Slip-stitched chain: Chain the stated number, then sl st back along the chain, one sl st in each ch. This makes the thick, rope-like body and spokes.
Gauge and Checkpoints
Gauge: 14 dc x 8 rows = 4 in (10.2 cm) in dc rows.
Border gauge: 3 sts = 1 in (2.5 cm) along the edge in Border Round 1.
Make one complete motif and block it before you start the full set. Every later measurement depends on this first motif.
Checkpoints:
1. One wing block (after Row 5): 1.7 in wide x 2.5 in tall (4.3 x 6.4 cm), not counting the edging loops.
2. One finished, blocked motif: 8 x 6 in (20.3 x 15.2 cm).
3. After joining 2 rows of motifs: 16 x 12 in (40.6 x 30.5 cm).
4. Full joined panel: 16 x 60 in (40.6 x 152.4 cm).
5. Bordered panel: 18 x 62 in (45.7 x 157.5 cm).
If your wing block is too big, try a 4.5 mm hook. If it’s too small, try a 5.5 mm hook. Small differences in the chain arcs can be fixed by blocking, but the wing block must be within 1/4 in (0.6 cm) of the checkpoint.
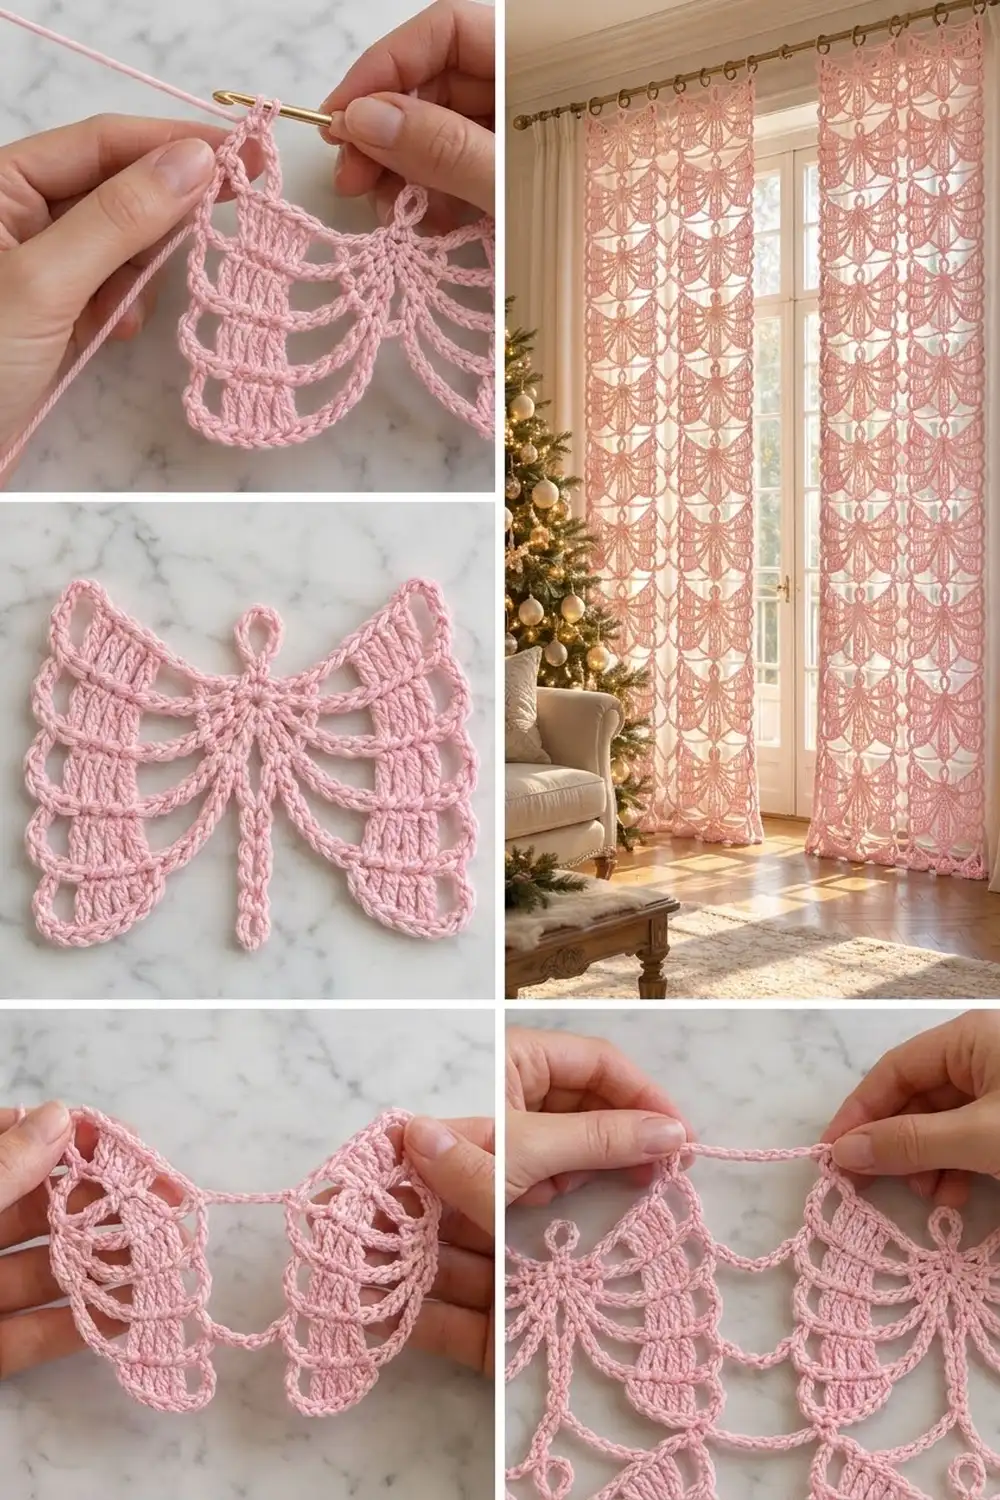
Wing (Make 2 per Motif)
The wing is worked in rows from the bottom up. Both decreases fall on the same edge, which is the inner edge facing the body. The opposite outer edge stays straight, so the wing narrows toward the center and points up and outward at the top. Both wings are worked the same way. To make the left wing, simply flip one over.
Ch 8.
Row 1 (RS): Dc in 4th ch from hook and in each ch across. Turn. (6 dc; the skipped ch-3 counts as the first dc)
Row 2: Ch 3 (counts as dc), dc in each dc across, ending with a dc in the top of the turning ch. Turn. (6 dc)
Row 3: Repeat Row 2. Turn. (6 dc)
Row 4: Ch 3 (counts as dc), dc in next 3 dc, dc2tog over the last 2 sts. Turn. (5 sts)
Row 5: Ch 2, dc in next st (counts as dc2tog), dc in each of last 3 sts. Do not turn or fasten off. (4 sts)
Total in the wing block: 6 + 6 + 6 + 5 + 4 = 27 sts. Check your size against Checkpoint 1: 1.7 x 2.5 in (4.3 x 6.4 cm).
Wing Edging
You are now at the top outer corner.
- Top tip loop: Ch 12, sl st in the same st. This makes the pointed teardrop loop at the wing tip.
- Outer arcs: Work down the straight outer edge. [Ch 5, sl st in the next row-end] 4 times. You will finish at the outer end of Row 1. (4 ch-5 arcs)
- Bottom loop: Ch 9, sl st in the foundation ch at the inner corner. This makes a loop that hangs under the wing.
Fasten off. Leave the 5 inner row-ends free, because the center spokes attach there.
Center, Spokes, Antenna and Body
The center joins the two wings. Lay both wings RS up with their decreased edges facing each other, tip loops at the top, and about 2 in (5.1 cm) apart.
Ch 6, sl st in first ch to form a ring.
Round 1: Ch 1, 12 sc in ring, sl st in first sc. (12 sc)
Number the sc clockwise from the top. Sc 1 is at the top and sc 7 is at the bottom. Sc 2–6 face the right wing and sc 8–12 face the left wing.
Antenna: Ch 10, sl st in sc 1. (1 ch-10 loop)
Right spokes: Sl st in sc 2. Ch 5, sl st in the Row 5 inner row-end of the right wing, then sl st in each of the 5 ch back toward the ring. Sl st in sc 3. Repeat this spoke from sc 3 to Row 4, from sc 4 to Row 3, from sc 5 to Row 2, and from sc 6 to Row 1. (5 spokes)
Body: Sl st in sc 7. Ch 18, sl st in 2nd ch from hook and in each ch back to the ring, then sl st in sc 7. (17 sl st)
Left spokes: Sl st in sc 8. Work spokes as before, from sc 8 to the Row 1 inner row-end of the left wing, from sc 9 to Row 2, from sc 10 to Row 3, from sc 11 to Row 4, and from sc 12 to Row 5. (5 spokes)
Sl st in sc 1 and fasten off. Each motif has 10 spokes, 1 antenna loop and 1 body.
Block the motif to 8 x 6 in (20.3 x 15.2 cm) to check Checkpoint 2. Measure the width from the outer arcs of one wing to the outer arcs of the other, and the height from the top of the tip loops to the bottom of the wing bottom loops.
Make All Pieces
For one panel:
– Blush Pink: 20 motifs (40 wings + 20 centers)
For a pair, make 40 motifs.
Layout grid (one panel):
ROW 1:  PINK  PINK
ROW 2:  PINK  PINK
ROW 3:  PINK  PINK
ROW 4:  PINK  PINK
ROW 5:  PINK  PINK
ROW 6:  PINK  PINK
ROW 7:  PINK  PINK
ROW 8:  PINK  PINK
ROW 9:  PINK  PINK
ROW 10: PINK  PINK
All motifs face the same way, with antennas up.
Weave in the ends on every motif before joining. Then block all the motifs to the same 8 x 6 in (20.3 x 15.2 cm) so that the join points line up.
Joining
Method: Tack the motifs together with a tapestry needle and matching yarn. Make 3 whipstitches through the center chain of both loops at each join point, then knot securely on the wrong side. Tacking keeps the open butterfly outline that you see in the hanging panel.
Horizontal joins (side by side), 3 points per pair:
– Right wing tip loop (ch 6 of 12) to the neighbor’s left wing tip loop (ch 6 of 12)
– Right wing 2nd outer arc (ch 3 of 5) to the neighbor’s left wing 2nd outer arc (ch 3 of 5)
– Right wing bottom loop (ch 5 of 9) to the neighbor’s left wing bottom loop (ch 5 of 9)
Vertical joins (stacked), 3 points per pair:
– Upper motif’s left bottom loop (ch 5) to the lower motif’s left tip loop (ch 6)
– Upper motif’s right bottom loop (ch 5) to the lower motif’s right tip loop (ch 6)
– Upper motif’s body tip (last sl st) to the lower motif’s antenna loop (ch 5 of 10)
Where four motifs meet, tack all four loops at a single point.
Stitch-to-stitch logic: Always match center chain to center chain. Every loop has a clear center (ch 6 of 12, ch 5 of 9, ch 3 of 5), so the motifs stay square to each other. They also stay exactly 8 in (20.3 cm) apart across and 6 in (15.2 cm) apart down.
Join count per panel: 10 rows x 3 horizontal points = 30. Then 9 gaps x 2 columns x 3 vertical points = 54. That makes 84 tacks in total.
Tension: Draw each tack snug but don’t pucker it. The loops should touch, not overlap.
Size checkpoint: After 2 rows the panel should measure 16 x 12 in (40.6 x 30.5 cm). The finished grid should be 16 x 60 in (40.6 x 152.4 cm).
Border
Border gauge: 3 sts = 1 in (2.5 cm). Corner ch-2 spaces are not included in any side count.
Border Round 1 (Mesh Round)
Join yarn in the left tip loop of the top-left motif.
Top edge, left to right: Ch 1. For each motif: 6 sc in the left tip loop, ch 5, 2 sc in the antenna loop, ch 5, 6 sc in the right tip loop. That is 24 sts per motif, with each ch counted as 1 st. Where motifs meet, work straight from one tip loop into the next. Top total: 2 x 24 = 48 sts.
Corner: Ch 2.
Right side, going down: For each motif: ch 10, then 2 sc in each of the 4 outer arcs. That is 18 sts per motif. Side total: 10 x 18 = 180 sts.
Corner: Ch 2.
Bottom edge, right to left: For each motif: 6 sc in the right bottom loop, ch 5, 2 sc around the body tip, ch 5, 6 sc in the left bottom loop. Bottom total: 2 x 24 = 48 sts.
Corner: Ch 2.
Left side, going up: For each motif: 2 sc in each of the 4 outer arcs, then ch 10. Side total: 10 x 18 = 180 sts.
Corner: Ch 2. Sl st in the first sc.
Round 1 total: 48 + 180 + 48 + 180 = 456 sts, plus 4 corner ch-2 sps.
Border Round 2 (Double Crochet)
Sl st into the corner sp. Ch 3 (counts as dc), then (dc, ch 2, 2 dc) in the same sp. Dc in each st along every side, and work (2 dc, ch 2, 2 dc) in each corner sp. Sl st in the top of the ch-3.
- Top and bottom: 48 worked 1-per-st + 4 added at the corners (2 from each end) = 52 dc
- Each side: 180 worked 1-per-st + 4 added at the corners = 184 dc
- Round 2 total: 52 + 52 + 184 + 184 = 472 dc, plus 4 ch-2 sps
Border Round 3 (Single Crochet Finish)
Sl st into the corner sp. Ch 1, sc in the same sp. Sc in each dc along every side, and work (sc, ch 2, sc) in each corner sp. End with sc in the first corner sp, ch 2, and sl st in the first sc.
- Top and bottom: 52 worked 1-per-st + 2 added at the corners = 54 sc
- Each side: 184 worked 1-per-st + 2 added at the corners = 186 sc
- Round 3 total: 54 + 54 + 186 + 186 = 480 sc, plus 4 ch-2 sps
Fasten off and weave in the ends.
Why the math works: Each motif contributes a fixed count to every edge: 24 sts across and 18 sts down. At 3 sts per inch, 24 sts equal the motif’s 8 in (20.3 cm) width and 18 sts equal its 6 in (15.2 cm) height. No stitches are added at seams. Adjacent motifs touch at shared loops, so the counts simply multiply: 2 x 24 = 48 sts for 16 in (40.6 cm), and 10 x 18 = 180 sts for 60 in (152.4 cm).
The border rounds then add stitches only at the corners. That keeps the sides flat, and the three rounds add a total depth of about 1 in (2.5 cm) on each side.
Clip placement: On the 54 sc of the top edge, attach clips at sts 1, 10, 19, 28, 37, 46 and 54. That gives 7 clips spaced about every 3 in (7.6 cm).
Final Blocking
- Lay the panel on blocking mats. You may need to block it in two sections.
- Mist it evenly with water until it is damp, not soaked.
- Pin the four corners first to 18 x 62 in (45.7 x 157.5 cm).
- Pin along the edges about every 2 in (5.1 cm), keeping them straight.
- Inside the panel, pin each wing tip loop and bottom loop into a neat teardrop.
- Straighten every body chain so it hangs vertically.
- Let it dry completely, ideally for 24 hours, before unpinning.
Final Quality-Control Checklist
- All 20 motifs have 10 spokes, 1 antenna and 1 body
- Every wing narrows toward the body, with the tip loop at the top outer corner
- All 84 join points are tacked center to center
- Border Round 1: 48 / 180 / 48 / 180 sts
- Border Round 2: 52 / 184 / 52 / 184 dc
- Border Round 3: 54 / 186 / 54 / 186 sc
- The panel measures 18 x 62 in (45.7 x 157.5 cm)
- All ends are woven in and invisible from the RS
- The clips are evenly spaced on the top edge
Troubleshooting
The wing leans the wrong way. The decreases have landed on opposite edges. Make sure Row 4 decreases at the end of the row and Row 5 decreases at the start, so both are on the same edge.
The spokes pull the wings in toward the body. Your sl sts are too tight. Work the slip-stitched spokes and body more loosely, or chain 6 for each spoke.
The motif is narrower than 8 in (20.3 cm). Block the spokes and arcs open. If it is still more than 1/2 in (1.3 cm) short, go up one hook size.
The border edge ruffles. Re-count Round 1 against the per-motif counts of 24 and 18. Extra sc in the arcs are the most common cause.
The border edge cups or tightens. Loosen the ch-10 bridges, or work them as ch 11 while keeping the same sc counts.
The panel twists when hung. Re-block it flat and check that all the antennas point up.
Care
Hand wash in cool water with mild soap, press out the water in a towel, and dry flat. Re-block lightly if the loops lose their shape.
Final Notes
The whole panel rests on one measurement chain. The 14-dc gauge gives a 1.7 x 2.5 in (4.3 x 6.4 cm) wing block, and that gives an 8 x 6 in (20.3 x 15.2 cm) motif. Twenty motifs in a 2 x 10 grid measure 16 x 60 in (40.6 x 152.4 cm). Three border rounds bring the panel to 18 x 62 in (45.7 x 157.5 cm).
Check each stage before you move on, and the finished curtain will hang straight and even. Make a second panel to complete the pair.
Happy crocheting!