

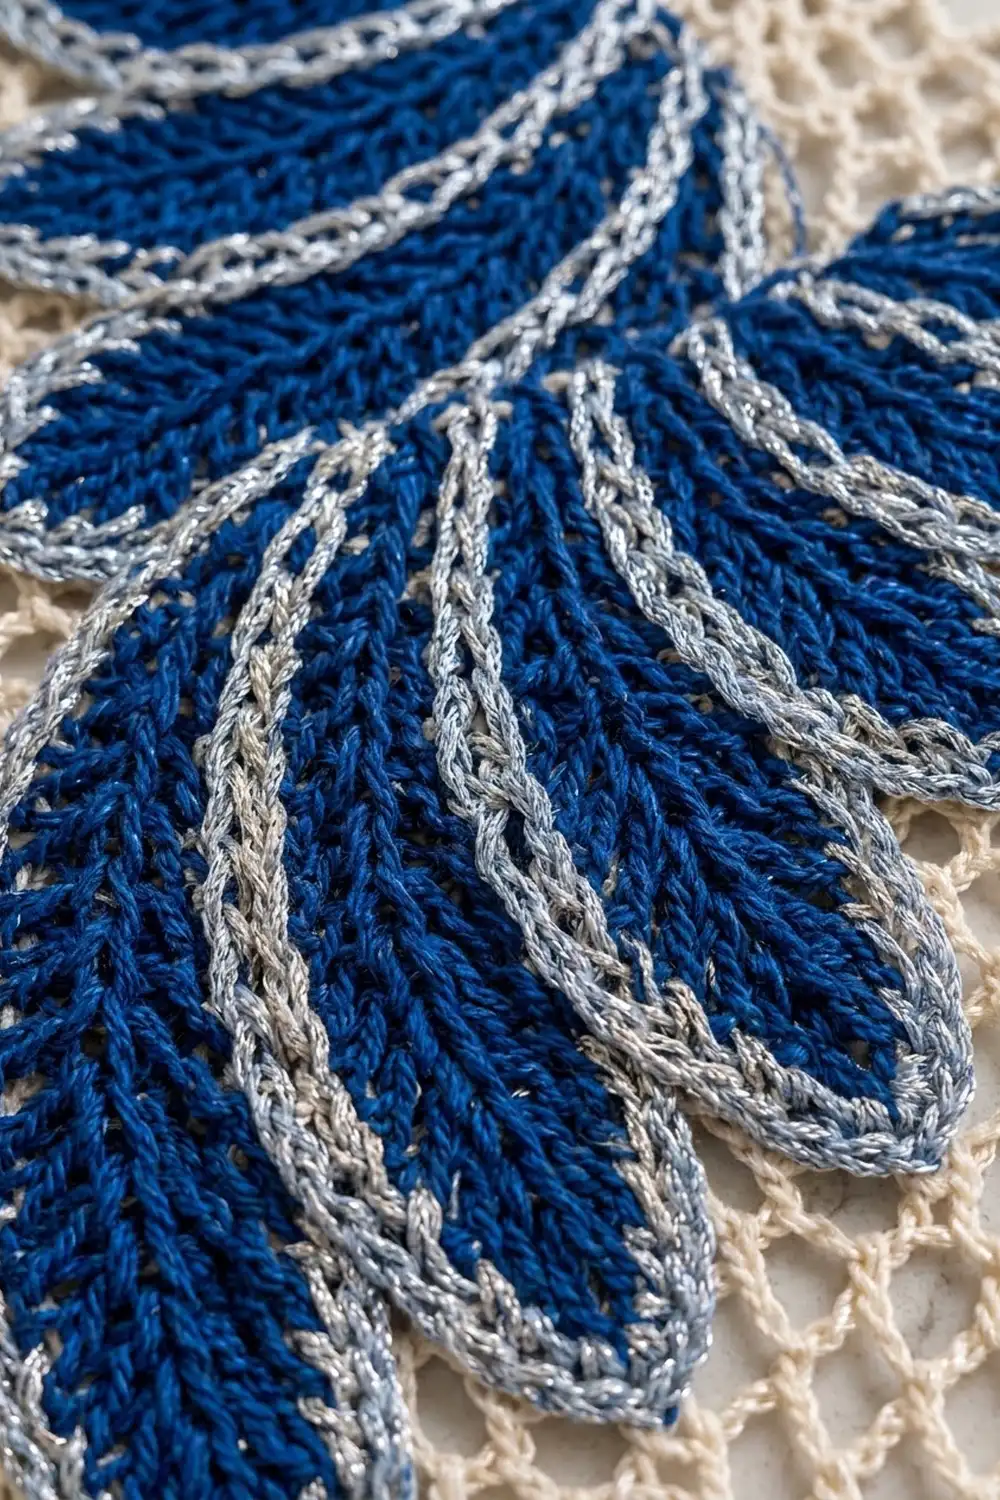
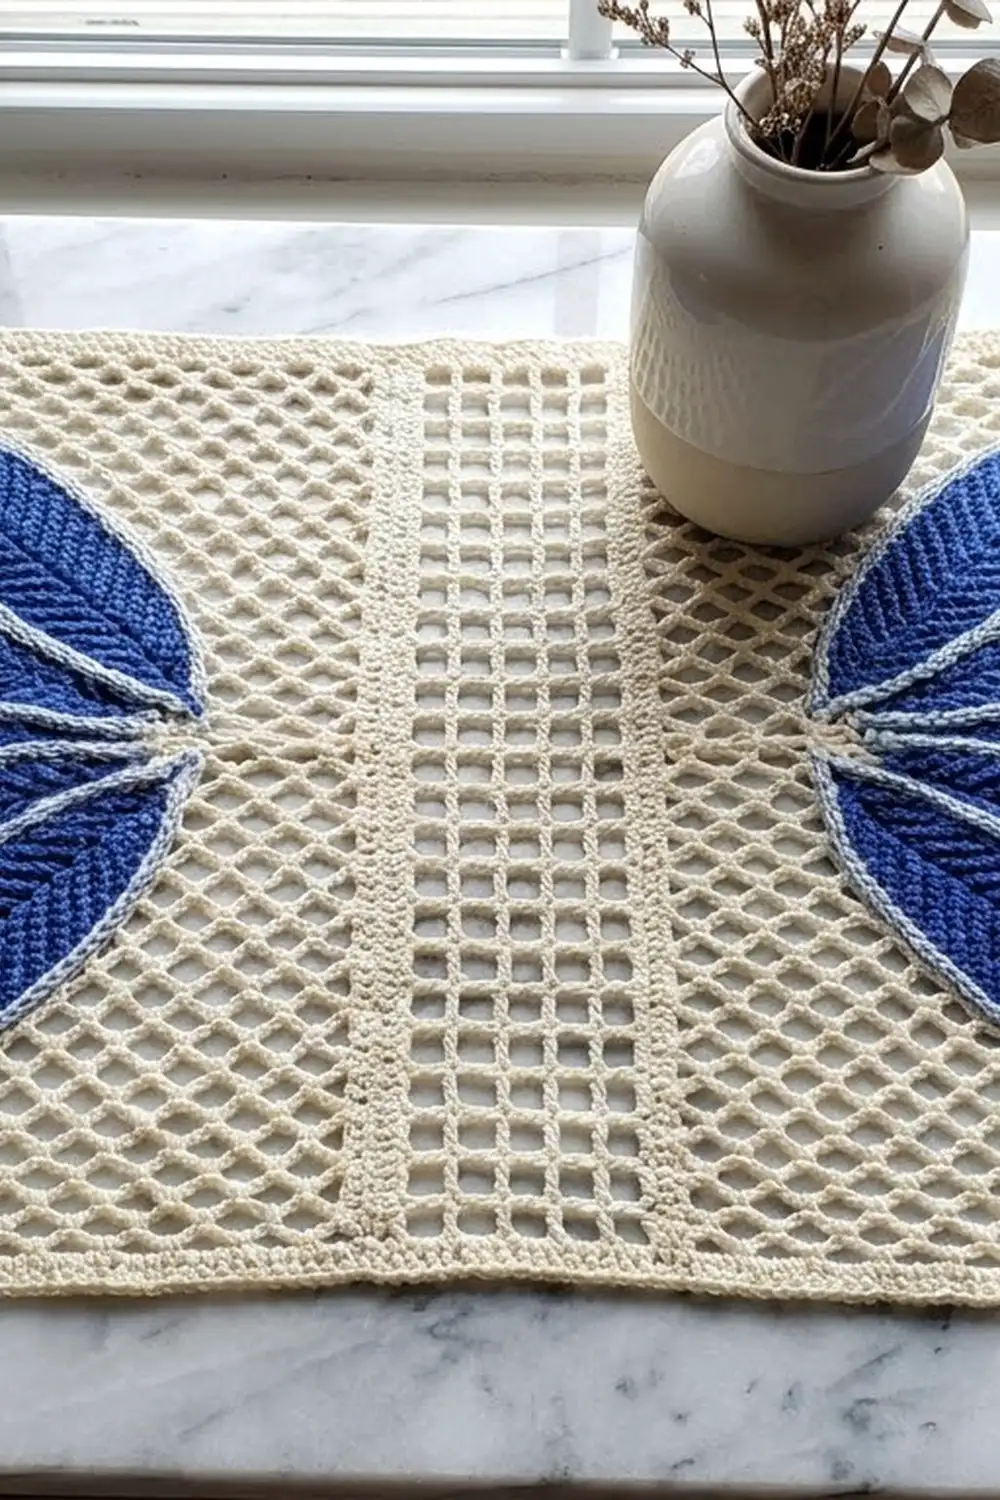
The Sapphire Wings Mesh Panel is a single rectangle of airy cream netting with two mirrored wings of blue leaves sewn onto its surface. Each wing is a fan of five overlapping leaves. Every leaf has a ridged, herringbone-style texture and a pale silver-blue outline that stands out against the open mesh.
The palette is ivory cream for the net, cobalt blue for the leaves, and silver-blue for the outlines. The style is elegant and slightly vintage, close to Irish-crochet appliqué but simpler to make. All instructions use US crochet terms.
The finished panel measures 15 x 12 in (38.1 x 30.5 cm), including a narrow picot border. You can use it as a wall hanging, a table centerpiece, or a framed textile piece.
Construction has three stages. First you crochet the cream base in rows: chain-loop net on both sides and a ladder strip of filet squares down the center. Next you make 10 separate blue leaves with silver-blue outlines. Finally you add a two-round border, block the panel, and sew on the leaves as two mirrored fans.
Finished Size and Construction
- Finished size: 15 x 12 in (38.1 x 30.5 cm)
- Skill level: Intermediate
- Terminology: US crochet terms
- Yarn weight: DK (#3) cotton
- Hook: 3.5 mm (E-4)
- Number of pieces: 1 base panel + 10 appliqué leaves (4 large, 4 medium, 2 small)
- Layout: two mirrored wings of 5 leaves each, one on each side of a central ladder strip
- Base panel size before border: 14 x 11 in (35.6 x 27.9 cm)
- Border depth: about 0.5 in (1.3 cm) per side, 2 rounds
- Leaf sizes: large 5.25 x 1.5 in (13.3 x 3.8 cm), medium 4.5 x 1.5 in (11.4 x 3.8 cm), small 3.75 x 1.5 in (9.5 x 3.8 cm)
Materials
Choose a smooth, mercerized DK cotton. It gives crisp leaf ridges, and it blocks flat so the mesh stays open. The amounts below assume about 120 m per 50 g.
- Color A – Cream (base and border): 60 g, about 144 m
- Color B – Cobalt Blue (leaves): 35 g, about 84 m
- Color C – Silver-Blue (outlines and sewing): 10 g, about 24 m
These quantities include a margin of about 15% for the gauge swatch and sewing tails.
Tools:
- 3.5 mm (E-4) crochet hook
- Tapestry needle
- Rust-proof pins (at least 30)
- Blocking mat or folded towel
- Spray bottle with water
- Measuring tape
- Scissors
Abbreviations (US Terms)
- ch – chain
- sl st – slip stitch
- sc – single crochet
- hdc – half double crochet
- dc – double crochet
- BLO – back loop only
- sk – skip
- sp – space
- st(s) – stitch(es)
- RS / WS – right side / wrong side
Special stitches:
- Picot: ch 3, sl st into the top of the last sc made.
- Net loop: ch 5, sc into the stitch or loop named.
Gauge and Checkpoints
- Sc gauge: 18 sc = 3.5 in (8.9 cm)
- Net gauge: 6 net rows (alternating Row A and Row B) = 3 in (7.6 cm), so 1 net row = 0.5 in (1.3 cm)
Test one piece first. Make one large leaf through Round 3. It should measure 5.25 x 1.5 in (13.3 x 3.8 cm). Then make a net swatch: ch 22, work 21 sc, then 6 net rows with 5 loops across. It should be 3 in (7.6 cm) tall above the sc row.
Checkpoints:
- After Row 1: 14 in (35.6 cm) wide.
- After Row 7: about 3.25 in (8.3 cm) tall.
- After Row 22: about 10.75 in (27.3 cm) tall.
- After Row 23: 14 x 11 in (35.6 x 27.9 cm).
- After the border: 15 x 12 in (38.1 x 30.5 cm).
Too big? Change to a 3.25 mm hook. Too small? Change to a 3.75 mm hook.
Base Panel
Use Color A. The panel is 72 stitches wide: the left net is on sts 1–29, the center ladder on sts 30–43, and the right net on sts 44–72.
Foundation: Ch 73.
Row 1 (RS): Sc in 2nd ch from hook and in each ch across, turn. (72 sc)
Row 2 (Row A, first time): Ch 1, sc in first sc. [Ch 5, sk 3 sc, sc in next sc] 7 times. The last sc is in st 29 and is the left anchor. Ch 2, sk 2 sc, dc in next sc (st 32). [Ch 2, sk 2 sc, dc in next sc] 3 times (sts 35, 38, 41). Ch 2, sk 2 sc, sc in st 44 (right anchor). [Ch 5, sk 3 sc, sc in next sc] 7 times, ending in the last sc. Turn.
(Each side: 7 net loops. Center: 2 anchors, 4 dc, 5 ch-2 sps.)
Every row keeps this center layout: anchor, 5 ch-2 spaces divided by 4 dc, anchor. This forms the ladder strip, 5 squares wide.
Row B: Ch 5 (counts as dc + ch 2), turn. Sc in first ch-5 loop. [Ch 5, sc in next ch-5 loop] 6 times. Ch 2, dc in anchor. Center: [ch 2, dc in next dc] 4 times, ch 2, dc in next anchor. Ch 2, sc in next ch-5 loop. [Ch 5, sc in next ch-5 loop] 6 times. Ch 2, dc in last sc. Turn.
(Each side: 6 full net loops + 2 half loops. Center: 2 dc anchors, 4 dc, 5 ch-2 sps.)
Row A (all later repeats): Ch 1, sc in first dc. [Ch 5, sc in next full ch-5 loop] 6 times. Ch 5, sc in anchor dc. Center: [ch 2, dc in next dc] 4 times, ch 2, sc in next anchor dc. [Ch 5, sc in next full ch-5 loop] 6 times. Ch 5, sc in 3rd ch of turning ch-5. Turn.
(Each side: 7 net loops. Center: 2 sc anchors, 4 dc, 5 ch-2 sps.)
The half loops at the ends of Row B keep the edges straight. Because the anchors alternate between sc and dc, the net and the ladder grow at the same height.
Rows 3–22: Alternate Row B and Row A, starting with Row B. Row 22 is a Row A. That gives 21 net rows: 11 A rows and 10 B rows.
Row 23 (trim row): Ch 1, turn. Sc in first sc. [3 sc in next ch-5 loop, sc in next sc] 7 times (29 sc). [2 sc in next ch-2 sp, sc in next st] 5 times (15 sc; the last one is in the anchor). [3 sc in next ch-5 loop, sc in next sc] 7 times (28 sc).
(Total: 29 + 15 + 28 = 72 sc)
Row 23 has the same count as Row 1, so the top and bottom edges match. Don’t fasten off.
Border
Use Color A. The border gauge is the same as the sc gauge: 18 sc = 3.5 in (8.9 cm). On the side edges, work 2 sc into each Row A end and 3 sc into each Row B end, because Row B ends in a taller dc.
A “corner center” is the middle sc of a 3-sc corner. The per-side counts below run between two corner centers.
Round 1: Ch 1. Work 3 sc in the last st of Row 23 (corner). Down the row ends of Rows 22 to 2, work 2 sc in each Row A end and 3 sc in each Row B end (11 x 2 + 10 x 3 = 52 sc). Work 3 sc in the first st of Row 1 (corner), sc in each of the next 70 sts, then 3 sc in the last st of Row 1 (corner). Work 52 sc up the second side the same way. Work 3 sc in the first st of Row 23 (corner), then sc in each of the next 70 sts. Join with a sl st.
(Per side: top and bottom 72 sc each, left and right 54 sc each, plus 4 corner centers. Total: 2 x 72 + 2 x 54 + 4 = 256 sc.)
Round 2 (picot round): Ch 1. (Sc, picot, sc) in corner center. [Sc in each of next 2 sts, picot] until 2 sts remain before the next corner center, then sc in each of those 2 sts. Repeat from * around. Join.
- Top and bottom: [2 sc, picot] 35 times + 2 sc = 72 sc, 35 picots per side
- Left and right: [2 sc, picot] 26 times + 2 sc = 54 sc, 26 picots per side
- Total: 256 sc worked 1-per-stitch + 4 extra corner sc = 260 sc, plus 2 x 35 + 2 x 26 + 4 = 126 picots
Why the math works: Both side counts, 72 and 54, are even, so the 2-sc picot repeat ends cleanly on every side. Each side finishes with 2 plain sc, so no picot crowds a corner. Each side edge gets 52 sc over 10.5 in (26.7 cm) of net rows. That is about 4.95 sc per inch, which is very close to the top edge’s 5.14 sc per inch, so the edges stay flat.
Fasten off. Checkpoint: 15 x 12 in (38.1 x 30.5 cm).
Leaves
Every leaf is made the same way. Only the dc section changes.
| Leaf | Make | Foundation ch | Dc per side (X) | Rnd 1 | Rnd 2 | Rnd 3 |
|---|---|---|---|---|---|---|
| Large | 4 | 26 | 18 | 51 | 53 | 55 |
| Medium | 4 | 22 | 14 | 43 | 45 | 47 |
| Small | 2 | 18 | 10 | 35 | 37 | 39 |
Foundation (Color B): Ch 26, 22 or 18.
Round 1: Sc in 2nd ch from hook, hdc in next 2 ch, dc in next X ch, hdc in next 2 ch, sc in next ch, 3 sc in last ch (tip). Working along the other side of the chain: sc in next ch, hdc in next 2 ch, dc in next X ch, hdc in next 2 ch, sc in the same ch as the first sc. Join with a sl st.
(Each side: X + 6 sts. Large: 24 + 3 + 24 = 51 sts.)
The short stitches at each end taper the leaf to a point, and the foundation chain becomes the center vein.
Round 2 (ridge round): Ch 1. Working in BLO, sc in each st to the center sc of the tip, 3 sc in that st, then sc in each remaining st. Join.
(Large: 51 worked 1-per-stitch + 2 extra = 53 sc.)
The unworked front loops form raised ridges on each side of the vein, which creates the herringbone texture. Fasten off Color B.
Round 3 (outline): Join Color C at the base. Ch 1, sc through both loops of each st, with 3 sc in the center sc of the tip. Join.
(Large: 53 worked 1-per-stitch + 2 extra = 55 sc.)
Fasten off, leaving a 12 in (30.5 cm) tail.
Leaf checkpoint: large 5.25 x 1.5 in (13.3 x 3.8 cm), medium 4.5 x 1.5 in (11.4 x 3.8 cm), small 3.75 x 1.5 in (9.5 x 3.8 cm).
Arranging and Sewing the Wings
Block the panel first (see below) so the net is square and open before you add the leaves.
Each wing uses 2 large, 2 medium and 1 small leaf. Gather all 5 leaf bases in a 2 in (5.1 cm) zone beside the ladder strip, about 2 in (5.1 cm) above the bottom border. The tips fan upward and outward.
Left wing, from the bottom of the stack to the top:
- Large leaf, almost vertical, beside the ladder strip.
- Large leaf, turned about 20 degrees outward.
- Medium leaf, turned about 40 degrees.
- Medium leaf, turned about 60 degrees.
- Small leaf, turned about 80 degrees, almost horizontal near the top outer corner.
Overlap each leaf onto the one before it by about one-third of its width, so every silver-blue outline sits on the blue leaf below. Give each leaf a gentle outward curve as you pin it.
Right wing: Mirror the left wing. Measure from the ladder strip so both wings sit at the same distance and height.
Sewing: Use the Color C tail to whipstitch through the outline round, catching one strand of net every 0.25 in (0.6 cm). Sew only the visible edges. Weave in the ends on the WS.
Final Blocking
- Lay the panel WS up on the mat.
- Spray it until damp, not dripping.
- Pin the corners to 15 x 12 in (38.1 x 30.5 cm).
- Pin along each edge every 1 in (2.5 cm).
- Open the net loops evenly with your fingers, and check that the ladder strip runs straight.
- Let the panel dry for at least 12 hours.
- Unpin the panel and sew on the leaves. Then lightly mist the leaves only, shape their curves, and let them dry.
Final Quality-Control Checklist
- Rows 1 and 23: 72 sc each.
- Row A: 7 loops per side. Row B: 6 full loops + 2 half loops per side.
- Ladder: 4 dc and 5 squares in every row.
- Border: Round 1 has 256 sc. Round 2 has 260 sc and 126 picots.
- 10 leaves, all fully outlined; the two wings mirror each other.
- The panel measures 15 x 12 in (38.1 x 30.5 cm) and lies flat.
Troubleshooting
- Net edges slant: You missed a half loop. Each Row B starts with ch 5 and ends with ch 2, dc.
- Ladder wavy: Your ch-2 spaces are too tight. Loosen them.
- Leaf curls into a tube: Make the foundation chain with a 4.0 mm hook.
- Blunt leaf tip: Put the 3 sc into the center tip st on Rounds 2 and 3.
- No visible ridges: Work Round 2 strictly in the back loop only.
- Border ruffles or pulls: Rework Round 1 with a hook 0.25 mm smaller or larger, and keep 52 sc on each side edge.
- Puckers behind the leaves: When sewing, catch only one strand of net.
Care
Hand wash in cool water with mild soap. Roll in a towel, reshape, and dry flat. Never wring or tumble dry.
Final Notes
Here is the measurement chain. A gauge of 18 sc = 3.5 in (8.9 cm) makes the 72-stitch row 14 in (35.6 cm) wide. Twenty-one net rows at 0.5 in (1.3 cm) each, plus 2 sc rows, make the panel 11 in (27.9 cm) tall. The border adds 0.5 in (1.3 cm) per side, for a finished size of 15 x 12 in (38.1 x 30.5 cm). The ten leaves, 3.75 to 5.25 in (9.5 to 13.3 cm) long, fan out within the two net sections, each about 5.5 in (14.0 cm) wide.
Happy crocheting!