

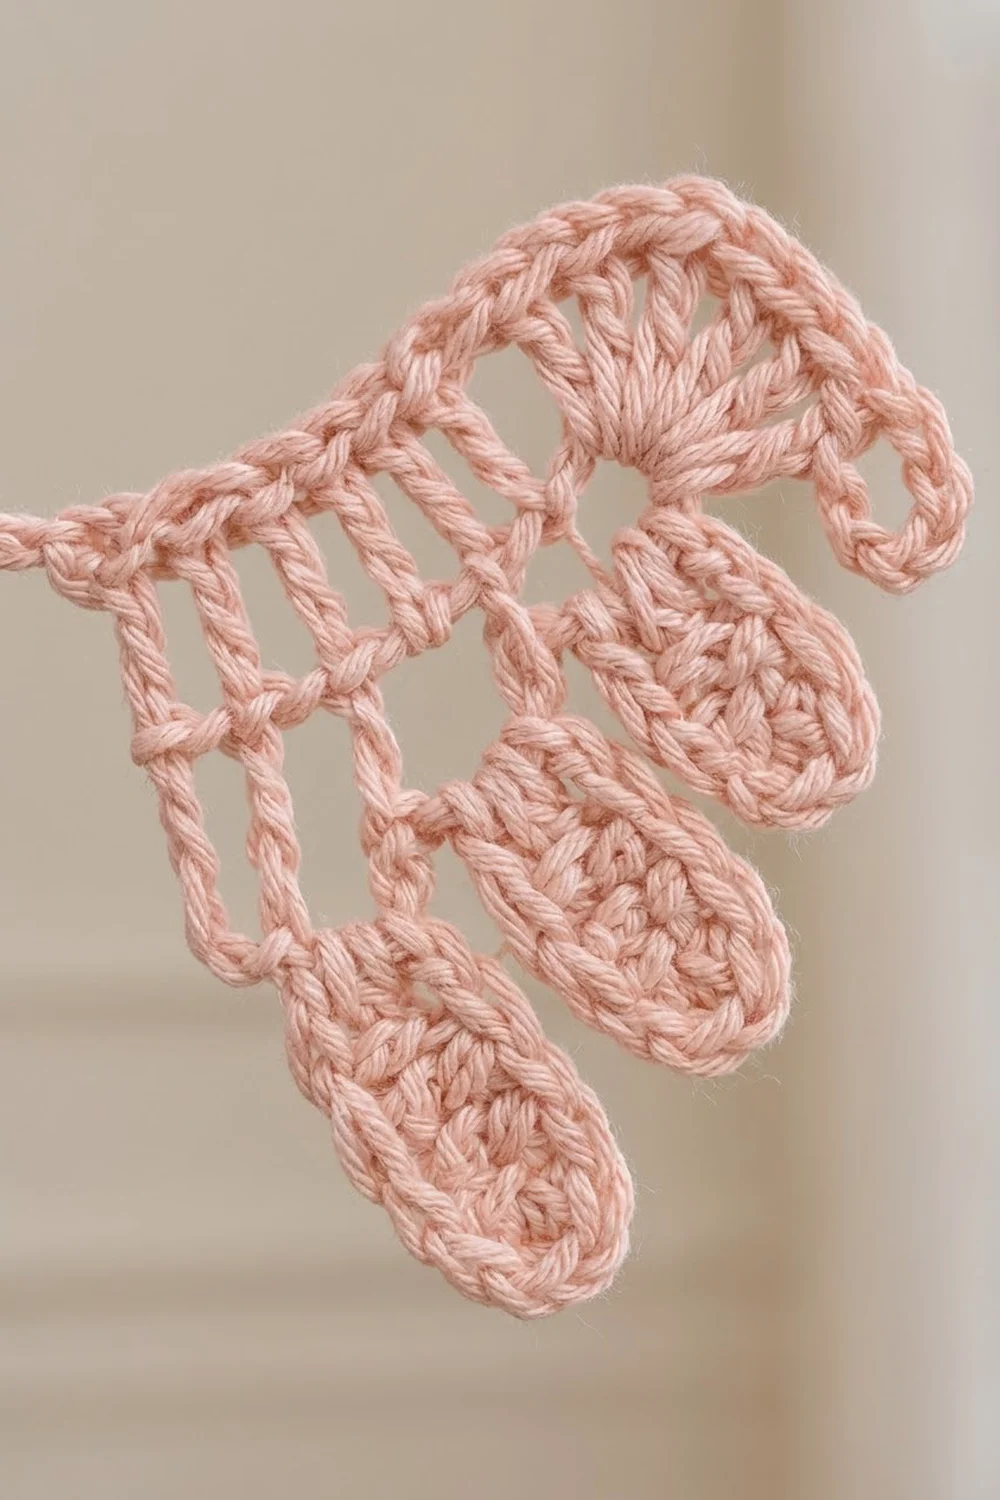
The Blush Angel Wings Appliqué is a small, lacy motif shaped like a pair of open wings. A short, firm chain bridge links the two mirrored wings at the center. Each wing has a row of tall open posts, three rounded feathers hanging below, a little fan at the outer top corner, and a curled tip.
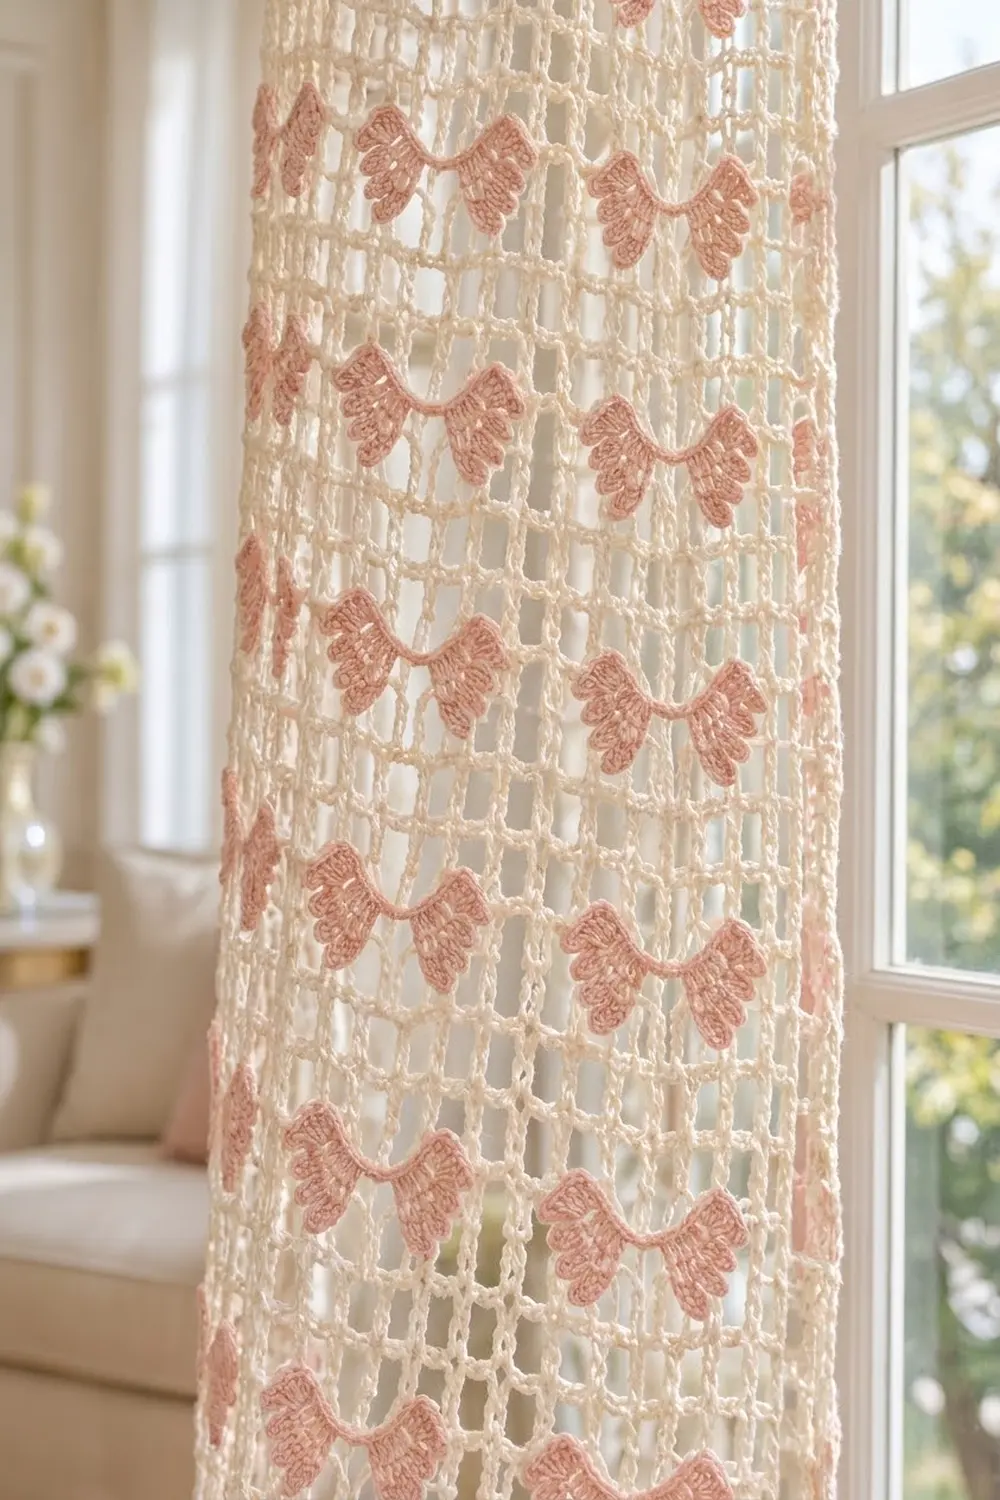
The sample uses one soft blush-pink cotton. The look is romantic and airy, and the motif works well sewn onto sheer mesh, curtains, bags, or baby blankets. This pattern covers one motif.
All instructions use US crochet terms. The finished motif measures 5.5 in wide × 2.25 in tall (14.0 cm × 5.7 cm) after blocking.
The whole motif is made in one piece. You work one foundation chain across both wings and the bridge, then add the feathers to each wing. A top-edge border finishes the motif and adds the fans and curled tips.
Finished Size and Construction
- Finished size: 5.5 in × 2.25 in (14.0 cm × 5.7 cm)
- Skill level: Easy-Intermediate
- Terminology: US crochet terms
- Yarn weight: DK / light worsted (CYC 3) cotton
- Hook: 4.0 mm (US G-6)
- Number of pieces: 1 motif, worked in one piece
- Layout: two mirrored wings joined by a center bridge
- Piece size: each wing 2.375 in (6.0 cm) wide including its fan; bridge 0.75 in (1.9 cm)
- Size before border: 4.75 in × 2.0 in (12.1 cm × 5.1 cm)
- Border depth: 0.25 in (0.6 cm) along the top edge, plus 0.375 in (1.0 cm) of fan at each side
Materials
Yarn advice: Choose a smooth cotton or cotton blend in DK weight. Cotton holds the feather shapes crisply and blocks well. Mercerized cotton gives a soft sheen, and matte cotton gives a cozier look. Avoid fuzzy yarns, because they blur the open posts and feather outlines.
- Blush Pink: 8 g, about 20 m (22 yd)
This amount includes a generous margin for your gauge swatch, weaving in ends, and one practice feather.
Tools:
- 4.0 mm (US G-6) crochet hook
- Tapestry needle
- Scissors
- Measuring tape or ruler
- Blocking mat and rust-proof pins
- Spray bottle with clean water
- Optional: light spray starch
Abbreviations (US Terms)
- ch – chain
- sl st – slip stitch
- sc – single crochet
- hdc – half double crochet
- dc – double crochet
- tr – treble crochet (yarn over twice)
- sk – skip
- sp – space
- st(s) – stitch(es)
- [ ] – repeat the steps inside the brackets as many times as stated
Special stitch – Feather: Ch the number stated, then sl st into the same ch-1 sp you started from. This makes a chain loop. Work the stated stitches into the loop, around the chain rather than into individual chains. Finish with a sl st into the same ch-1 sp. The result is a closed oval with a rounded dc tip.
Special stitch – Curl: Ch 6, sc in 2nd ch from hook and in each of the next 4 ch (5 sc). The sc pull the chain into a gentle hook shape.
Gauge and Checkpoints
Gauge: 18 dc = 4 in (10.2 cm) with a 4.0 mm hook. For this motif, Row 1 is the more useful gauge. Each wing section of Row 1 (5 tr and 4 ch-1 sps) should measure 2 in (5.1 cm) wide and 0.75 in (1.9 cm) tall. Measure on a flat surface without stretching.
Test one piece first. Make one full motif before you start a large batch for appliqué. One motif takes about 20–30 minutes.
Checkpoints:
- After Row 1: 4.75 in × 0.75 in (12.1 cm × 1.9 cm). Each wing is 2 in (5.1 cm) and the bridge is 0.75 in (1.9 cm).
- After the feathers: 2.0 in (5.1 cm) tall from the foundation to the tip of the large feather. Large feather 1.25 in (3.2 cm), medium 1.0 in (2.5 cm), small 0.75 in (1.9 cm).
- After the border and blocking: 5.5 in × 2.25 in (14.0 cm × 5.7 cm).
If your motif is too big, go down to a 3.5 mm hook. If it is too small, go up to a 4.5 mm hook. If only the bridge is off, fix that part alone by loosening or tightening your slip stitches across those 4 chains.
Pattern
The foundation chain becomes the top edge of the motif. The tops of the treble posts become the bottom edge, and the feathers hang from there.
Row 1: Posts and Bridge
Ch 25.
Wing A: Tr in 6th ch from hook (the 5 skipped ch count as the first tr and a ch-1 sp). [Ch 1, sk next ch, tr in next ch] 3 times.
Wing A: 5 tr, 4 ch-1 sps.
Work each tr fully: yarn over twice, insert the hook, pull up a loop to post height, then draw through two loops three times. Tall, even posts give the open columns their clean look.
Bridge: Sl st in each of the next 4 ch.
Bridge: 4 sl st.
Wing B: Sl st in next ch. Ch 4 (counts as first tr). [Ch 1, sk next ch, tr in next ch] 4 times. Your last tr goes into the very first chain you made.
Wing B: 5 tr, 4 ch-1 sps.
Row 1 totals: 10 tr and 8 ch-1 sps across both wings, 4 bridge sl st, and 1 set-up sl st under Wing B’s first tr. All 25 chains are used: 12 for Wing A, 4 for the bridge, and 9 for Wing B.
Keep the bridge slip stitches relaxed. They should lie flat and stay about 4 chains wide, without pulling the two wings together.
Checkpoint: 4.75 in × 0.75 in (12.1 cm × 1.9 cm).
Wing B Feathers
You are at the outer end of Wing B, on top of its last tr. The tr tops form the bottom edge of the motif.
Turn. Sl st in first ch-1 sp.
Large feather: Ch 10, sl st in same sp. In the ch-10 loop, work 2 sc, 2 hdc, 7 dc, 2 hdc, 2 sc. Sl st in same sp.
15 sts.
Sl st in next tr, sl st in next ch-1 sp.
Medium feather: Ch 8, sl st in same sp. In the ch-8 loop, work 2 sc, 2 hdc, 5 dc, 2 hdc, 2 sc. Sl st in same sp.
13 sts.
Sl st in next tr, sl st in next ch-1 sp.
Small feather: Ch 6, sl st in same sp. In the ch-6 loop, work 2 sc, 2 hdc, 3 dc, 2 hdc, 2 sc. Sl st in same sp.
11 sts.
Sl st in next tr. Fasten off.
The 4th ch-1 sp, nearest the bridge, stays empty. It forms the small open window beside the center.
Feather logic: Every feather has the same 8 edge stitches: 2 sc and 2 hdc at each end. The dc tip changes. Its dc count always equals the loop chain minus 3: 7, 5, and 3. This keeps the three feathers in the same proportions as they get shorter toward the center.
Wing B feather totals: 15 + 13 + 11 = 39 sts.
Wing A Feathers
Join yarn with a sl st in the top of Wing A’s outer post (the top of the beginning skipped chains). This is the outer corner of the bottom edge.
Sl st in first ch-1 sp. Work the large feather, sl st in next tr, sl st in next ch-1 sp. Work the medium feather, sl st in next tr, sl st in next ch-1 sp. Work the small feather, sl st in next tr. Fasten off.
Wing A feather totals: 39 sts. The two wings now mirror each other, with the large feather on the outside and the small one beside the bridge.
Use the same tension on Wing A as on Wing B. If one wing’s feathers come out longer, the motif will tilt when you sew it down.
Checkpoint: 4.75 in × 2.0 in (12.1 cm × 5.1 cm) before the border.
Border
The border is a single row along the top edge, worked into the free loops of the foundation chain. It adds the fans and curled tips and firms up the top line.
Border gauge: Work 1 sc in each free loop. That is 22 positions across 4.75 in (12.1 cm), about 4.6 per inch (1.8 per cm). This matches the foundation exactly, so the top edge stays flat.
Where the 22 loops come from: The foundation had 25 ch. The first 3 skipped chains stand upright inside Wing A’s first tr, so they are not on the top edge. That leaves 25 − 3 = 22 free loops: 9 over Wing A, 4 over the bridge, and 9 over Wing B.
Border Row
Hold the motif with the foundation edge on top. Join with a sl st in the free loop at the outer corner of Wing A.
Wing A tip: Work a Curl (ch 6, 5 sc back down the chain).
Wing A fan: Ch 3 (counts as dc), 6 dc in the same free loop.
Fan: 7 dc.
Wing A top: Sc in each of the next 8 free loops.
8 sc.
Bridge top: Sc in each of the next 4 free loops.
4 sc.
Wing B top: Sc in each of the next 8 free loops.
8 sc.
Wing B fan: 7 dc in the last free loop.
Fan: 7 dc.
Wing B tip: Work a Curl. Sl st in the same free loop. Fasten off.
Border counts per side:
- Wing A: 1 loop with a 7-dc fan + 8 sc = 9 loops used
- Bridge: 4 sc = 4 loops used
- Wing B: 8 sc + 1 loop with a 7-dc fan = 9 loops used
- Tips: 2 Curls of 5 sc each
Border total: 14 dc + 20 sc + 10 curl sc = 44 sts, using 9 + 4 + 9 = 22 free loops.
Why the math works: Each free loop gets exactly one stitch group, so nothing is added or skipped across the top. All the extra fullness is in the two corner loops, where 7 dc fan out 0.375 in (1.0 cm) beyond each wing. This brings the width from 4.75 in to 5.5 in (12.1 cm to 14.0 cm). The 20 sc add 0.25 in (0.6 cm) of height, taking the motif from 2.0 in to 2.25 in (5.1 cm to 5.7 cm).
Final Blocking
- Weave in all ends along the posts or inside the feathers, not along the bridge.
- Spray the motif evenly with clean water until it is damp but not soaking.
- Lay it right side up on the blocking mat with the border edge on top.
- Pin the bridge first, either straight or with a shallow dip, so the wings sit 0.75 in (1.9 cm) apart.
- Pin the top edge of each wing so it slopes gently up toward the fan.
- Open each fan into a half circle and pin the outer dc.
- Ease each feather downward and slightly outward. Pin the tips so the large feathers reach 2.25 in (5.7 cm) below the top of the border.
- Shape the curls with your fingers so they hook upward and inward.
- Check the width: 5.5 in (14.0 cm) from fan edge to fan edge.
- For crisp feathers, add light starch. Let the motif dry completely before unpinning.
Final Quality-Control Checklist
- Row 1 has 5 tr and 4 ch-1 sps on each wing.
- The bridge has 4 sl st and 4 border sc, and it lies flat.
- Each wing has a large, medium, and small feather of 15, 13, and 11 sts.
- The large feathers sit on the outer edges of both wings.
- The ch-1 sp beside the bridge is empty on both wings.
- Each fan has 7 dc, and each tip has a 5-sc curl.
- All 22 top-edge loops are filled, with no puckers.
- The blocked motif measures 5.5 in × 2.25 in (14.0 cm × 5.7 cm).
- All ends are secure and hidden.
Troubleshooting
Feathers ruffle or cup. Your loop chain is too tight. Chain the feathers a little looser, or go up half a hook size for the feathers only.
Feathers look skinny or gappy. Your loop chain is too loose. Tighten the chain and push the stitches together along the loop as you work.
Wings pull toward each other. The bridge sl sts are too tight. Work them loosely, or use a 4.5 mm hook for those 4 stitches.
Top edge puckers. You may have skipped a free loop. Count them: 9, 4, 9.
Fans lie flat or fold. Make sure all 7 dc go into one loop, and pin them open in a half circle while blocking.
Wings don’t match. Check that you started the feathers from the outer corner on both wings, so the large feathers sit on the outside.
Curls unroll. Work the curl sc slightly tighter, and shape the curl while it is damp.
Care
Hand wash in cool water with mild soap, press the water out in a towel, and lay flat to dry. If the motif is sewn onto fabric, reshape the feathers by hand while they are still damp.
Final Notes
Here are the measurements to check at each stage. Row 1 sets the base at 4.75 in × 0.75 in (12.1 cm × 1.9 cm), with each wing 2 in (5.1 cm) and the bridge 0.75 in (1.9 cm). The feathers bring the height to 2.0 in (5.1 cm). The border adds 0.375 in (1.0 cm) of fan at each side and 0.25 in (0.6 cm) along the top. That gives a finished motif of 5.5 in × 2.25 in (14.0 cm × 5.7 cm).
If you check each stage against these numbers, every motif will match. This matters if you plan to make a batch and stitch them in rows onto mesh or fabric. Compare your first finished motif with the checkpoints before starting the next.
Happy crocheting!