

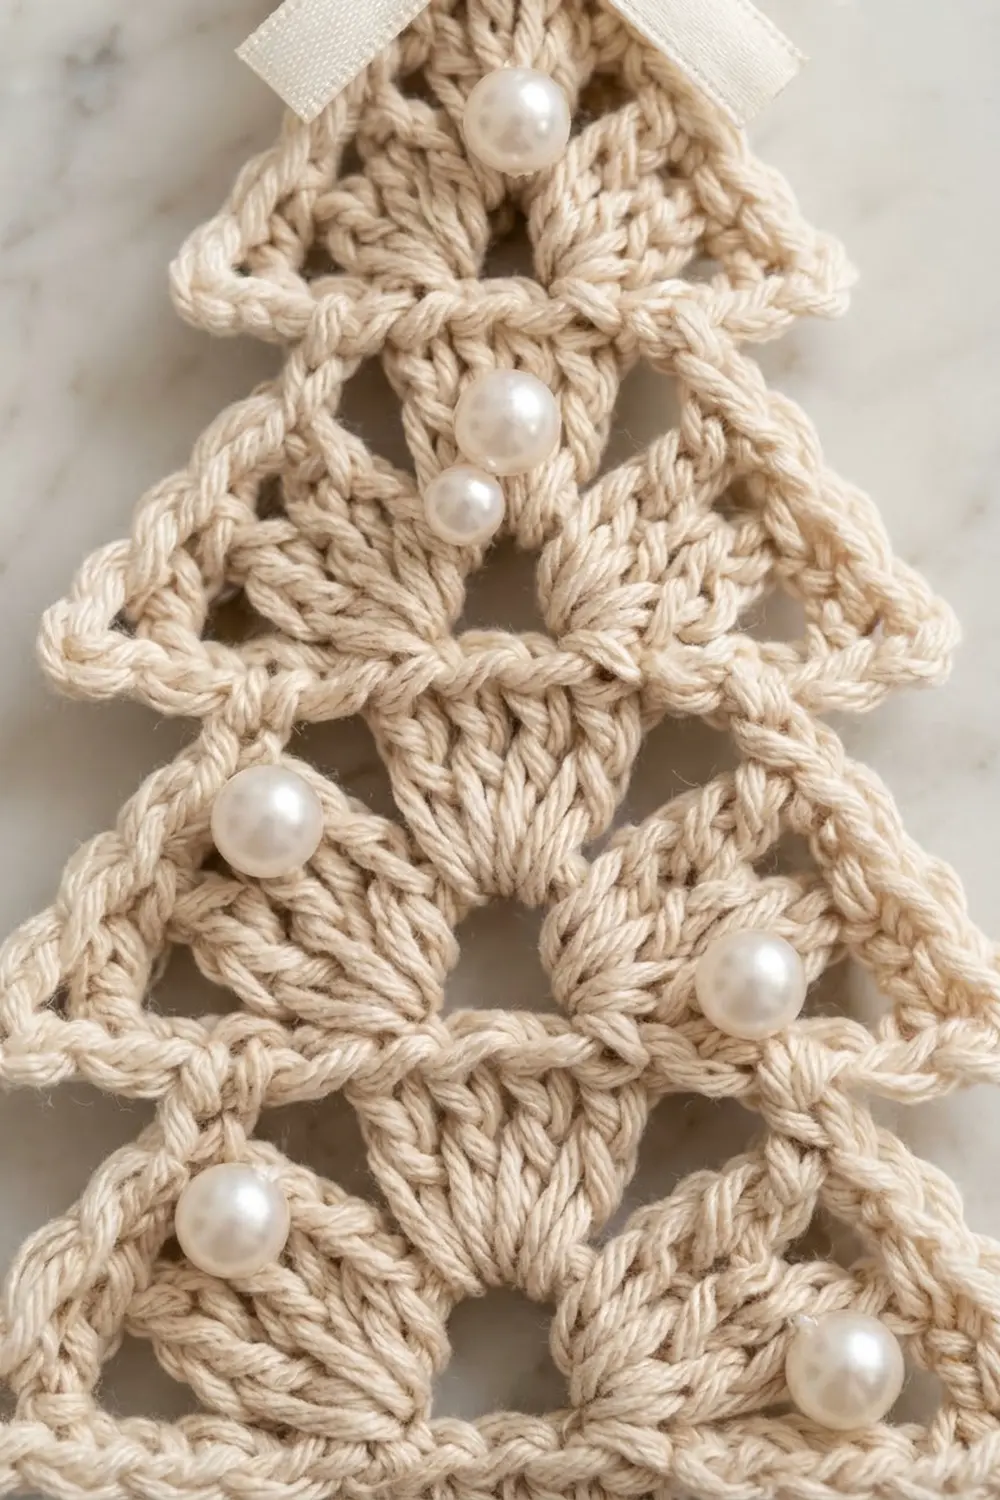
This ornament is a small, airy Christmas tree in cream cotton. Five lacy triangular tiers stack above a solid rectangular trunk. Each tier is filled with fan stitches that close into petal shapes, leaving open holes between them. Pearls sewn across the tiers add a soft shine. A braided cord loop and a cream silk bow finish the top.
The look is quiet and elegant. One natural color keeps attention on the texture, and the crisp single crochet outline gives each tier a clean triangular edge. It hangs flat, so it suits a tree branch, a gift tag, or a window hook.
The pattern uses US crochet terms. The finished ornament measures 4.6 in (11.7 cm) wide by 6.2 in (15.7 cm) tall, not including the hanging loop. With the loop, it hangs 8.7 in (22.1 cm) long.
You work the whole tree as one continuous flat piece from the bottom up. You make the trunk in rows first. Then you build each tier with three rows: a single crochet base row, a fan row, and a cluster row that gathers each fan into a petal. Each new tier’s base row is extended with chains and foundation single crochet so it sticks out past the tier below. A two-round border outlines the shape. Last, you add the braided loop, bow, and pearls.
Finished Size and Construction
- Finished size: 4.6 in (11.7 cm) wide x 6.2 in (15.7 cm) tall, plus a 2.5 in (6.4 cm) loop
- Skill level: Intermediate (foundation single crochet and 5-dc clusters)
- Terminology: US
- Yarn weight: DK (#3) cotton
- Hook: 3.5 mm (E-4)
- Number of pieces: 1 crocheted body, plus a braided cord and a ribbon bow as finishing
- Layout: single vertical piece with the trunk at the bottom and five tiers above it
- Piece size before border: 4.2 in (10.7 cm) wide x 5.8 in (14.7 cm) tall
- Border depth: 0.2 in (0.5 cm) on all edges
Materials
Yarn: Use a smooth, mercerized or combed DK cotton in cream or natural. Cotton holds the petal shapes and the pointed tier tips well. Avoid fuzzy or very loose-plied yarn, because it blurs the holes.
- Cream DK cotton: 15 g (about 33 m)
This amount includes roughly a 30% margin for your gauge swatch and the braided cord.
Tools and notions:
- 3.5 mm (E-4) crochet hook
- Tapestry needle
- 9 cream pearl beads, 6 mm, with holes (8 for the tiers and 1 optional for the bow center)
- Cream sewing thread and a beading needle
- Cream silk ribbon, 3/8 in (1.0 cm) wide, 8 in (20.3 cm) long
- Stitch markers
- Rust-proof pins and a blocking mat
- Optional: fabric stiffener or spray starch
- Scissors and a tape measure
Abbreviations (US Terms)
- ch: chain
- sl st: slip stitch
- sc: single crochet
- dc: double crochet
- fsc: foundation single crochet
- sk: skip
- st(s): stitch(es)
- rep: repeat
Special stitches:
- fsc (foundation single crochet): Insert your hook into the “chain” at the base of the last stitch. Yarn over and pull up a loop. Yarn over and pull through 1 loop (this makes the new chain). Yarn over and pull through both loops. Repeat for each fsc.
- dc5tog (5-double-crochet cluster): Yarn over, insert your hook into the next st, yarn over, pull up a loop, yarn over, pull through 2 loops. Repeat from * to * 4 more times (6 loops on hook). Yarn over and pull through all 6 loops.
Gauge and Checkpoints
Gauge: 5 sc and 6 sc rows = 1 in (2.5 cm). Each dc row is about 0.4 in (1.0 cm) tall.
For a single-piece project, the trunk and Tier 1 are your test piece. Measure at each checkpoint before you go on.
- After the trunk (Row 6): 1.4 in (3.6 cm) wide x 1.0 in (2.5 cm) tall
- After Row 7: the Tier 1 base row is 4.2 in (10.7 cm) wide
- After Tier 1 (Row 9): 2.0 in (5.1 cm) tall from the trunk’s bottom edge
- After Tier 2 (Row 12): 2.9 in (7.4 cm) tall
- After Tier 3 (Row 15): 3.9 in (9.9 cm) tall
- After Tier 4 (Row 18): 4.9 in (12.4 cm) tall
- After Tier 5 (Row 21): 5.8 in (14.7 cm) tall
Each tier adds about 1 in (2.5 cm) of height.
If your piece is too big, go down 0.25 to 0.5 mm in hook size. If it is too small, go up 0.25 to 0.5 mm. If only the fan rows ruffle, use the smaller hook for those rows only.
Trunk
Ch 8.
Row 1: Sc in the 2nd ch from the hook and in each ch across. (7 sc)
Rows 2–6: Ch 1, turn, sc in each st across. (7 sc)
Checkpoint: the trunk is 1.4 in (3.6 cm) x 1.0 in (2.5 cm). Do not fasten off.
Tiers
Every tier follows the same three-row logic. Here, n is the number of fans in that tier.
- Base row: 4n + 1 sc
- Fan row: 6n + 1 sts (n fans of 5 dc and n + 1 sc)
- Cluster row: 2n − 1 sts (n clusters and n − 1 dc)
Each base row is built from three parts: X chain-side sc, the previous row’s sts, and X fsc.
Tier 1 (5 fans)
Row 7 (base row): Ch 8. Sc in the 2nd ch from the hook and in the next 6 ch (7 sc). Sc in each of the 7 trunk sts. Work 7 fsc off the last sc. (21 sc: 7 + 7 + 7)
Row 8 (fan row): Ch 1, turn, sc in the first sc. Sk 1, 5 dc in the next sc, sk 1, sc in the next sc. Rep from * 4 more times. (31 sts: 5 fans of 5 dc, plus 6 sc)
Row 9 (cluster row): Ch 1, turn, sl st in the first sc, ch 2 (does not count as a st). Dc5tog over the next 5 dc. Dc in the next sc, dc5tog over the next 5 dc. Rep from * 3 more times. Leave the last sc unworked. (9 sts: 5 clusters, 4 dc)
Tier 2 (4 fans)
Row 10: Ch 5. Sc in the 2nd ch from the hook and in the next 3 ch (4 sc). Sc in each of the 9 sts. Work 4 fsc. (17 sc)
Row 11: Work as for Row 8, repeating 3 more times after the first fan. (25 sts: 4 fans, 5 sc)
Row 12: Work as for Row 9, repeating 2 more times. (7 sts: 4 clusters, 3 dc)
Tier 3 (3 fans)
Row 13: Ch 4. Sc in the 2nd ch from the hook and in the next 2 ch (3 sc). Sc in each of the 7 sts. Work 3 fsc. (13 sc)
Row 14: Fan row with 3 fans. (19 sts: 3 fans, 4 sc)
Row 15: Cluster row. (5 sts: 3 clusters, 2 dc)
Tier 4 (2 fans)
Row 16: Ch 3. Sc in the 2nd ch from the hook and in the next ch (2 sc). Sc in each of the 5 sts. Work 2 fsc. (9 sc)
Row 17: Fan row with 2 fans. (13 sts: 2 fans, 3 sc)
Row 18: Cluster row. (3 sts: 2 clusters, 1 dc)
Tier 5 (1 fan)
Row 19: Ch 2. Sc in the 2nd ch from the hook (1 sc). Sc in each of the 3 sts. Work 1 fsc. (5 sc)
Row 20: Ch 1, turn, sc in the first sc, sk 1, 5 dc in the next sc, sk 1, sc in the last sc. (7 sts)
Row 21: Ch 1, turn, sl st in the first sc, ch 2, dc5tog over the 5 dc. Leave the last sc unworked. (1 st, which forms the apex)
Fasten off.
Base widths are 4.2 in (10.7 cm), 3.4 in (8.6 cm), 2.6 in (6.6 cm), 1.8 in (4.6 cm), and 1.0 in (2.5 cm). Each base row is wider than the top of the tier below, which creates the stacked, notched tree outline.
Border
Border gauge: 5 sc = 1 in (2.5 cm), the same as the body. Work 1 sc per stitch along straight edges and 1 sc per row end on the trunk sides. On each sloped tier side, work 1 sc for every 0.2 in (0.5 cm) of slope.
Each slope rises 0.8 in (2.0 cm) over two dc rows. The horizontal step-in is half of (base width − top width). Using that geometry:
- Tier 1: 1.44 in (3.7 cm), 7 sc
- Tier 2: 1.28 in (3.3 cm), 6 sc
- Tier 3: 1.13 in (2.9 cm), 6 sc
- Tier 4: 1.00 in (2.5 cm), 5 sc
- Tier 5: 0.89 in (2.3 cm), 4 sc
Round 1 (RS): Join yarn at a bottom corner of the trunk. Work the edges as follows:
- Trunk bottom: 1 sc in each of the 7 foundation ch, with 3 sc in each corner ch.
- Each trunk side: 6 sc, 1 per row end.
- Each extension underside: 1 sc per st. That is 7 for Tier 1, 4 for Tier 2, 3 for Tier 3, 2 for Tier 4, and 1 for Tier 5.
- Each tier tip: 2 more sc into the outermost extension st, making 3 sc in that st.
- Each slope: 7, 6, 6, 5, and 4 sc (Tiers 1–5).
- Inner notches: add nothing.
- Apex: 3 sc in the top of the final cluster.
Join with a sl st to the first sc.
Count check: Round 1 is a conversion round, not a growth round. Here is how it adds up:
- Stitches worked one per existing stitch or row end: 110 (bottom 7 + 2 sides x [6 + 17 + 28] + apex 1)
- Extra corner stitches: 26 (trunk corners 4 + tips 20 + apex 2)
- Total: 110 + 26 = 136 sc
Round 2: Ch 1. Sl st loosely in each sc around. (136 sl sts) Join and fasten off.
Why the math works: The straight edges match the body gauge exactly. The extra corner stitches let the five tips and the apex turn sharply without cupping. Leaving the inner notches unincreased keeps them crisp. The slope counts come straight from each slope’s measured length. Round 2 adds no stitches. It only firms the edge into a cord-like outline 0.2 in (0.5 cm) deep.
Final Blocking
- Weave in all ends along the border, but keep the trunk end long.
- Soak the ornament in cool water for 10 minutes, then press out the water in a towel.
- Pin it flat to 4.6 in (11.7 cm) x 6.2 in (15.7 cm).
- Pin each tier tip and the apex to a sharp point.
- Open each petal and hole with a pin, so the fans spread evenly.
- Optional: mist with stiffener or starch for a crisp ornament.
- Let it dry completely before you add the trims.
Braided cord: Make 3 chains of 30 ch, each about 6 in (15.2 cm) long. Knot them together, braid, and knot the other end, giving about 5 in (12.7 cm). Fold the braid in half and sew both ends to the back of the apex. The loop stands 2.5 in (6.4 cm) tall.
Bow: Tie the ribbon into a bow about 1.5 in (3.8 cm) wide. Sew it over the cord join, and add the optional pearl at its center.
Pearls: Sew 2 pearls on each of Tiers 1–3 and 1 pearl on each of Tiers 4–5. Place them at the cluster tops or in the petal centers.
Final Quality-Control Checklist
- The trunk is 1.4 in (3.6 cm) x 1.0 in (2.5 cm).
- Base rows count 21, 17, 13, 9, and 5 sc.
- Fan rows count 31, 25, 19, 13, and 7 sts.
- Cluster rows count 9, 7, 5, 3, and 1 sts.
- Border Round 1 has 136 sc.
- The bordered size is 4.6 in (11.7 cm) x 6.2 in (15.7 cm).
- All five tips and the apex are sharp.
- The cord, bow, and pearls are secure, with no thread showing on the front.
Troubleshooting
- Fans ruffle: Your dc are too loose. Use a 3.25 mm hook for the fan rows only.
- Petals look open at the top: Pull each dc5tog snug before you work the next st.
- The extension twists: Keep the chain flat, and work into the back bump of the chain.
- fsc side is longer than the chain side: Tighten the fsc’s “chain” step.
- Border flares on slopes: Remove 1 sc from that slope.
- Border cups on slopes: Add 1 sc to that slope.
- Tips are rounded: Repin while damp and use stiffener.
- Pearls droop: Stitch through each pearl twice and anchor the thread inside a dc post.
Care
Hand wash in cool water, press dry in a towel, and reshape flat to dry. Store the ornament flat or hanging, away from damp.

Final Notes
The measurement chain is simple to follow. Start with a trunk of 1.4 in (3.6 cm) x 1.0 in (2.5 cm). Next come five tiers of about 1 in (2.5 cm) each, with bases of 21, 17, 13, 9, and 5 sc. That gives a body of 4.2 in (10.7 cm) x 5.8 in (14.7 cm). A 136-sc border adds 0.2 in (0.5 cm) per edge, for a finished size of 4.6 in (11.7 cm) x 6.2 in (15.7 cm). Check each step, and the ornament will hang flat with crisp tips.
Happy crocheting!