

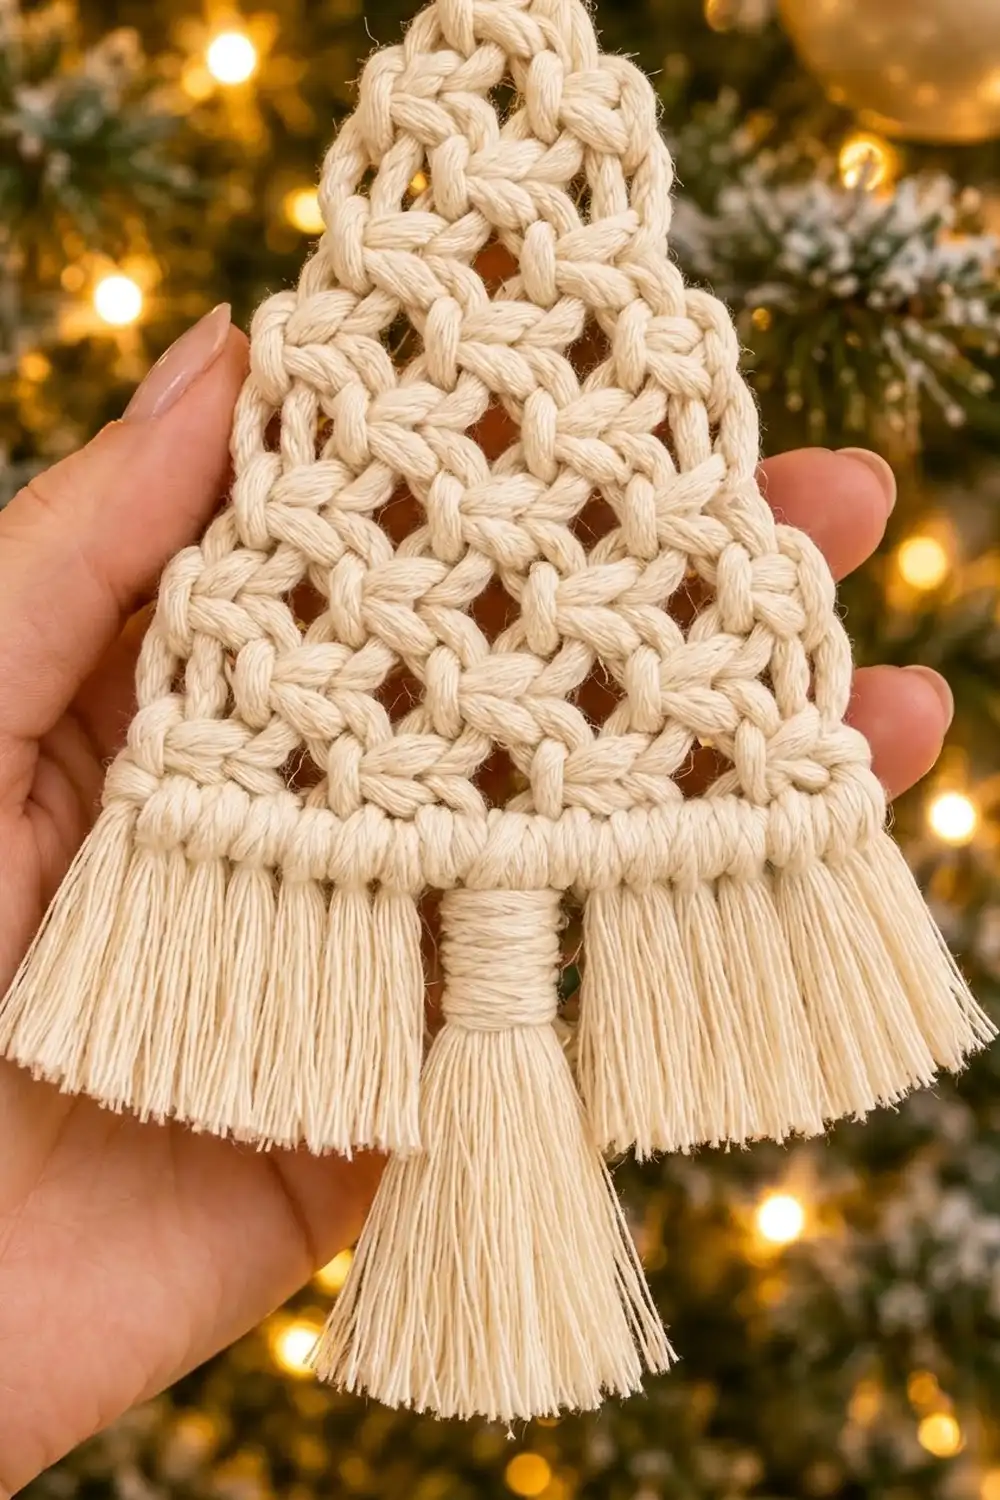
This small tree ornament is one flat triangle. It has an open diamond lattice, a solid band at the base, a soft fringe skirt and a wrapped tassel trunk. A wooden star sits at the top, and a jute loop lets it hang straight from a branch.
The sample is worked in natural cream cotton for a calm, Scandinavian look. The design also works well in terracotta or sage green, and all three colors look lovely together on one tree. The chunky joints in the lattice give it a knotted, rope-like texture.
The pattern uses US crochet terms. The finished tree body measures 4.9 in (12.4 cm) wide at the band. It is 6 in (15.2 cm) tall from the top of the tab to the bottom of the band. The fringe ends 8 in (20.3 cm) below the top of the tab, and the tassel tip ends 9.5 in (24.1 cm) below it.
You work the piece top-down in rows: first a narrow tab, then a lattice that grows by one space every row, then a three-row band. A short border firms up the slanted sides. You add the fringe, tassel, star and hanger at the end.
Finished Size and Construction
- Finished size: body 4.9 in (12.4 cm) wide x 6 in (15.2 cm) tall; 9.5 in (24.1 cm) from the top of the tab to the tassel tip
- Skill level: Easy
- Terminology: US crochet terms
- Yarn weight: Bulky (#5) cotton or cotton cord
- Hook: 6 mm (US J-10)
- Number of pieces: 1 crocheted piece, plus fringe and tassel
- Layout: Single triangle; no joining
- Piece size before border: 4.4 in (11.2 cm) wide x 6 in (15.2 cm) tall after folding the tab
- Border depth: 0.25 in (0.6 cm) on each slanted side
Materials
Choose a smooth, firm bulky cotton or a soft 3-ply cotton cord. Twisted cotton shows the lattice joints clearly and brushes into a nice fringe. Avoid fuzzy acrylic, which blurs the diamond openings.
- Cream (main color): 30 g, about 30 m (32.8 yd)
- Other colors: terracotta or sage green, same amount per ornament
These amounts include about 25% extra for your gauge swatch and trimming.
Tools and extras:
- 6 mm (US J-10) crochet hook
- Wooden star, about 2.5 in (6.4 cm) across, with an open center
- Jute twine, 10 in (25.4 cm), for the hanger
- Stiff card, 7 in (17.8 cm) long, for the tassel
- Sharp scissors and a tapestry needle
- Fine-tooth comb or pet brush for the fringe
- Ruler, pins and a blocking mat
Abbreviations (US Terms)
- ch – chain
- sc – single crochet
- sp(s) – space(s)
- st(s) – stitch(es)
- rsc – reverse single crochet
- RS – right side
Special stitch – reverse single crochet (rsc), also called crab stitch: Work in the opposite direction from normal. Insert the hook into the next stitch to the right (to the left if you are left-handed), yarn over and pull up a loop, then yarn over and pull through both loops. It makes a twisted, rope-like edge.
Gauge and Checkpoints
Gauge matters because the lattice and the band must end up the same width. Make the tab and the first five lattice rows, then measure before you go on.
- Sc gauge: 11 sc = 4 in (10.2 cm); 3 sc rows = 1 in (2.5 cm)
- Lattice gauge: 5 ch-2 spaces = 2 in (5.1 cm) wide; 5 lattice rows = 2 in (5.1 cm) tall
Checkpoints:
- After Row 6, the tab is 1.1 in (2.8 cm) wide and 2 in (5.1 cm) long.
- After Row 11 (6 spaces), the lattice is 2.4 in (6.1 cm) wide at that row and 2 in (5.1 cm) tall.
- After Row 16 (11 spaces), the lattice is 4.4 in (11.2 cm) wide and 4 in (10.2 cm) tall.
- After Row 19, the band is 4.4 in (11.2 cm) wide and 1 in (2.5 cm) tall.
If your piece is too big, go down to a 5.5 mm (US I-9) hook. If it is too small, go up to a 6.5 mm (US K-10.5) hook. If only the lattice is off, work your chains relaxed and even. Tight chains shrink the diamonds and make the tree too narrow.
Pattern
Tab
At the end you will fold the tab around the star, so leave a 12 in (30.5 cm) tail at the start for sewing.
Foundation: Ch 4.
Row 1: Sc in 2nd ch from hook and in each ch across. (3 sc)
Rows 2–6: Ch 1, turn, sc in each sc across. (3 sc)
The tab measures 1.1 in (2.8 cm) wide x 2 in (5.1 cm) long.
Lattice
Each lattice row puts one sc in each end stitch and one sc in every ch-2 space. This adds exactly one space per row, half a space on each side, so the sides slope evenly.
Row 7 (set-up): Ch 1, turn, sc in first sc, ch 2, sc in next sc, ch 2, sc in last sc. (3 sc, 2 ch-2 sps)
Row 8: Ch 1, turn, sc in first sc, ch 2, sc in next ch-2 sp, ch 2, sc in next ch-2 sp, ch 2, sc in last sc. (4 sc, 3 ch-2 sps)
Rows 9–16: Ch 1, turn, sc in first sc, *ch 2, sc in next ch-2 sp; repeat from * across, ch 2, sc in last sc.
Each row has one more space and one more sc than the row before. Full count for each row:
- Row 9: 5 sc, 4 ch-2 sps
- Row 10: 6 sc, 5 ch-2 sps
- Row 11: 7 sc, 6 ch-2 sps
- Row 12: 8 sc, 7 ch-2 sps
- Row 13: 9 sc, 8 ch-2 sps
- Row 14: 10 sc, 9 ch-2 sps
- Row 15: 11 sc, 10 ch-2 sps
- Row 16: 12 sc, 11 ch-2 sps
Pull each sc snug against its chains. These tight sc form the “knots” of the lattice, and the open chains form the diamond openings.
At Row 16 the lattice measures 4.4 in (11.2 cm) wide and 4 in (10.2 cm) tall.
Band
Row 17 (conversion): Ch 1, turn, sc in first sc, sc in each ch-2 sp across. Count: 1 sc in the first sc + 11 sc worked one per ch-2 sp = 12 sc. Skip the other 11 sc of Row 16.
Rows 18–19: Ch 1, turn, sc in each sc across. (12 sc)
Do not fasten off. The band measures 4.4 in (11.2 cm) wide and 1 in (2.5 cm) tall. It matches the lattice width exactly, because 12 sc at 11 sc per 4 in (10.2 cm) comes to 4.4 in (11.2 cm).
Border
The border runs along the two slanted sides only. The bottom stays plain so you can attach the fringe there, and the top of the lattice runs straight into the tab.
Border gauge: 11 sc = 4 in (10.2 cm). Each slanted side measures about 1 in (2.5 cm) along the band plus 4.3 in (10.9 cm) along the lattice.
Right Side (as you look at the RS)
Row 1: With the working loop at the end of Row 19, ch 1. Work up the side into the row ends. Work 1 sc in each of the 3 band row ends (3 sc). Then work 1 sc in each lattice row end from Row 16 up to Row 7, plus 1 extra sc in the row ends of Rows 14 and 10 (10 + 2 = 12 sc). Total: 15 sc.
Row 2: Ch 1, do not turn. Rsc in each sc back down to the band. (15 rsc) Fasten off.
Left Side
Row 1: With RS facing, join yarn on the left side at the base of the tab. Work down the side. Work 1 sc in each lattice row end from Row 7 down to Row 16, plus 1 extra sc in the row ends of Rows 10 and 14 (10 + 2 = 12 sc). Then work 1 sc in each of the 3 band row ends (3 sc). Total: 15 sc.
Row 2: Ch 1, do not turn. Rsc in each sc back up to the tab. (15 rsc) Fasten off.
Why the math works: The lattice side is about 4.3 in (10.9 cm) long. At 11 sc per 4 in (10.2 cm), 12 sc measure 4.36 in (11.1 cm), so the edge lies flat. The band side is 1 in (2.5 cm), and its 3 sc measure 1.09 in (2.8 cm). That tiny bit of extra length keeps the corners from cupping. Each side gains 0.25 in (0.6 cm), so the base width becomes 4.4 + 0.25 + 0.25 = 4.9 in (12.4 cm).
Fringe, Trunk and Star
Fringe
- Cut 20 strands, each 5 in (12.7 cm) long.
- With RS facing, count the 12 sts of Row 19 from right to left. Sts 1–5 and 8–12 get fringe. Save sts 6–7 for the trunk.
- Hold 2 strands together and fold them in half. Attach them with a lark’s head knot through each fringe stitch. (10 sts x 2 strands = 20 strands, 40 ends)
- Brush out the ends with the comb. Trim straight across so the fringe hangs 2 in (5.1 cm) below the band.
Trunk Tassel
- Wrap yarn 24 times around the 7 in (17.8 cm) card.
- Slide a 12 in (30.5 cm) tie under the wraps at one end and knot it tightly. Cut the wraps at the other end.
- Use the tie ends to sew the folded top of the tassel to the back of sts 6–7 of Row 19, so the fold sits at the bottom edge of the band.
- With a 30 in (76.2 cm) strand, wrap the tassel tightly for 1 in (2.5 cm) right below the band. Secure the end by threading it up under the wraps.
- Brush the tassel and trim it to hang 3.5 in (8.9 cm) below the band. That is 1.5 in (3.8 cm) past the fringe.
Star and Hanger
- Slide Rows 1–3 of the tab through the center of the star. Bring them over the bottom edge of the opening, between the two lower points.
- Fold them to the back and sew Row 1 to the back of Row 6 with the starting tail. Only 1 in (2.5 cm) of the tab now shows on the front.
- Thread the 10 in (25.4 cm) jute through the star opening and around the top point. Knot the ends to make a hanging loop about 4 in (10.2 cm) long.
Final Blocking
- Lightly mist the tree with water, or soak it briefly and roll it in a towel.
- Lay it RS up on a blocking mat. Keep pins out of the star and fringe.
- Pin the band corners so the band measures 4.9 in (12.4 cm) across, border included.
- Use a ruler to pin the two slanted sides straight from the band to the tab.
- Gently open each diamond with your fingertips so the lattice looks even.
- Comb the fringe and tassel straight down.
- Let it dry completely, then trim any uneven fringe ends.
Final Quality-Control Checklist
- Tab: 3 sc wide, with 1 in (2.5 cm) showing below the star.
- Lattice: 10 rows, ending with 12 sc and 11 ch-2 spaces.
- Band: 12 sc wide in all three rows.
- Border: 15 sc and 15 rsc on each slanted side.
- Width at the band: 4.9 in (12.4 cm).
- Body height: 6 in (15.2 cm).
- Fringe: 20 strands on 10 stitches, 2 in (5.1 cm) long.
- Trunk: wrapped for 1 in (2.5 cm), with the tip 3.5 in (8.9 cm) below the band.
- The star sits centered and the tree hangs straight.
Troubleshooting
The sides curve or ripple. Check your lattice counts. Each row must have exactly one more space than the last. A missing space pulls the side in.
The band is narrower than the lattice. Make sure Row 17 has 12 sc. If the count is right, your sc are too tight. Loosen them, or use a larger hook for the band only.
The diamonds look closed. Your chains are too tight. Relax your hand on the chains and keep the sc firm.
The border flares. On that side, leave out the extra sc in Row 14 or Row 10. Then check that both sides match.
The tree hangs crooked. Center the tab on the star again and re-sew it, or shorten one side of the jute loop.
The fringe looks thin. Use 3 strands per stitch instead of 2. That means cutting 10 more 5 in (12.7 cm) strands.
Care
Spot clean with a damp cloth and mild soap. If needed, hand wash in cool water, reshape it flat and let it air dry, keeping the wooden star out of the water.

Final Notes
The measurements build in a simple chain. The 3 sc tab is 1.1 in (2.8 cm) wide. The lattice grows from 2 to 11 spaces to reach 4.4 in (11.2 cm). The 12 sc band matches that same 4.4 in (11.2 cm). The border adds 0.25 in (0.6 cm) per side for a final width of 4.9 in (12.4 cm). Check your gauge at Row 11 and Row 16, and everything after that will fall into place.
Make one in cream, then try terracotta and sage for a whole tree of matching ornaments.
Happy crocheting!