

This cheerful wall basket brings a bright pop of color to a kitchen, entryway, or bathroom. A rounded yellow dome rises at the back, a cream pocket sits across the lower half, and a ribbed cream cuff wraps around a wooden ring for hanging. Five plump yellow tassels swing along the bottom edge.
The fabric is dense single crochet throughout, so the basket holds its shape and keeps small items from slipping through. The yellow upper dome forms a rounded bell silhouette that opens downward into the pocket. The top edge of the cream pocket creates a clean horizontal band across the middle of the basket.
This pattern uses US crochet terms. The finished basket measures 7 in (17.8 cm) wide and 11 in (27.9 cm) tall from the bottom edge to the top of the cuff. The ring and tassels are not included in that height.
Construction is simple. You crochet a yellow back panel with a shaped dome top and a cream front pocket. You join the two pieces with a yellow single crochet border, then add the cream ribbed cuff around the ring and finish with five yellow tassels.
Finished Size and Construction
- Finished size: 7 in (17.8 cm) wide x 11 in (27.9 cm) tall, excluding ring and tassels
- Skill level: Easy / advanced beginner
- Terminology: US crochet terms
- Yarn weight: Worsted (#4) cotton
- Hook: 5.0 mm (H-8)
- Number of pieces: 2 (yellow back panel, cream front pocket), plus cuff and tassels
- Layout: Pocket laid over the lower part of the back panel, aligned at the bottom and sides
- Back panel size: 6.75 in (17.1 cm) wide x 9.5 in (24.1 cm) tall
- Front pocket size: 6.75 in (17.1 cm) wide x 6 in (15.2 cm) tall
- Size before border: 6.75 in (17.1 cm) x 9.5 in (24.1 cm)
- Border depth: about 0.125 in (0.3 cm) per edge
- Cuff: adds 1.25 in (3.2 cm) above the dome
- Tassels: 2.75 in (7.0 cm) long
Materials
Choose a smooth, firmly plied worsted cotton or cotton blend. Cotton keeps the fabric firm and stands up to kitchen use. Avoid very soft or stretchy acrylic, because the basket will sag when loaded.
- Yellow: 100 g / about 180 m (back panel, border, tassels)
- Cream: 50 g / about 90 m (front pocket, cuff)
These quantities include a comfortable margin. The basket itself uses roughly 70 g of yellow and 35 g of cream.
Tools:
- 5.0 mm (H-8) crochet hook
- Wooden ring, 3 in (7.6 cm) diameter
- Tapestry needle
- Scissors
- Stiff card, 3 in (7.6 cm) tall, for tassels
- Stitch markers
- Measuring tape
- Rust-proof pins and a blocking surface
Abbreviations (US Terms)
- ch – chain
- sc – single crochet
- sc2tog – single crochet 2 together (decrease)
- BLO – back loop only
- sl st – slip stitch
- st(s) – stitch(es)
- RS / WS – right side / wrong side
Special stitch – sc2tog: Insert hook in next st, yarn over, pull up a loop. Insert hook in following st, yarn over, pull up a loop. Yarn over and pull through all 3 loops on hook. This turns 2 sts into 1.
Sc in BLO: Work a regular sc, inserting the hook under the back loop only. This creates the horizontal ridges of the cuff.
Gauge and Checkpoints
Gauge: 16 sc and 18 rows = 4 in (10.2 cm) in rows of sc.
That works out to 4 sc per inch and 4.5 rows per inch. Dense fabric is the goal, so do not loosen up to match a softer look.
Test with the back panel itself. Work through Row 10, then measure. The width should be 6.75 in (17.1 cm) across 27 sts.
Checkpoints:
- Back panel after Row 27: 6.75 in (17.1 cm) x 6 in (15.2 cm)
- Back panel after Row 43: 9.5 in (24.1 cm) tall, top edge 2.25 in (5.7 cm) wide
- Front pocket: 6.75 in (17.1 cm) x 6 in (15.2 cm)
- After border: 7 in (17.8 cm) x 9.75 in (24.8 cm)
- After cuff: 7 in (17.8 cm) x 11 in (27.9 cm)
If your piece is too big: Switch to a 4.5 mm hook and restart.
If your piece is too small: Switch to a 5.5 mm hook and restart.
A difference of 0.25 in (0.6 cm) is acceptable. Larger differences will throw off the dome shape and the pocket fit.
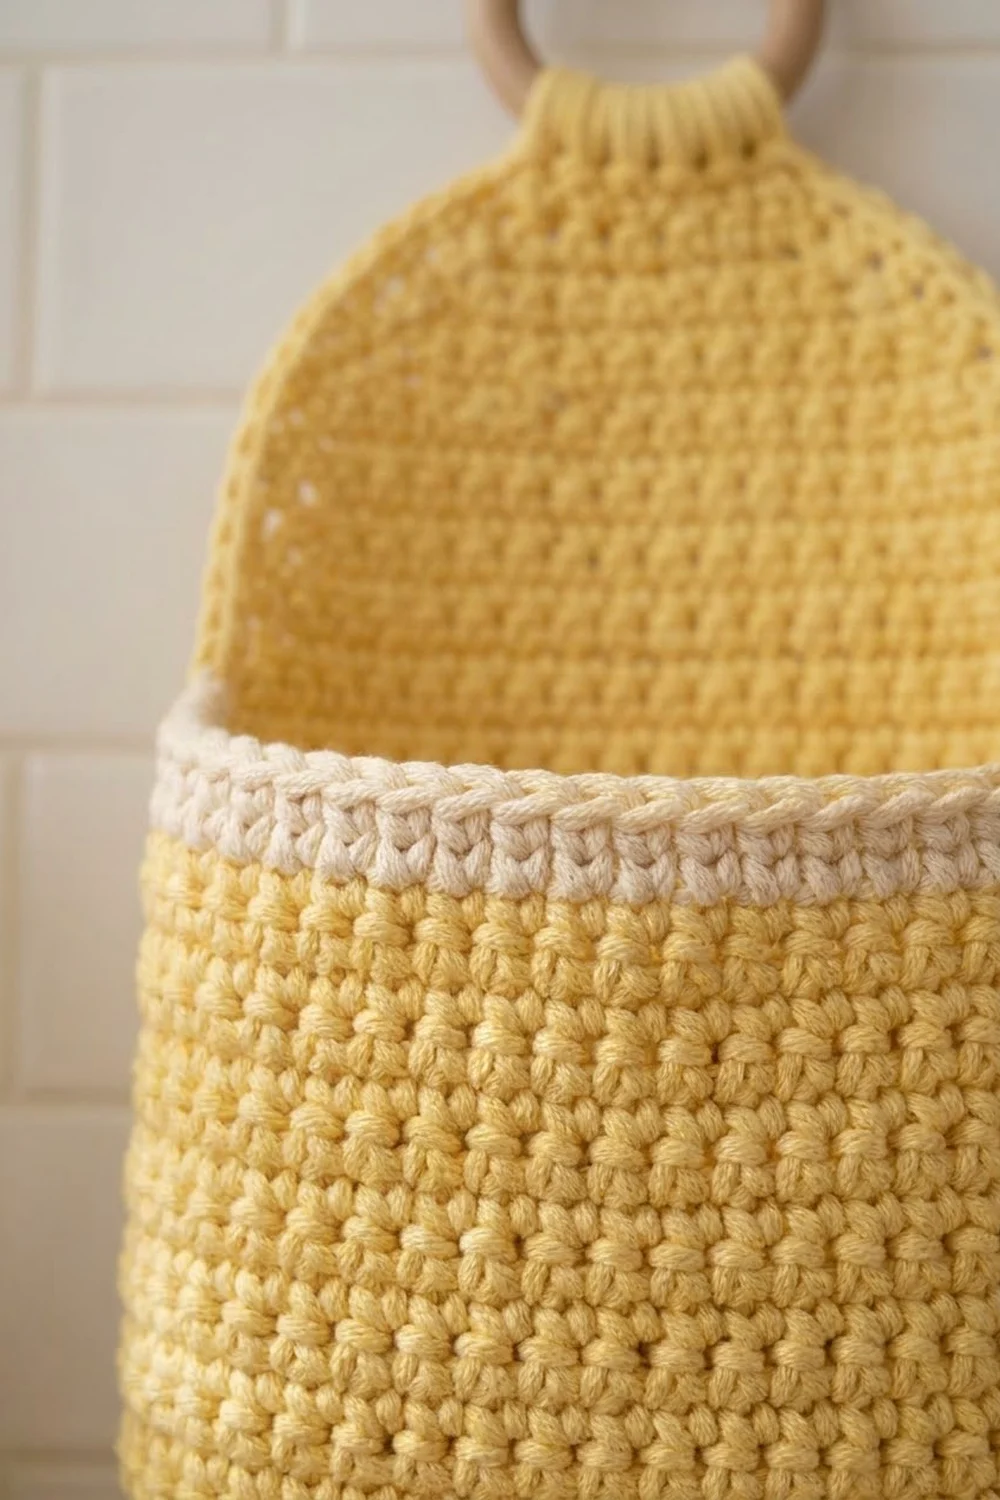
Back Panel (Yellow)
The back panel is worked flat in rows. The lower section is straight, then the top is shaped into a rounded dome. The decreases start far apart and get closer together, which creates a smooth curve rather than a pointed triangle.
Foundation: With yellow, ch 28.
Row 1 (RS): Sc in 2nd ch from hook and in each ch across, turn. (27 sts)
Rows 2–27: Ch 1 (does not count as a st), sc in each st across, turn. (27 sts)
Checkpoint: 6.75 in (17.1 cm) wide x 6 in (15.2 cm) tall.
Dome Shaping
Each decrease row is worked as: ch 1, sc2tog, sc across to last 2 sts, sc2tog, turn. Each even row is worked as: ch 1, sc in each st across, turn.
- Row 28: Decrease row. (25 sts)
- Rows 29–31: Even. (25 sts)
- Row 32: Decrease row. (23 sts)
- Rows 33–34: Even. (23 sts)
- Row 35: Decrease row. (21 sts)
- Row 36: Even. (21 sts)
- Row 37: Decrease row. (19 sts)
- Row 38: Even. (19 sts)
- Row 39: Decrease row. (17 sts)
- Row 40: Decrease row. (15 sts)
- Row 41: Decrease row. (13 sts)
- Row 42: Decrease row. (11 sts)
- Row 43: Decrease row. (9 sts)
Fasten off and weave in ends.
The dome uses 9 decrease rows, each removing 2 sts, for 18 sts total. That takes 27 sts down to 9 sts. The dome is 16 rows tall, about 3.5 in (8.9 cm).
Checkpoint: The panel is 9.5 in (24.1 cm) tall. The top edge is 2.25 in (5.7 cm) wide.
Front Pocket (Cream)
The pocket matches the straight section of the back panel exactly, so the edges line up row for row.
Foundation: With cream, ch 28.
Row 1 (RS): Sc in 2nd ch from hook and in each ch across, turn. (27 sts)
Rows 2–27: Ch 1, sc in each st across, turn. (27 sts)
Fasten off and weave in ends.
Checkpoint: 6.75 in (17.1 cm) x 6 in (15.2 cm). Lay it on the back panel. The edges should match the straight section, and the top of the pocket should align with Row 27.
Make All Pieces
- Yellow: 1 back panel, 5 tassels (border added during joining)
- Cream: 1 front pocket (cuff added after joining)
Layout (front view, top to bottom):
- TOP EDGE: CREAM CUFF around WOODEN RING
- UPPER: YELLOW DOME (back panel only)
- LOWER: CREAM POCKET over YELLOW BACK
- BOTTOM EDGE: YELLOW TASSEL x 5
Joining
The two pieces are joined with a single round of yellow sc. This round also serves as the border.
Place the pieces WS together, with the pocket facing you. Align the bottom edges and both side edges. Pin or clip every 1 in (2.5 cm).
Along the bottom and the straight sides, insert your hook through both layers for every stitch. Along the dome, work through the back panel only.
Stitch-to-stitch logic: The bottom edges match stitch for stitch, because both pieces have 27 foundation sts. The sides match row for row, because both pieces have 27 straight rows. You always pair the matching stitch or row end of each layer.
Tension: Keep your tension even and slightly relaxed. If you pull too tight, the sides will pucker. If you work too loosely, the seam will flare.
Size checkpoint: After joining, the basket should measure 7 in (17.8 cm) x 9.75 in (24.8 cm).
Border
Border gauge: 4 sc per inch, which is the same as the panels.
The panels have 4.5 rows per inch, but the border needs 4 sts per inch. On the straight sides, work 8 sc for every 9 row ends. Skip the 9th, 18th, and 27th row ends. This keeps the sides from rippling.
Border Round (yellow): Join yellow in the first foundation st at a bottom corner, working through both layers.
- Bottom edge: 3 sc in first st, sc in each of next 25 sts, 3 sc in last st. That is 27 sts worked 1-per-stitch plus 4 extra corner sts. (31 sc)
- First straight side (both layers): Work 8 sc for every 9 row ends across 27 row ends. (24 sc)
- First dome side (back only): 1 sc in each of the 16 row ends. (16 sc)
- Top of dome: Sc in each of 9 sts of Row 43. (9 sc)
- Second dome side: 1 sc in each of the 16 row ends. (16 sc)
- Second straight side (both layers): 8 sc for every 9 row ends. (24 sc)
Sl st to the first sc to join. (120 sc total)
Why the math works:
- 31 + 24 + 16 + 9 + 16 + 24 = 120 sc.
- The bottom has 31 sc. Each 3-sc corner places its center stitch at position 2 and position 30.
- The straight sides have 24 sc over 6 in (15.2 cm), which matches 4 sc per inch.
- The dome edges have 1 sc per row end. The curved, stair-stepped edge is longer than a straight edge, so it takes the extra stitches without ruffling.
- No extra corners are added where the sides meet the dome, so the curve stays smooth.
Fasten off and weave in ends.
Cuff (Cream)
The cuff is a short strip of BLO sc ribbing. It wraps over the ring and is sewn to the back.
Row 1: With RS facing, join cream in the first of the 9 border sc across the dome top. Ch 1, sc in each of the 9 sts, turn. (9 sts)
Rows 2–14: Ch 1, sc in BLO of each st across, turn. (9 sts)
Fasten off, leaving a 12 in (30.5 cm) tail.
The strip is about 3.1 in (7.9 cm) long. Pass it through the wooden ring and fold it to the back. Whipstitch the last row to the base of Row 1 on the WS. The folded loop adds 1.25 in (3.2 cm) above the dome.
Checkpoint: The total height is now 11 in (27.9 cm).
Tassels (Make 5, Yellow)
- Wrap yellow 20 times around the 3 in (7.6 cm) card.
- Slide a 10 in (25.4 cm) strand under the wraps at the top and tie it tightly. Leave both ends long for attaching.
- Cut the wraps at the bottom edge.
- Wrap a separate strand around the tassel 0.5 in (1.3 cm) below the top tie. Wind it 6 times, knot it, and bury the ends inside the tassel.
- Trim the tassel to 2.75 in (7.0 cm).
Placement: Number the 31 bottom border sts from 1 to 31. Attach the tassels at sts 2, 9, 16, 23, and 30. That gives 7 sts between each tassel, with the outer tassels on the corners and the middle tassel at the exact center.
Thread the tie ends through the border stitch and both layers. Knot them on the inside of the pocket and weave in the ends.
Final Blocking
- Lightly mist the basket with water until it is damp, not soaked.
- Stuff the pocket with a folded hand towel to open its shape.
- Pin the basket flat at 7 in (17.8 cm) x 9.75 in (24.8 cm), not counting the cuff.
- Smooth the dome into an even curve. Check that both sides are symmetrical.
- Straighten the pocket’s top edge so the cream band runs level.
- Comb the tassels with your fingers and trim them evenly.
- Let everything dry completely, then remove the towel.
Final Quality-Control Checklist
- [ ] The width is 7 in (17.8 cm) at the pocket.
- [ ] The height is 11 in (27.9 cm) to the top of the cuff.
- [ ] The dome curve is smooth and symmetrical, with no pointed top.
- [ ] The pocket’s top edge is level across the middle.
- [ ] The border lies flat, without ripples or puckers.
- [ ] The cuff is sewn securely, and the ring cannot slip out.
- [ ] The tassels are evenly spaced at sts 2, 9, 16, 23, and 30.
- [ ] All tassels are the same length.
- [ ] All ends are woven in.
Troubleshooting
The dome looks pointed. You probably decreased too early or too often. Recheck the even rows in Rows 29–38.
The sides ripple. You worked 1 sc in every row end. Use 8 sc for every 9 row ends.
The sides pucker. Your border tension is too tight. Loosen up, or go up one hook size for the border only.
The pocket doesn’t line up. Your two pieces have different row counts. Both need exactly 27 straight rows.
The basket sags when loaded. The fabric is too loose. Use a smaller hook or a firmer cotton yarn.
The tassels look uneven. Trim them while they are damp, all together, against a ruler.
Care
Spot clean or hand wash in cool water, then reshape and dry flat. Remove the wooden ring before washing if you can.
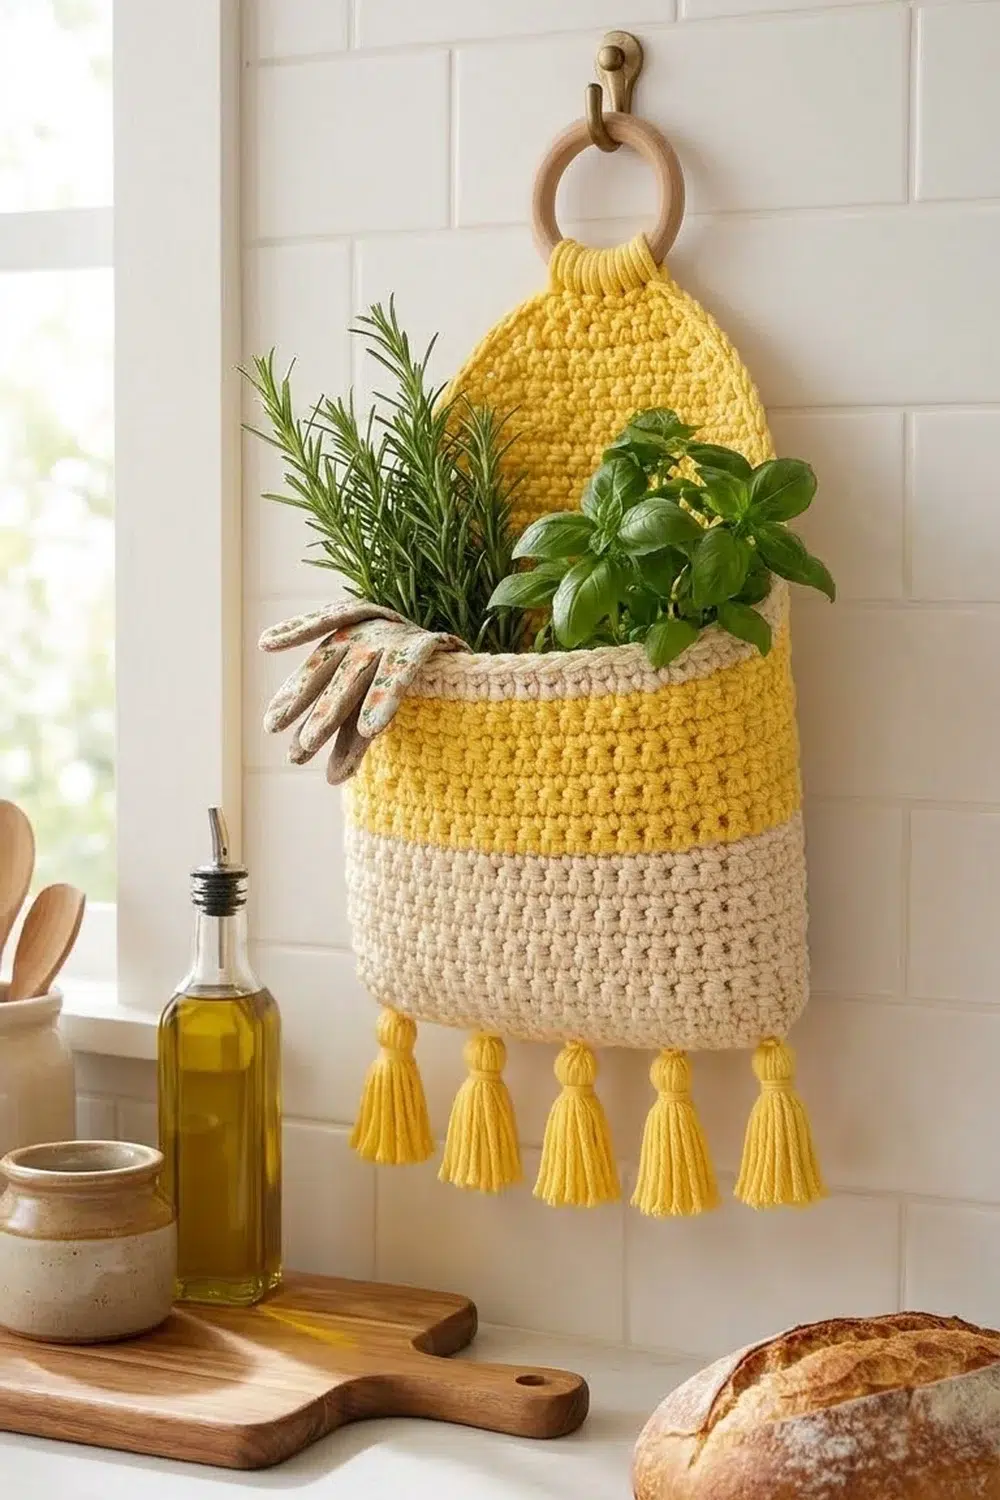
Final Notes
The measurement chain is simple. A gauge of 16 sc x 18 rows = 4 in (10.2 cm) gives a back panel of 6.75 in x 9.5 in (17.1 cm x 24.1 cm) and a pocket of 6.75 in x 6 in (17.1 cm x 15.2 cm). The 120-st border brings the basket to 7 in x 9.75 in (17.8 cm x 24.8 cm). The cuff finishes it at 11 in (27.9 cm) tall.
Check your work at every stage, and the sunny dome will come out right.
Happy crocheting!