

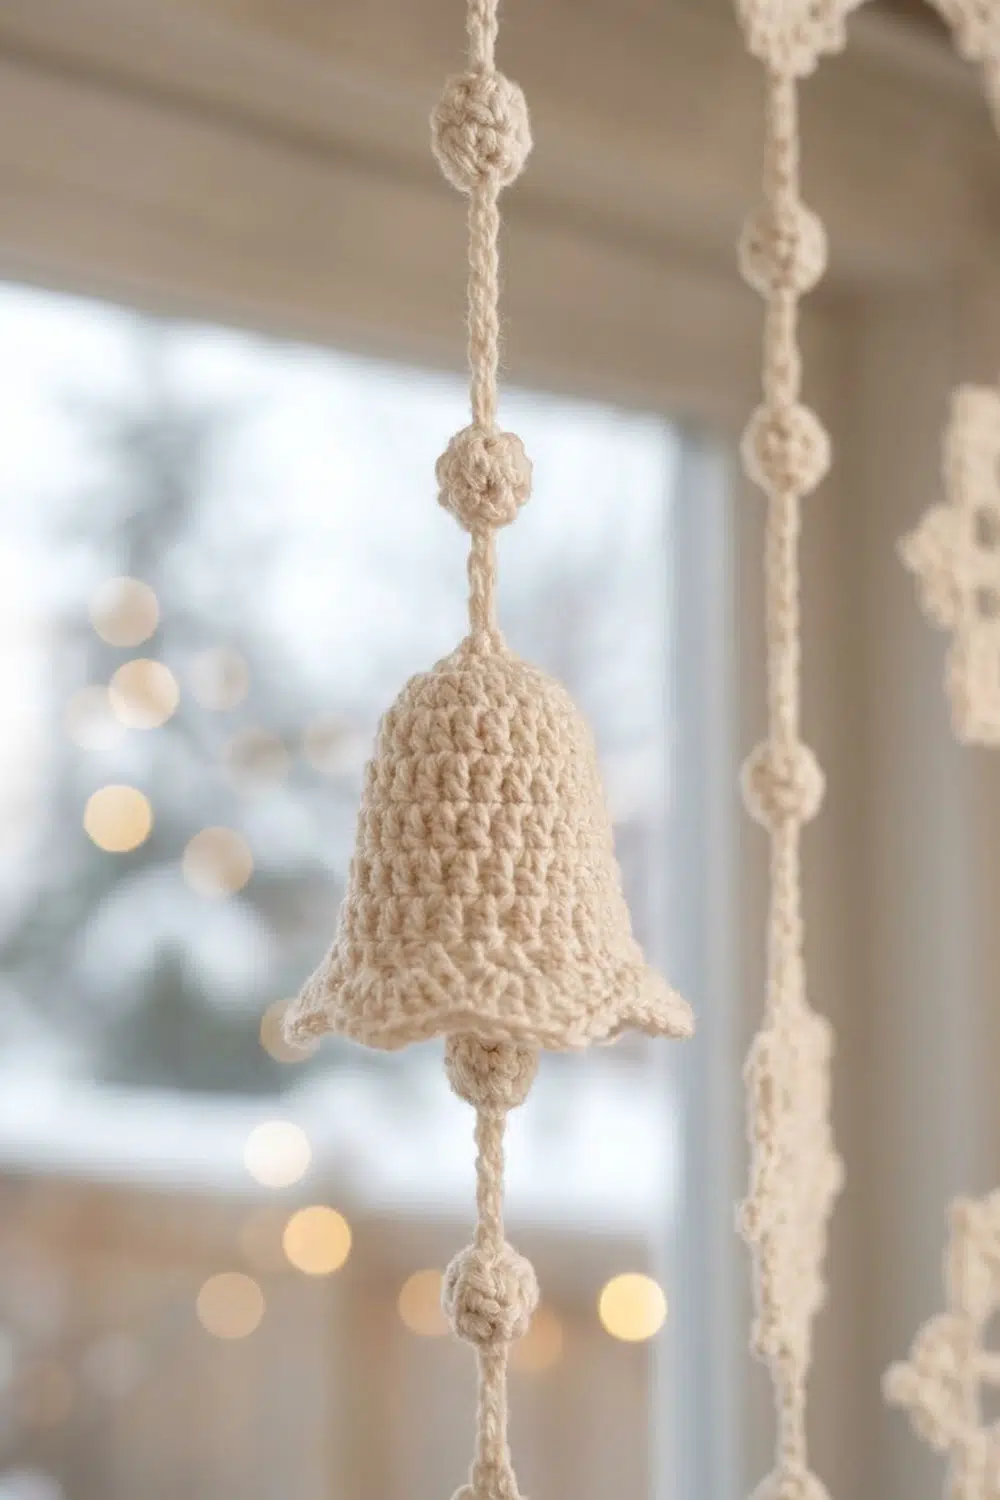
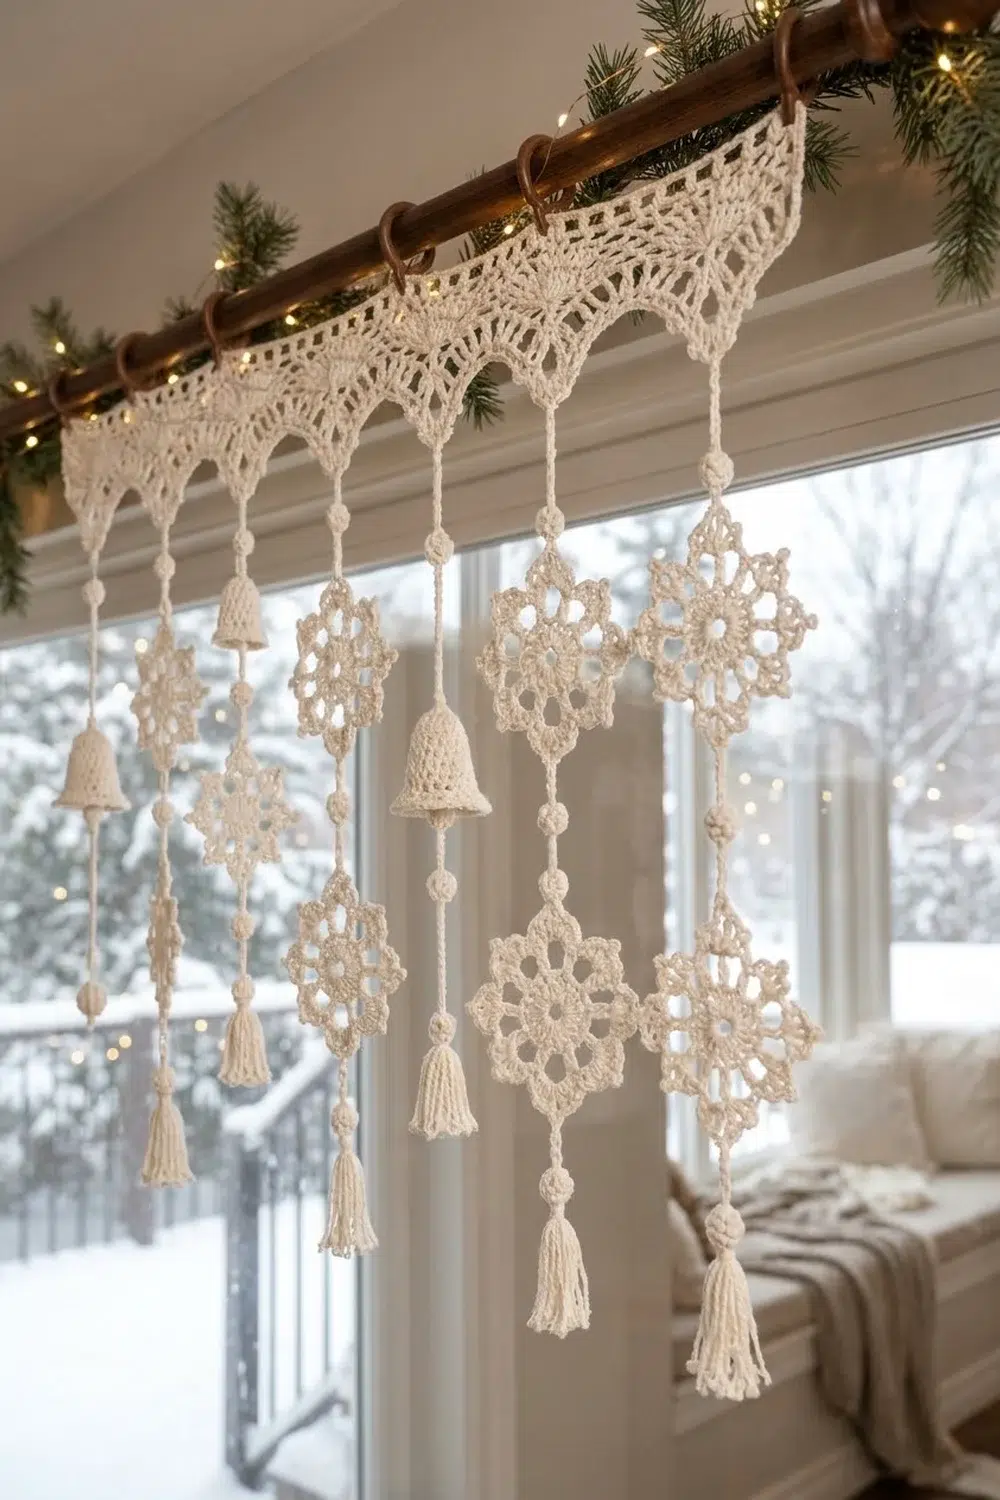
This valance is a soft, wintry piece for a window. A scalloped filet lace header runs across the top. Fifteen beaded strands hang from it, and each one ends in a lacy snowflake, a small tulip-shaped bell, or a full tassel. The strands fall at three different lengths, so the ornaments sit at staggered heights and give the window depth.
The whole piece uses a single cream cotton yarn. The one color keeps the look romantic and quiet, and lets the lace and texture do the work. The style mixes traditional filet crochet with a cottage-holiday feel.
The pattern uses US crochet terms. The header measures 36.2 in (91.9 cm) wide and 5.5 in (14.0 cm) deep. The longest drop, from the top edge to the tip of the lowest snowflake, is about 28 in (71.1 cm).
Construction is continuous. You work the header flat in rows from the top down, finishing with a two-row scallop. You then add the top and side edging with hanging loops. Each strand is chained directly off the center of a scallop, with bead bobbles worked into the chain, and its ornament is crocheted onto the end of that same strand. The result is one single piece with no sewn-on motifs. The tassels are tied onto loops at the strand ends.
Finished Size and Construction
- Finished size: 36.2 in (91.9 cm) wide; header 5.5 in (14.0 cm) deep; longest drop about 28 in (71.1 cm)
- Skill level: Intermediate
- Terminology: US crochet terms
- Yarn weight: DK / light (#3) cotton
- Hook: 3.5 mm (E-4)
- Number of pieces: 1 (header, strands and ornaments are worked continuously)
- Layout: 15 scallops across the header, with 1 strand from the center of each scallop
- Header size before border: 36.2 in x 5 in (91.9 cm x 12.7 cm)
- Border depth: 0.5 in (1.3 cm) along the top, plus hanging loops
- Ornaments: 5 snowflakes (3.5 in / 8.9 cm), 5 bells (2 in / 5.1 cm tall), 5 tassels (3 in / 7.6 cm)
Materials
Yarn: Use a smooth, mercerized or combed DK cotton. Cotton holds the lace crisp, takes starch well and shows the bead bobbles clearly. Avoid fuzzy or very splitty yarns, because they blur the filet blocks.
- Cream: 150 g, approximately 360 m (394 yd)
This quantity includes roughly a 20% margin for swatching, tassel trimming and tails.
Tools:
- 3.5 mm (E-4) crochet hook
- Tapestry needle
- 15 locking stitch markers
- Stiff card 3.5 in (8.9 cm) tall, for tassels
- Scissors and a measuring tape
- Blocking mat, rust-proof pins and a spray bottle
- Optional: fabric starch
- Optional: clip rings for hanging
Abbreviations (US Terms)
- ch – chain
- sl st – slip stitch
- sc – single crochet
- hdc – half double crochet
- dc – double crochet
- sk – skip
- sp(s) – space(s)
- st(s) – stitch(es)
- yo – yarn over
- RS – right side
- rep – repeat
Special stitches:
- Bead Bobble (BB): Ch 3. [Yo, insert hook in 3rd ch from hook, yo, pull up a loop, yo, pull through 2 loops] 5 times, leaving 6 loops on the hook. Yo and pull through all 6 loops. Ch 1 tightly to close. Roll the bobble so it sits centered on the strand. The ch 3 of a BB is not counted in strand chain totals.
- Picot Point (PP): Ch 6, sl st in 4th ch from hook, ch 2.
- Filet space: Ch 1, sk next st, dc in next dc (2 sts).
- Filet block: Dc in next st (dc or ch-1 sp), dc in next dc (2 sts).
Gauge and Checkpoints
Gauge: 20 dc and 10 rows = 4 in (10.2 cm). In filet mesh, 10 spaces = 4 in (10.2 cm). Each dc row is 0.4 in (1.0 cm) tall.
Strand gauge: 6 ch = 1 in (2.5 cm), lightly stretched.
Test one piece first. Work a 22-st dc swatch for 10 rows, then make one snowflake from a short length of chain. If the swatch is 4 in (10.2 cm) square and the snowflake blocks to 3.5 in (8.9 cm), your tension is right for the whole piece.
Checkpoints:
- After Row 2: 36.2 in (91.9 cm) wide.
- After Row 10: 4 in (10.2 cm) deep.
- After Row 12: 5 in (12.7 cm) deep at the scallop tips.
- After the top border: 5.5 in (14.0 cm) deep.
- Snowflake: 1 in (2.5 cm) after Round 1, 2.5 in (6.4 cm) after Round 3, 3.5 in (8.9 cm) after Round 4.
- Bell: 2 in (5.1 cm) tall, rim about 2.3 in (5.8 cm) across.
If your work is too big, go down 0.5 mm in hook size. If it is too small, go up 0.5 mm. Do not change the stitch counts, because the scallop and loop spacing depend on 181 stitches.
Header
Foundation: Ch 183.
Row 1: Dc in 4th ch from hook and in each ch across. The skipped 3 ch count as the first dc. Turn. (181 dc)
Row 2: Ch 3 (counts as dc throughout), dc in each st across. Turn. (181 dc)
Row 3 (mesh): Ch 4 (counts as dc + ch 1), sk next st, dc in next st. Ch 1, sk next st, dc in next st; rep from * across. Turn. (91 dc, 90 ch-1 sps = 181 sts; 90 filet spaces)
Rows 4–9 (diamond chart): The 90 spaces form 15 repeats of 6 spaces, numbered 1–6 within each repeat. Work a filet block or a filet space at each position as listed below. Begin each row with ch 4 for a first space, or ch 3 plus a dc in the next st for a first block. Every row is 181 sts.
- Row 4: blocks at 3, 4
- Row 5: blocks at 2, 3, 4, 5
- Row 6: blocks at 2 and 5; spaces at 3, 4
- Row 7: blocks at 2, 3, 4, 5
- Row 8: blocks at 3, 4
- Row 9: all spaces
The chart is symmetrical within each repeat, so it reads the same in both directions. You do not need to reverse it on alternate rows.
Row 10 (solid): Ch 3, dc in each dc and in each ch-1 sp across. Turn. This is a conversion row: 91 dc worked into the existing dc plus 90 dc worked into the spaces. (181 dc)
Row 11 (fans): Ch 1, sc in first st. Sk 5 sts, in next st work [dc, ch 1] 6 times, dc. Sk 5 sts, sc in next st; rep from * across. Turn.
The sc land on sts 1, 13, 25 … 181, and the fans land on sts 7, 19 … 175. (16 sc, 15 fans of 7 dc each = 105 dc, 90 ch-1 sps)
Row 12 (lace edge): Ch 1, sc in first sc. Ch 3, sc in next ch-1 sp; [ch 3, sc in next ch-1 sp] 2 times; ch 3, sc in center (4th) dc of fan and place a marker in this sc; [ch 3, sc in next ch-1 sp] 3 times; ch 3, sc in next sc; rep from * across. Fasten off.
Each scallop has 7 sc inside it and 8 ch-3 loops. (16 + 105 = 121 sc; 120 ch-3 loops; 15 markers)
Strands and Ornaments
Each strand starts at a marked center sc and ends in its ornament. Work them in the order below, from left to right with the RS facing. Lengths are measured from the header to the start of the ornament.
- Short (S): [Ch 24, BB] 2 times, ch 6. This gives 54 ch and 2 BB, about 10 in (25.4 cm).
- Medium (M): [Ch 24, BB] 3 times, ch 6. This gives 78 ch and 3 BB, about 14.5 in (36.8 cm).
- Long (L): [Ch 24, BB] 4 times, ch 6. This gives 102 ch and 4 BB, about 19 in (48.3 cm).
Strand plan (SF = snowflake, BE = bell, TA = tassel):
- SF-L
- BE-S
- TA-M
- SF-S
- BE-L
- TA-S
- SF-M
- BE-S
- TA-L
- SF-S
- BE-M
- TA-S
- SF-L
- BE-S
- TA-M
Totals: 5 of each ornament type. 4 long, 4 medium and 7 short strands. 42 bead bobbles (16 + 12 + 14).
To start each strand, join yarn with a sl st in the marked sc, then work the chain sequence for that strand.
Snowflake (worked at strand end)
After the final ch 6, ch 4 and sl st in the 4th ch from hook to form a ring.
- Round 1: Ch 3, 11 dc in ring, sl st to top of ch-3. (12 dc)
- Round 2: Ch 5 (counts as dc + ch 2). Dc in next dc, ch 2; rep around. Sl st to 3rd ch of ch-5. (12 dc, 12 ch-2 sps)
- Round 3: Sl st in first ch-2 sp, ch 3, 2 dc in same sp, ch 2. 3 dc in next sp, ch 2; rep around. Sl st to top of ch-3. (36 dc, 12 ch-2 sps)
- Round 4: Sl st in next 2 dc and in next ch-2 sp, ch 1. Sc in this sp, ch 3, sk 3 dc, in next sp work [2 dc, PP, 2 dc], ch 3, sk 3 dc; rep around. Sl st to first sc and fasten off. (6 sc, 24 dc, 6 PP, 12 ch-3 sps)
Bell (worked top-down at strand end)
This is rounded amigurumi-style crown shaping followed by a flared lip. Work in a continuous spiral and mark the first st of each round. After the final ch 6, ch 3 and sl st in the first of these 3 ch to form a ring.
- Round 1: 6 sc in ring. (6)
- Round 2: 2 sc in each st. (12)
- Round 3: Sc in next st, 2 sc in next st; rep around. (18)
- Rounds 4–7: Sc in each st. (18)
- Round 8: Sc in next 2 sts, 2 sc in next st; rep around. (24)
- Round 9: Sc in next 3 sts, 2 sc in next st; rep around. (30)
- Round 10: Hdc in next 4 sts, 2 hdc in next st; rep around. (36 hdc)
Sl st in next st and fasten off. The bell is about 2 in (5.1 cm) tall.
Tassel Loop and Tassel
After the final ch 6, ch 4, sl st in the 4th ch from hook and fasten off.
- Wrap yarn 40 times around the 3.5 in (8.9 cm) card.
- Thread a 10 in (25.4 cm) tie through the top, pass it through the strand loop and knot it tightly.
- Cut the bottom wraps.
- Wrap the neck 0.5 in (1.3 cm) below the top and knot.
- Trim to 3 in (7.6 cm).
Border
Work the border after the header and before the strands, or after them, whichever you prefer.
Border gauge: 5 sc per in (2.5 cm). This matches the dc gauge because the top is worked 1 sc into each foundation st.
Top Row A: With RS facing, join yarn in the first foundation ch. Sc in the base of each of the 181 sts across. Turn. (181 sc)
Top Row B (hanging loops): Ch 1, sc in first sc, ch 12, sc in same sc. Sc in next 12 sc, ch 12, sc in same sc; rep from * 15 times. Fasten off.
This is a conversion row: 181 sc worked 1 per existing st, plus 16 extra sc (the second sc in each loop st). (197 sc, 16 ch-12 loops) Each loop fits a rod up to about 1 in (2.5 cm) in diameter.
Side edges: On each short edge, work 2 sc in each dc row end (Rows 1–10 = 20 sc) and 1 sc in each border row end (2 sc). (22 sc per side) The 4.5 in (11.4 cm) edge works out to about 4.9 sc per in, close enough to lie flat.
Why the math works: 181 = 12 x 15 + 1. The loops sit on sts 1, 13 … 181, directly above the sc valleys of Row 11. The strands hang from the fan centers at sts 7 … 175, exactly halfway between loops, which is 2.4 in (6.1 cm) apart. Each scallop therefore drapes evenly and carries its ornament at its lowest point.
Final Blocking
- Spritz the header with water until it is damp, not soaked.
- Pin the header to 36.2 in x 5.5 in (91.9 cm x 14.0 cm), keeping the filet rows straight.
- Pin each scallop loop open, with the tips at 5 in (12.7 cm) from the top edge, excluding the border.
- Pin the snowflake points out to 3.5 in (8.9 cm) across.
- Stuff each bell with plastic wrap to hold its shape. Shape the lip so it flares evenly.
- Starch the header, snowflakes and bells if desired, then let everything dry fully.
- Hang the piece and steam the strands lightly so they fall straight. Trim the tassels again if needed.
Final Quality-Control Checklist
- Header is 36.2 in (91.9 cm) wide and 5.5 in (14.0 cm) deep.
- 15 scallops, each with 8 ch-3 loops.
- 16 hanging loops, evenly spaced 2.4 in (6.1 cm) apart.
- 15 strands, each attached at a scallop center.
- 42 bead bobbles, all rolled to the center of their strands.
- 5 snowflakes, 5 bells and 5 tassels, placed per the strand plan.
- Long strands are about 19 in (48.3 cm), medium 14.5 in (36.8 cm), short 10 in (25.4 cm).
- All tails are woven in securely.
Troubleshooting
- Header too wide: Your dc are loose. Go down a hook size and re-check Row 2 against 36.2 in (91.9 cm).
- Filet diamonds look slanted: You are missing the turning space or block. Recount to 181 sts at the end of each row.
- Fans crowd or gap: Check that you skip exactly 5 sts on each side of every fan.
- Bobbles flop sideways: Ch 1 more tightly to close each BB, then roll it into place.
- Bell won’t flare: Starch it and dry it over a small cone or a stuffed plastic-wrap form.
- Snowflake cups: Round 4 is too tight. Block it firmly, or loosen the ch-3 spaces.
- Strands twist: Hang the piece and lightly steam each strand while it hangs straight.
Care
Hand wash in cool water with mild soap, press out the water in a towel and re-block flat. Re-starch the snowflakes and bells after washing if they soften.
Final Notes
The measurement chain runs like this:
- A gauge of 5 dc per in (2.5 cm) makes 181 sts equal 36.2 in (91.9 cm).
- Ten rows give 4 in (10.2 cm) of depth, and the scallop rows bring the header to 5 in (12.7 cm).
- The border adds 0.5 in (1.3 cm), for a total of 5.5 in (14.0 cm).
- A strand chain gauge of 6 ch per in (2.5 cm) sets the drops at 10, 14.5 and 19 in (25.4, 36.8 and 48.3 cm).
- The longest strand plus its 3.5 in (8.9 cm) snowflake reaches 28 in (71.1 cm).
If you check gauge first and confirm each checkpoint as you go, the scallops, loops and ornaments will line up exactly.
Optional: for a wider window, add scallops in 12-st steps (2.4 in / 6.1 cm each) and one strand per added scallop.
Happy crocheting!