

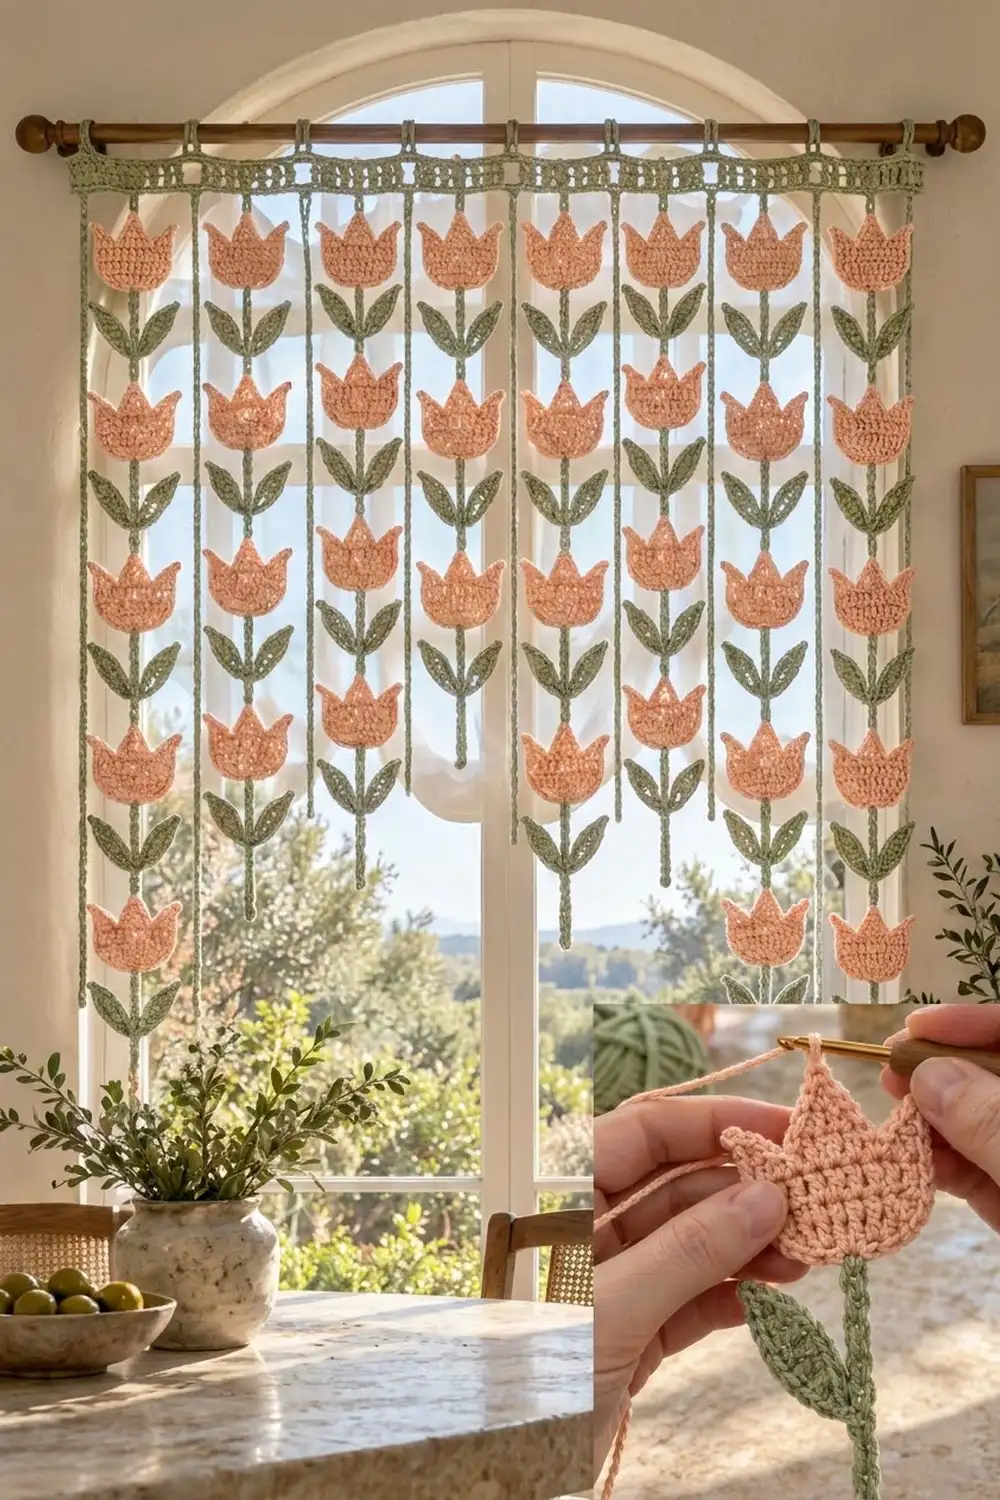
This curtain has rows of soft peach tulips on slim sage green stems, and each stem has a pair of pointed leaves just below its flower. Nine strands hang from a tabbed top band, so light comes through between the flowers and the curtain still frames the window.
The palette is just two colors: warm peach for the tulips and muted sage for the band, cords and leaves. The look is cottage-style and calm, and it suits a kitchen window, a pantry doorway or a sunny dining nook.
The pattern uses US crochet terms throughout. The finished curtain is 32 in (81.3 cm) wide. It hangs 45.5 in (115.6 cm) from the top of the band to the end of the longest strands and 33.5 in (85.1 cm) to the end of the shortest.
You will make 52 flat tulip motifs and nine cords, working the leaves straight off each cord as you go. Then you make one top band, sew the tulips onto the cords, attach the cords to the band, and finish with an edging round and rod tabs.
Finished Size and Construction
- Finished width: 32 in (81.3 cm)
- Finished length: 33.5–45.5 in (85.1–115.6 cm), staggered
- Skill level: Easy-intermediate
- Terminology: US
- Yarn weight: Worsted (#4) cotton
- Hook: 4.5 mm (US 7)
- Number of pieces: 52 tulips, 9 leafed cords, 1 top band
- Layout: 9 strands side by side, 3.5 in (8.9 cm) apart, center to center
- Tulip size: 3.25 in (8.3 cm) wide × 3 in (7.6 cm) tall
- Band before border: 31.5 × 2 in (80.0 × 5.1 cm)
- Border depth: 0.25 in (0.6 cm) on every edge
Materials
Use a smooth, mercerized or matte worsted-weight cotton. Cotton holds the petal points crisply and hangs straight without stretching. The quantities below assume about 78 m per 50 g.
- Peach: 250 g (390 m), for the tulips
- Sage green: 300 g (468 m), for the cords, leaves, band, border and tabs
Tools:
- 4.5 mm (US 7) hook
- Tapestry needle
- Locking stitch markers
- Rust-proof pins and blocking mats
- Spray bottle
- Measuring tape
- Curtain rod up to 0.75 in (1.9 cm) in diameter
All quantities include a margin of about 15–20% for gauge swatches and differences in tension.
Abbreviations (US Terms)
- ch – chain
- sl st – slip stitch
- sc – single crochet
- hdc – half double crochet
- dc – double crochet
- tr – treble crochet
- st(s) – stitch(es)
- RS / WS – right side / wrong side
Special stitch – Point: Ch 2, then sl st into the top of the last tall stitch you made. This makes a sharp tip on a petal or leaf.
Special technique – Back-bump cord: Work 1 sl st into the bump on the back of each chain. This gives a firm, round-looking cord that does not stretch.
Gauge and Checkpoints
- Hdc gauge: 16 sts and 12 rows = 4 in (10.2 cm)
- Cord gauge: 5 sts = 1 in (2.5 cm)
Make one complete tulip before anything else, and check it at each stage:
- After Row 1: 5 sts = 1.25 in (3.2 cm) wide
- After Row 4: 11 sts = 2.75 in (7.0 cm) wide
- After Row 5: 13 sts = 3.25 in (8.3 cm) wide
- After Row 7: about 2.33 in (5.9 cm) tall
- After Row 8: 3 in (7.6 cm) tall to the center point
Then work a 30-st sample of cord. After a gentle tug it should measure 6 in (15.2 cm).
If your tulip is wider than 3.25 in (8.3 cm), go down half a hook size. Wider tulips will crowd the 3.5 in (8.9 cm) strand spacing. If it is narrower, go up half a size. If only the cord is off, change hooks for the cord alone. Its length matters more than its thickness.
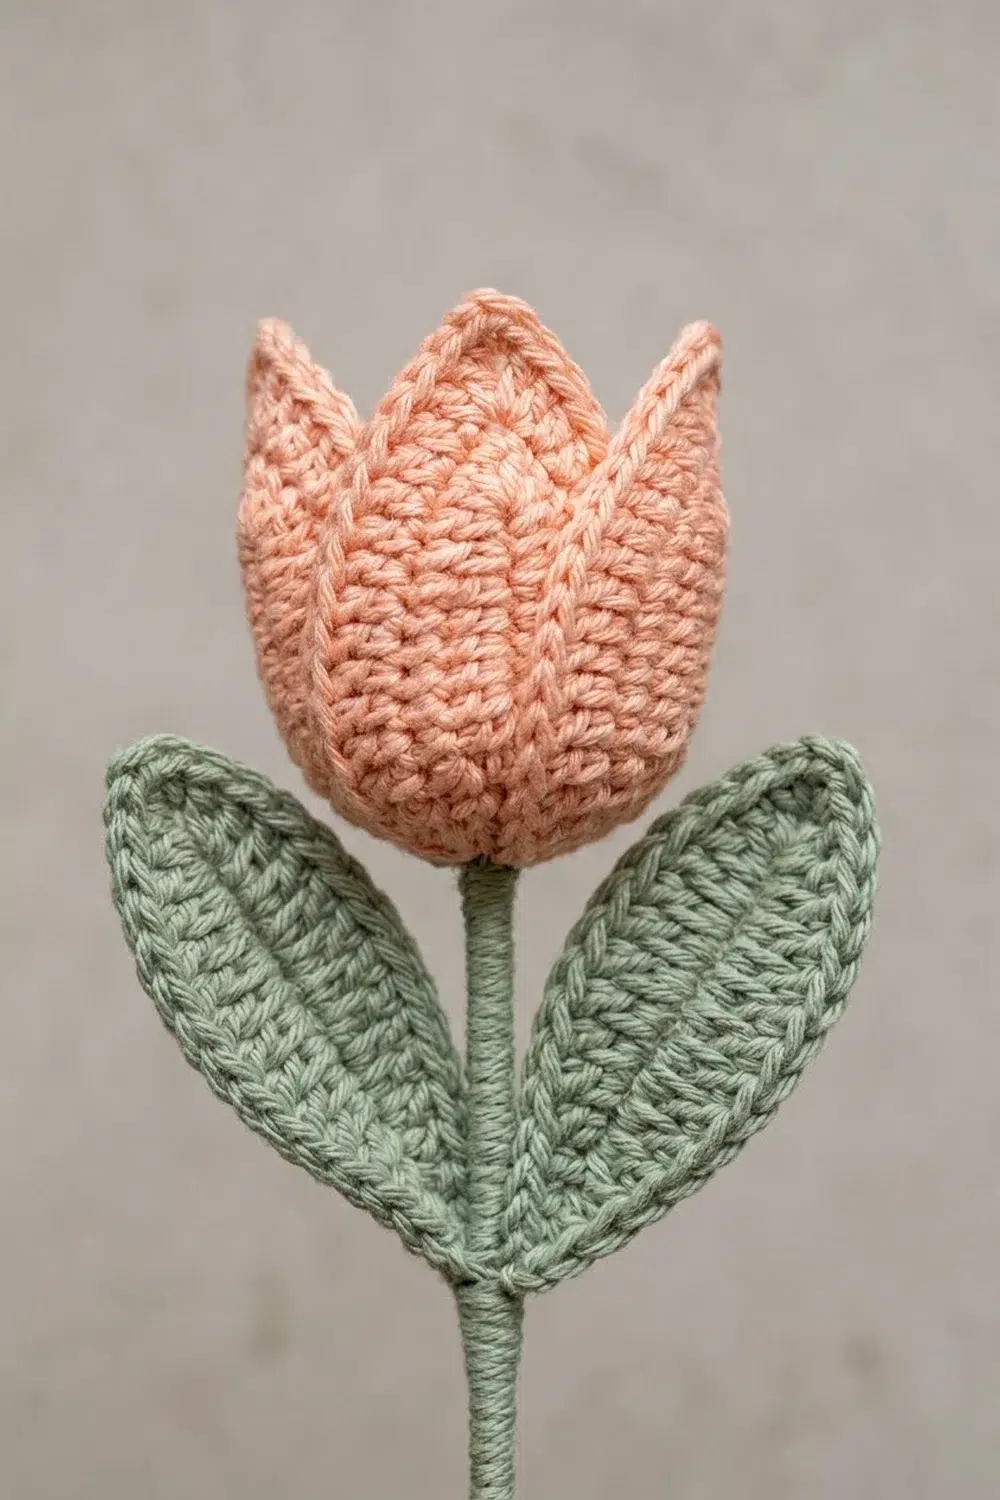
Tulip (Make 52 in Peach)
The tulip is worked flat from the base upward.
Row 1: Ch 7, hdc in 3rd ch from hook and in each ch across, turn. (5 hdc; the skipped ch does not count.)
Row 2: Ch 1 (does not count here or on later rows), 2 hdc in first st, hdc in next 3 sts, 2 hdc in last st, turn. (7 sts)
Row 3: Ch 1, 2 hdc in first st, hdc in next 5 sts, 2 hdc in last st, turn. (9 sts)
Row 4: Ch 1, 2 hdc in first st, hdc in next 7 sts, 2 hdc in last st, turn. (11 sts)
Row 5: Ch 1, 2 hdc in first st, hdc in next 9 sts, 2 hdc in last st, turn. (13 sts)
Rows 6–7: Ch 1, hdc in each st across, turn. (13 sts each)
Row 8 (petal row): This row turns 13 sts into three petals.
- Left petal: Ch 4 (counts as tr), tr in first st, Point. Dc in next st, hdc in next st, sc in next st.
- Valley: Sl st in next st (st 5).
- Center petal: Hdc in next st. In next st (st 7), work (dc, tr, Point, dc). Hdc in next st.
- Valley: Sl st in next st (st 9).
- Right petal: Sc in next st, hdc in next st, dc in next st. In last st, work (tr, tr, Point).
Count for Row 8: 13 sts worked 1 per existing st + 4 extra sts (1 in st 1, 2 in st 7, 1 in st 13) = 17 sts, plus 3 Points.
Fasten off and leave a 12 in (30.5 cm) tail for sewing. The tall-to-short gradient on each outer petal makes it flare outward, and the center petal stays upright.
Leafed Cord (Make 9 in Sage)
Each cord is chained from the top down, then worked back up from the bottom with sl sts. The leaf pairs are made off the cord as you climb.
Strand lengths (N = number of tulips):
| Strand length | Foundation ch | Cord sts (30N + 7) | Visible length |
|---|---|---|---|
| 7 tulips | 218 | 217 | 43 in (109.2 cm) |
| 6 tulips | 188 | 187 | 37 in (94.0 cm) |
| 5 tulips | 158 | 157 | 31 in (78.7 cm) |
The top 2 sts of each cord tuck behind the band, so the visible length is (30N + 5) sts ÷ 5.
Leaf (worked off the cord):
- Ch 9.
- Sl st in the back bump of the 2nd ch from hook and of the next 7 ch. This makes 8 sl sts that form the vein, and your hook is back at the cord.
- Working into the free loops of the same chain, toward the tip: sc, hdc, dc in next 3, hdc, sc, sl st. (8 sts)
- Point.
- Working down the other side of the vein: sl st, sc, hdc, dc in next 3, hdc, sc. (8 sts)
- Sl st into the same cord st.
Each leaf has 16 sts plus 1 Point and measures about 1.75 in (4.4 cm) long.
Leaf pair: Make 1 leaf, then make a second leaf from the same cord st.
Cord:
- Ch the foundation length for your strand.
- Sl st in the back bump of the 2nd ch from hook and of the next 4 ch. (5 sts: 1 in / 2.5 cm bottom tail)
- Leaf pair.
- Sl st in the back bump of the next 30 ch, leaf pair. Repeat from * N − 1 times.
- Sl st in the back bump of the last 32 ch.
Fasten off and leave an 8 in (20.3 cm) tail.
Check: Count sts on the finished cord: 5 + 30 × (N − 1) + 32 = 30N + 7. Count leaf pairs: there should be N.
Make All Pieces
- Peach: 52 tulips
- Sage: 2 cords with 7 tulip positions, 3 with 6, and 4 with 5 (52 leaf pairs in total), plus 1 top band
Layout, viewed from the front (T = tulip):
Strand:   1  2  3  4  5  6  7  8  9
Tulip 1:  T  T  T  T  T  T  T  T  T
Tulip 2:  T  T  T  T  T  T  T  T  T
Tulip 3:  T  T  T  T  T  T  T  T  T
Tulip 4:  T  T  T  T  T  T  T  T  T
Tulip 5:  T  T  T  T  T  T  T  T  T
Tulip 6:  T  .  T  .  T  .  T  .  T
Tulip 7:  T  .  .  .  .  .  .  .  T
Total: 45 + 5 + 2 = 52 tulips.
Placing tulips on a cord: Lay the cord flat with the leaves pointing up and out at about 45°. Center a tulip RS up over the cord so that the middle of Row 1 sits 5 cord sts (1 in / 2.5 cm) above the leaf pair. The tulip covers the next 15 cord sts, and its center point lands 20 sts above the leaves.
With the peach tail, tack the tulip to the cord at three places: st 3 of Row 1, st 6 of Row 4 and st 7 of Row 7. Weave the tail in on the back.
Top Band (1 in Sage)
Foundation: Ch 128, hdc in 3rd ch from hook and in each ch across, turn. (126 hdc)
Rows 2–6: Ch 1, hdc in each st across, turn. (126 sts each)
Checkpoint: 31.5 × 2 in (80.0 × 5.1 cm). Fasten off.
The band is divided into 9 slots of 14 sts each (9 × 14 = 126). Each slot is 3.5 in (8.9 cm) wide, which matches the 3.25 in (8.3 cm) tulip plus a 0.25 in (0.6 cm) gap.
Joining
Method: Whipstitch the top of each cord to the band, then lock it in place with the border.
Stitch-to-stitch logic: Each strand hangs at the center of its slot, which is the gap between sts 7 and 8 of that slot. Count across the foundation edge from the right with the RS facing you. The joining gaps fall between these sts:
- 7/8 and 21/22
- 35/36 and 49/50
- 63/64 and 77/78
- 91/92 and 105/106
- 119/120
These positions are mirror-symmetric, so it doesn’t matter which end you count from.
Place the strands in this order, from strand 1 to strand 9:
| Strand | 1 | 2 | 3 | 4 | 5 | 6 | 7 | 8 | 9 |
|---|---|---|---|---|---|---|---|---|---|
| Tulips | 7 | 5 | 6 | 5 | 6 | 5 | 6 | 5 | 7 |
To attach a strand:
- Pass the top of the cord through its gap from front to back.
- Lay the top 2 cord sts flat against the WS of Row 1.
- Whipstitch them down with the cord tail, using 4 stitches.
Tension: Hang the band first and let each strand drop freely before you sew it. Sew snugly, but don’t tighten so much that the band edge puckers.
Checkpoint: All first tulips should line up along one level row, 2 in (5.1 cm) below the band.
Border
Border gauge: 4 sc = 1 in (2.5 cm). This matches the hdc stitch width, so 1 sc per hdc keeps the band flat.
Round 1: Join sage in the last st of Row 6. Work sc around the whole band as follows:
- Corner sts: Work 3 sc into each corner st. On each long edge, the corner sts are band sts 1 and 126.
- Top edge: Sc in each of sts 2–125. (124 sc)
- Each short side: Work 1 sc in each of the 6 row ends, plus 1 extra sc in the row ends of Rows 2 and 5. (6 + 2 = 8 sc)
- Bottom edge: Sc in each of the free foundation loops of sts 2–125. (124 sc) Where a cord passes through, work the sc through both the band and the cord to lock it.
Sl st to the first sc. Round 1 is a trim round, so count it as sts worked 1 per existing st plus extras: 252 (long edges) + 16 (short sides) + 8 extra (2 per corner) = 276 sc. Check by sides: 124 + 124 + 8 + 8 + (4 × 3) = 276.
Why the math works: The short sides are 2 in (5.1 cm) tall and take 8 sc at 4 sc per inch. The long edges keep 1 sc per hdc, so the width only grows by the border depth: 31.5 in + 0.25 in + 0.25 in = 32 in (81.3 cm).
Tabs (make 10): Number the 124 top-edge sc between the corner groups from 1 to 124. Place tabs on these sc:
- 1–4
- 12–15
- 26–29
- 40–43
- 54–57
- 68–71
- 82–85
- 96–99
- 110–113
- 121–124
The eight inner tabs sit over the boundaries between slots. Check the count across the top edge: 2 end tabs of 4 sts, 2 end gaps of 7 sts, 8 inner tabs of 4 sts and 7 inner gaps of 10 sts give 4 + 7 + 32 + 70 + 7 + 4 = 124.
For each tab:
- Row 1: Join sage, sc in the 4 tab sts, turn.
- Rows 2–14: Ch 1, sc in each st, turn. (4 sc each)
The tab is about 3.1 in (7.9 cm) long. Fold it to the WS and whipstitch the last row along band Row 3. The loop fits a rod up to 0.75 in (1.9 cm) thick.
Final Blocking
- Weave in all remaining ends. Leave the band off the rod.
- Lay the curtain flat on mats, RS up.
- Mist all the pieces until they are evenly damp but not dripping.
- Pin the band to 32 × 2.5 in (81.3 × 6.4 cm).
- Pin each cord straight down from its gap, with the strands 3.5 in (8.9 cm) apart.
- Pin each tulip to 3.25 × 3 in (8.3 × 7.6 cm). Put one pin in each of the 3 Points: the center one straight up and the outer two flaring outward.
- Pin each leaf at about 45° from the cord, with a pin in its Point.
- Let everything dry completely, then unpin and hang.
Final Quality-Control Checklist
- [ ] There are 52 tulips, each with 13 sts in Rows 5–7 and 17 sts plus 3 Points in Row 8.
- [ ] Every tulip measures 3.25 × 3 in (8.3 × 7.6 cm).
- [ ] Each cord has the correct number of sts (217, 187 or 157) and one leaf pair per tulip.
- [ ] Each tulip base sits 1 in (2.5 cm) above its leaves.
- [ ] The band measures 126 sts and 6 rows before the border.
- [ ] The border round has 276 sc.
- [ ] There are 10 tabs of 14 rows each, evenly placed.
- [ ] The tulips form level horizontal rows, and the strand lengths match the layout grid.
- [ ] All ends are woven in on the WS.
Troubleshooting
- Tulips curl at the sides: Your hdc tension is tight. Go up half a hook size or block more firmly.
- Points are blunt: Pull the Point sl st snug, and pin the tips while blocking.
- Cord stretches or twists: Make sure you’re working into the back bumps, not the top loops. Steam lightly and let the cord hang with weight on it.
- Tulip rows don’t line up: Recount the 32-st top segment and the 30-st repeats. One missing st per repeat adds up over a strand.
- Band ripples at the bottom: You have worked extra sc around the cords. Keep exactly 1 sc per foundation st.
- Leaves droop: Work the vein sl sts firmly, then block the leaves at 45°.
Care
Hand wash in cool water with mild soap, roll in a towel and dry flat, reshaping the tulips and leaves. Avoid hanging the curtain while wet, because the strands will stretch.
Final Notes
Everything in this pattern scales from two gauges. At 16 hdc = 4 in, a 13-st tulip is 3.25 in (8.3 cm) wide. It fits a 14-st slot of 3.5 in (8.9 cm), and nine slots give a 126-st band of 31.5 in (80.0 cm), which the border brings to 32 in (81.3 cm). At 5 cord sts per inch, each 30-st repeat spaces the tulips 6 in (15.2 cm) apart, so every row of flowers lines up across the window. If you check your gauge at each checkpoint, the finished curtain will hang straight and evenly.
Happy crocheting!