

This curtain is a soft winter forest you can hang in a window. Thirteen cream cords drop from a lacy cream header. Each cord carries a column of small blush pink Christmas trees, with a round cream bead between trees. The trees are made of scalloped fans with cream bobbles between them, so each one looks like it is dotted with snow or ornaments.
The palette is two colors: blush pink for the trees and cream for the bobbles, cords, beads, and header. Against a dark window the pink glows warm, and in daylight it reads cozy and quiet. The pattern uses US crochet terms throughout.
The finished curtain measures 43.4 in (110.2 cm) wide and about 50 in (127.0 cm) long from the top of the header to the bottom of the lowest tree. Each tree is 4 1/4 in (10.8 cm) wide and 4 in (10.2 cm) tall.
The construction is modular. You crochet 98 identical trees top-down in rows, with the bobbles worked in as you go. Next you make the header as one flat lace band. Last, you chain each cord down from the header and attach the trees to it one at a time. Neighboring cords are staggered by half a tree spacing, so the trees nest together without overlapping.
Finished Size and Construction
- Finished size: 43.4 in (110.2 cm) wide x about 50 in (127.0 cm) long
- Skill level: Intermediate (two-color bobbles, a lot of repetition)
- Terminology: US crochet terms
- Yarn weight: DK (light, #3)
- Hook: 3.5 mm (US E-4)
- Number of pieces: 98 tree motifs, 1 header, 13 cords
- Layout: 13 cords; odd-numbered cords carry 8 trees, even-numbered cords carry 7
- Piece size: one tree is 4 1/4 in (10.8 cm) wide x 4 in (10.2 cm) tall
- Header size before shell edge: 43.4 in (110.2 cm) x 1 1/2 in (3.8 cm)
- Shell edge depth: 1/2 in (1.3 cm), so the full header is 2 in (5.1 cm) deep
Materials
Pick a smooth DK cotton or cotton blend. Cotton holds the fan shapes crisply, keeps the bobbles round, and hangs straight without stretching. Avoid fuzzy yarns, because the fans lose definition.
- Blush pink (trees): 350 g, about 790 m (at 225 m per 100 g)
- Cream (bobbles, cords, beads, header): 250 g, about 560 m
Both quantities include roughly a 15% margin for swatching, gauge differences, and weaving in ends.
Tools:
- 3.5 mm (US E-4) crochet hook
- Tapestry needle
- Scissors
- 13 locking stitch markers
- Blocking mats, rust-proof pins, and a spray bottle
- A curtain rod or tension rod up to 1/2 in (1.3 cm) across, or 13 curtain clip rings
Abbreviations (US Terms)
- ch – chain
- sl st – slip stitch
- sc – single crochet
- dc – double crochet
- sk – skip
- sp(s) – space(s)
- st(s) – stitch(es)
- RS / WS – right side / wrong side
- rep – repeat
Special stitches
- Bobble (bob): [yo, insert hook in st, yo, pull up a loop, yo, draw through 2 loops] 4 times, yo, draw through all 5 loops on hook. One bob counts as 1 st.
- Fan: 7 dc worked into the same ch-sp or ring.
- Cord bead: ch 3, bob in 3rd ch from hook. The bead sits on the cord as a small cream ball.
- Color change: finish the last stitch before the change by working its final yo with the new color. Carry the unused color along the top of the row and work over it.
Gauge and Checkpoints
- Header gauge: 20 sc and 24 rows = 4 in (10.2 cm)
- Cord gauge: 5 ch = 1 in (2.5 cm)
- Tree: 4 1/4 in (10.8 cm) wide x 4 in (10.2 cm) tall, measured flat after blocking
Make one test tree before starting the batch, and measure it at each checkpoint:
- After Row 1: 1 1/4 in (3.2 cm) wide x 1 in (2.5 cm) tall
- After Row 3: 2 1/4 in (5.7 cm) wide x 2 in (5.1 cm) tall
- After Row 5: 3 1/4 in (8.3 cm) wide x 3 in (7.6 cm) tall
- After Row 7: 4 1/4 in (10.8 cm) wide x 4 in (10.2 cm) tall
If your tree is more than 1/4 in (0.6 cm) too big, go down half a hook size. If it is too small, go up half a size. Trees that come out a little wide still fit, because of the stagger. Trees that come out too tall change the curtain length by up to 8 times the difference on the longest cords, so it’s important to match the height.
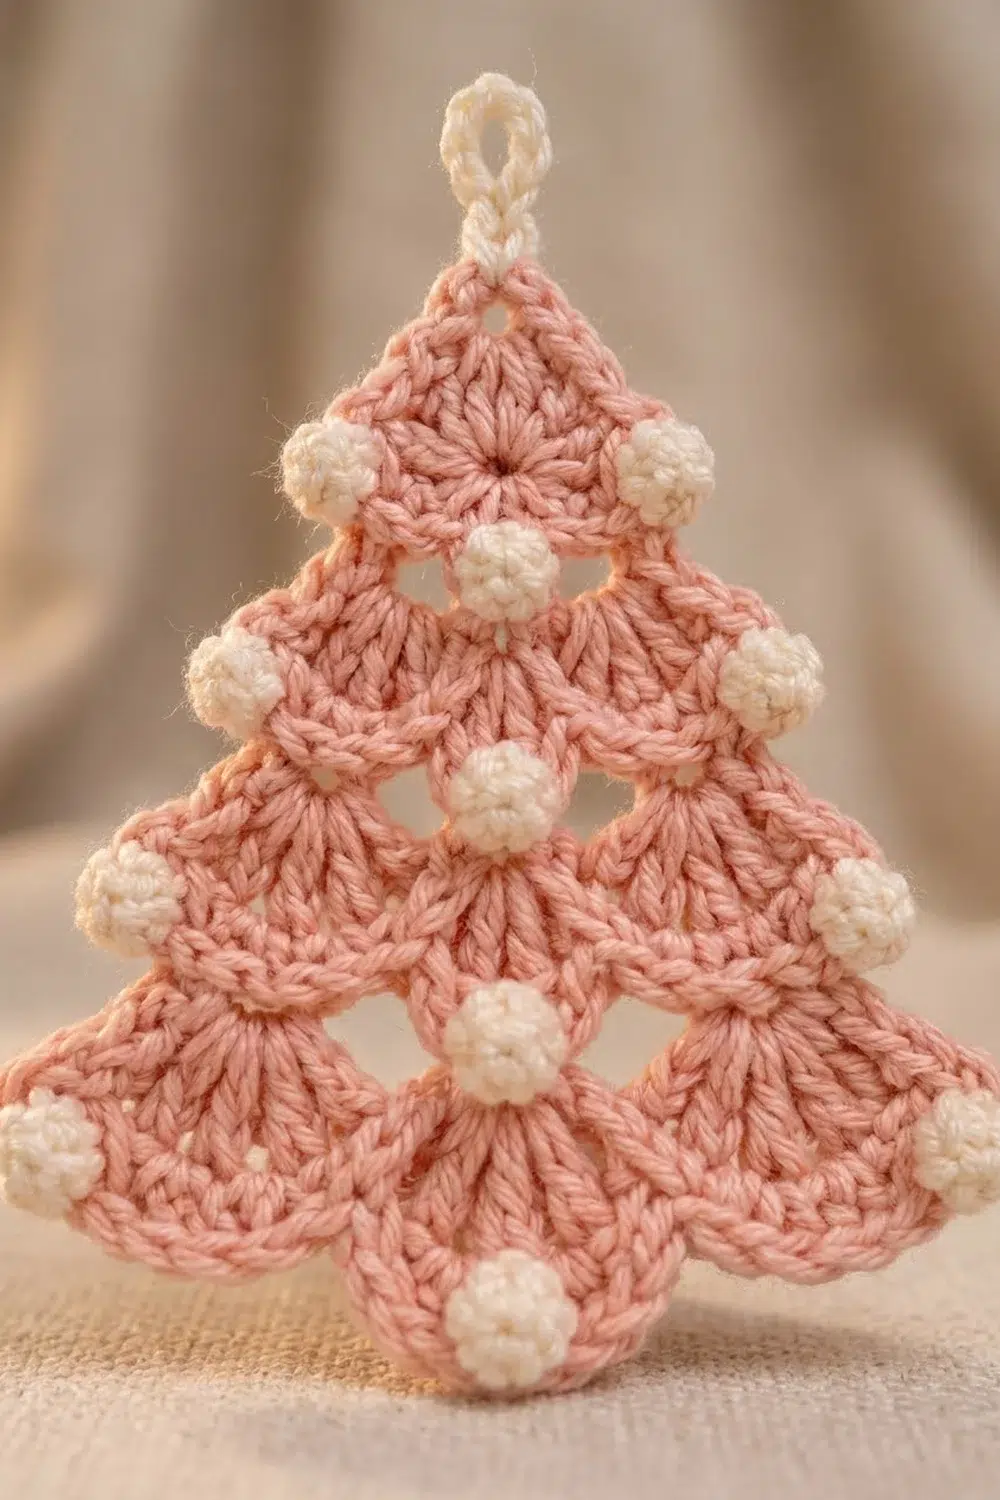
Tree Motif (make 98)
Every tree is worked top-down. The fan rows are WS rows, so the bobbles pop out toward the RS.
Row 1 (WS): With pink, ch 4, sl st in first ch to form a ring. Ch 3 (counts as dc), 6 dc in ring. Turn. (7 dc = 1 fan)
Row 2 (RS): Ch 1, sc in first dc, ch 3, sk 2 dc, sc in next dc (center of fan), ch 3, sk 2 dc, sc in top of turning ch. Lay the cream tail along the top of the row and work over it as you go. Change to cream on the last yo of the final sc. Turn. (3 sc, 2 ch-3 sps)
Row 3 (WS): With cream, ch 2 (does not count), bob in first sc. Change to pink: 7 dc in ch-3 sp. Change to cream: bob in next sc. Change to pink: 7 dc in next ch-3 sp. Change to cream: bob in last sc. Change to pink on the final yo. Turn. (2 fans + 3 bobs = 17 sts)
Row 4 (RS): With pink, carrying the cream across the row, ch 1, sc in first bob, ch 3, sc in 4th dc of next fan, ch 5, sk the center bob, sc in 4th dc of next fan, ch 3, sc in last bob. Change to cream on the last yo. Turn. (4 sc, 3 ch-sps: ch-3, ch-5, ch-3)
Row 5 (WS): Ch 2, bob in first sc, with pink 7 dc in next ch-sp, with cream bob in next sc; rep from * 2 more times. Turn. (3 fans + 4 bobs = 25 sts)
Row 6 (RS): With pink, ch 1, sc in first bob, ch 3, sc in 4th dc of next fan, [ch 5, sk next bob, sc in 4th dc of next fan] twice, ch 3, sc in last bob. Change to cream. Turn. (5 sc, 4 ch-sps: ch-3, ch-5, ch-5, ch-3)
Row 7 (WS): Ch 2, bob in first sc, with pink 7 dc in next ch-sp, with cream bob in next sc; rep from * 3 more times. (4 fans + 5 bobs = 33 sts)
Fasten off both colors and weave in ends. Each tree has 10 fans (1 + 2 + 3 + 4) and 12 bobbles (3 + 4 + 5). The ch-5 spaces pass over the inner bobbles, so each fan in the next tier sits directly above a bobble. That gives the tree its staggered, ornament-dotted look.
Pin each tree to 4 1/4 x 4 in (10.8 x 10.2 cm), mist, and let it dry before assembly. Flat trees are much easier to attach evenly.
Make All Pieces
- Trees: 98 in total; 7 odd cords x 8 trees = 56, plus 6 even cords x 7 trees = 42
- Per tree: about 3 g pink and 1.5 g cream
- Header: 1, in cream
- Cords: 13, in cream, chained directly from the header during joining
Layout grid (T = tree, | = cord only; each line is a 3 in / 7.6 cm band):
Cord:    1  2  3  4  5  6  7  8  9 10 11 12 13
Band 1:  T  |  T  |  T  |  T  |  T  |  T  |  T
Band 2:  |  T  |  T  |  T  |  T  |  T  |  T  |
Band 3:  T  |  T  |  T  |  T  |  T  |  T  |  T
  ... alternate the same way down to ...
Band 14: |  T  |  T  |  T  |  T  |  T  |  T  |
Band 15: T  .  T  .  T  .  T  .  T  .  T  .  T
Odd cords carry trees in bands 1, 3, 5 … 15 (8 trees). Even cords carry trees in bands 2, 4 … 14 (7 trees).
Joining: Cords and Trees
The cords hang from the header’s shell edge, so make the header first (see the next section). Then come back here.
Placing the cords: Row 10 of the header has 37 sc between and beside its shells. Put a marker in sc 1, 4, 7, 10, 13, 16, 19, 22, 25, 28, 31, 34, and 37. That is every 3rd sc, which is 18 header sts or 3.6 in (9.1 cm) apart. Cord 1 hangs from the first st of the row and cord 13 from the last.
Each cord, worked top to bottom:
- With cream, join with sl st in a marked sc. For odd cords, ch 10 (2 in / 5.1 cm). For even cords, ch 25 (5 in / 12.7 cm).
- Attach a tree: With the tree’s RS facing you, insert the hook through the Row 1 ring from front to back, yo, and pull through the ring and the loop on the hook. The cream cord now shows as a hanging loop at the tree tip.
- Ch 17 (about 3.4 in / 8.6 cm) behind the tree. Then sl st into the back of the center bob of Row 7 (the 3rd of 5 bobs).
- Gap: Ch 5, cord bead, ch 4. That gives a visible gap of about 2 in (5.1 cm) between trees.
- Repeat steps 2–4 until the cord holds its trees (8 for odd cords, 7 for even). After the last tree, work ch 5 and a cord bead in place of step 4, then fasten off.
Stitch logic: The cord touches each tree at exactly 2 points: the ring and the center bottom bobble. That keeps the tree flat and stops it from spinning. The ch 17 should lie flat behind the tree. If the tree puckers, add 1 ch; if the cord sags, remove 1.
Tension advice: Chain at the same tension as your gauge swatch. Chains that are too tight shorten every cord, and the stagger stops lining up.
Length checkpoint: Odd cords measure 2 + (8 x 4) + (7 x 2) = 48 in (121.9 cm) from the header to the bottom of the last tree. Even cords measure 5 + (7 x 4) + (6 x 2) = 45 in (114.3 cm). Hang each cord as you finish it and check before moving on.
Border: Lace Header
The header plays the role of a border. It sets the width, carries the rod, and spaces the cords.
Header gauge: 20 sc = 4 in (10.2 cm), so 217 sts = 43.4 in (110.2 cm).
Row 1: With cream, ch 218, sc in 2nd ch from hook and in each ch across. Turn. (217 sc)
Rows 2–5: Ch 1, sc in each st across. Turn. (217 sc)
Row 6 (rod mesh): Ch 1, sc in first st, ch 3, sk 2, sc in next st; rep from * 71 more times. Turn. (73 sc + 72 ch-3 sps)
Row 7 (conversion): Ch 1, sc in first sc, 2 sc in ch-3 sp, sc in next sc; rep from * 71 more times. Turn. (73 sc worked 1 per sc + 144 sc worked in spaces = 217 sc)
Rows 8–9: Ch 1, sc in each st across. Turn. (217 sc)
Checkpoint: the header should now measure 43.4 x 1 1/2 in (110.2 x 3.8 cm).
Row 10 (shell edge): Ch 1, sc in first st, sk 2, 5 dc in next st, sk 2, sc in next st; rep from * 35 more times. Fasten off. (36 shells of 5 dc + 37 sc = 217 sts)
Why the math works: 217 = (36 x 6) + 1, so the 6-st shell repeat ends on a sc. 217 = (72 x 3) + 1, so the mesh ends on a sc too. The cords sit every 3rd sc, or every 18 sts. That gives 12 spaces x 18 = 216 sts plus the first st, which is 217 again. So cord 1 and cord 13 land exactly on the two outer edges. With 3.6 in (9.1 cm) between cords and a 3 in (7.6 cm) vertical stagger, a wide tree base always sits beside a narrow tree tip. That is why the trees nest without overlapping.
Final Blocking
- Lay the header flat, WS up. Pin it to 43.4 x 2 in (110.2 x 5.1 cm), opening each shell into a scallop.
- Mist the header and let it dry completely.
- Hang the curtain from its rod by weaving the rod over and under the Row 6 mesh spaces. You can also clip rings to the top edge, one at each cord position.
- Mist the cords lightly while they hang. Their own weight straightens them.
- Hold each tree flat with your palm while it is damp and nudge the fans into even scallops.
- Leave it to dry hanging, with nothing touching the trees.
Final Quality-Control Checklist
- 98 trees, each 4 1/4 x 4 in (10.8 x 10.2 cm), with 10 fans and 12 bobbles
- All bobbles pop to the RS
- Header 217 sts wide with 36 shells and 37 sc on Row 10
- 13 cords, one on every 3rd sc of Row 10, including both end stitches
- Odd cords: 8 trees, 48 in (121.9 cm); even cords: 7 trees, 45 in (114.3 cm)
- Each tree is attached at the ring and at the center bottom bobble
- One cord bead in every gap and one at the end of each cord
- All ends woven in on the WS
Troubleshooting
- Bobbles sink to the back: You worked a fan row on the RS. Fan rows (1, 3, 5, 7) are WS rows.
- Tree edges curl: Your ch-3 edge spaces are too tight. Chain more loosely or make them ch 4.
- Cream shows through the fans: Keep the carried strand snug along the top of the row and wrap the dc firmly around it.
- Tree tilts on the cord: The bottom sl st missed the center bob. Count the bobs and reattach at the 3rd of 5.
- Cords end at different lengths: Check chain tension, then re-measure the gaps against the 2 in (5.1 cm) target.
- Header ripples: The foundation chain is too tight. Redo it with a hook one size larger.
Care
Hand wash in cool water with mild soap, roll it in a towel, and dry it hanging. Do not tumble dry, since the cords can tangle.
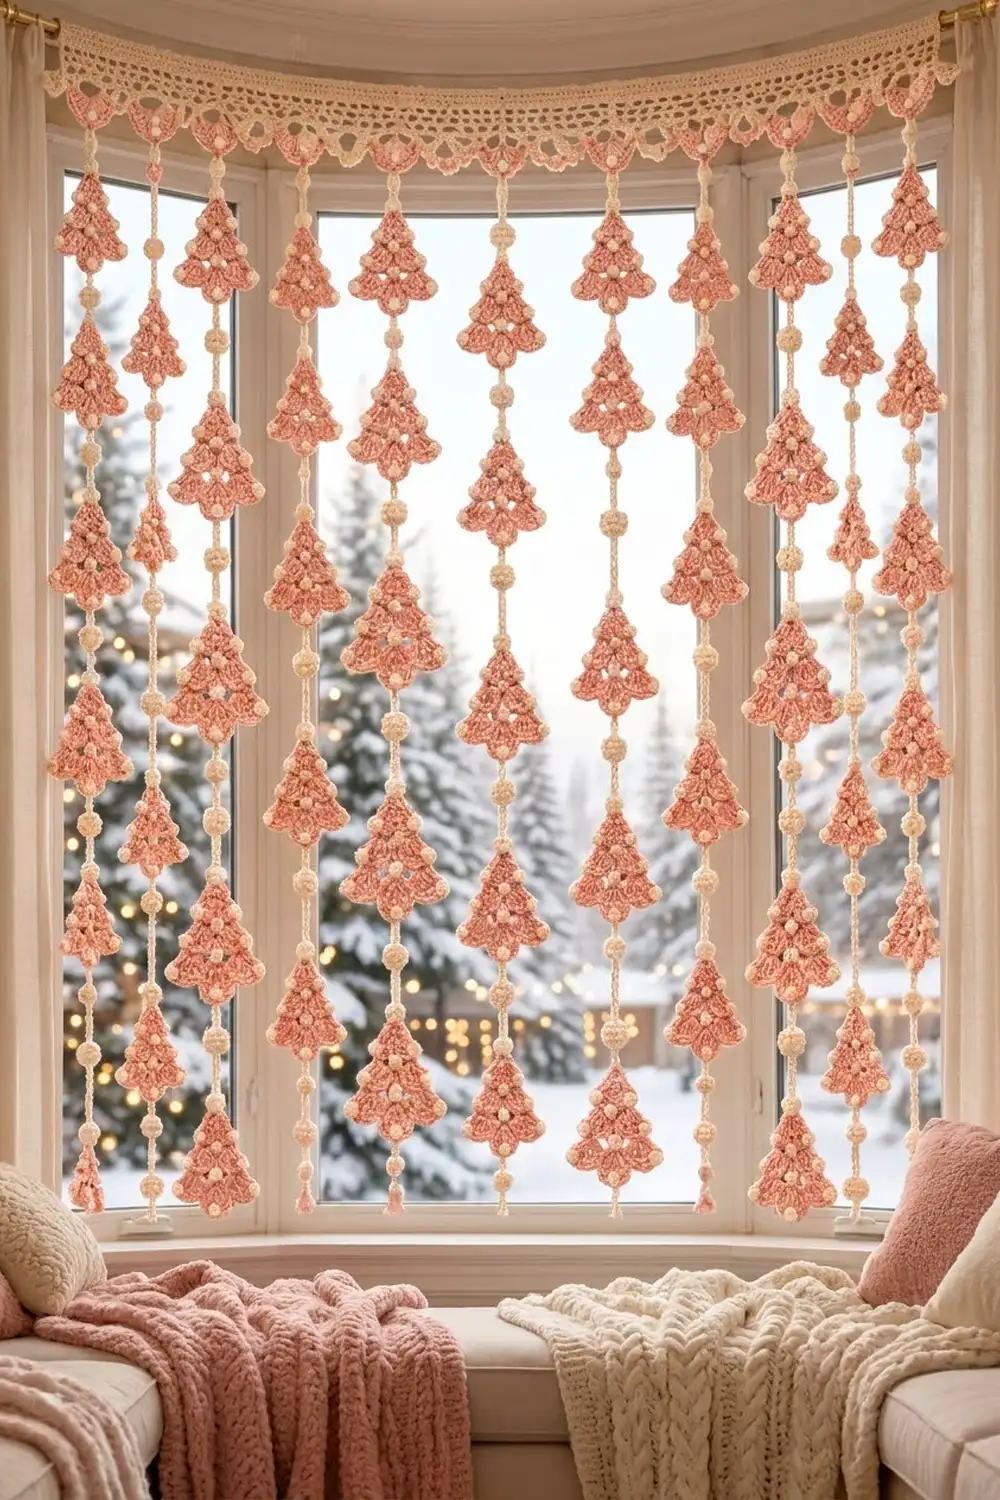
Final Notes
Everything comes down to one chain of measurements. The tree grows by 1 in (2.5 cm) of width and 1 in (2.5 cm) of height per tier, ending at 4 1/4 x 4 in (10.8 x 10.2 cm). The gaps add 2 in (5.1 cm) between trees, which gives a 6 in (15.2 cm) repeat. Cords are staggered by half that, 3 in (7.6 cm). The 217-st header spaces the 13 cords 3.6 in (9.1 cm) apart across 43.4 in (110.2 cm), and the finished curtain hangs about 50 in (127.0 cm) long. Get the first tree to gauge and everything after it will line up.
Happy crocheting!