

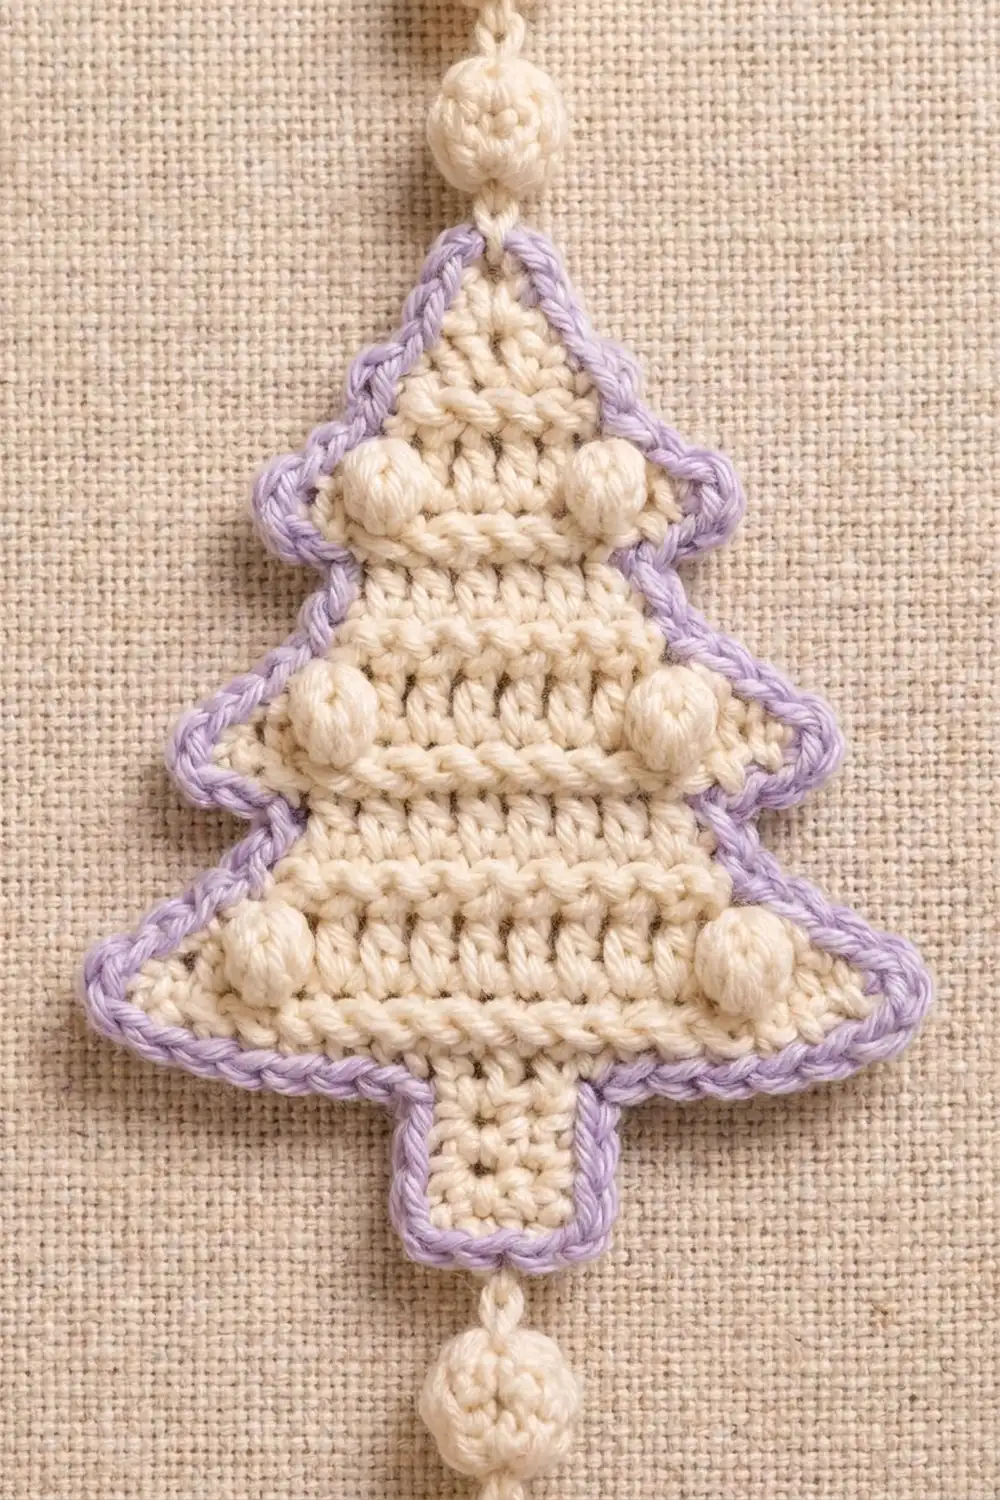
This little tree is one flat motif with a lot of texture. The cream body is worked in rows with a raised ridge on every row. Small bobbles sit near the tier tips and down the center like snow-dusted ornaments. A pale lavender crab-stitch edge outlines the whole shape and makes it stand out.
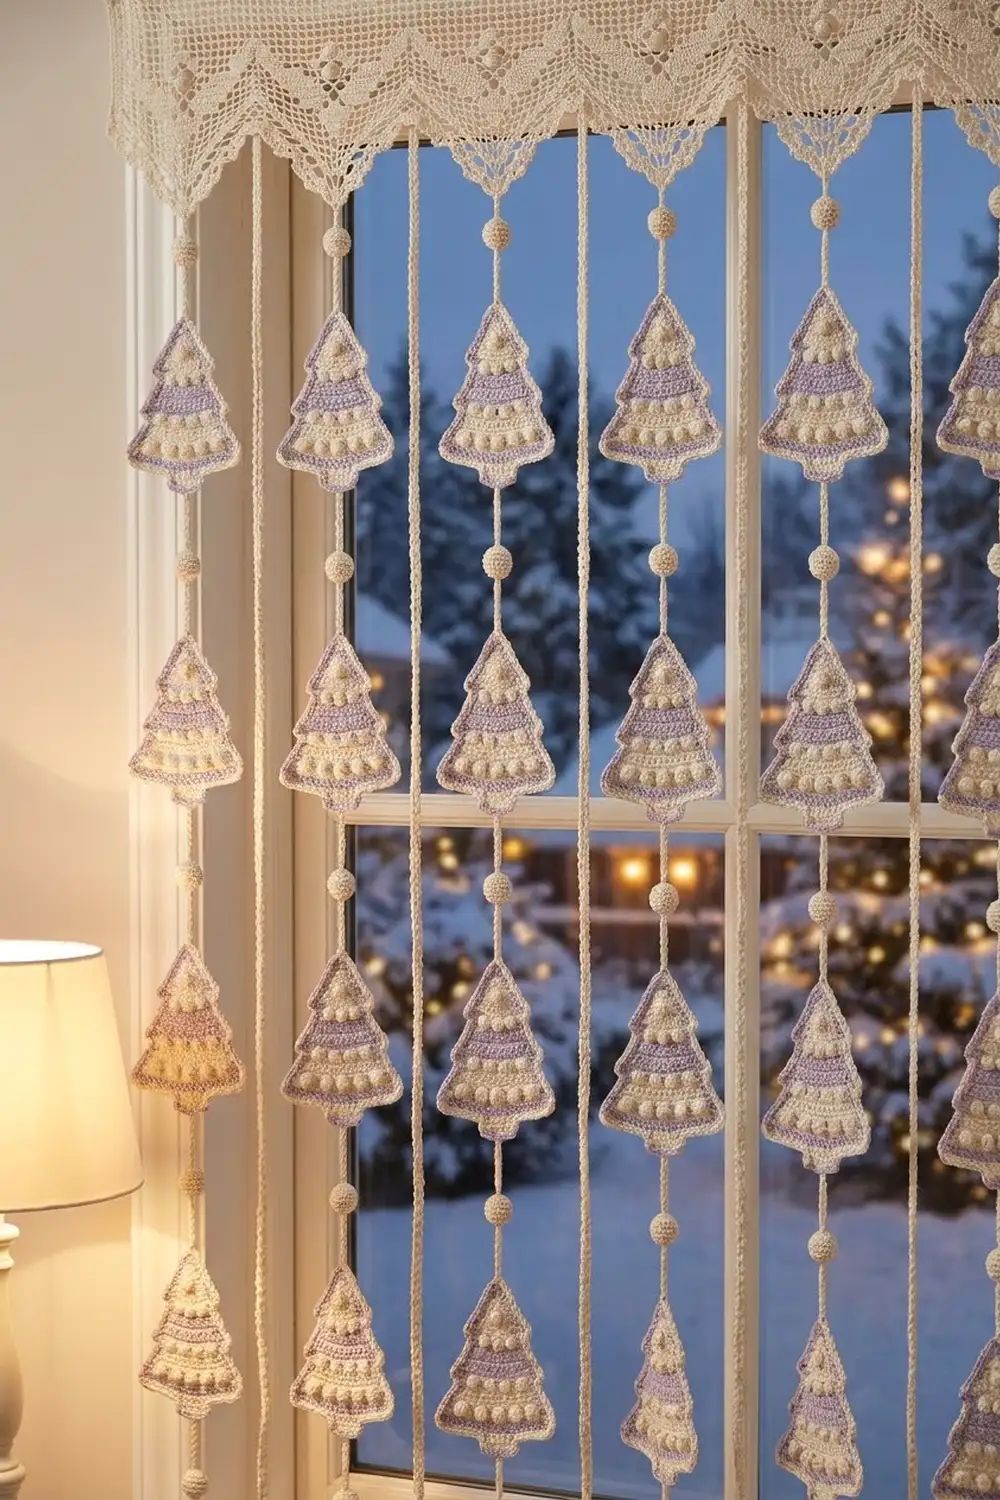
The design is cozy and wintry, with a slightly vintage look. You can use it as a tree ornament, a gift tag, or a window hanging. A small stuffed bead ball sits on a short chain above the peak, and another hangs below the trunk.
The pattern uses US crochet terms. The finished motif measures 3.75 in (9.5 cm) wide and 5.5 in (14.0 cm) tall including the border. That size doesn’t include the hanger and bead balls.
Construction is simple. You work the tree top-down in rows of half double crochet. Each tier grows by increasing at both ends, then you slip stitch inward to start the next, narrower tier. A short trunk comes last. Then you add two lavender border rounds, make two bead balls, and attach them with chains.
Finished Size and Construction
- Finished size: 3.75 in (9.5 cm) wide x 5.5 in (14.0 cm) tall, border included
- Skill level: Advanced beginner
- Terminology: US crochet terms
- Yarn weight: DK (#3), cotton or cotton blend
- Hook: 4.0 mm (G-6)
- Number of pieces: 1 tree motif, plus 2 small bead balls for the hanger
- Layout: single stand-alone motif (no joining)
- Piece size before border: 3.25 in (8.3 cm) wide x 5.0 in (12.7 cm) tall
- Border depth: 0.25 in (0.6 cm) on every side, 2 rounds
- Bead ball diameter: about 0.75 in (1.9 cm)
Materials
Choose a smooth DK cotton or cotton blend. Cotton shows the ridges and bobbles clearly and holds the stepped outline after blocking. Avoid fuzzy or very splitty yarn, because the crab-stitch edge needs clean stitches.
- Cream (Color A): 10 g, about 23 m (tree body, bead balls, hanger chains)
- Pale lavender (Color B): 5 g, about 11 m (border)
These quantities include a margin of roughly 30 percent, so one small ball of each color is plenty.
Tools:
- 4.0 mm (G-6) crochet hook
- Tapestry needle
- Scissors
- Small amount of polyester fiberfill
- Stitch markers (2)
- Ruler or tape measure
- Pins and a blocking mat or folded towel
- Spray bottle with water
Abbreviations (US Terms)
- ch: chain
- sl st: slip stitch
- sc: single crochet
- hdc: half double crochet
- dc: double crochet
- rev sc: reverse single crochet (crab stitch)
- sc2tog: single crochet 2 together
- BLO / FLO: back loop only / front loop only
- MR: magic ring
- st(s): stitch(es)
- RS / WS: right side / wrong side
Special stitches
- Bobble (bob): Yarn over, insert the hook in the indicated loop, pull up a loop, yarn over, pull through 2 loops. Repeat 3 more times in the same loop (5 loops on hook). Yarn over, pull through all 5 loops. Work bobbles on WS rows so they pop out on the RS. A bobble counts as 1 st.
- Ridged hdc: On RS (odd) rows, work hdc in BLO. On WS (even) rows, work hdc in FLO. Both leave the unused loop on the RS, which creates a ridge on every row.
- Reverse single crochet (rev sc): Working from left to right (for right-handers), insert the hook in the next st to the right, pull up a loop, yarn over, pull through both loops.
Gauge and Checkpoints
Gauge: 16 ridged hdc x 12 rows = 4 in (10.2 cm). That is 4 sts and 3 rows per 1 in (2.5 cm).
Make one tree before you commit to a batch. The motif is small, so it doubles as your gauge swatch. Measure it flat, without stretching.
Checkpoints:
- After Row 4: width 9 sts = 2.25 in (5.7 cm)
- After Row 6: height 2 in (5.1 cm)
- After Row 8: width 11 sts = 2.75 in (7.0 cm)
- After Row 12: width 13 sts = 3.25 in (8.3 cm), height 4 in (10.2 cm)
- After Row 15: height 5.0 in (12.7 cm), trunk width 5 sts = 1.25 in (3.2 cm)
- After border: 3.75 in (9.5 cm) x 5.5 in (14.0 cm)
If your tree is too big, go down a hook size to 3.75 mm. If it is too small, go up to 4.5 mm. If the width is right but the height is off, check your hdc height and pull the first loop up to the same height on every stitch. Don’t change stitch counts to fix the size, because the shape depends on them.
Tree Body
Use Color A. The ch 2 at the start of each row does not count as a stitch. To increase, work 2 hdc in the first and last st.
Tier 1
Row 1 (RS): Ch 3, 3 hdc in 3rd ch from hook. Ch 2, turn. (3 sts)
Row 2 (WS): Working in FLO, 2 hdc in first st, hdc in next st, 2 hdc in last st. Ch 2, turn. (5 sts)
Row 3 (RS): Working in BLO, 2 hdc in first st, hdc in next 3 sts, 2 hdc in last st. Ch 2, turn. (7 sts)
Row 4 (WS): Working in FLO, 2 hdc in first st, bob in next st, hdc in next 3 sts, bob in next st, 2 hdc in last st. Do not ch, turn. (9 sts, including 2 bobbles)
Tier 1 is complete: 9 sts, 2.25 in (5.7 cm) wide.
Tier 2
Row 5 (RS, step-in row): Sl st in each of first 3 sts. Ch 2. Working in BLO, hdc in same st as last sl st and in next 4 sts. Leave last 2 sts unworked. Ch 2, turn. (5 sts)
This leaves 2 exposed sts on each side of Row 4. These form the overhanging tips of Tier 1.
Row 6 (WS): Working in FLO, 2 hdc in first st, hdc in next st, bob in next st, hdc in next st, 2 hdc in last st. Ch 2, turn. (7 sts, 1 bobble in the center)
Row 7 (RS): Working in BLO, 2 hdc in first st, hdc in next 5 sts, 2 hdc in last st. Ch 2, turn. (9 sts)
Row 8 (WS): Working in FLO, 2 hdc in first st, bob in next st, hdc in next 2 sts, bob in next st, hdc in next 2 sts, bob in next st, 2 hdc in last st. Do not ch, turn. (11 sts, including 3 bobbles)
Tier 2 is complete: 11 sts, 2.75 in (7.0 cm) wide.
Tier 3
Row 9 (RS, step-in row): Sl st in each of first 3 sts. Ch 2. Working in BLO, hdc in same st as last sl st and in next 6 sts. Leave last 2 sts unworked. Ch 2, turn. (7 sts)
Row 10 (WS): Working in FLO, 2 hdc in first st, hdc in next st, bob in next st, hdc in next st, bob in next st, hdc in next st, 2 hdc in last st. Ch 2, turn. (9 sts, including 2 bobbles)
Row 11 (RS): Working in BLO, 2 hdc in first st, hdc in next 7 sts, 2 hdc in last st. Ch 2, turn. (11 sts)
Row 12 (WS): Working in FLO, 2 hdc in first st, bob in next st, hdc in next 3 sts, bob in next st, hdc in next 3 sts, bob in next st, 2 hdc in last st. Do not ch, turn. (13 sts, including 3 bobbles)
Tier 3 is complete: 13 sts, 3.25 in (8.3 cm) wide. The tree is now 4 in (10.2 cm) tall.
Trunk
Row 13 (RS, step-in row): Sl st in each of first 5 sts. Ch 2. Working in BLO, hdc in same st as last sl st and in next 4 sts. Leave last 4 sts unworked. Ch 2, turn. (5 sts)
Rows 14–15: Work ridged hdc in each st across (FLO on Row 14, BLO on Row 15). Ch 2 and turn after Row 14. (5 sts each row)
Fasten off after Row 15 and weave in the tail. The body now measures 3.25 in (8.3 cm) x 5.0 in (12.7 cm).
Shape check: Each tier tip overhangs the tier below by 2 sts, which is 0.5 in (1.3 cm). The trunk is set in by 4 sts, which is 1 in (2.5 cm), on each side of Tier 3.
Border
Border gauge: 16 sc = 4 in (10.2 cm), so 4 sc per 1 in (2.5 cm). Work with the RS facing. Work into the exposed ledge sts and the sl sts from the step-in rows as if they were normal stitches.
Round 1 (Color B): Join Color B at the peak, in the base of Row 1 (the foundation ch). Ch 1, then work (sc, ch 1, sc) in the peak. Then work down the first side:
- Tier 1 row ends (Rows 1–4): 2 sc, 2 sc, 2 sc, 1 sc = 7 sc
- Tier 1 tip ledge (2 exposed sts): 3 sc in the tip st, 1 sc in the next st = 4 sc
- Tier 2 row ends (Rows 5–8): 2, 2, 2, 1 = 7 sc
- Tier 2 tip ledge (2 sts): 3 sc in tip, 1 sc in next = 4 sc
- Tier 3 row ends (Rows 9–12): 2, 2, 2, 1 = 7 sc
- Tier 3 tip ledge (4 sts): 3 sc in tip, 1 sc in each of next 3 sts = 6 sc
- Trunk row ends (Rows 13–15): 2, 1, 1 = 4 sc
Trunk bottom (5 sts): 3 sc in first st, 1 sc in each of next 3 sts, 3 sc in last st = 9 sc
Work the second side as a mirror image, from trunk to peak: 4, 6, 7, 4, 7, 4, 7 = 39 sc. Join with a sl st to the first sc.
Round 1 count: 89 sc plus the peak ch-1 sp.
– Each side: 39 sc; both sides = 78 sc
– Trunk bottom: 9 sc
– Peak: 2 sc
– 78 + 9 + 2 = 89 sc
To check it another way, add up the parts. That gives 21 sts worked 1-per-existing-st (8 ledge sts per side x 2 = 16, plus 5 trunk sts) + 12 extra sc at the 6 tier tips + 4 extra sc at the 2 trunk corners + 50 row-end sc + 2 peak sc = 89.
Round 2 (Color B): Ch 1. Working in reverse, rev sc in each sc around and 1 rev sc in the peak ch-1 sp. Join with a sl st to the first rev sc. (90 rev sc: 89 + 1) Fasten off and weave in ends.
Why the math works: At 4 sc per 1 in (2.5 cm), the 4 sc along each trunk side cover its 3 rows, which measure exactly 1 in (2.5 cm). Each slanted tier edge steps outward as it drops, so it measures just over 1.5 in (3.8 cm). Its 7 sc give a little ease so the edge can turn the tips without cupping. The 3-sc tips and corners add the extra length that every outside point needs. The inner corners get no extra stitches, so they stay sharp. The two rounds add 0.25 in (0.6 cm) on each side. That takes the body from 3.25 in x 5.0 in (8.3 cm x 12.7 cm) to 3.75 in x 5.5 in (9.5 cm x 14.0 cm).
Bead Balls and Hanger
Bead Ball (make 2, Color A):
Rnd 1: 6 sc in MR. (6 sts)
Rnd 2: 2 sc in each st around. (12 sts)
Rnds 3–4: Sc in each st around. (12 sts each round)
Stuff firmly with a small pinch of fiberfill.
Rnd 5: Sc2tog 6 times. (6 sts)
Fasten off, leaving a 6 in (15.2 cm) tail. Thread the tail through the front loops of the last 6 sts and pull tight. Keep the tail for sewing. Each ball measures about 0.75 in (1.9 cm) across.
Top hanger: Join Color A in the peak ch-1 sp, behind the lavender border. Ch 5, which is about 1 in (2.5 cm), and fasten off. Sew one bead ball to the end of the chain. Join Color A at the top of the ball and ch 15, which is about 3 in (7.6 cm). Sl st back into the top of the ball to form a hanging loop, then fasten off.
Bottom drop: Join Color A in the center sc of the trunk bottom. Ch 5 (about 1 in / 2.5 cm) and fasten off. Sew the second bead ball to the end.
Final Blocking
- Weave in every tail before blocking, keeping lavender tails inside the lavender border.
- Spray the motif lightly with water until it is damp, not soaked.
- Lay it RS up on a blocking mat or folded towel.
- Pin the peak, the 6 tier tips, and the 2 trunk corners first.
- Check the size: 3.75 in (9.5 cm) across Tier 3 and 5.5 in (14.0 cm) from peak to trunk bottom.
- Pin each inner corner so the steps stay crisp, then smooth the slanted edges straight.
- Use a fingertip to lift each bobble back into shape.
- Let the motif dry completely, with the bead balls hanging free, then unpin it.
Final Quality-Control Checklist
- Stitch counts per row: 3, 5, 7, 9 / 5, 7, 9, 11 / 7, 9, 11, 13 / 5, 5, 5
- 10 bobbles in total, all popping out on the RS
- A ridge shows on every row on the RS
- Each tier tip overhangs by 2 sts, about 0.5 in (1.3 cm), on both sides
- The trunk is centered, with 4 sts left on each side of Tier 3
- Round 1 has 89 sc plus the peak ch-1 sp, and Round 2 has 90 rev sc
- Finished size is 3.75 in x 5.5 in (9.5 cm x 14.0 cm)
- The motif lies flat with no cupping or ruffling
- Both bead balls are firm, round, and securely sewn
Troubleshooting
Ridges show only on every other row. One type of row was worked in the wrong loop. RS rows go in BLO and WS rows go in FLO.
Bobbles pop out on the back. Bobbles belong on WS (even) rows. Check that Row 1 is facing you as the RS.
Tier tips look uneven. Count the sl sts at each step-in. Rows 5 and 9 need 3, and Row 13 needs 5.
Border ruffles on the slanted edges. Your sc are looser than 4 per 1 in (2.5 cm). Work 2, 1, 2, 1 for 6 sc per tier edge, or go down a hook size for the border only. If you change the count, recount Rounds 1 and 2.
Border cups or pulls the tips inward. Make sure every outside tip has 3 sc in a single st, and loosen your tension slightly.
Crab stitch looks flat. Keep each rev sc loose and twist the hook slightly as you pull through.
Bead ball looks lumpy. Use less stuffing, spread it evenly, and close the opening tightly.
Care
Hand wash in cool water with mild soap, press out the water in a towel, and dry flat. If the shape relaxes, pin the tips again while the motif is damp.
Final Notes
The measurement chain is short and easy to check. Gauge is 16 hdc x 12 rows = 4 in (10.2 cm). Tier 1 ends at 2.25 in (5.7 cm) wide, Tier 2 at 2.75 in (7.0 cm), and Tier 3 at 3.25 in (8.3 cm). After the trunk, the body is 5.0 in (12.7 cm) tall. Two lavender rounds of 89 sc and 90 rev sc add 0.25 in (0.6 cm) per side. The finished motif is 3.75 in x 5.5 in (9.5 cm x 14.0 cm), with a bead ball above and below. If your gauge matches at each checkpoint, every tree you make will match the first. Make as many as you like and string them onto ornament strands.
Happy crocheting!