

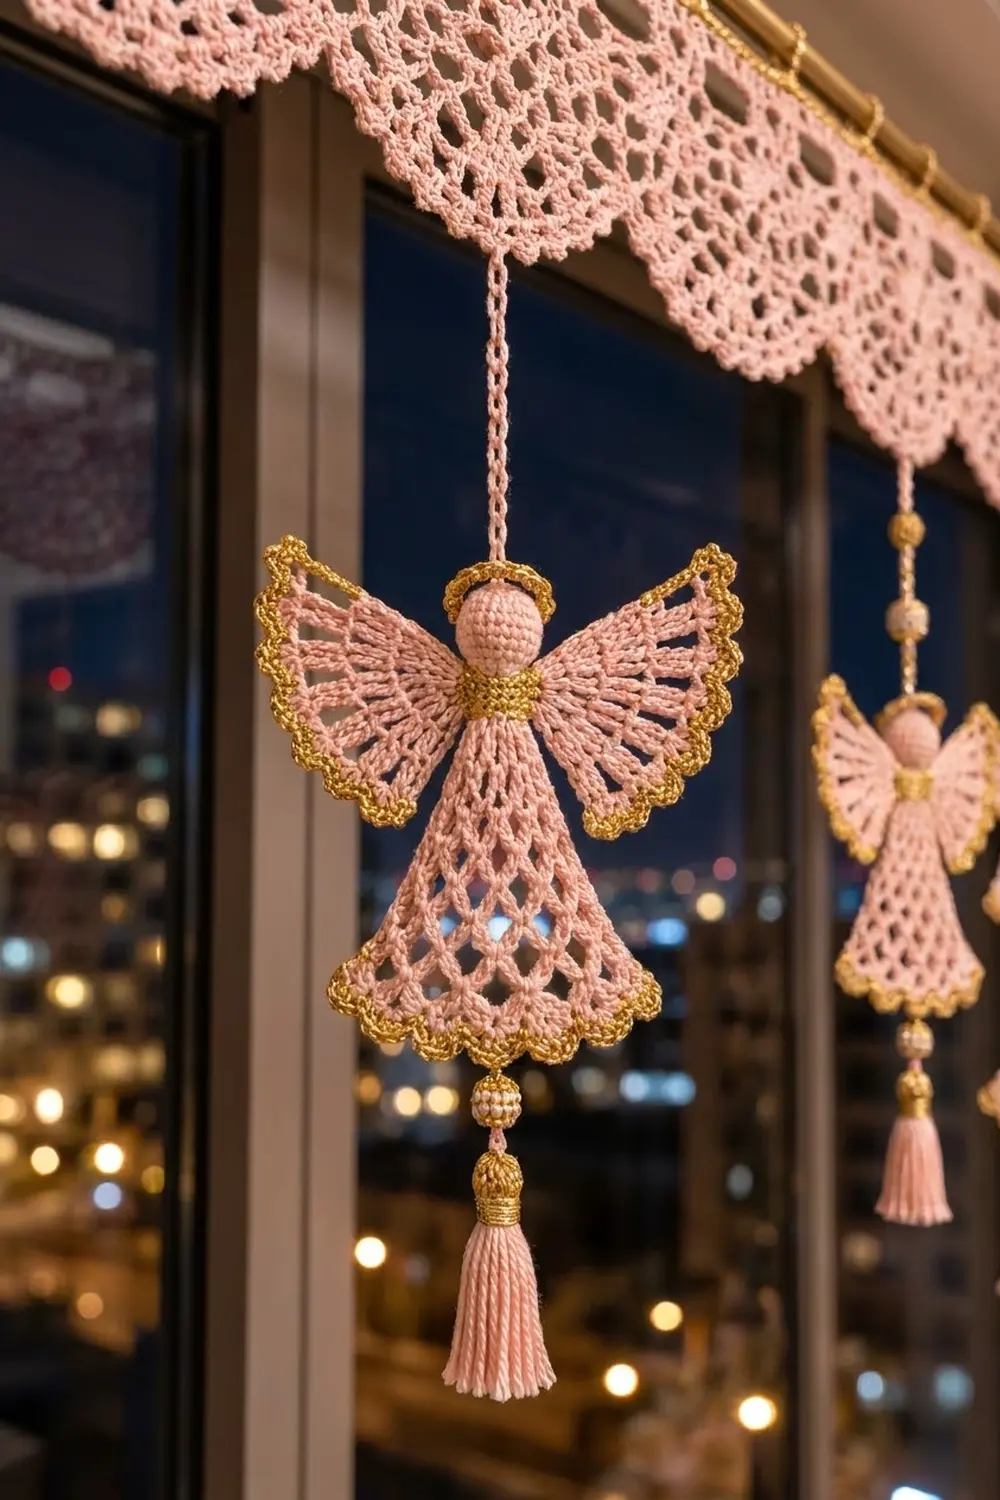
This little angel pairs soft blush pink cotton with a bright metallic gold trim. She has a round stuffed head with a slim gold halo, a gold collar across her shoulders, two open fan wings, and a lacy diamond-mesh skirt that flares into a scalloped gold hem.
The style is light and airy rather than solid. The wings get their texture from radiating pairs of tall stitches separated by chain spaces, and the skirt is a classic chain-loop net that grows by one loop every row. Gold appears only where it frames the shape: the halo, the collar, the outer wing edges, and the hem.
This pattern uses US crochet terms. The finished angel is about 5.5 in (14.0 cm) across the wings and 5 in (12.7 cm) tall, not counting the hanging loop.
You make six small components: the head, halo, collar, two wings, and skirt. You edge the wings and skirt in gold, block everything flat, and then sew it all into one ornament.
Finished Size and Construction
- Finished size: 5.5 in (14.0 cm) wingspan × 5 in (12.7 cm) tall
- Skill level: Intermediate (increasing net, small amigurumi ball, assembly)
- Terminology: US
- Yarn weight: Sport / Fine (#2) cotton
- Hook: 2.75 mm (C-2)
- Number of pieces: 1 finished angel, made of 6 components sewn together
- Layout: Single motif. No grid and no joining to other motifs.
- Piece sizes: head 0.9 in (2.3 cm) across. Each wing is 2.1 in (5.3 cm) in radius after edging. The skirt is 3.75 in (9.5 cm) tall × 4 in (10.2 cm) wide at the hem after edging.
- Size before gold edging: each wing is 1.9 in (4.8 cm) in radius. The skirt is 3.5 in (8.9 cm) tall × 3.75 in (9.5 cm) wide.
- Gold edging depth: about 0.25 in (0.6 cm)
Materials
Use a smooth, mercerized sport-weight cotton for the pink so the mesh and stitch spokes show clearly. For the gold, use a sport-weight metallic or a metallic-blend yarn that is soft enough to crochet without splitting. Very stiff tinsel threads make the scallops hard to shape.
- Blush pink, sport cotton: 10 g, about 30 m
- Metallic gold, sport weight: 4 g, about 14 m
These quantities include a margin of about 20% for swatching and sewing tails.
Tools:
– 2.75 mm (C-2) crochet hook
– Tapestry needle
– A small pinch of polyester fiberfill
– Stitch marker
– Rust-proof pins and a blocking mat
– Spray starch or a 1:1 mix of white glue and water (optional, for stiffening)
– Scissors and a ruler
Abbreviations (US Terms)
- ch – chain
- sl st – slip stitch
- sc – single crochet
- hdc – half double crochet
- dc – double crochet
- tr – treble crochet
- sc2tog – single crochet 2 together
- MR – magic ring
- sk – skip
- sp(s) – space(s)
- st(s) – stitch(es)
- inc – 2 sc in the same stitch
Special stitches:
– Shell (wing): (hdc, 3 dc, hdc) all worked in the same chain space.
– Shell (hem): 5 dc worked in the same stitch.
Gauge and Checkpoints
Gauge: 13 sc = 2 in (5.1 cm) in single crochet, worked in rounds or rows.
Before making the whole angel, make the head and one wing as your test pieces.
Checkpoints:
– Head after Round 3: a flat circle of 18 sc, about 0.9 in (2.3 cm) across.
– Head finished and stuffed: about 0.9 in (2.3 cm) in diameter and 2.75 in (7.0 cm) around.
– Wing after Row 5: 1.9 in (4.8 cm) from the fan point to the outer edge.
– Skirt after Row 1: 1.5 in (3.8 cm) wide.
– Skirt after Row 11: 3.25 in (8.3 cm) tall.
If your pieces are too big: go down to a 2.5 mm hook, or tighten the chain loops by pulling each chain snug.
If your pieces are too small: go up to a 3.0 mm hook.
Small differences only change the overall size, not the shape. Just keep all pieces on the same hook so the proportions stay matched.
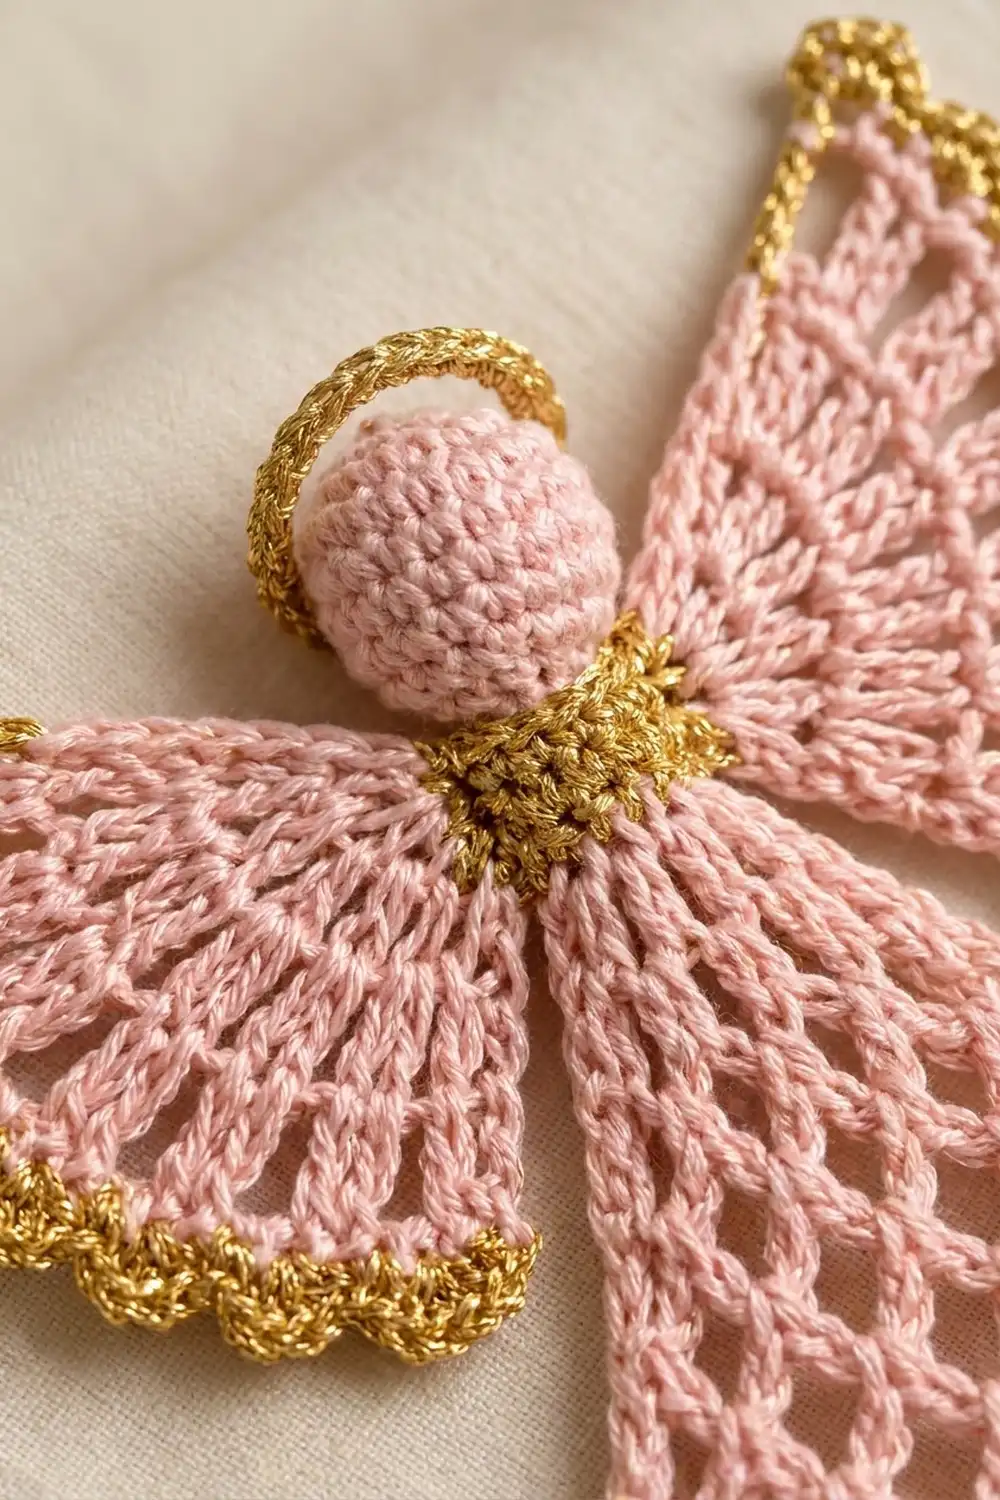
Head (make 1, pink)
The head is worked in a continuous spiral. Place a marker in the first stitch of each round.
Round 1: 6 sc in MR. (6 sts)
Round 2: Inc in each st around. (12 sts)
Round 3: (sc in next st, inc) 6 times. (18 sts)
Rounds 4–6: Sc in each st around. (18 sts per round)
Round 7: (sc in next st, sc2tog) 6 times. (12 sts)
Stuff the head firmly with fiberfill so it becomes a smooth sphere.
Round 8: Sc2tog 6 times. (6 sts)
Fasten off and leave a 10 in (25.4 cm) tail. Thread the tail through the front loops of the last 6 sts and pull tight. Keep the tail for sewing.
Checkpoint: 0.9 in (2.3 cm) diameter.
Halo (make 1, gold)
Foundation: Ch 16 and sl st to the first ch to form a ring, without twisting.
Round 1: Ch 1, sc in each ch around. Sl st to the first sc. (16 sts)
Fasten off and leave an 8 in (20.3 cm) tail. The ring measures about 0.8 in (2.0 cm) across, slightly smaller than the head, so it sits snugly around the crown.
Collar (make 1, gold)
Foundation: Ch 14.
Row 1: Sc in 2nd ch from hook and in each ch across. Turn. (13 sts)
Row 2: Ch 1, sc in each st across. (13 sts)
Fasten off and leave an 8 in (20.3 cm) tail. The strip is 2 in (5.1 cm) long × 0.3 in (0.8 cm) tall. It is wider than the skirt top so it covers the wing bases.
Wings (make 2, pink, then edge in gold)
Each wing is a fan worked in turned rows from a single point. The tall stitches are kept in pairs, and the chain spaces between the pairs widen each row. This creates the radiating ridges and open slots.
Row 1: Ch 4. Work 5 dc in the 4th ch from the hook (the skipped ch counts as 1 dc). Turn. (6 dc)
Row 2: Ch 3 (counts as dc), dc in the same st, 2 dc in each remaining st across. Turn. (12 dc)
Row 3: Ch 3 (counts as dc), dc in next st, ch 1, dc in each of next 2 sts. Repeat from * 4 more times. Turn. (12 dc, 5 ch-1 sps)
Row 4: Ch 4 (counts as tr), tr in next dc, ch 2, sk ch-1 sp, tr in each of next 2 dc. Repeat from * 4 more times. Turn. (12 tr, 5 ch-2 sps)
Row 5: Ch 4 (counts as tr), tr in next tr, ch 3, sk ch-2 sp, tr in each of next 2 tr. Repeat from * 4 more times. (12 tr, 5 ch-3 sps, 27 sts in total including chains)
Fasten off the pink. The wing should be a fan that spreads about 140 degrees, with 6 pairs of tall stitches radiating from the point.
Checkpoint: 1.9 in (4.8 cm) from the point to the edge.
Skirt (make 1, pink)
The skirt is worked top-down in turned rows. Every net row adds exactly one ch-4 loop: one new loop at the start and one at the end, minus the shift of one loop across. This gives the bell flare.
Foundation: Ch 10.
Row 1: Sc in 2nd ch from hook and in each ch across. Turn. (9 sc)
Row 2: Ch 1, sc in first st, ch 4, sk 1 st, sc in next st. Repeat from * 3 more times. Turn. (4 ch-4 loops)
Row 3: Ch 1, sc in first sc, ch 4, sc in first loop, ch 4, sc in next loop. Repeat from * across. Ch 4, sc in last sc. Turn. (5 loops)
Each new row is worked the same way: ch 1, sc in the edge sc, ch 4, sc in each loop with ch 4 between, ch 4, sc in the last edge sc.
Rows 4–11: Repeat Row 3. The loop count for each row is shown below.
| Row | Loops in that row |
|---|---|
| 4 | 6 |
| 5 | 7 |
| 6 | 8 |
| 7 | 9 |
| 8 | 10 |
| 9 | 11 |
| 10 | 12 |
| 11 | 13 |
Checkpoint after Row 11: 3.25 in (8.3 cm) tall. Each ch-4 sc row forms the diamond net, and the loops stacked in alternating positions read as diamonds.
Row 12 (trim row): Ch 1, sc in first edge sc, 4 sc in each of the 13 loops, sc in last edge sc. That is 2 sc worked 1-per-stitch plus 52 sc worked into the loops. (54 sc)
Do not fasten off the tail. Cut the pink, leaving a 4 in (10.2 cm) tail to weave in.
Checkpoint: 3.5 in (8.9 cm) tall, 3.75 in (9.5 cm) wide at the hem.
Border (Gold Edging on Wings and Hem)
Border gauge: the edging adds about 0.25 in (0.6 cm) to each edge it trims. One wing shell spans about 0.5 in (1.3 cm), and one hem shell spans about 0.3 in (0.8 cm).
Wing Edging (Row 6, on each wing)
With the right side facing, join gold in the top of the first stitch of Row 5.
Row 6: Ch 1, sc in each of the first 2 tr, shell (hdc, 3 dc, hdc) in next ch-3 sp, sc in each of next 2 tr. Repeat from * 4 more times. Fasten off. (5 shells, 12 sc, 37 sts total)
Why the math works: Row 5 has 6 tr pairs and 5 spaces. Each tr gets 1 sc (12 sc), and each space gets one 5-st shell (25 sts). 12 + 25 = 37. The scallops land exactly between the spokes, so each pink ridge ends in a gold “valley”.
Checkpoint: 2.1 in (5.3 cm) radius.
Hem Edging (Row 13, on the skirt)
With the right side facing, join gold in the first sc of Row 12.
Row 13: Ch 1, sc in first st, sk 1 st, 5 dc in next st, sk 1 st, sc in next st. Repeat from * 12 more times, then sc in the last st. Fasten off. (13 shells, 15 sc, 80 sts total)
Why the math works: Each repeat uses 4 sts of Row 12. The first sc uses 1 st, 13 repeats use 52 sts, and the final sc uses 1 st. 1 + 52 + 1 = 54, which matches Row 12 exactly. The stitch count is 65 dc in shells + 15 sc = 80.
There is one scallop for each of the 13 net loops above it, so the hem scallops line up with the diamonds.
Checkpoint: skirt 3.75 in (9.5 cm) tall × 4 in (10.2 cm) wide.
Assembly
- Collar: Lay the skirt right side up. Center the collar over Row 1 so it extends about 0.25 in (0.6 cm) past each side. Whipstitch both long edges in place with the gold tail.
- Wings: Place each wing behind the skirt, with its fan point tucked behind the collar about 0.25 in (0.6 cm) from the center. Angle each fan up and outward so the top of the wing reaches the level of the head. Sew through the wing’s Rows 1–2 and the back of the collar.
- Head: Center the head on top of the collar, with the gathered end facing down and overlapping the collar by about 0.2 in (0.5 cm). Sew it securely around the base with the pink tail.
- Halo: Slip the halo over the top of the head so it sits around the crown at a slight tilt. Tack it in 4 places with the gold tail.
- Hanging loop: Join pink at the top of the head, ch 30, and sl st back into the same spot. Fasten off. This makes a loop about 2 in (5.1 cm) long when folded.
Checkpoint: 5.5 in (14.0 cm) wingspan × 5 in (12.7 cm) tall.
Final Blocking
- Lightly dampen the assembled angel, or block the wings and skirt before sewing for the crispest result.
- Pin the skirt to a trapezoid 4 in (10.2 cm) wide at the hem and 3.75 in (9.5 cm) tall. Open each diamond with your fingertip.
- Pin each wing fan open. Put one pin at the tip of every gold scallop and one in the valley at the end of each tr pair.
- Pin each hem scallop point so it forms a rounded shell.
- If you like, mist with starch or the glue mix for stiffness.
- Let it dry completely, about 12 hours, before unpinning. Don’t pin or press the head; let it keep its round shape.
Final Quality-Control Checklist
- The head is round, firm, and 0.9 in (2.3 cm) across, with no fiberfill showing.
- The halo sits evenly around the crown and doesn’t slide.
- The collar is straight, centered, and covers the wing bases.
- Each wing has 6 tr pairs and 5 gold shells, and both wings match in size.
- The skirt has 13 loops in Row 11, 54 sc in Row 12, and 13 hem shells.
- The skirt mesh lies flat with open diamonds, without puckering.
- The overall size is 5.5 in (14.0 cm) × 5 in (12.7 cm).
- All tails are woven in, and the hanging loop is secure.
Troubleshooting
- The wing ruffles: Your chains are too long for your stitch height. Use ch 2 instead of ch 3 in Row 5, and add 1 ch to the edging shells if needed.
- The wing cups: Your stitches are too tight. Go up a hook size for Rows 4–5 only.
- The skirt flares unevenly: Count the loops in each row. Each row should have exactly one more loop than the row before.
- The hem ripples: Check that Row 12 has 54 sc and that each shell sits in every 4th stitch.
- Fiberfill shows through the head: Use a smaller hook for the head, or stuff a little less firmly.
- The metallic yarn splits: Work slowly with a smooth-headed hook and keep the yarn under light tension.
Care
Spot clean or hand wash cool, then reshape and dry flat. Store the angel flat in a box so the wings and scallops keep their blocked shape.
Final Notes
The measurements build in order:
– Gauge: 13 sc = 2 in (5.1 cm)
– Head: 0.9 in (2.3 cm)
– Each wing: 1.9 in (4.8 cm), growing to 2.1 in (5.3 cm) with gold edging
– Skirt: 3.5 in (8.9 cm) tall and 3.75 in (9.5 cm) wide, growing to 3.75 in (9.5 cm) tall and 4 in (10.2 cm) wide with gold edging
– Finished angel: 5.5 in (14.0 cm) wingspan × 5 in (12.7 cm) tall
If each checkpoint matches, the finished angel will too. Make one for the tree, a gift tag, or a window, or make several and hang them on separate cords.
Happy crocheting!