

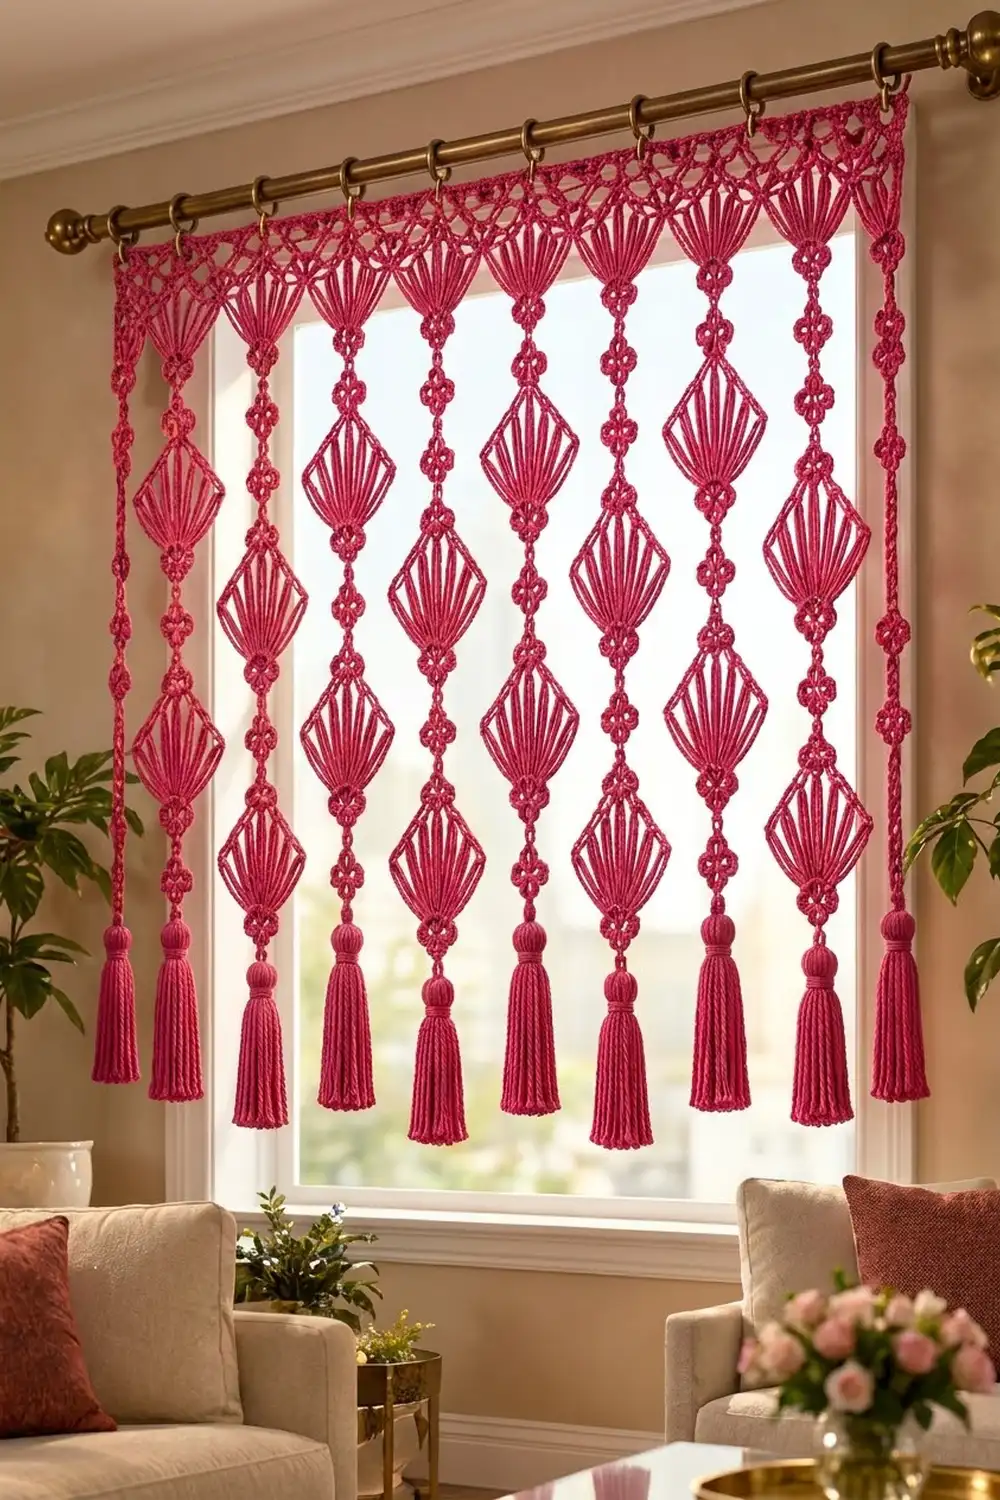
The Raspberry Fan Cascade Curtain is a lace window curtain made of long hanging strands. Each strand stacks diamond-shaped fan motifs, joined by small four-petal flowers, and ends in a thick tassel. A light lattice header holds all the strands in an even row along the curtain rod.
The design uses one bold raspberry-pink cotton. Using a single color lets the texture stand out: the long fan ribs, the pointed chain frames, the round flower links, and the full tassels. Against a window at night the strands look almost like jewelry, and they let plenty of light through during the day.
This pattern uses US crochet terms. The finished curtain is about 40 in (101.6 cm) wide and 42.5 in (108.0 cm) long from the top of the header to the tassel tips.
You make it in small units. First you crochet the fan motifs and then the flower links, joining the links to the motifs as you go so each strand comes together. Next you add the tassels. Finally you crochet the header straight across the tops of the strands, so it joins them and finishes the top edge in one step.
Finished Size and Construction
- Finished size: 40 in (101.6 cm) wide × 42.5 in (108.0 cm) long
- Skill level: Intermediate
- Terminology: US crochet terms
- Yarn weight: DK / light (3), cotton
- Hook: 4.0 mm (G-6)
- Number of pieces: 60 fan motifs, 70 flower links, 10 tassels, 1 header band
- Layout: 10 strands side by side, each strand built as Link–Fan–Link repeating (7 links, 6 fans), ending in a tassel
- Piece sizes: fan motif 3.75 in (9.5 cm) wide × 4.5 in (11.4 cm) tall; flower link 1.25 in (3.2 cm) tip to tip
- Size before border: 10 strands on 4 in (10.2 cm) centers = 40 in (101.6 cm) wide; each strand hangs 40.25 in (102.2 cm) including its hanging loop and tassel
- Border (header) depth: 2.25 in (5.7 cm)
Materials
Yarn: Use a smooth, tightly plied mercerized or combed cotton in DK weight. Cotton keeps the fan ribs straight and crisp and won’t stretch much while the curtain hangs. Avoid fuzzy or very stretchy yarns, which blur the ribs and let the strands grow longer over time.
- Raspberry pink: about 300 g / 672 m (six 50 g balls of 112 m each)
Rough use per piece: fan motif about 5.6 m, flower link about 1.5 m, tassel about 9 m, header about 45 m. These quantities include about a 15% margin.
Tools:
– 4.0 mm (G-6) crochet hook
– Tapestry needle
– Scissors
– Stiff card 4 in (10.2 cm) tall for the tassels
– Locking stitch markers
– Blocking mats, rust-proof pins, and a spray bottle
– 11 curtain clip rings
Abbreviations (US Terms)
- ch – chain
- sl st – slip stitch
- sc – single crochet
- dc – double crochet
- dtr – double treble crochet: yarn over 3 times, insert hook, pull up a loop, then [yarn over, pull through 2 loops] 4 times
- sp – space
- st(s) – stitch(es)
- RS – right side
Special stitch – 3-dc cluster (3-dc cl): [Yarn over, insert hook in the indicated st, pull up a loop, yarn over, pull through 2 loops] 3 times in the same st, then yarn over and pull through all 4 loops on the hook.
Gauge and Checkpoints
Gauge: 20 sc and 22 rows = 4 in (10.2 cm) with a 4.0 mm hook.
Before you start, make one full test unit: one fan motif plus one flower link. Check it at each stage:
- Fan after Row 2: ribs measure about 2.5 in (6.4 cm) from the ring center to the rib tops.
- Fan after Row 3: the straight distance between the two ends of the arc is 3.75 in (9.5 cm).
- Finished fan: 3.75 in (9.5 cm) wide × 4.5 in (11.4 cm) from the top loop to the bottom picot.
- Flower link: 1.25 in (3.2 cm) from the top petal tip to the bottom petal tip.
- First Link–Fan–Link section of a strand: 7 in (17.8 cm).
If your fan is too big (wider than 4 in / 10.2 cm), the strands will overlap. Go down to a 3.75 mm hook.
If your fan is too small (narrower than 3.5 in / 8.9 cm), the gaps between strands will look wide. Go up to a 4.5 mm hook.
Recheck the sc gauge too, because the header width depends on it.
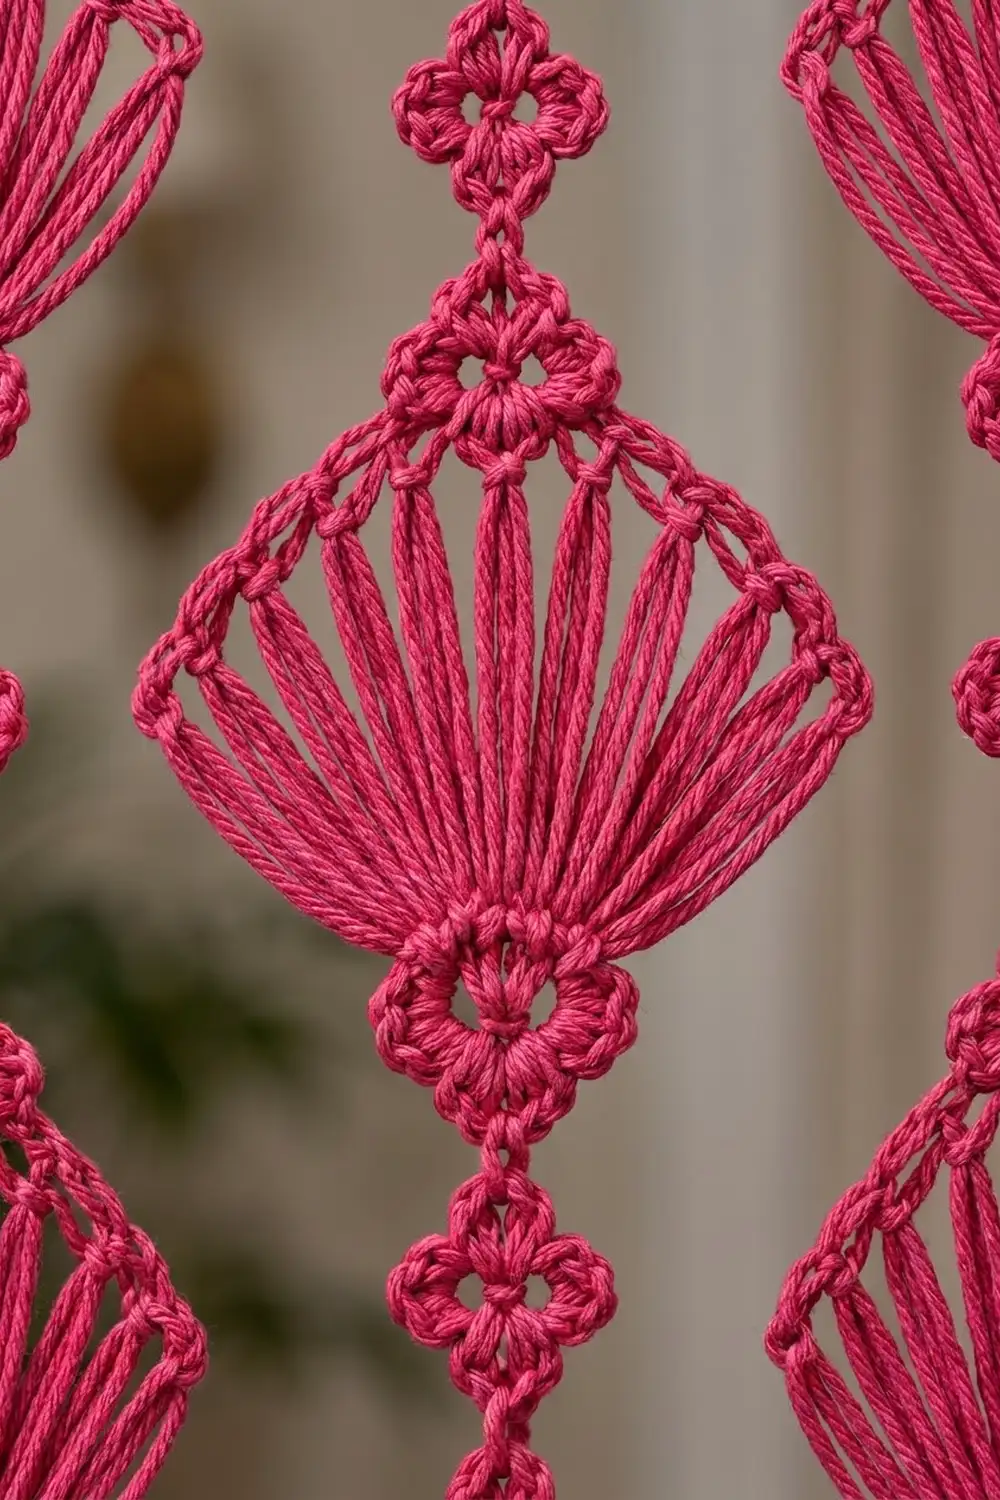
Fan Motif (make 60)
The motif is worked flat from the bottom ring upward.
Base ring: Ch 10, sl st in the first ch to form a ring.
Row 1 (RS): Ch 5 (counts as dtr), [ch 1, dtr in ring] 10 times. Work all stitches into the upper half of the ring and leave the lower half free.
11 dtr, 10 ch-1 sps.
Row 2: Ch 5, turn (counts as dtr). [Ch 2, dtr in next dtr] 10 times, working the last dtr in the 5th ch of the turning ch.
11 dtr, 10 ch-2 sps.
The two rows of stacked dtr line up into 11 long ribs that fan outward.
Row 3 (arc): Ch 1, turn. Sc in the first dtr, then [sc in next ch-2 sp, sc in next dtr] 10 times.
21 sc (11 sc worked into the dtr + 10 sc worked into the spaces). The arc pulls the rib tops into a smooth curve.
Row 4 (frame): Ch 1, turn, sc in the first sc. Ch 14. For the top loop, ch 4 more and sl st in the 4th ch from the hook. For the spine, ch 6, sc in the center (11th) sc of Row 3, then sl st in each of the 6 spine chs to climb back up to the base of the top loop. Ch 14, sc in the last sc of Row 3.
2 ch-14 sides, 1 top loop, 1 spine.
Row 5: Ch 1, turn. Work 16 sc over the ch-14 side you just made, sl st at the base of the top loop, 16 sc over the other ch-14 side, then sl st in the first sc of Row 4. Fasten off.
32 sc of frame. The two sc-covered sides meet at the top loop to form the diamond’s point.
Bottom trim: With RS facing, join yarn in the ring right beside the first dtr. [Sc in ring, ch 3] 5 times across the free lower half of the ring, then sl st in the ring beside the last dtr. Fasten off.
5 sc, 5 ch-3 picots. The center (3rd) picot is the bottom picot you use for joining.
Weave in all ends securely, because these motifs will hang under their own weight.
Flower Link (make 70)
Rnd 1: Ch 4, sl st to form a ring. Ch 1, 8 sc in ring, sl st in the first sc.
8 sc.
Rnd 2: [(Ch 2, 3-dc cl, ch 2, sl st) all in next sc, sl st in next sc] 4 times.
4 petals. Petals 1 and 3 are opposite each other: petal 1 is the top petal and petal 3 is the bottom petal.
Joining petal: To join a petal to a motif as you go, work it as (ch 2, 3-dc cl, ch 1, sl st in the target loop, ch 1, sl st) in the same sc.
Make All Pieces
For each strand you need 6 fans, 7 links, and 1 tassel. Across the whole curtain that is:
- Fans: 60
- Links: 70 (joined as you go)
- Tassels: 10
- Header: 1, worked last
Layout (S = strand, L = link, F = fan, T = tassel):
HEADER BAND – 201 sts, 40 in (101.6 cm)
S1  S2  S3  S4  S5  S6  S7  S8  S9  S10
L1  L1  L1  L1  L1  L1  L1  L1  L1  L1
F1  F1  F1  F1  F1  F1  F1  F1  F1  F1
L2  L2  L2  L2  L2  L2  L2  L2  L2  L2
F2  F2  F2  F2  F2  F2  F2  F2  F2  F2
L3 ... continue alternating ...
F6  F6  F6  F6  F6  F6  F6  F6  F6  F6
L7  L7  L7  L7  L7  L7  L7  L7  L7  L7
T   T   T   T   T   T   T   T   T   T
Joining
Work through each strand from the top down:
- L1: Make it normally until petal 3, then work petal 3 as a joining petal into the top loop of F1.
- L2 to L6: Work petal 1 as a joining petal into the bottom picot of the fan above. Work petal 3 as a joining petal into the top loop of the next fan below.
- L7: Work petal 1 as a joining petal into the bottom picot of F6. Work petal 3 normally; this is where the tassel hangs.
- Hanging loop: Join yarn with a sl st in the ch-2 sp at the tip of L1’s top petal, ch 8, sl st in the same sp, and fasten off.
Each join is one sl st into one loop, so there is no extra bulk. Keep the sl st snug but not tight; a tight join cinches the loop and tilts the motif.
Checkpoint: A strand body, from the top of L1 to the tip of L7, measures 35.75 in (90.8 cm): 7 links × 1.25 in plus 6 fans × 4.5 in. With the hanging loop (0.5 in / 1.3 cm) and the tassel (4 in / 10.2 cm) added, it hangs 40.25 in (102.2 cm). Lay all 10 strands side by side and check that they are the same length within 0.25 in (0.6 cm).
Tassels (make 10): Wrap yarn 40 times around the 4 in (10.2 cm) card. Thread a 10 in (25.4 cm) tie under the wraps at the top edge, pass it through the ch-2 sp at L7’s bottom petal tip, and knot it tightly. Slide the wraps off the card. Then wrap a separate 12 in (30.5 cm) strand firmly around the bundle 0.5 in (1.3 cm) below the top to form the rounded head, and bury its ends inside. Cut the loops at the bottom and trim the tassel evenly to 4 in (10.2 cm).
Border: Header Band
The header is the curtain’s only border. It runs along the top edge only.
Border gauge: the same as the main gauge, 5 sc per 1 in (2.5 cm). Each strand gets a 20-st unit, which is 4 in (10.2 cm).
Row 1 (joining row): Lay the strands in order with the RS facing you and none of them twisted. Make a slip knot. [Ch 6, 7 sc in the hanging loop of the next strand, ch 7] 10 times. Ch 1 to turn; this ch does not count.
200 sts = 10 strands × 20 sts each (130 ch + 70 sc). No stitches are added between units.
Row 2 (conversion): Turn. Sc in each of the first 199 sts, then 2 sc in the last st.
201 sc (200 worked one per stitch + 1 added).
Row 3 (lattice): Ch 1, turn, sc in the first sc. [Ch 5, skip 3 sc, sc in next sc] 50 times.
51 sc, 50 ch-5 loops.
Row 4: Ch 5, turn (counts as dc + ch 2). Sc in the first loop, then [ch 5, sc in next loop] 49 times. Ch 2, dc in the last sc.
50 sc, 49 ch-5 loops, plus a half-loop at each end.
Row 5: Ch 1, turn, sc in the first dc. [Ch 5, sc in next ch-5 loop] 49 times. Ch 5, sc in the 3rd ch of the turning ch.
51 sc, 50 ch-5 loops.
Row 6 (trim): Ch 1, turn, sc in the first sc. [3 sc in next ch-5 loop, sc in next sc] 50 times.
201 sc (1 + 50 × 4).
Row 7: Ch 1, turn, sc in each sc across. Fasten off.
201 sc.
Why the math works: Row 1 gives each strand exactly 20 sts. That puts the strand centers 4 in (10.2 cm) apart, which leaves a 0.25 in (0.6 cm) gap between neighboring 3.75 in (9.5 cm) fans. Adding the single extra stitch in Row 2 makes 201 sts, and 201 = 1 + 50 × 4 is exactly what the 4-st lattice repeat needs. Row 6 puts back exactly 4 sts per repeat, so the header stays 201 sts (40 in / 101.6 cm) across and does not ruffle or pull in. The finished header is 2.25 in (5.7 cm) deep.
Attach the 11 clip rings at sts 1, 21, 41, and so on to st 201, so there is one ring every 20 sts and each ring sits between two strands.
Final Blocking
- Lightly mist the header and pin it flat to 40 in (101.6 cm) × 2.25 in (5.7 cm).
- Lay each strand out straight. Pin the fans to 3.75 in (9.5 cm) × 4.5 in (11.4 cm), spreading the ribs evenly.
- Pin the frame sides straight so each top point is sharp.
- Mist everything until damp, then let it dry completely.
- Steam the tassels and comb them straight with your fingers. Trim them again to 4 in (10.2 cm).
- Hang the curtain for 24 hours, then check that the strands are still the same length.
Final Quality-Control Checklist
- Every fan has 11 ribs, a 21-sc arc, and a 32-sc frame
- Every bottom trim has 5 picots, and the joins go through the center picot
- Each strand has 7 links and 6 fans
- None of the strands are twisted
- Header rows match their counts: 200 / 201 / 51 / 50 / 51 / 201 / 201
- Width is 40 in (101.6 cm) and total length is 42.5 in (108.0 cm)
- All ends are woven in securely
Troubleshooting
- Ribs splay unevenly: Make sure all Row 1 dtr sit in the upper half of the ring, and block the ribs into an even fan.
- The fan’s top point droops: The ch-14 sides are too loose. Work them with a tighter chain, or put 15 sc on each side in Row 5 instead of 16.
- Strands are different lengths: Your link joins are pulling. Redo the tight joins with more relaxed sl sts.
- Header ruffles: Check the 3 sc per loop in Row 6, or go down a hook size for the header.
- Header pulls the strands together: Your Row 1 chains are too tight. Use a hook one size up for the chains only.
- Tassels look thin: Wrap 45 times instead of 40.
Care
Hand wash in cool water with mild soap, and roll the curtain in a towel to remove the water. Reshape it and dry it flat, then re-block the fan points if needed.
Final Notes
The measurements build on each other in a simple chain. With a gauge of 20 sc to 4 in (10.2 cm), each fan motif comes out 3.75 in (9.5 cm) × 4.5 in (11.4 cm) and each flower link 1.25 in (3.2 cm). Six fans and seven links give a 35.75 in (90.8 cm) strand body. The hanging loop and tassel bring each strand to 40.25 in (102.2 cm), and the 2.25 in (5.7 cm) header brings the curtain to 42.5 in (108.0 cm). Across the width, 10 strands × 20 sts give the 40 in (101.6 cm) header. If you check each stage against its number, the finished curtain will hang straight and even.
Happy crocheting!