

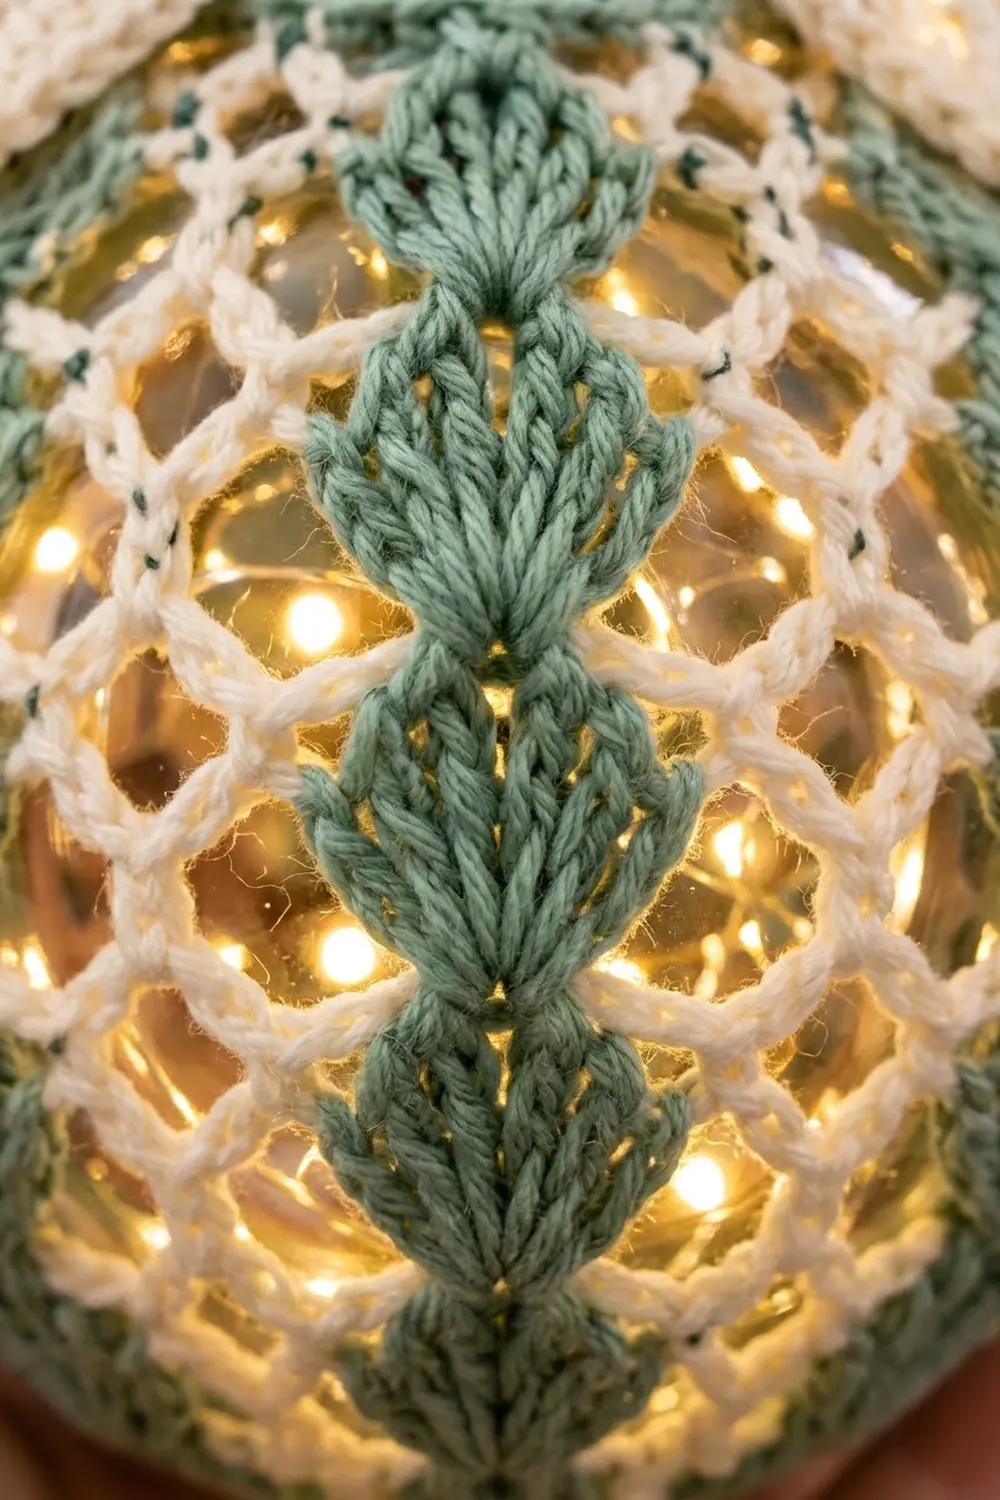
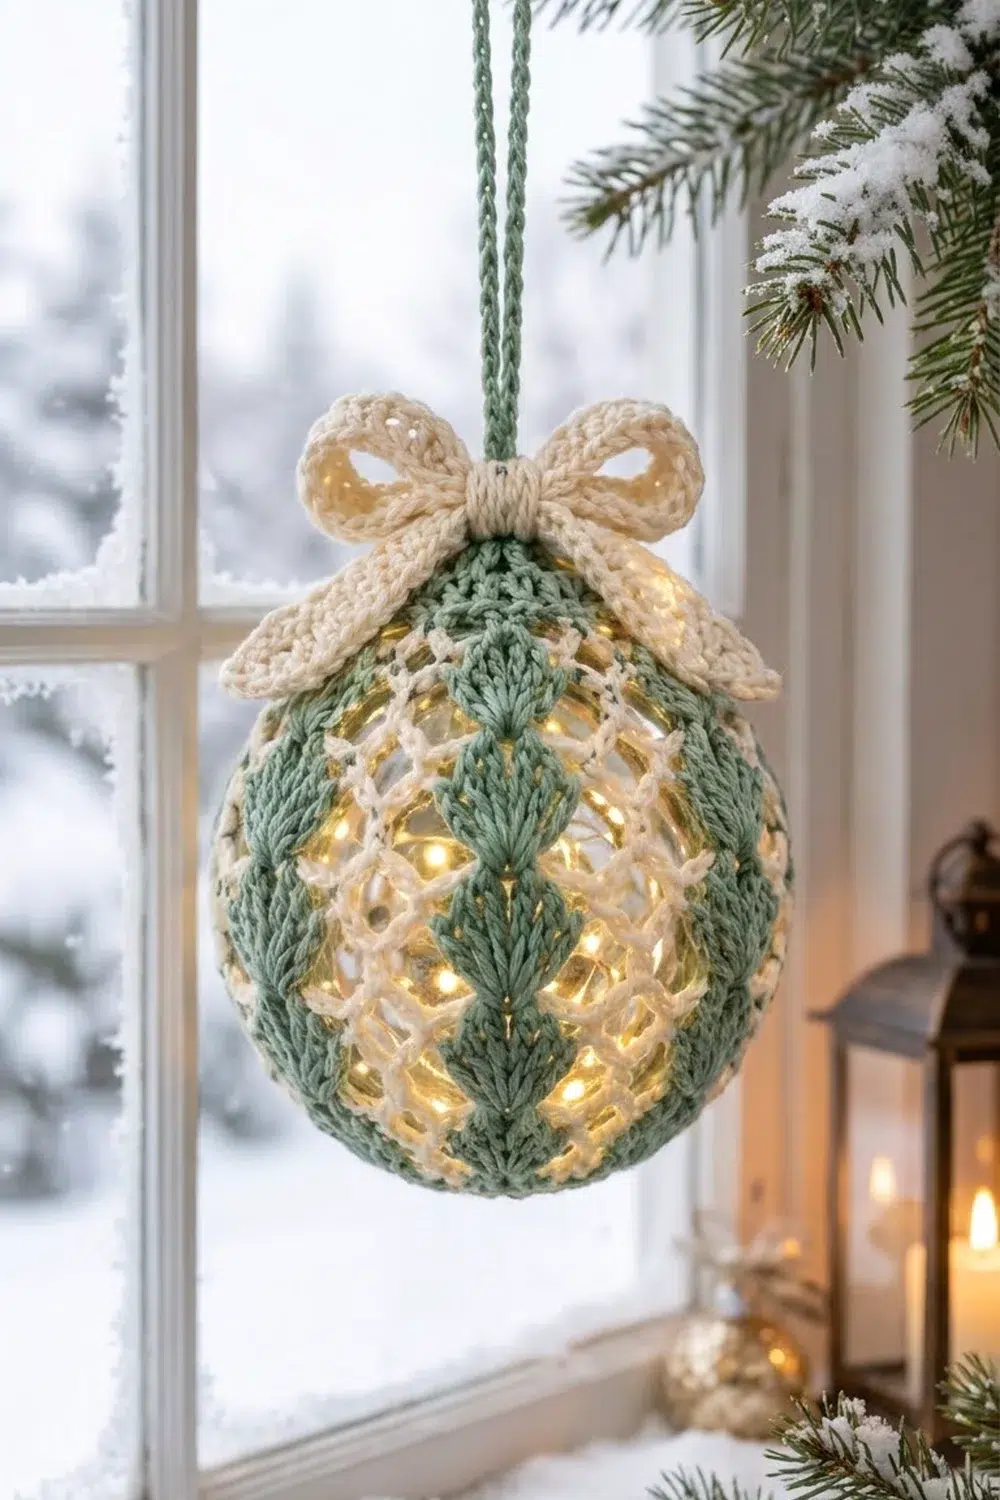
This ornament cover wraps a clear glass ball in a soft cream lattice, with six columns of stacked sage-green fans running from top to bottom. When you put a string of warm fairy lights inside the ball, the light shows through the open mesh diamonds and the solid fan columns stand out against it.
The palette is two calm colors: sage green for the fan columns, the top and bottom bands, and the hanging cord, and cream for the mesh and the bow. It suits a Scandinavian or farmhouse tree and looks good in a window.
The pattern uses US crochet terms. The cover fits a 3.15 in (8.0 cm) ball with a removable cap. The finished ornament is about 3.3 in (8.4 cm) across, and the bow is about 2.8 in (7.1 cm) wide.
Construction is simple. You work one flat panel in rows. Each row runs from the bottom pole to the top of the ball, so the colors change in vertical stripes. A crocheted joining row closes the panel into a tube. Then you work a sage band at the top, slip the ball inside, and work a sage band at the bottom directly on the ball before cinching it closed. A cream bow and a sage chain cord finish the top.
Finished Size and Construction
- Finished size: about 3.3 in (8.4 cm) diameter on a 3.15 in (8.0 cm) ball
- Skill level: Intermediate
- Terminology: US crochet terms
- Yarn weight: Sport weight (#2 fine) mercerized cotton
- Hook: 2.75 mm (US C-2)
- Number of pieces: 1 cover (worked flat, then closed into a sphere), plus 1 bow (3 small parts) and 1 hanging cord
- Layout: 6 pattern repeats around the ball, with 1 sage fan column and 1 cream mesh section in each repeat
- Panel size: 9.6 in x 4.4 in (24.4 cm x 11.2 cm) when flat
- Size before bands: open tube 9.6 in (24.4 cm) around and 4.4 in (11.2 cm) from end to end
- Band depth: top band 0.4 in (1.0 cm); bottom band 0.5 in (1.3 cm)
Materials
Pick a smooth mercerized cotton. It gives clear stitch definition, holds the fan shapes, and does not fuzz over the warm lights. Do not use acrylic near lights for long periods.
- Sage green (Color A): 20 g, about 62 m
- Cream (Color B): 20 g, about 62 m
These quantities include a margin for a gauge swatch and weaving in. One ornament uses about 15 g of each color.
Tools and extras:
- 2.75 mm (US C-2) crochet hook
- Tapestry needle
- Scissors and stitch markers
- One 3.15 in (8.0 cm) clear glass or plastic ball ornament with a removable cap
- Optional: a micro LED fairy light string sized for fillable ornaments
- Rust-proof pins and a spray bottle for blocking
Abbreviations (US Terms)
- ch – chain
- sc – single crochet
- dc – double crochet
- sl st – slip stitch
- sc2tog – single crochet 2 together
- BLO – back loop only
- sk – skip
- st(s) – stitch(es)
- rep – repeat
Special stitches:
- Shell: 5 dc in the same stitch.
- Half shell: 3 dc in the same stitch.
- Back-bump sl st: a slip stitch worked into the bump on the back of a chain, which makes a firm, rounded cord.
Gauge and Checkpoints
Gauge: 7 sc = 1 in (2.5 cm) in sc rows. One full 6-row pattern repeat = 1.6 in (4.1 cm) measured across the rows.
Make one test repeat before you start the cover. Ch 32 and work Rows 1–6 below. This test piece is a complete swatch.
- Checkpoint 1: Row 1 measures 4.4 in (11.2 cm) long.
- Checkpoint 2: Rows 1–6 measure 1.6 in (4.1 cm) across the rows.
- Checkpoint 3: After Row 35 the flat panel measures about 9.4 in (23.9 cm) across.
- Checkpoint 4: The joined tube measures 9.6 in (24.4 cm) around, about 0.3 in (0.8 cm) less than the 9.9 in (25.1 cm) circumference of the ball. This small negative ease keeps the cover snug.
If your swatch is too big, go down one hook size. If it is too small, go up one hook size. Row length matters most. If Row 1 runs longer than 4.6 in (11.7 cm), the cover will sag at the poles.
Cover Panel
Rows run from pole to pole. Fasten off at each color change and leave 4 in (10.2 cm) tails. The bands will hide these tails later.
With Color A, ch 32.
Repeat 1
Row 1 (Color A, shell row): Sc in 2nd ch from hook, sk 2 ch, shell in next ch, sk 2 ch, sc in next ch; rep from * 4 more times. Turn. (5 shells and 6 sc = 31 sts)*
Row 2 (Color A, offset shell row): Ch 3 (counts as dc), 2 dc in first sc (half shell made), sc in center dc of next shell, shell in next sc; rep from * 3 more times, sc in center dc of last shell, half shell in last sc. Fasten off. (3 + 24 + 1 + 3 = 31 sts)*
The offset shells sit between the shells of Row 1, so the two rows lock together into one column of stacked fans.
Row 3 (Color B, mesh row): Turn. Join Color B in the last st. Ch 1, sc in same st, ch 5, sk 2 sts, sc in next st; rep from * 9 more times. The last sc goes in the top of the ch-3. Turn. (11 sc and 10 ch-5 loops)*
Row 4 (Color B): Ch 5 (counts as dc + ch 2), sc in first ch-5 loop, ch 5, sc in next ch-5 loop; rep from * 8 more times, ch 2, dc in last sc. Turn. (10 sc, 9 full loops, and 2 half loops)*
Row 5 (Color B): Ch 1, sc in first dc, ch 5, sc in next ch-5 loop; rep from * 8 more times, ch 5, sc in 3rd ch of turning ch-5. Fasten off. (11 sc and 10 ch-5 loops)*
Rows 3–5 build two rows of offset diamonds. This is the cream lattice between the fan columns.
Row 6 (Color A, base row): Turn. Join Color A in the first sc. Ch 1, sc in same sc, 3 sc in next ch-5 loop; rep from * 9 more times. Turn. (1 + 30 = 31 sc)*
Repeats 2–6
Row 7 (shell row): With Color A, ch 1, sc in first sc, sk 2 sc, shell in next sc, sk 2 sc, sc in next sc; rep from * 4 more times. Turn. (31 sts)*
Rows 8–12: Work as Rows 2–6. (31 sts at the end of Row 12)
Repeat Rows 7–12 three more times (Rows 13–30).
Rows 31–35: Work as Rows 7–11. Do not work a base row. (Row 35: 11 sc and 10 ch-5 loops)
The panel now has 6 fan columns and 6 mesh sections. It should measure about 9.4 in (23.9 cm) across.
Joining Row
Row 36 (Color A, joining row): Fold the panel into a tube with the wrong side out. Hold the foundation chain behind Row 35, with the chain’s free loops lined up under Row 35. Join Color A in the first sc of Row 35. Ch 1, sc through that sc and the first foundation ch together, 3 sc in next ch-5 loop, catching the next 3 foundation ch with each sc group; rep from * 9 more times. Fasten off. (31 sc, matching the 31 foundation ch one to one)*
This row is the sixth base row. That gives every repeat the same 6 rows, and the seam is invisible in the pattern. Turn the tube right side out. It measures 9.6 in (24.4 cm) around and 4.4 in (11.2 cm) from end to end.
Bow
All bow parts use Color B. The BLO rows make soft ridges for a ribbed texture.
Loops strip: Ch 41. Sc in 2nd ch from hook and in each ch across. (40 sc)
Rows 2–4: Ch 1, turn, sc BLO in each st across. (40 sc) Fasten off. The strip measures 5.7 in x 0.5 in (14.5 cm x 1.3 cm).
Tails strip: Ch 25. Sc in 2nd ch from hook and across. (24 sc) Work Rows 2–4 the same way as the loops strip. (24 sc) The strip measures 3.4 in (8.6 cm) long.
Center wrap: Ch 9. Sc in 2nd ch from hook and across. (8 sc) Work 2 more rows of sc BLO. (8 sc) The wrap measures 1.1 in (2.8 cm) long.
Assemble: Fold both short ends of the loops strip to the center and overlap them by 0.25 in (0.6 cm). Stitch them in place. Fold the tails strip into a shallow V and lay it behind the loops. Pinch the centers together. Wrap the center wrap around them and sew its ends together at the back. The finished bow measures about 2.8 in (7.1 cm) across.
Hanging Cord
With Color A, ch 60. Sl st in the back bump of each ch across. (60 sl sts) The cord measures 8.6 in (21.8 cm) long. Fasten off and leave 6 in (15.2 cm) tails.
Border: Top and Bottom Bands
Border gauge: 7 sc = 1 in (2.5 cm), the same as the panel.
Each open end of the tube has 36 row-ends: 6 per repeat. Work 8 sc into the row-ends of each repeat:
- Shell rows (2 rows): 2 sc each = 4 sc
- Mesh rows (3 rows): 1 sc each = 3 sc
- Base or joining row: 1 sc
Top Band
Rnd 1: With the right side facing, join Color A at the joining seam. Work 8 sc across each repeat, 6 times. Sl st to first sc. (48 sc) Work over the color-change tails as you go.
Rnd 2: Ch 1, sc in next 2 sts, sc2tog; rep from * around. Sl st to first sc. (36 sc)*
Rnd 3: Ch 1, sc in next st, sc2tog; rep from * around. Sl st to first sc. Fasten off. (24 sc)*
Twenty-four sc measures 3.4 in (8.6 cm). This fits snugly around the ball’s neck, just below the cap rim.
Insert the Ball
Remove the cap. Add fairy lights now if you are using them. Slip the ball into the cover through the open bottom end. Push the neck up through the top band, then put the cap back on.
Bottom Band
Rnd 1: Join Color A at the seam on the bottom end. Work 8 sc per repeat, 6 times, the same way as the top band. Sl st to first sc. (48 sc)
Rnd 2: Ch 1, sc in next 2 sts, sc2tog; rep from * around. (36 sc)*
Rnd 3: Ch 1, sc in next st, sc2tog; rep from * around. (24 sc)*
Rnd 4: Ch 1, sc2tog around. (12 sc) Fasten off and leave an 8 in (20.3 cm) tail. Weave the tail through the front loops of all 12 sts, pull it tight, and secure it.
Why the math works: 8 sc per repeat x 6 repeats = 48 sc. Every repeat is identical, so each decrease round removes the same amount from each column, and the fan columns stay straight as they curve over the poles. Rnd 2 removes 12 sts (48 to 36). Rnd 3 removes 12 sts (36 to 24). Rnd 4 halves the count (24 to 12). The panel, the top band, and the bottom band add up to 0.4 in + 4.4 in + 0.5 in = 5.3 in (13.5 cm). This matches the bottom-pole-to-neck distance on the ball.
Finishing
Thread both cord ends down through the cap’s hanger loop. Pass the ends through the center wrap of the bow from front to back. Knot them together so the loop stands about 4 in (10.2 cm) high. Sew the bow to the top band so that it covers the cap.
Final Blocking
- Before you join the panel, pin it flat to 9.4 in x 4.4 in (23.9 cm x 11.2 cm). Open each mesh diamond with the pins.
- Mist the panel with water and let it dry fully.
- Once the cover is on the ball, mist the cover lightly. Remove the fairy lights first.
- Nudge each fan column so it runs straight from pole to pole.
- Center the mesh diamonds between the columns.
- Shape the bow loops around a rolled tissue. Starch them lightly if you want crisp loops.
- Let everything dry for 12 hours before hanging.
Final Quality-Control Checklist
- All 6 fan columns are straight and evenly spaced.
- The mesh shows clear, open diamonds.
- The joining seam blends into the pattern.
- The top band sits snugly under the cap rim.
- The bottom is tightly closed with no gap.
- The bow is centered and the cord knot is hidden.
- All tails are woven in and nothing pokes through the mesh.
Troubleshooting
- The cover is loose on the ball: Your row gauge is too large. Go down one hook size, or remake the cover with 5 repeats.
- The fans look flat: The sc between shells is too loose. Work it firmly.
- The mesh twists: Count to make sure you have 10 loops per row. Ch 5 exactly.
- The top band won’t pass over the cap: Remove the cap before you insert the ball.
- The bottom has a hole: Cinch through the front loops, then make a second pass.
Care
Hand-wash only after removing the lights. Spot-clean with cool water, reshape the cover on the ball, and let it air-dry.
Final Notes
Check each measurement in order. The 7 sc gauge gives a 31-st row of 4.4 in (11.2 cm). Each repeat is 1.6 in (4.1 cm). Six repeats make a tube 9.6 in (24.4 cm) around. The bands of 48 to 24 sc and 48 to 12 sc close the cover, and the finished ornament measures 3.3 in (8.4 cm) across. Make one, then fill your tree.
Happy crocheting!