

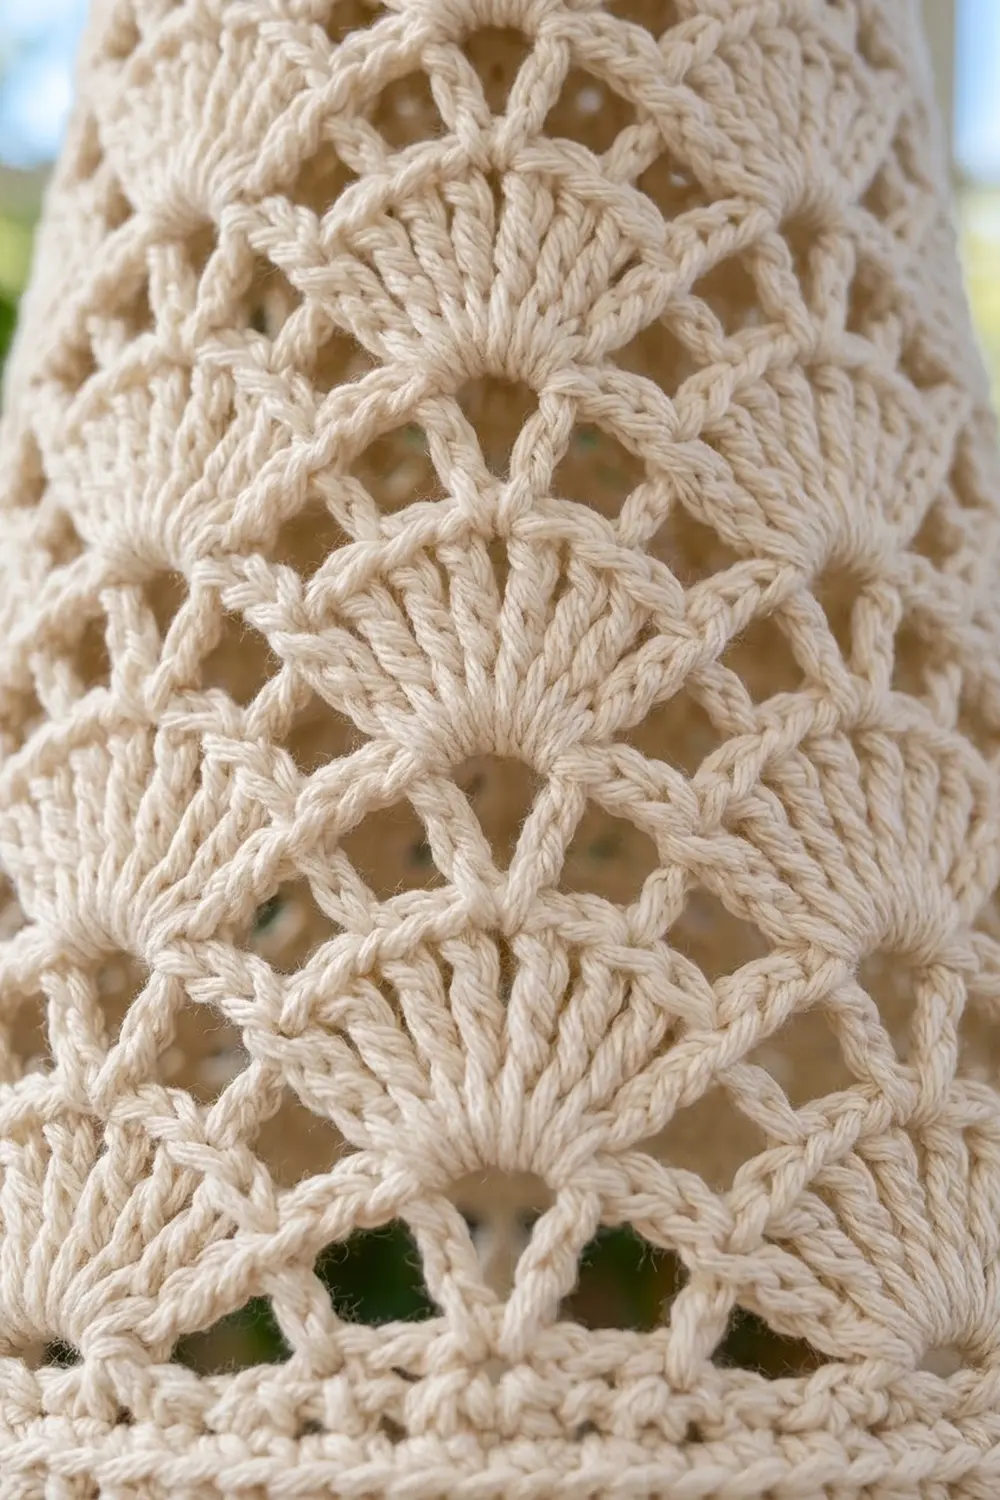
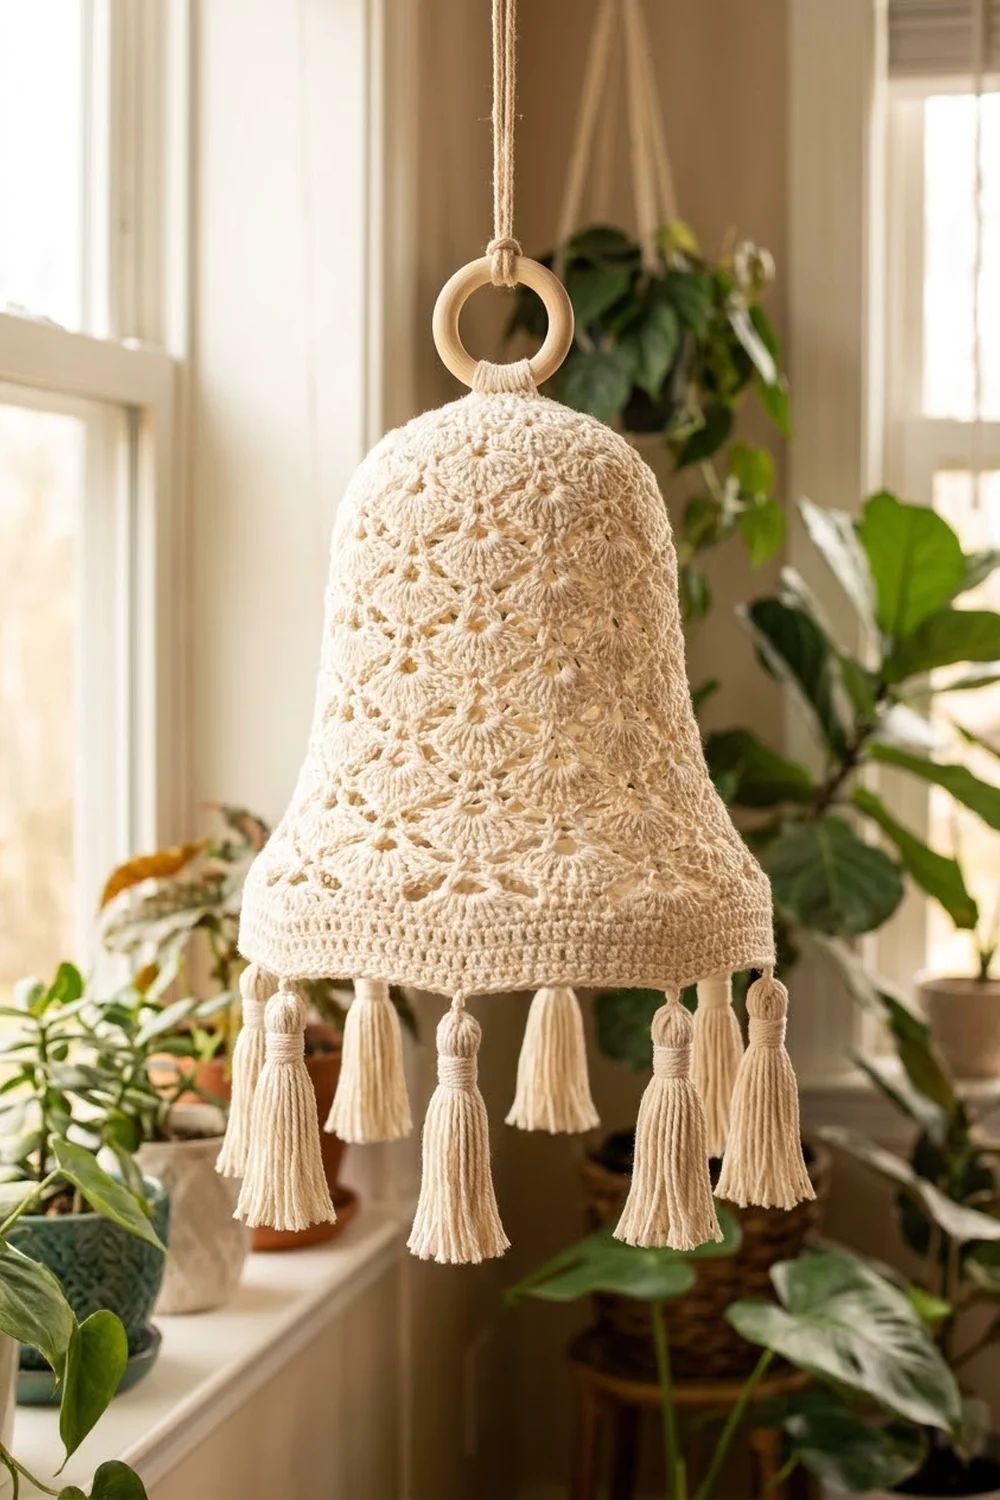
The Sunlit Lace Bell is a hanging decoration with a soft, airy look. Fan-shaped shells alternate with V-stitches in staggered rounds, so the sides fill with small diamond windows that catch the light. A solid flared brim gives the shape a firm bottom edge, and eight round-headed tassels hang beneath it.
The whole bell uses one color: a warm cream cotton. Because the color is plain, the texture does the work. The lace looks good in a sunny window, over a reading nook, or among houseplants.
This pattern uses US crochet terms. The finished bell is about 10 in (25.4 cm) tall and about 11 in (27.9 cm) across the bottom opening. With tassels, it hangs about 13½ in (34.3 cm) from the ring to the longest tassel tip.
You work the bell top-down in one continuous piece. It starts as a small single crochet dome. Then come three lace sections, each with larger shells than the last, so the bell widens without any increase rounds in the lace. A solid brim finishes the bottom. The tassels and wooden ring are added at the end.
Finished Size and Construction
- Finished size: about 10 in (25.4 cm) tall × 11 in (27.9 cm) bottom diameter
- Skill level: Intermediate
- Terminology: US crochet terms
- Yarn weight: Worsted (#4) cotton
- Hook: 5 mm (H-8)
- Number of pieces: 1 crocheted bell, plus 8 tassels
- Layout: worked top-down in joined rounds
- Piece size before the brim (after Rnd 18): about 9 in (22.9 cm) diameter × 8¾ in (22.2 cm) tall
- Brim (border) depth: about 1½ in (3.8 cm)
Materials
Yarn: Use a smooth, mercerized or combed worsted-weight cotton. Cotton holds the bell shape and shows stitch definition far better than acrylic. Avoid fuzzy or very splitty yarns, because the shells need crisp edges.
- Cream: 130 g (about 220 m / 240 yd). That covers about 75 g for the bell and about 30 g for the tassels, plus extra.
The quantities include a margin of about 20% for gauge swatching and tension differences.
Tools:
- 5 mm (H-8) crochet hook
- 1 natural wooden ring, 1½ in (3.8 cm) diameter
- 8 wooden beads, 12 mm, for round tassel heads (optional)
- Cardboard for tassels, cut 4 in (10.2 cm) and 3¼ in (8.3 cm) tall
- Stitch marker
- Tapestry needle
- Scissors
- Fabric stiffener or starch spray (optional)
- An inflated balloon or an upturned bowl for blocking
Abbreviations (US Terms)
- ch – chain
- sl st – slip stitch
- sc – single crochet
- dc – double crochet
- rev sc – reverse single crochet (crab stitch)
- sp – space
- st(s) – stitch(es)
- rnd – round
Special stitches:
- V-st (small): (dc, ch 1, dc) in the same st or sp.
- V-st (large): (dc, ch 2, dc) in the same st or sp. Used in Section 3 only.
- Shell: the stated number of dc worked into one sp, for example “5-dc shell.”
- Rev sc: work sc from left to right (right-handed). Insert the hook into the next st to the right, pull up a loop, yarn over and draw through both loops.
Gauge and Checkpoints
Sc gauge: 14 sc and 16 rnds = 4 in (10.2 cm).
Lace gauge: at Rnd 10, one repeat (one 5-dc shell plus one V-st) measures about 1¾ in (4.4 cm) wide. Four lace rounds measure about 2.4 in (6.1 cm) tall.
To test, work Rnds 1–10 first and check your measurements. This short section is a gauge swatch and the start of your bell in one.
Checkpoints:
| After | Diameter | Circumference | Height |
|---|---|---|---|
| Rnd 5 | 3 in (7.6 cm) | – | dome |
| Rnd 10 | 4½ in (11.4 cm) | 14 in (35.6 cm) | 4 in (10.2 cm) |
| Rnd 14 | 6¾ in (17.1 cm) | 21 in (53.3 cm) | 6¼ in (15.9 cm) |
| Rnd 18 | 9 in (22.9 cm) | 28 in (71.1 cm) | 8¾ in (22.2 cm) |
| Rnd 23 | 11 in (27.9 cm) | 34 in (86.4 cm) | 10 in (25.4 cm) |
If your work is too big (more than ½ in / 1.3 cm over at Rnd 10), change to a 4.5 mm hook. If it is too small, change to a 5.5 mm hook. Keep the same hook for the whole bell so the sections flare evenly.
Pattern
All rounds are joined with a sl st, and you do not turn. A beginning ch-3 counts as a dc. A beginning ch-4 counts as dc + ch 1, and a beginning ch-5 counts as dc + ch 2.
Top Dome
Rnd 1: Make a magic ring, ch 1, 8 sc in the ring. Pull the ring tight and join. (8 sc)
Rnd 2: Ch 1, 2 sc in each st, join. (16 sc)
Rnd 3: Ch 1, sc in next st, 2 sc in next st; repeat from * 8 times, join. (24 sc)
Rnd 4: Ch 1, sc in next 2 sts, 2 sc in next st; repeat from * 8 times, join. (32 sc)
Rnd 5: Ch 1, sc in each st, join. (32 sc)
This even round turns the edge downward and forms the rounded crown. Checkpoint: the dome measures about 3 in (7.6 cm) across.
Rnd 6 (V-st base): Sl st in next st, ch 4, dc in the same st (first V-st). Skip 1 st, V-st in next st; repeat from * 14 more times, skip the last st, and join to the 3rd ch of ch-4. (16 small V-sts)
Section 1: 5-Dc Shells
Rnd 7: Sl st into the first V-sp, ch 3, 4 dc in the same sp (first shell). Small V-st in next V-sp, 5-dc shell in next V-sp; repeat from * 6 more times. Small V-st in the last V-sp and join to the top of ch-3. (8 shells + 8 V-sts = 64 sts)
Rnd 8: Sl st in the next 2 dc to reach the center (3rd) dc of the shell. Ch 4, dc in the same st. 5-dc shell in next V-sp, small V-st in the center dc of next shell; repeat from * 6 more times. Work a 5-dc shell in the last V-sp and join to the 3rd ch of ch-4. (8 V-sts + 8 shells = 64 sts)
Rnd 9: Sl st into the first V-sp, ch 3, 4 dc in the same sp. Small V-st in the center dc of next shell, 5-dc shell in next V-sp; repeat from * 6 more times. Small V-st in the center dc of the last shell and join. (64 sts)
Rnd 10: Repeat Rnd 8. (64 sts)
Shells now sit above V-sts and V-sts above shells. This stagger is what opens the diamond windows. Checkpoint: 4½ in (11.4 cm) diameter, 4 in (10.2 cm) tall.
Section 2: 7-Dc Shells
Rnd 11: Sl st into the first V-sp, ch 3, 6 dc in the same sp. Ch 1, small V-st in the center (3rd) dc of next shell, ch 1, 7-dc shell in next V-sp; repeat from * 6 more times. Ch 1, small V-st in the center dc of the last shell, ch 1, and join. Each repeat is 7 + 1 + 3 + 1 = 12 sts. (96 sts)
Rnd 12: Sl st in the next 3 dc to reach the center (4th) dc. Ch 4, dc in the same st. Ch 1, 7-dc shell in next V-sp, ch 1, small V-st in the center (4th) dc of next shell; repeat from * 6 more times. Ch 1, 7-dc shell in the last V-sp, ch 1, and join. (96 sts)
Rnd 13: Repeat Rnd 11, but work each V-st into the center (4th) dc of the 7-dc shells. (96 sts)
Rnd 14: Repeat Rnd 12. (96 sts)
Checkpoint: 6¾ in (17.1 cm) diameter, 6¼ in (15.9 cm) tall.
Section 3: 9-Dc Shells
Rnd 15: Sl st into the first V-sp, ch 3, 8 dc in the same sp. Ch 2, large V-st in the center (4th) dc of next shell, ch 2, 9-dc shell in next V-sp; repeat from * 6 more times. Ch 2, large V-st in the center of the last shell, ch 2, and join. Each repeat is 9 + 2 + 4 + 2 = 17 sts. (136 sts)
Rnd 16: Sl st in the next 4 dc to reach the center (5th) dc. Ch 5, dc in the same st. Ch 2, 9-dc shell in next V-sp, ch 2, large V-st in the center (5th) dc of next shell; repeat from * 6 more times. Ch 2, 9-dc shell in the last V-sp, ch 2, and join to the 3rd ch of ch-5. (136 sts)
Rnd 17: Repeat Rnd 15, but work each V-st into the center (5th) dc of the 9-dc shells. (136 sts)
Rnd 18: Repeat Rnd 16. (136 sts)
Checkpoint: 9 in (22.9 cm) diameter, 8¾ in (22.2 cm) tall. Do not fasten off.
Brim (Border)
Border gauge: the brim is worked at the sc gauge, 14 sc = 4 in (10.2 cm), or 3.5 sc per inch.
Rnd 19 (conversion round): Ch 1. Sc in next dc, sc in ch-2 sp, sc in next dc, sc in next ch-2 sp, sc in each of next 9 dc, sc in next ch-2 sp; repeat from * 8 times, and join.
- Sts worked 1 per existing dc: 11 per repeat × 8 = 88
- Extra sts, 1 into each ch-2 sp: 3 per repeat × 8 = 24
- Total: 88 + 24 = 112 sc
Rnd 20: Ch 1, sc in next 13 sts, 2 sc in next st; repeat from * 8 times, and join. (120 sc)
Rnd 21: Ch 3, dc in each st around, and join. (120 dc)
Rnd 22: Ch 1, sc in each st, join. (120 sc)
Rnd 23: Ch 1, rev sc in each st around, join, and fasten off. (120 rev sc)
Why the math works: the lace at Rnd 18 is about 28 in (71.1 cm) around. At 3.5 sc per inch, 112 sc relaxes to about 32 in (81.3 cm), and 120 sc relaxes to about 34 in (86.4 cm). That gradual widening makes the gentle flare without any ruffling.
If you put one sc into every chain instead, the round would have 136 sts and need 39 in (99.1 cm), so the brim would wave. Working one sc into each space keeps the flare controlled.
Tassels (Make 8)
Large tassels (make 4):
- Wrap yarn 35 times around the 4 in (10.2 cm) card.
- Tie the top with a 10 in (25.4 cm) strand and cut the bottom loops.
- If you want a round head, push a 12 mm bead into the center under the top tie.
- Wrap the neck tightly about ¾ in (1.9 cm) below the top.
- Trim the tassel to 3½ in (8.9 cm).
Small tassels (make 4): Make them the same way with 28 wraps around the 3¼ in (8.3 cm) card. Trim to 2¾ in (7.0 cm).
Tassel Cords and Ring
- Find the cord positions. With the bell upside down, find the 5th sc of each 9-sc shell group on Rnd 19. That gives 8 positions, one centered under each shell.
- Make the cords. From the inside, join yarn with a sl st in the first position, ch 7 (about 1¼ in / 3.2 cm), and fasten off. Repeat at each position.
- Attach the tassels. Sew a tassel to the end of each cord, alternating large and small.
- Cover the ring. Join yarn to the wooden ring and work 20 sc around it. Do not cover the top quarter of the ring.
- Attach the ring. Sew the base of the covered section to the center of Rnd 1.
- Add the hanger. Chain 10 in (25.4 cm), loop it through the ring, and knot it.
Final Blocking
- Soak the bell in cool water for 10 minutes, then press out the water in a towel. Do not wring it.
- Inflate a balloon to about 9 in (22.9 cm) wide, or use an upturned bowl of that size.
- Slide the bell on so the dome sits snugly on top.
- Smooth the shells into even fans and open each diamond window with your fingers.
- Pull the brim outward so it measures 11 in (27.9 cm) across, and pin it to a towel if needed.
- If you want a firmer bell, spray it with fabric stiffener or starch.
- Let it dry completely, usually 24–48 hours.
- Remove the form, then comb and re-trim the tassels.
Final Quality-Control Checklist
- Rnd 18 has 136 sts: 8 shells and 8 large V-sts.
- All 8 repeats line up in straight vertical columns.
- Rnd 19 has 112 sc, and Rnds 20–23 each have 120 sts.
- The bell is 10 in (25.4 cm) tall and 11 in (27.9 cm) across.
- The brim lies flat without waving.
- The 8 tassels are evenly spaced, alternate large and small, and hang straight.
- The ring is centered and the bell hangs level.
- All ends are woven in securely.
Troubleshooting
- Shells lean to one side: you may be placing V-sts in the wrong dc. Recount to make sure each V-st goes into the exact center dc of its shell.
- The bell is too narrow: your dc tension is tight. Go up one hook size, or work the dc more loosely.
- The brim ruffles: you probably worked more than 1 sc per ch-2 sp in Rnd 19. Recount to 112.
- The brim cups inward: your tension is too tight. Work Rnds 21–22 with a hook one size larger.
- The dome is flat: make sure Rnd 5 has no increases.
- The bell hangs crooked: re-center the ring over Rnd 1 and check that the tassels alternate evenly.
Care
Spot clean, or hand wash in cool water. Reshape the bell over a form and let it dry flat. If you used stiffener, reapply it after washing.
Final Notes
The measurements build on each other in this order:
- The 3 in (7.6 cm) dome sets up 16 V-sts.
- The 5-dc shells widen the bell to 4½ in (11.4 cm).
- The 7-dc shells take it to 6¾ in (17.1 cm).
- The 9-dc shells take it to 9 in (22.9 cm).
- The 112-to-120 sc brim flares it to 11 in (27.9 cm).
Check each stage before moving on, and the bell will hang evenly. Happy crocheting!