

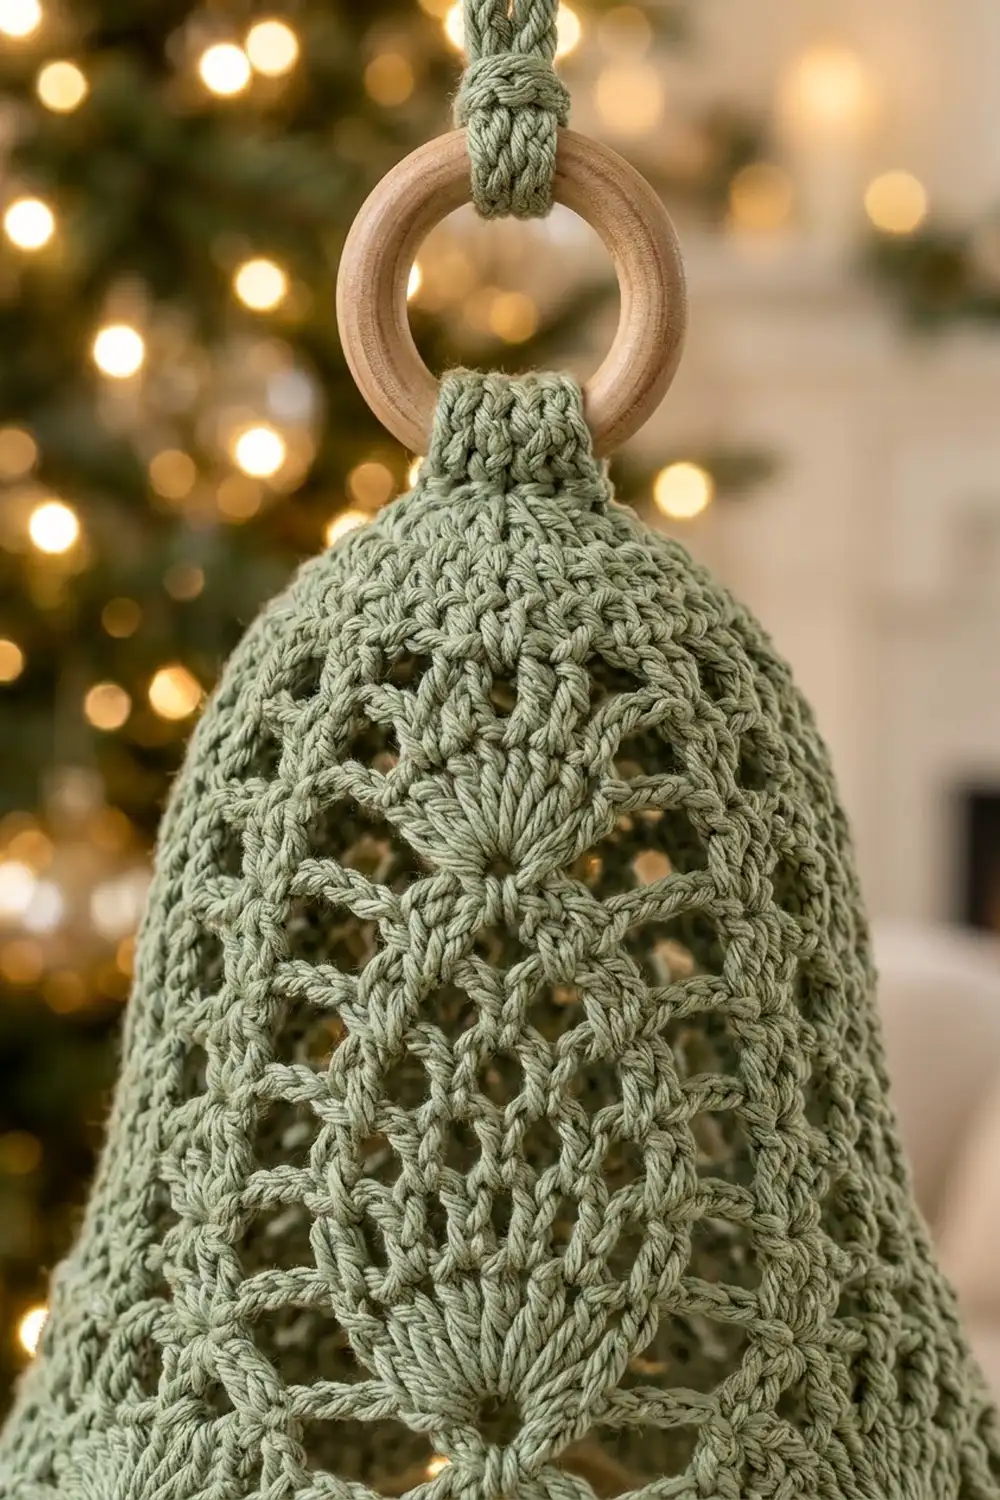
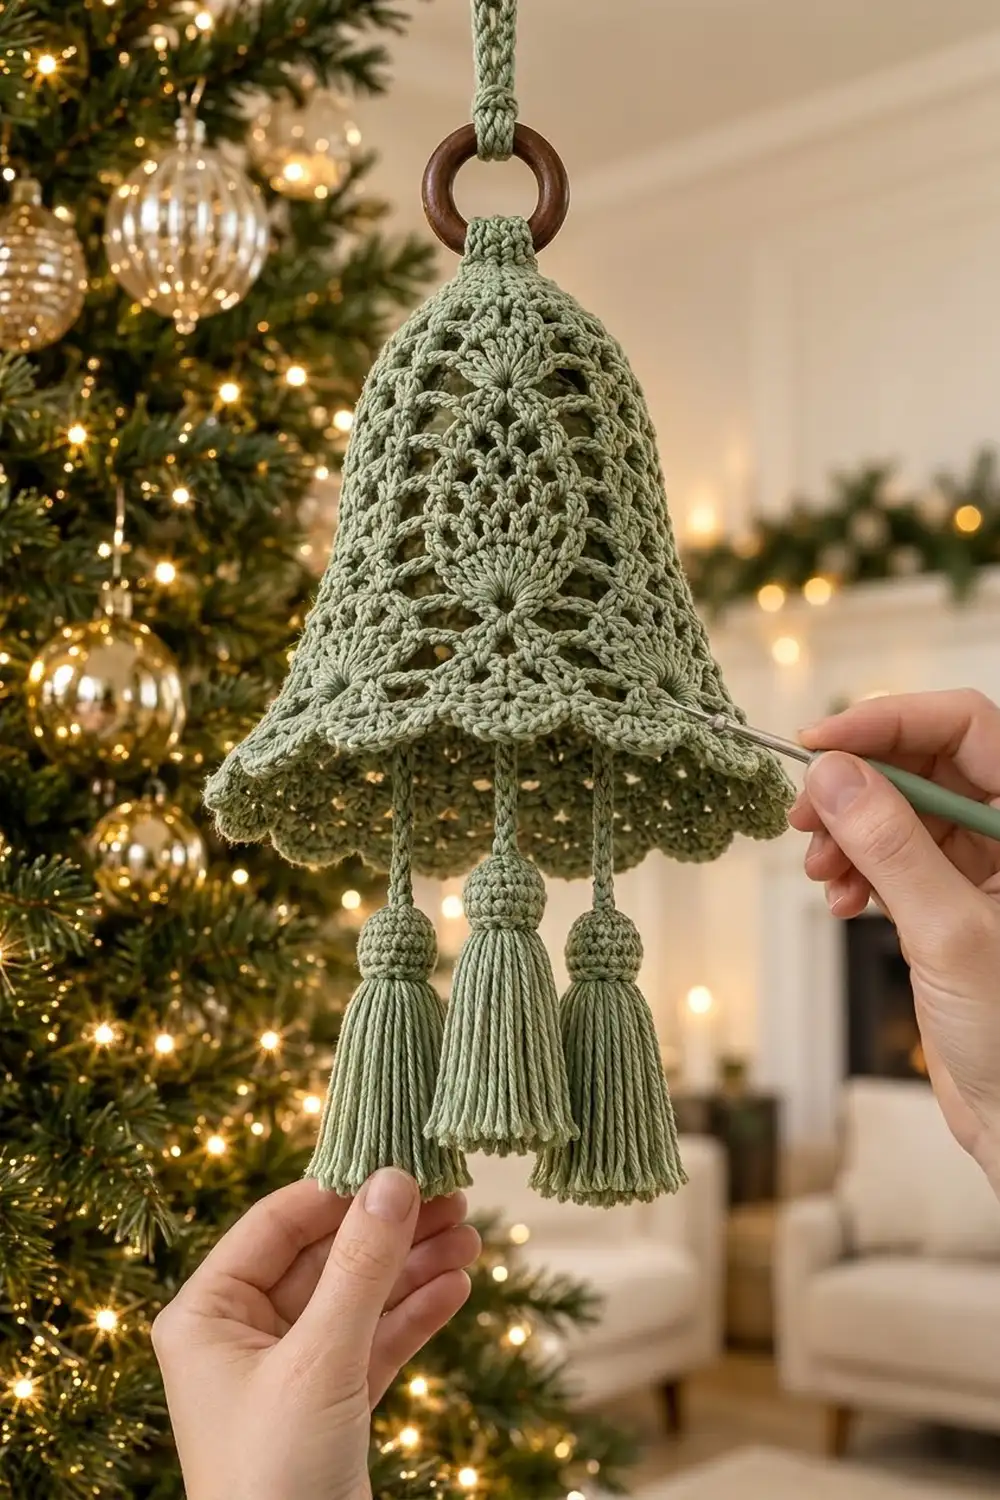
This lace bell is a soft, vintage-style tree ornament worked in one sage green cotton. Classic pineapple panels climb from a fanned base near the hem up to a small rounded cap. Narrow shell columns separate the panels, and a row of rounded scallops finishes the edge.
A natural wooden ring and a crocheted tab hold the bell at the top. Three tassels with crocheted ball tops hang from inside the bell, with the center tassel set slightly higher than the other two. The look is quiet, textured, and festive without being loud.
The pattern uses US crochet terms. The finished bell is 5.5 in (14.0 cm) tall and 6.5 in (16.5 cm) across the hem. Including the side tassels, it hangs about 10 in (25.4 cm) from the cap to the lowest tassel tip.
You work the bell from the bottom up in joined rounds. Start with a chain ring at the hem, build six pineapple panels that narrow naturally as their loops decrease, and close the top with decrease rounds. The scalloped border goes into the free loops of the foundation chain. Then come blocking, the hanger, and the tassels.
Finished Size and Construction
- Finished size: 5.5 in (14.0 cm) tall, 6.5 in (16.5 cm) hem diameter, 20.4 in (51.8 cm) hem circumference
- Skill level: Intermediate
- Terminology: US
- Yarn weight: DK (light worsted / 3), cotton
- Hook: 3.0 mm (C/2–D/3)
- Number of pieces: 1 bell, plus small attached parts (1 tab, 1 hanging cord, 3 tassel cords, 3 tassels with ball tops)
- Layout: six pineapple panels around, separated by shell columns
- Piece size (bell body before border): 5 in (12.7 cm) tall, 20 in (50.8 cm) around the hem
- Border depth: 0.5 in (1.3 cm)
Materials
Yarn: Use a smooth, mercerized or combed DK cotton. Cotton shows lace clearly and holds its shape after starching. Avoid fuzzy or very stretchy yarns, because they blur the pineapple loops.
- Sage green: 60 g, about 138 m (2.3 m per gram), split roughly as follows:
- Bell body and border: about 22 g / 51 m
- Three tassels: about 15 g / 35 m
- Cords, tab, and balls: about 5 g / 12 m
These quantities include a margin of about 18 g for swatching and tassel trimming.
Tools:
– 3.0 mm crochet hook
– Wooden ring, 1.5 in (3.8 cm) outside diameter
– Tapestry needle
– Scissors
– Stiff card, 3 in (7.6 cm) tall, for winding tassels
– A small amount of fiberfill (optional, for the balls)
– Fabric stiffener or spray starch
– A bell-shaped form for blocking, such as an inverted plastic cup or small bowl about 6.5 in (16.5 cm) across
– Rust-proof pins
– Stitch marker
Abbreviations (US Terms)
- ch – chain
- sl st – slip stitch
- sc – single crochet
- dc – double crochet
- tr – treble crochet
- sc2tog – single crochet 2 together
- dc2tog – double crochet 2 together
- inc – 2 sc in the same stitch
- sk – skip
- st(s) – stitch(es)
- sp(s) – space(s)
- MR – magic ring
Special stitches
– Shell: (2 dc, ch 2, 2 dc) in the same stitch or space.
– Beginning shell: ch 3 (counts as dc), then (dc, ch 2, 2 dc) in the same stitch or space.
– Fan: 7 tr in the same stitch.
Gauge and Checkpoints
Gauge: 24 dc = 5 in (12.7 cm). Five rounds of the pineapple section (Rnds 4–8) measure about 2.25 in (5.7 cm) tall.
Test before committing: chain 96, join, and work Rnd 1. Lay the ring flat without stretching it. It should measure 10 in (25.4 cm) across the fold, which equals 20 in (50.8 cm) around.
Checkpoints (measured from the foundation edge upward):
– After Rnd 1: 0.5 in (1.3 cm) tall, 20 in (50.8 cm) around
– After Rnd 3: 1.75 in (4.4 cm) tall
– After Rnd 9: 4 in (10.2 cm) tall
– After Rnd 13: 5 in (12.7 cm) tall
– After the border: 5.5 in (14.0 cm) total
If your ring is too big (over 10.5 in / 26.7 cm flat), go down to a 2.75 mm hook. If it is too small (under 9.5 in / 24.1 cm flat), go up to a 3.25 mm hook. Do not change the stitch counts, because the six-panel math depends on 96 stitches.
Bell Body
Every round starts at a shell, so the beginning ch-3 always counts as the first dc. Join each round with a sl st to the top of the beginning ch-3.
Foundation: Ch 96. Join with a sl st to the first ch to form a ring, taking care not to twist the chain.
Rnd 1: Ch 3 (counts as dc). Dc in the next ch and in each ch around. Join. (96 dc)
Rnd 2 (fan set-up): Beginning shell in the same st as the join, ch 3, sk 7 dc, fan in the next dc, ch 3, sk 7 dc. Shell in the next dc, ch 3, sk 7 dc, fan in the next dc, ch 3, sk 7 dc. Repeat from * 4 more times. Join. (6 shells, 6 fans = 42 tr, 12 ch-3 sps)
Each repeat uses 16 sts: 1 for the shell, 7 skipped, 1 for the fan, 7 skipped. The 7 tr fanning out from a single stitch create the spoke-like base of each pineapple.
Rnd 3: Sl st in the next dc and into the ch-2 sp. Beginning shell in the same sp, ch 3, tr in the first tr of the fan, (ch 1, tr in the next tr) 6 times, ch 3. Shell in the next shell sp, ch 3, tr in the first tr, (ch 1, tr in the next tr) 6 times, ch 3. Repeat from * 4 more times. Join. (6 shells, 42 tr, 36 ch-1 sps, 12 ch-3 sps)
This is a conversion round: 1 tr goes into each existing tr (42), and a ch-1 is added between them (6 per fan).
Rnd 4: Sl st to the shell sp. Beginning shell, ch 3, sk the ch-3 sp, sc in the first ch-1 sp, (ch 3, sc in the next ch-1 sp) 5 times, ch 3, sk the ch-3 sp. Shell in the shell sp, ch 3, sk ch-3, sc in the first ch-1 sp, (ch 3, sc in the next ch-1 sp) 5 times, ch 3. Repeat from * 4 more times. Join. (6 shells; each pineapple has 6 sc and 5 inner loops: 36 sc, 30 inner loops)
Rnd 5: Sl st to the shell sp. Beginning shell, ch 3, sk ch-3, sc in the first inner loop, (ch 3, sc in the next loop) 4 times, ch 3. Work the shell and pineapple the same way around. Join. (Each pineapple: 5 sc, 4 inner loops. Total: 30 sc, 24 inner loops)
Rnd 6: Repeat Rnd 5, with (ch 3, sc in the next loop) 3 times. (Each pineapple: 4 sc, 3 inner loops. Total: 24 sc, 18 inner loops)
Rnd 7: Repeat Rnd 5, with (ch 3, sc in the next loop) 2 times. (Each pineapple: 3 sc, 2 inner loops. Total: 18 sc, 12 inner loops)
Rnd 8: Repeat Rnd 5, with (ch 3, sc in the next loop) once. (Each pineapple: 2 sc, 1 inner loop. Total: 12 sc, 6 inner loops)
Rnd 9 (tips): Sl st to the shell sp. Beginning shell, ch 3, sk ch-3, sc in the single inner loop, ch 3. Shell in the shell sp, ch 3, sk ch-3, sc in the inner loop, ch 3. Repeat from * 4 more times. Join. (6 shells, 6 tip sc, 12 ch-3 sps)
The pineapples are now closed. The circumference has dropped to about 6.5 in (16.5 cm), because the chain loops narrow by one each round.
Top Cap
Rnd 10 (conversion): Sl st to the shell sp. Ch 3 (counts as dc), 2 dc in the same sp, dc in the next ch-3 sp, sk the tip sc, dc in the next ch-3 sp. 3 dc in the next shell sp, dc in the next ch-3 sp, sk the sc, dc in the next ch-3 sp. Repeat from * 4 more times. Join.
The count is (6 shell sps × 3 dc) + (12 ch-3 sps × 1 dc) = 30 dc.
Rnd 11: Ch 3, dc2tog over the next 2 sts. Dc in the next st, dc2tog. Repeat from * 8 more times. Join. (20 dc)
Rnd 12: Ch 2, dc in the next st (counts as dc2tog). Dc2tog 9 times. Join. (10 sts)
Rnd 13: Ch 1, sc2tog 5 times. Join. (5 sc)
Cut the yarn, leaving a 6 in (15.2 cm) tail. Weave it through the 5 sts and pull them snug, but leave a small opening for the tassel cords. Do not weave the tail in yet.
The bell body now measures 5 in (12.7 cm) tall and 20 in (50.8 cm) around the hem.
Tassels, Cords, and Hanger
Make these parts now, but attach them after blocking.
Tassel cords (make 3):
– Center cord: Ch 28. Sl st in the back bump of the 2nd ch from the hook and in each ch across. (27 sl st, 5.5 in / 14.0 cm)
– Side cords (make 2): Ch 33. Sl st in the back bump of the 2nd ch and in each ch across. (32 sl st, 6.5 in / 16.5 cm)
Leave a 6 in (15.2 cm) tail at both ends of each cord.
Tassel skirt (make 3):
1. Wrap the yarn 30 times around the 3 in (7.6 cm) card.
2. Slide an 8 in (20.3 cm) strand under the wraps at the top edge and tie it tightly. Cut the loops at the bottom edge.
3. Wrap a separate strand 4 times around the bundle, 0.5 in (1.3 cm) below the tie. Knot it and bury the ends inside the tassel.
Ball top (make 3):
– Rnd 1: 6 sc in a MR. (6)
– Rnd 2: Inc in each st. (12)
– Rnd 3: (Sc, inc) 6 times. (18)
– Rnds 4–5: Sc in each st. (18)
– Rnd 6: (Sc, sc2tog) 6 times. (12)
Thread the tassel’s tie strands up through the MR center with a needle. Push the tied head of the tassel into the ball, adding a pinch of fiberfill if needed.
- Rnd 7: Sc2tog 6 times, working snugly around the tassel neck. (6)
Fasten off and sew the ball’s last round to the tassel neck. The ball is about 1 in (2.5 cm) across, and the finished tassel is 3.5 in (8.9 cm) long including the ball.
Tab: Ch 13. Sc in the 2nd ch from the hook and in each ch across. (12 sc, 2.5 in / 6.4 cm)
Hanging cord: Ch 41. Sl st in the back bump of the 2nd ch and in each ch across. (40 sl st, 8 in / 20.3 cm)
Border
The border is worked into the free loops of the foundation chain, along the bottom edge of Rnd 1.
Border gauge: One scallop repeat of 8 sts = 1.7 in (4.3 cm).
Border Rnd 1: With the hem facing you, join the yarn in the free loop at the base of the Rnd 1 beginning ch-3. Ch 1, sc in each free loop around. Join to the first sc. (96 sc)
That is 1 sc per existing loop, with nothing added. Each pineapple panel has 16 sc.
Border Rnd 2 (scallops): Ch 1. Sc in the next 2 sts, sk 2 sts, 9 dc in the next st, sk 2 sts, sc in the next st. Repeat from * 11 more times. Join to the first sc. (12 scallops: 108 dc + 36 sc = 144 sts)
Fasten off and weave in the end.
Why the math works: 96 = 6 panels × 16 sts = 12 scallops × 8 sts. That gives exactly 2 scallops per pineapple panel, with no partial repeats. The 9-dc fans add a gentle flare, so the hem goes from 20 in (50.8 cm) to 20.4 in (51.8 cm) around: 12 scallops × 1.7 in (4.3 cm). That works out to the 6.5 in (16.5 cm) hem diameter.
Final Blocking
- Soak the bell in cool water with a little stiffener or starch for 5 minutes, then press out the water gently in a towel. Do not wring it.
- Cover your form with plastic wrap. Slide the bell over it, top down, so the cap sits snugly on the top of the form.
- Ease each pineapple panel straight and centered. Line up the shell columns vertically.
- Pin the hem so that each of the 12 scallops is rounded and the hem reads 6.5 in (16.5 cm) across.
- Open every chain loop with a fingertip so the lace shows clearly.
- Let it dry completely, usually 24 hours.
- Assembly:
- Thread the starting tails of the three tassel cords through the top opening and sew them firmly to the inside of Rnd 13. Put the center cord in the middle with one side cord on each side. Pull the Rnd 13 tail closed and weave it in.
- Tie each cord’s end tail to the tie strands of one tassel, then bury the ends in the ball.
- Fold the tab around the wooden ring and sew both ends to the outside of the cap.
- Thread the hanging cord through the ring and join its ends with a square knot to make a 4 in (10.2 cm) loop.
Final Quality-Control Checklist
- Rnd 1 has 96 dc, and the hem measures 20 in (50.8 cm) before the border.
- There are six pineapples, each starting from a 7-tr fan and closing with one tip sc at Rnd 9.
- The shell columns run straight up between the panels.
- The cap closes smoothly with 30, 20, 10, then 5 sts.
- There are 12 even scallops, 2 under each panel.
- The bell is 5.5 in (14.0 cm) tall and 6.5 in (16.5 cm) across the hem.
- The center cord is 5.5 in (14.0 cm) and the side cords are 6.5 in (16.5 cm).
- The tassels are 3.5 in (8.9 cm) long and trimmed evenly.
- All ends are woven in and nothing shows through the lace.
Troubleshooting
- The foundation ring twisted: Check before working Rnd 1. A twist cannot be fixed later.
- The pineapples lean sideways: You probably missed the “sk ch-3” step. Recount so that each pineapple’s sc go only into its own inner loops.
- The hem ruffles: Your tension on the 9-dc fans is too loose. Rework the border with a hook one size smaller.
- The cap puckers: Make the Rnd 12 decreases slightly looser, or block with a little more stretch at the top.
- The bell collapses after blocking: Use a stronger stiffener solution and let it dry fully on the form.
- The tassels look thin: Add 5 more wraps per tassel.
Care
Hand wash in cool water, press out the moisture, and reshape the bell over its form to dry. Store it flat or hanging, away from heavy ornaments that could crush the lace.
Final Notes
The measurement chain is short and reliable. A 96-dc foundation measuring 20 in (50.8 cm) leads to six pineapple panels and a 5 in (12.7 cm) body. The 12-scallop border adds 0.5 in (1.3 cm), which brings the bell to 5.5 in (14.0 cm) tall with a 6.5 in (16.5 cm) hem. Check Rnd 1, and every round after it will fall into place.
Happy crocheting!