

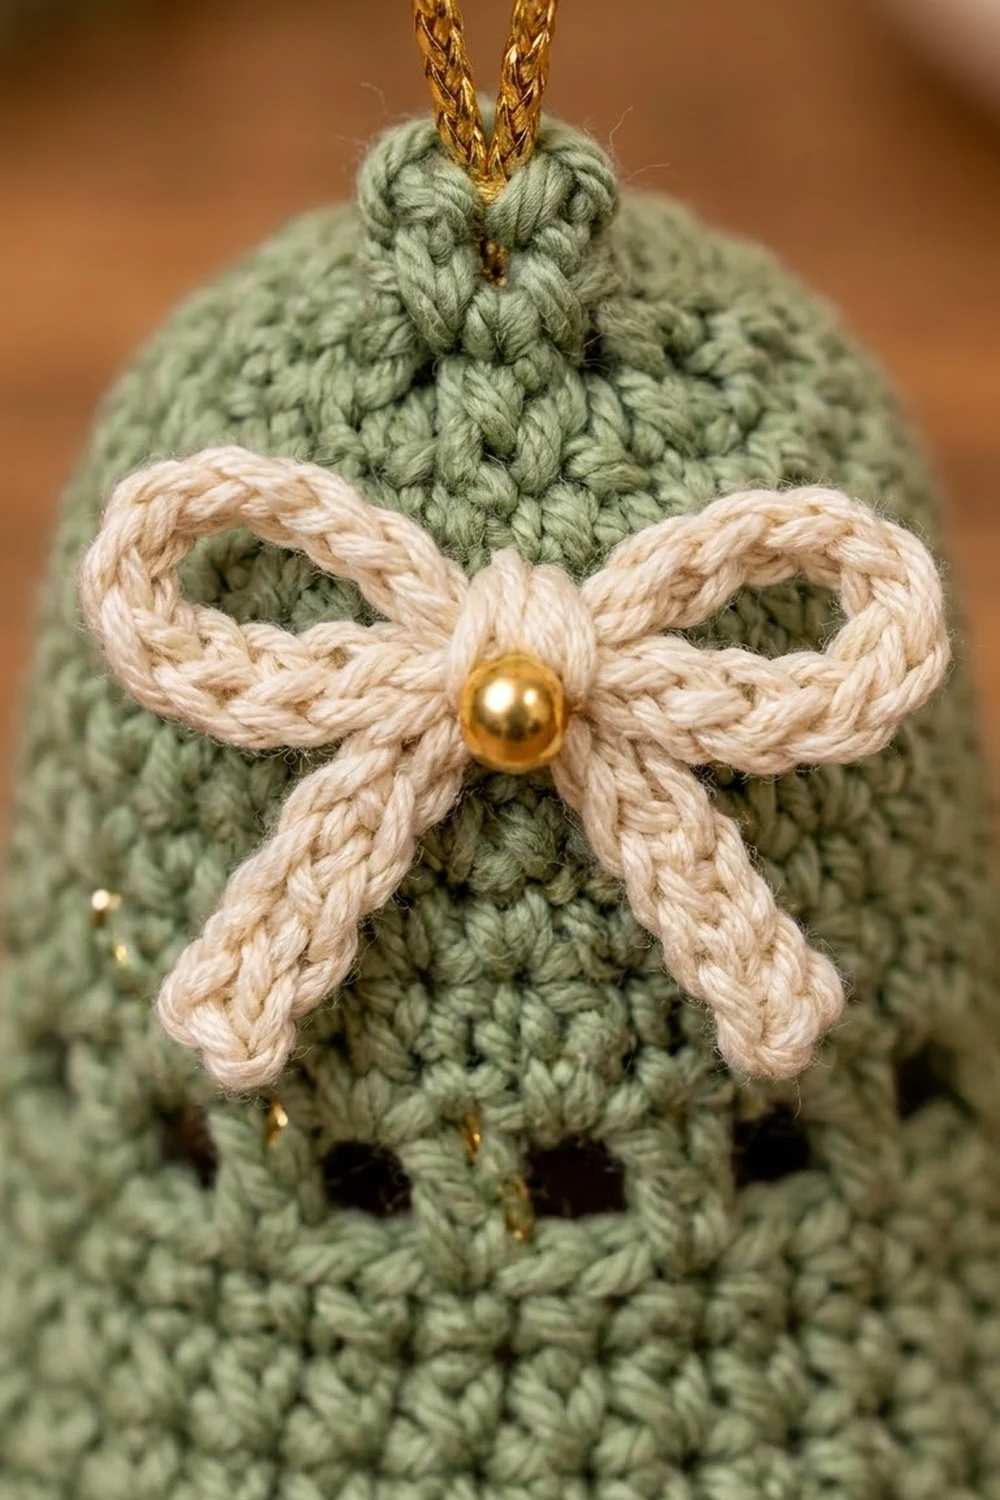
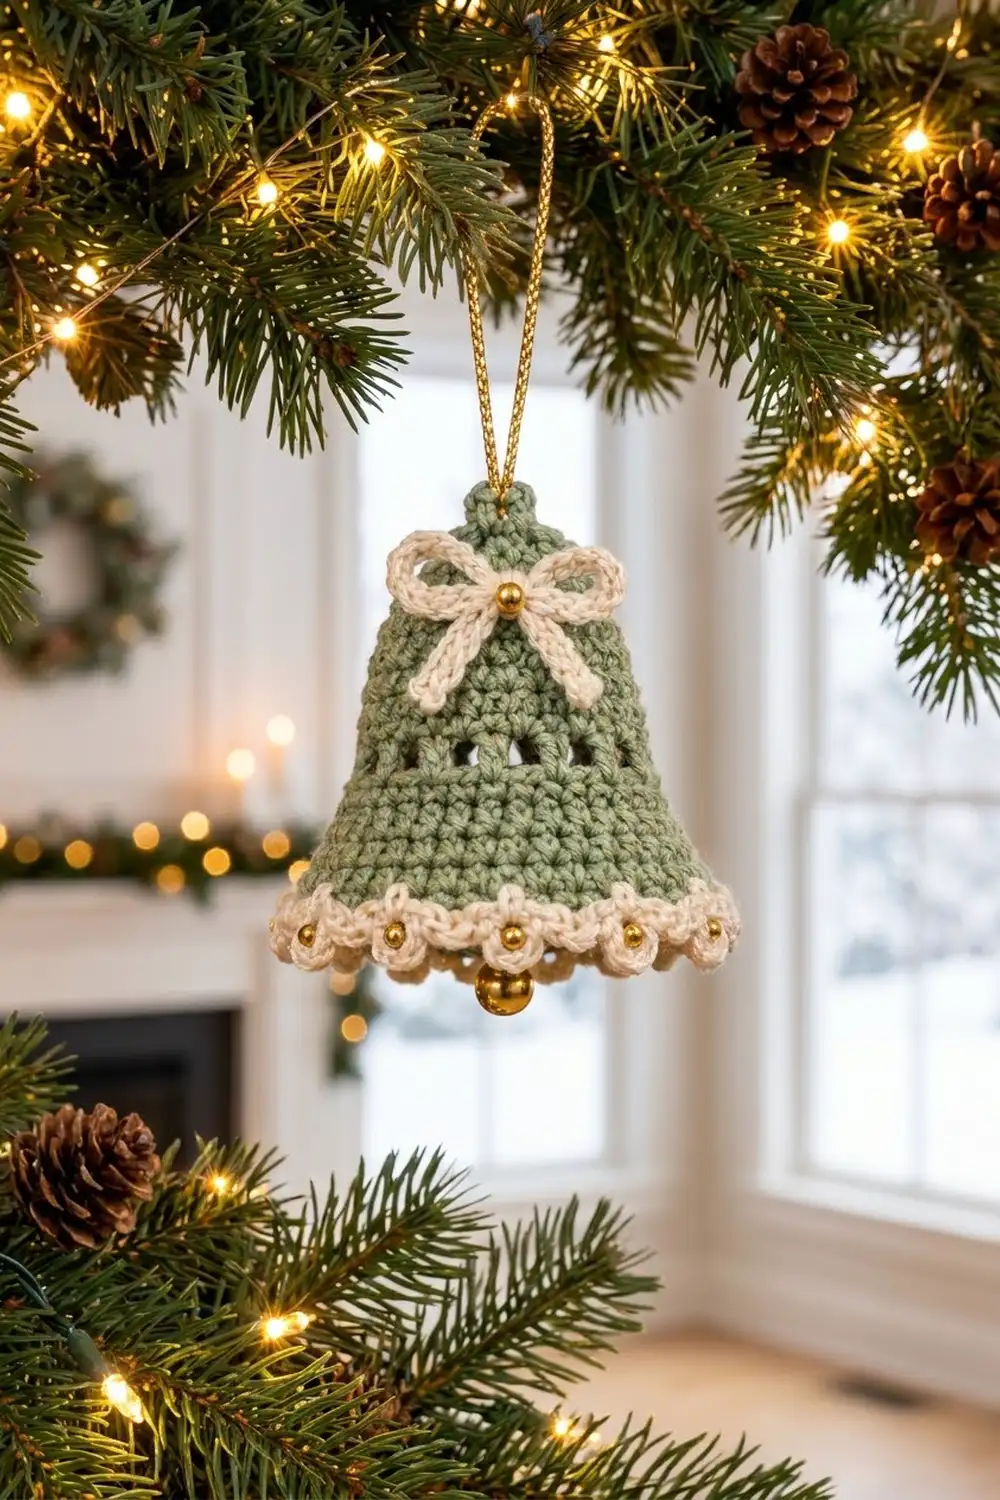
This little bell is a quiet, cozy holiday ornament. The body is soft sage green with one ring of eyelets near the top. The mouth flares out into a cream scalloped edge with tiny gold beads. A cream bow, a gold clapper and a gold hanging loop finish it.
The colors are sage green, cream and gold, which gives a calm Scandinavian-farmhouse look. It looks good on a green tree, tied to a gift or hung in a window. The pattern uses US crochet terms throughout.
The finished bell is about 3 1/8 in (7.9 cm) tall and about 3 in (7.6 cm) across the flared scallops. The hanging loop adds about 2 1/4 in (5.7 cm) on top.
You’ll crochet the bell top-down in joined rounds as one piece. You start with a small flat circle for the crown, work straight rounds for the upper bell, add one eyelet round, then increase gradually to flare the mouth. Two cream rounds make the scalloped edge. The bow, beads, clapper and loop are added at the end.
Finished Size and Construction
- Finished size: about 3 1/8 in (7.9 cm) tall, and about 3 in (7.6 cm) across the scalloped mouth
- Skill level: Easy
- Terminology: US crochet terms
- Yarn weight: Sport weight (#2) cotton or cotton blend
- Hook: 2.75 mm (US C/2)
- Number of pieces: 1 bell body, plus 1 small bow cord
- Layout: a single 3D bell worked in joined rounds, top-down
- Piece size before edging: 2 3/4 in (7.0 cm) tall; rim circumference 8 in (20.3 cm), which is a flattened width of 4 in (10.2 cm)
- Edging depth: about 3/8 in (1.0 cm)
Materials
Yarn: Use a smooth, mercerized or matte sport weight cotton. Cotton holds the bell shape better than acrylic and shows the eyelets clearly. Avoid fuzzy yarns, which will blur the scallops.
- Color A – Sage green: 8 g (about 25 m)
- Color B – Cream: 4 g (about 12 m)
These quantities include a margin for your gauge swatch and tails.
Tools and notions:
- 2.75 mm (US C/2) crochet hook
- Tapestry needle
- Beading needle or fine sewing needle, plus cream sewing thread
- 12 gold beads, 4 mm (for the scallops)
- 1 gold bead, 6 mm (for the bow center)
- 1 gold bead or mini jingle bell, 10 mm (for the clapper)
- 8 in (20.3 cm) of gold metallic cord (for the hanging loop)
- 1 stitch marker
- Scissors
- Optional: fabric stiffener or starch spray
Abbreviations (US Terms)
- ch – chain
- sl st – slip stitch
- sc – single crochet
- dc – double crochet
- sk – skip
- st(s) – stitch(es)
- sp – space
- inc – increase: 2 sc in the same stitch
- rep – repeat
- Rnd – round
Special stitch – Shell: 5 dc worked into the same stitch.
Joined rounds: Start each round with ch 1. This ch 1 does not count as a stitch. Work the first sc into the same stitch as the join. End each round with sl st into the first sc. Put a marker in the first sc so you can always find it.
Gauge and Checkpoints
Gauge: 12 sc and 13 rows = 2 in (5.1 cm) in sc with Color A. That works out to 6 sc and 6.5 rows per 1 in (2.5 cm).
Gauge matters here because the bell’s shape comes from the stitch counts. Make a swatch, or simply crochet Rnds 1–8 and check them before going on.
Checkpoints:
- After Rnd 3: the flat circle measures about 7/8 in (2.2 cm) across.
- After Rnd 8: the tube circumference is 4 in (10.2 cm), which is a flattened width of 2 in (5.1 cm).
- After Rnd 9 (eyelets): the bell is about 1 1/2 in (3.8 cm) tall from the crown.
- After Rnd 18: the bell is 2 3/4 in (7.0 cm) tall, and the rim circumference is 8 in (20.3 cm), a flattened width of 4 in (10.2 cm).
If your bell is too big: go down to a 2.5 mm hook. If it is too small or very stiff: go up to a 3.0 mm hook. Change hooks rather than stitch counts, because the eyelet and scallop repeats depend on the counts below.
Bell Body (Color A – Sage Green)
Crown
Rnd 1: Make a magic ring. Ch 1, then work 6 sc into the ring. Sl st to the first sc and pull the ring tight. (6 sts)
Rnd 2: Ch 1, inc in each st around. Sl st to the first sc. (12 sts)
Rnd 3: Ch 1, sc in next st, inc in next st; rep from * 6 times total. Sl st to the first sc. (18 sts)*
Checkpoint: you have a flat circle about 7/8 in (2.2 cm) across.
Upper Bell
Rnds 4–6: Ch 1, sc in each st around. Sl st to the first sc. (18 sts in each round)
The edges will start to curl up into a small dome. That is the crown of the bell.
Rnd 7: Ch 1, sc in next 2 sts, inc in next st; rep from * 6 times total. Sl st to the first sc. (24 sts)*
Rnd 8: Ch 1, sc in each st around. Sl st to the first sc. (24 sts)
Checkpoint: the circumference is 4 in (10.2 cm), a flattened width of 2 in (5.1 cm).
Eyelet Band
Rnd 9: Ch 4 (counts as 1 dc + ch 1). Sk next st. Dc in next st, ch 1, sk next st; rep from * 11 more times. Sl st into the 3rd ch of the beginning ch-4. (12 dc + 12 ch-1 sps = 24 sts)*
This round makes the ring of 12 openings shown on the bell. Keep the ch-1s the same size as your other stitches so the eyelets look even.
Rnd 10: Ch 1. Sc in each dc and in each ch-1 sp around. Sl st to the first sc. (12 sc in dc + 12 sc in sps = 24 sts)
Lower Bell and Flare
Rnd 11: Ch 1, sc in next 3 sts, inc in next st; rep from * 6 times total. Sl st to the first sc. (30 sts)*
Rnds 12–13: Ch 1, sc in each st around. Sl st to the first sc. (30 sts in each round)
Rnd 14: Ch 1, sc in next 4 sts, inc in next st; rep from * 6 times total. Sl st to the first sc. (36 sts)*
Rnd 15: Ch 1, sc in each st around. Sl st to the first sc. (36 sts)
Rnd 16: Ch 1, sc in next 5 sts, inc in next st; rep from * 6 times total. Sl st to the first sc. (42 sts)*
Rnd 17: Ch 1, sc in next 6 sts, inc in next st; rep from * 6 times total. Sl st to the first sc. (48 sts)*
Rnds 16 and 17 increase back to back, which makes the flare at the mouth.
Rnd 18: Ch 1, sc in each st around. Sl st to the first sc. (48 sts)
Fasten off Color A and weave in the tail.
Checkpoint: the bell is 2 3/4 in (7.0 cm) tall. The rim circumference is 8 in (20.3 cm), a flattened width of 4 in (10.2 cm).
Border: Cream Scalloped Edge (Color B)
Border gauge: each scallop sits over 4 rim stitches, so it spans about 2/3 in (1.7 cm). Twelve scallops fill the 8 in (20.3 cm) rim.
Rnd 19: Join Color B with a sl st in any st of Rnd 18. Ch 1, sc in each st around. Sl st to the first sc. (48 sts)
This plain cream round gives the scallops a neat base and makes the cream band at the rim.
Rnd 20: Ch 1. Sc in next st, sk next st, shell (5 dc) in next st, sk next st; rep from * 12 times total. Sl st to the first sc. (12 sc + 60 dc = 72 sts; 12 scallops)*
Fasten off and weave in the tail.
Why the math works: one scallop repeat uses exactly 4 rim stitches (sc, skip, shell, skip). 48 ÷ 4 = 12, so the repeat closes perfectly with no extra or missing stitches. The flare in Rnds 16–17 also helps the scallops fan outward instead of ruffling.
Scallop Beads
Thread a beading needle with cream sewing thread. Sew one 4 mm gold bead to the 3rd (center) dc of each shell, so there are 12 beads in total. Carry the thread inside Rnd 19 between beads so it doesn’t show. Knot the thread securely inside the bell.
Bow (Color B – Cream)
Bow cord: With Color B, ch 46. Sl st in the back bump of the 2nd ch from the hook and in each ch across. (45 sl sts)
Fasten off and leave 4 in (10.2 cm) tails at both ends. The cord should measure about 5 in (12.7 cm).
Tie the cord into a bow with loops about 1/2 in (1.3 cm) long and tails about 3/4 in (1.9 cm) long. The bow should be about 1 1/2 in (3.8 cm) wide.
Place the bow centered on the front of the bell over Rnds 4–6, just under the crown. Use the yarn tails to sew it in place through the knot and at the tip of each tail. Sew the 6 mm gold bead onto the knot.
Hanging Loop and Clapper
- Fold the 8 in (20.3 cm) gold cord in half.
- Use a tapestry needle to push both cut ends through the center of the magic ring, from the outside to the inside.
- On the outside, adjust the loop so it stands about 2 1/4 in (5.7 cm) above the crown.
- Cut 6 in (15.2 cm) of Color A and thread the 10 mm gold bead onto it.
- Inside the bell, tie the clapper strand to both cord ends with a tight double knot. Adjust it so the bead hangs about 1/4 in (0.6 cm) below the cream rim.
- Trim the ends. Add a dab of fabric glue to the knot if you like.
Final Blocking
- Lightly mist the whole bell with water or starch spray.
- Stuff the bell firmly with plastic wrap, or slip it over a small funnel or egg cup that matches its shape.
- Use your fingers to shape the dome round and the sides smooth.
- Pull each scallop outward and down so all 12 sit evenly. Check that the beads face forward.
- Tug gently around the eyelet band so the 12 openings are the same size.
- Fluff and shape the bow loops.
- Let it dry completely, usually 6–12 hours.
- Remove the form and check the final size: about 3 1/8 in (7.9 cm) tall and about 3 in (7.6 cm) across the scallops.
Final Quality-Control Checklist
- Stitch counts: 6, 12, 18, 18, 18, 18, 24, 24, 24, 24, 30, 30, 30, 36, 36, 42, 48, 48, then 48 and 72 in the border
- There are 12 even eyelets in Rnd 9
- There are 12 scallops, each with one centered gold bead
- The seam line from the joins is straight and neat
- The bow is centered over the eyelets and below the crown
- The clapper hangs centered and shows just below the rim
- The hanging loop is secure and the bell hangs straight
- All tails are woven in and none show on the outside
Troubleshooting
The bell flares too early or ruffles. Your tension may be loose in Rnds 11–18. Try a smaller hook for the lower bell.
The scallops cup or crowd together. Check that Rnd 18 has exactly 48 stitches. Also check that you skip one stitch on each side of every shell.
The eyelets are uneven. Make all ch-1s the same size, and pull each dc up to the same height.
The join seam travels in a spiral. Always work the first sc into the same stitch as the sl st join, not the next stitch.
The crown is pointy instead of rounded. Pull the magic ring fully closed, and block the dome over a rounded form.
The bell leans to one side when hung. Re-center the cord at the magic ring, and make sure the clapper knot sits in the middle.
The bow droops. Add a stitch at each bow loop as well as at the knot.
Care
Spot clean gently with cool water and mild soap, then reshape and air dry over a form. Store flat or loosely wrapped so the scallops and bow keep their shape.
Final Notes
Each stage of this bell builds on the one before it:
- Gauge of 6 sc per 1 in (2.5 cm) makes a crown about 7/8 in (2.2 cm) across.
- That leads to a 24-stitch upper bell of 4 in (10.2 cm) circumference, with 12 eyelets in Rnd 9.
- The bell then grows to a 48-stitch rim of 8 in (20.3 cm) circumference at 2 3/4 in (7.0 cm) tall.
- 48 rim stitches divide into exactly 12 four-stitch scallops, which bring the bell to 3 1/8 in (7.9 cm).
If each checkpoint matches, the finished ornament will match too. Make one for your tree, a few for gift toppers, or a whole set in different colors.
Happy crocheting!