

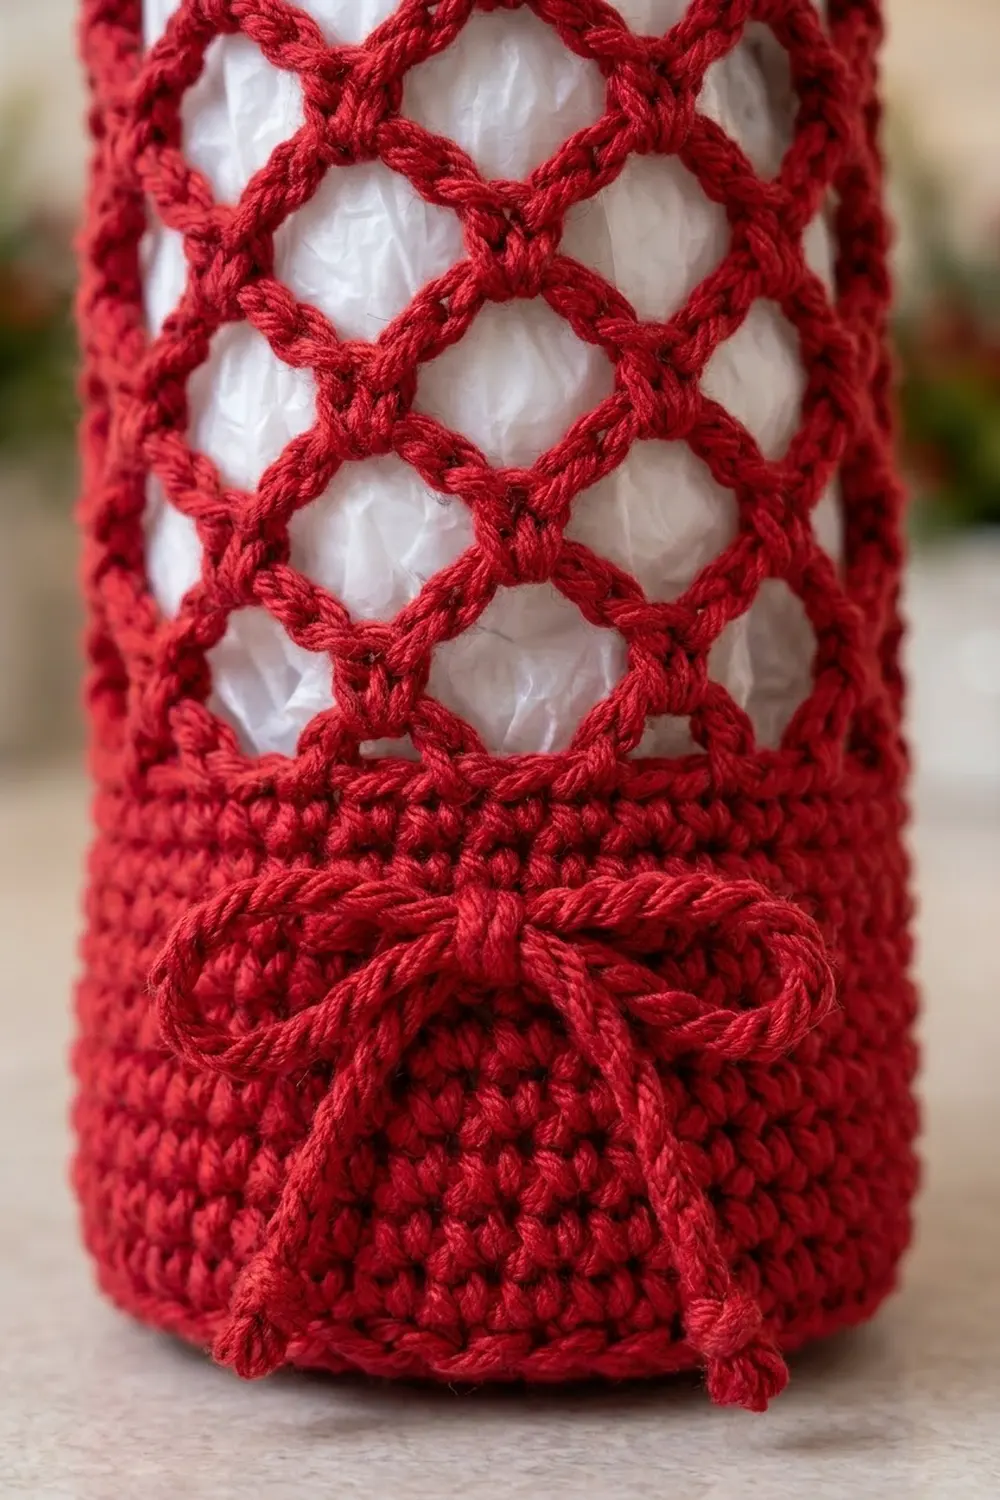
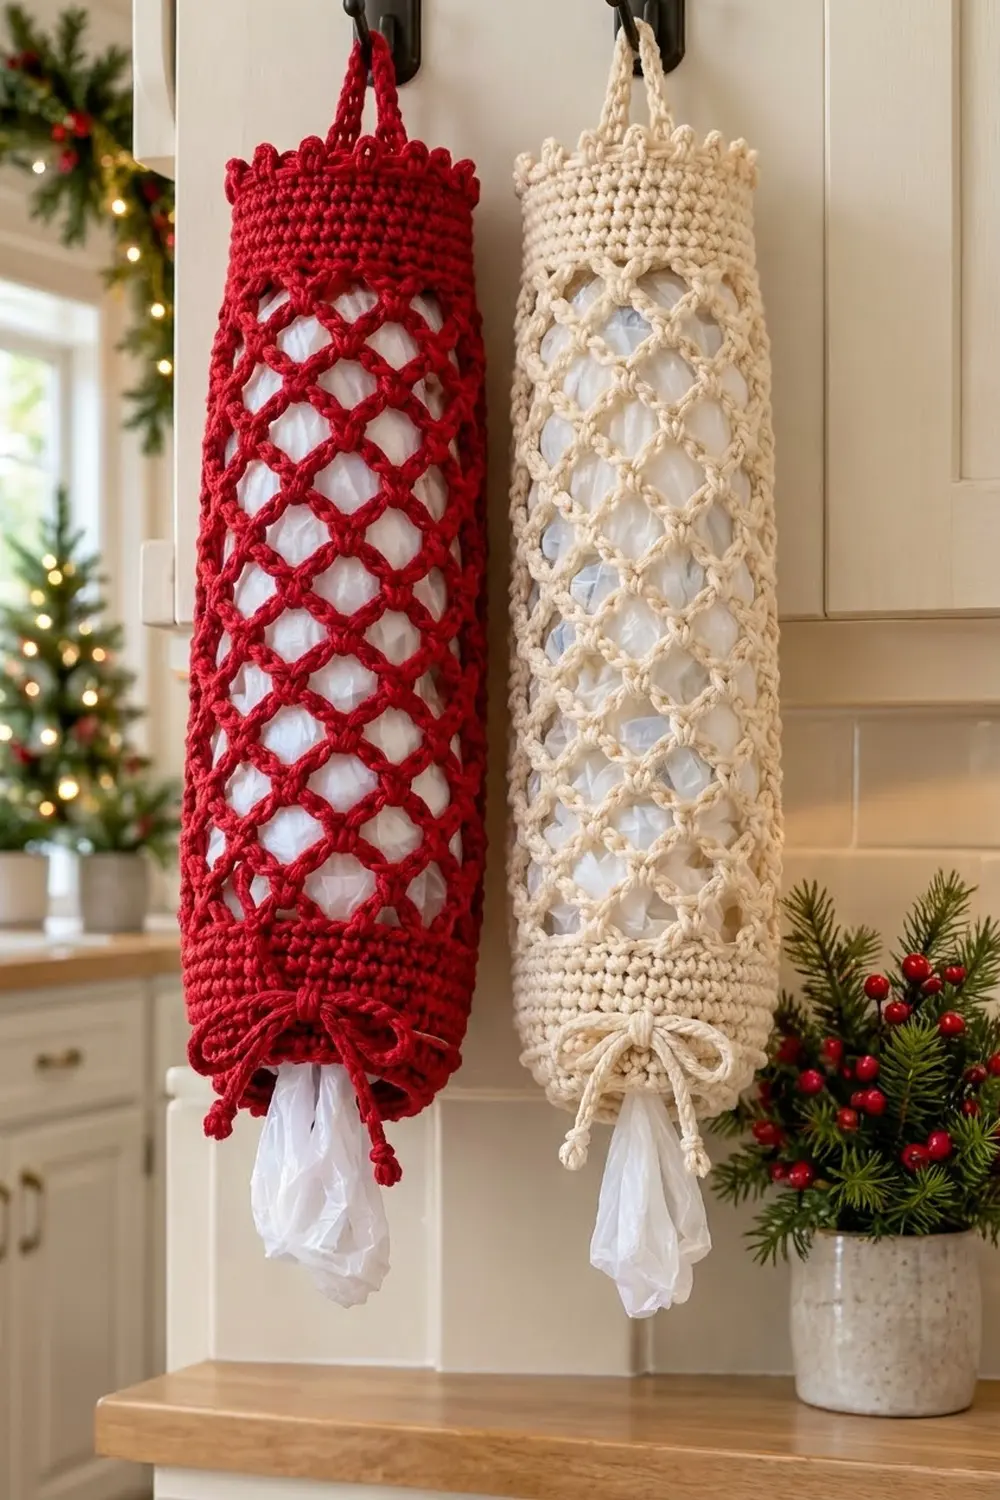
The Holly Lattice Bag Holder is a tall, slim tube that keeps loose grocery bags in one place. Its open diamond net shows the bags inside, so you can tell at a glance when it’s time to refill. Solid bands at the top and bottom keep it sturdy. A small picot edge and a drawstring bow give it a festive finish.
The sample is shown in two colorways: a rich holly red and a soft ivory cream. Hang them side by side on cabinet hooks for a classic Christmas kitchen look, or make a single holder in any color to suit your space.
This pattern uses US crochet terms. The finished holder is about 15.4 in (39.1 cm) around and 17.25 in (43.8 cm) tall, not counting the hanging strap.
The holder is worked in one piece from the bottom up, in joined rounds. You begin with a single crochet band that includes an eyelet round for the drawstring. Next comes the chain-5 net mesh, then a top band, a picot edge and a hanging strap worked directly onto the top. Finally, you make a chain drawstring and weave it through the eyelets. You stuff bags in through the top and pull them out through the cinched bottom.
Finished Size and Construction
- Finished size: 15.4 in (39.1 cm) circumference, 7.7 in (19.6 cm) wide laid flat, about 17.25 in (43.8 cm) tall
- Skill level: Easy
- Terminology: US crochet terms
- Yarn weight: Worsted (#4), cotton or cotton blend
- Hook: 5.0 mm (H-8)
- Number of pieces: 1 tubular body (the strap is worked on; the drawstring is a separate chain)
- Layout: Single vertical tube, open at both ends
- Piece size: 54 sts around
- Size before border: 17 in (43.2 cm) tall
- Border depth: about 0.25 in (0.6 cm) picot edge
Materials
Choose a smooth worsted-weight cotton. Cotton holds its shape and won’t stretch out under a full load of bags, and it shows the stitch texture clearly. Acrylic also works, but the mesh will be a little bouncier.
Yarn, per holder:
- Holly Red (or your main color): 150 g, about 234 m (based on a 50 g / 78 m ball)
- Ivory Cream (optional second holder): 150 g, about 234 m
Each holder uses only one color. The amounts above include a margin of about 15% for gauge differences and the drawstring.
Tools:
- 5.0 mm (H-8) crochet hook
- Locking stitch marker
- Tapestry needle
- Scissors
- Measuring tape
- Rustproof pins and a towel for blocking
Abbreviations (US Terms)
- ch: chain
- sl st: slip stitch
- sc: single crochet
- fsc: foundation single crochet
- sk: skip
- st(s): stitch(es)
- sp: space
- rnd(s): round(s)
- RS: right side
Special stitch: Picot. Ch 3, then sl st in the 3rd ch from the hook (the first ch you made).
Foundation single crochet (fsc): Ch 2, insert the hook in the 2nd ch from the hook, yarn over and pull up a loop, yarn over and pull through 1 loop (this makes the “chain”), then yarn over and pull through 2 loops (this makes the sc). For each following fsc, insert the hook into the “chain” of the previous stitch and repeat. You can use a regular chain of 54 instead. Fsc just gives a stretchier edge that’s less likely to twist.
Gauge and Checkpoints
Gauge: 14 sc and 16 rnds = 4 in (10.2 cm) in sc worked in the round.
Mesh gauge: 4 mesh rnds = 3 in (7.6 cm) when lightly stretched lengthwise.
Test first: Work Rnds 1–8 (the bottom band), then measure before going any further. Fewer than 8 rounds won’t give you a reliable reading.
Checkpoints:
- After Rnd 8: The band is 2 in (5.1 cm) tall and 15.4 in (39.1 cm) around (7.7 in / 19.6 cm laid flat).
- After Rnd 16: The total height is about 8 in (20.3 cm).
- After Rnd 24: The mesh is about 12 in (30.5 cm) tall, for a total of about 14 in (35.6 cm).
- After Rnd 36: The total height is 17 in (43.2 cm).
- After Rnd 37: The total height is about 17.25 in (43.8 cm).
If your band is too big (more than 16 in / 40.6 cm around), go down one hook size. If it’s too small (less than 15 in / 38.1 cm around), go up one hook size. Don’t change the stitch count, because the mesh depends on a multiple of 3.
Pattern
Bottom Band
Rnd 1: Work 54 fsc. Join with a sl st to the first fsc, taking care not to twist. (54 sts)
Rnd 2: Ch 1 (does not count as a st), sc in each st around. Join with a sl st to the first sc. (54 sc)
Rnd 3: Repeat Rnd 2. (54 sc)
Rnd 4 (eyelet round): Ch 1, sc in each of the next 4 sts, ch 2, sk 2. Repeat from * 8 more times, then join. (36 sc + 9 ch-2 sps; 9 repeats × 6 sts = 54)
Rnd 5: Ch 1, sc in each of the next 4 sc, 2 sc in the next ch-2 sp. Repeat around and join. (36 sc worked 1 per sc + 18 sc worked into spaces = 54 sc)
Rnds 6–8: Ch 1, sc in each st around, then join. (54 sc each round)
Checkpoint: The band is 2 in (5.1 cm) tall and 15.4 in (39.1 cm) around.
Diamond Net Mesh
Rnd 9 (set-up mesh round): Ch 1, sc in the first st, ch 5, sk 2, sc in the next st. Repeat from * around. End with ch 5, sk 2, sl st to the first sc. (18 sc + 18 ch-5 loops)
Check: each repeat covers 3 sts of Rnd 8, and 18 × 3 = 54.
Rnd 10: Sl st in each of the next 3 ch to reach the center of the first loop. Ch 1, sc in the same loop, ch 5, sc in the next ch-5 loop. Repeat from * 16 more times. Ch 5, sl st to the first sc. (18 sc + 18 ch-5 loops)
Rnds 11–24: Repeat Rnd 10. (18 ch-5 loops each round)
Each new sc sits at the center of a loop from the round below. This is what creates the diamond lattice you see in the photo, with every intersection a small sc “knot.” Don’t skip the sl sts at the start of each round. They move your starting point to the loop’s center, so the diamonds stay straight instead of spiraling.
Checkpoint: There are 16 mesh rounds (Rnds 9–24), the mesh is about 12 in (30.5 cm) tall, and the total height is about 14 in (35.6 cm).
Top Band
Rnd 25 (conversion round): Sl st in each of the next 3 ch to reach the center of the first loop. Ch 1, 3 sc in each ch-5 loop around, then join. (18 loops × 3 sc = 54 sc)
Count carefully here. Exactly 3 sc per loop brings you back to the same 54 sts as the bottom band, so the top and bottom match.
Rnds 26–36: Ch 1, sc in each st around, then join. (54 sc each round)
Checkpoint: The top band is 12 rounds (Rnds 25–36), or 3 in (7.6 cm) tall. The total height is 17 in (43.2 cm). Don’t fasten off. The border comes next.
Border (Picot Top Edge)
Border gauge: Use the same 14 sc = 4 in (10.2 cm). A picot adds width without adding stitches, so the edge stays at 54 sts and won’t flare.
Rnd 37: Ch 1, sc in each of the next 3 sts, picot. Repeat from * 17 more times. Join to the first sc and fasten off. (54 sc + 18 picots)
When the holder is laid flat, that’s 27 sc and 9 picots on the front and the same on the back.
Why the math works: 54 ÷ 3 = 18. One picot lands above each of the 18 mesh columns, so the edge looks evenly spaced and lines up with the lattice. Because every stitch is still worked 1 per stitch, the circumference stays at 15.4 in (39.1 cm).
Hanging Strap
- Lay the holder flat with the beginning-of-round seam at one side fold. Count 13 sts in from the seam along Rnd 36 and place a marker. Count 27 sts on from that marker and place a second marker. The markers now sit directly opposite each other, at the center of the front and back.
- With RS facing, join yarn with a sl st in the first marked st of Rnd 36, working behind the picots.
- Ch 28, then sl st in the second marked st.
- Turn, and sc in each ch back across. (28 sc)
- Sl st in the first marked st and fasten off.
The finished strap is about 8 in (20.3 cm) long. It arches about 3 in (7.6 cm) above the rim, just like the loop in the photo.
Drawstring
Ch 120, about 30 in (76.2 cm). Fasten off and leave 1 in (2.5 cm) tails.
- Starting at the center front, weave the chain in and out of the 9 eyelets on Rnd 4 so both ends come out of neighboring eyelets at the front.
- Tie an overhand knot about 0.5 in (1.3 cm) from each end, then trim and tuck the tails into the knots. These make the small knotted tips on the bow.
- Pull the drawstring to close the bottom to about a 1.5 in (3.8 cm) opening, and tie a bow.
Final Blocking
- Weave in all the ends along the solid bands, never across the mesh.
- Wet the holder in cool water, then gently squeeze it out. Don’t wring it.
- Roll it in a towel to remove extra water.
- Slide a rolled towel or a 4.9 in (12.4 cm) wide bottle inside to give it a round shape.
- Gently stretch the mesh lengthwise so the total height measures 17.25 in (43.8 cm). Even out the diamonds by hand.
- Pin each picot so it stands upright.
- Let it dry completely before you add any bags.
Final Quality-Control Checklist
- 54 sts in every solid round, and 18 loops in every mesh round
- 9 evenly spaced eyelets on Rnd 4
- Diamonds run straight up the tube, with no spiral
- 18 picots, spaced evenly
- Strap is attached at points directly opposite each other and hangs straight
- Circumference is 15.4 in (39.1 cm), and height is about 17.25 in (43.8 cm)
- The drawstring closes snugly and the bow sits at the front
- All ends are woven in securely
Troubleshooting
The mesh spirals: You probably skipped the sl sts to the loop center at the start of a round. Rip back to the round where it started and redo it.
The mesh is too short: Add 1–2 mesh rounds. Each one adds about 0.75 in (1.9 cm).
The top band flares or puckers: Count Rnd 25. It must be exactly 54 sc (3 per loop).
The bag opening is too loose: Pull the drawstring tighter, or make a shorter chain.
The strap stretches: Work the sc row with a smaller hook, or work a second sc row along it.
The diamonds look uneven: Keep every ch-5 the same size, then block firmly.
Care
Hand wash in cool water and lay flat to dry, reshaping the mesh while it’s damp. Don’t tumble dry, as it can distort the drawstring and picots.
Final Notes
The measurement chain is simple. Gauge sets the 54-stitch circumference at 15.4 in (39.1 cm). The 2 in (5.1 cm) bottom band holds the drawstring. Sixteen mesh rounds add 12 in (30.5 cm), the 3 in (7.6 cm) top band brings the holder to 17 in (43.2 cm), and the picot edge finishes it at about 17.25 in (43.8 cm). Check each stage and your holder will hang straight, hold plenty of bags and look festive all season.
Happy crocheting!