

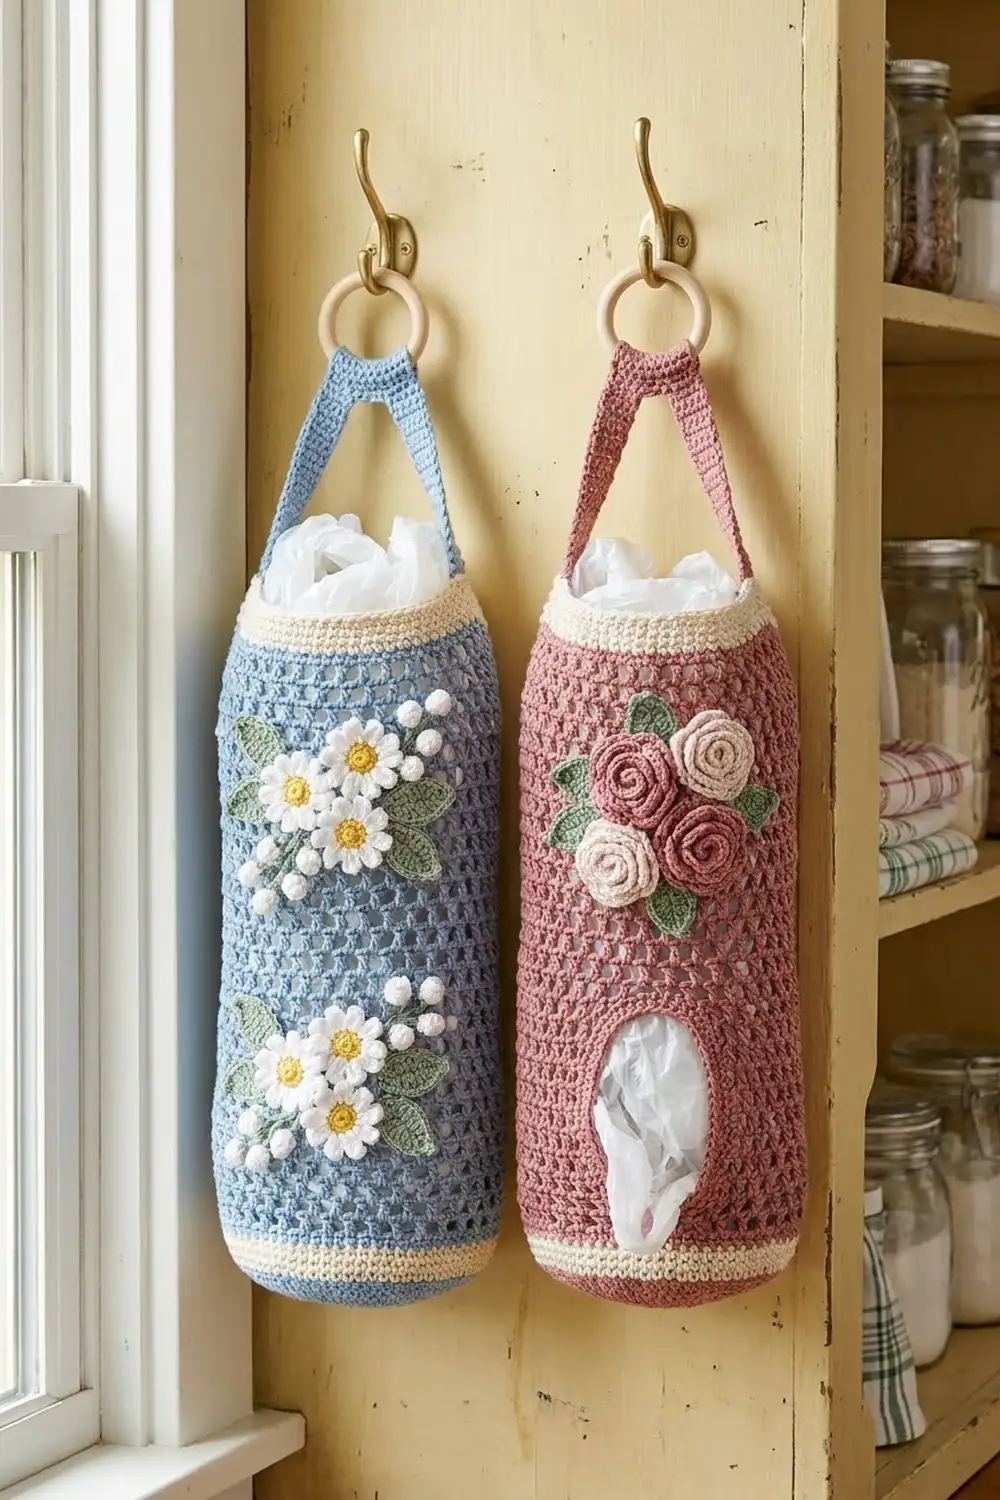
The Garden Trellis Plastic Bag Holder is a tall mesh tube that keeps loose grocery bags tidy. You push bags in at the top and pull them out through an oval opening near the bottom. The open grid looks light and airy, and cream bands at the top and bottom give it a clean, finished frame.
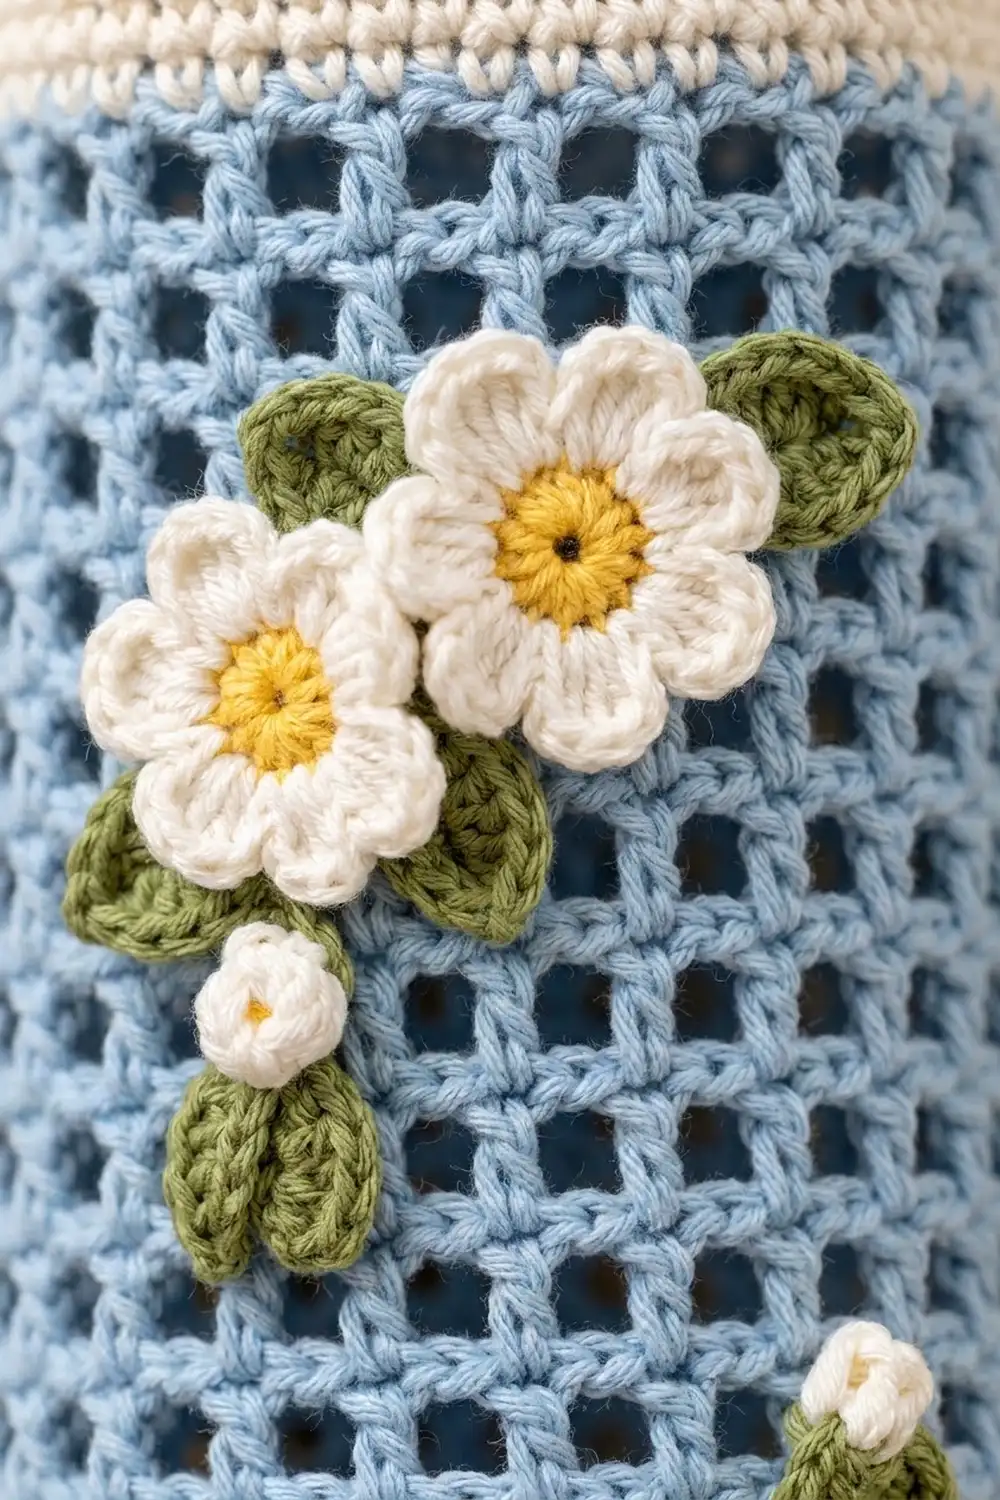
The pattern includes two colorways. The daisy version has a powder-blue mesh with white daisies, yellow centers, little white buds and sage leaves. The rose version has a dusty-rose mesh with a cluster of rolled roses in dusty rose and pale blush. Each holder hangs from a wooden ring by a narrow strap. To recreate the pair in the photo, make one of each.
The pattern uses US crochet terms. The finished holder is 16 in (40.6 cm) tall and 12 in (30.5 cm) around, which is about 3.8 in (9.7 cm) across. The strap adds a 2.5 in (6.4 cm) tab above the top edge, and the ring hangs above that.
Construction is bottom-up and seamless. You start with a flat circle for the base, work straight up in single crochet for the bottom band, switch to filet mesh for the body (working a few rows back and forth to leave the dispensing hole), then finish with the top band and the strap. The flowers are made separately and sewn on.
Finished Size and Construction
- Finished size: 16 in (40.6 cm) tall × 12 in (30.5 cm) around; 6 in (15.2 cm) wide laid flat
- Skill level: Easy
- Terminology: US
- Yarn weight: Worsted (#4) cotton
- Hook: 4.5 mm (US 7)
- Number of pieces: 1 tube body, plus appliqués (daisy version: 4 daisies, 3 buds, 7 leaves; rose version: 4 roses, 4 leaves)
- Layout: Seamless tube worked in joined rounds
- Piece size before the top band: 14.5 in (36.8 cm) tall
- Top band depth: about 1.5 in (3.8 cm)
- Dispensing hole: about 2.25 in wide × 1.5 in tall (5.7 × 3.8 cm) after edging
Materials
Choose a smooth worsted-weight cotton or cotton blend. Cotton holds the tube’s shape and doesn’t stretch out when the holder is full. The amounts below assume about 1.9 m of yarn per gram.
Daisy version
– Powder blue (MC): 50 g, 95 m
– Cream (CC): 30 g, 57 m
– White: 10 g, 19 m
– Yellow: 5 g, 10 m
– Sage green: 5 g, 10 m
Rose version
– Dusty rose (MC, body plus 2 roses): 50 g, 95 m
– Cream (CC): 30 g, 57 m
– Pale blush: 10 g, 19 m
– Sage green: 5 g, 10 m
Tools
– 4.5 mm (US 7) hook
– One 3 in (7.6 cm) wooden ring
– Tapestry needle
– Stitch marker
– Scissors and a measuring tape
– Rustproof pins for blocking
These quantities include a safety margin of about 20%.
Abbreviations (US Terms)
- ch – chain
- sl st – slip stitch
- sc – single crochet
- hdc – half double crochet
- dc – double crochet
- sc2tog – single crochet 2 together
- sp – space
- st(s) – stitch(es)
- MC / CC – main color / contrast color
- RS / WS – right side / wrong side
Mesh unit: one dc plus the ch-1 sp that follows it, so 2 sts. At the start of a round or row, ch 4 counts as the first dc plus its ch-1.
Popcorn: work 4 dc in the same st, take the hook out of the loop, insert it in the first dc, then pick up the dropped loop and pull it through.
Gauge and Checkpoints
- Single crochet: 16 sc × 18 rounds = 4 in (10.2 cm)
- Mesh: 8 mesh units (16 sts) × 8 rounds = 4 in (10.2 cm)
Because both fabrics work out to 4 sts per inch, the 48-stitch tube is 12 in (30.5 cm) around in both the bands and the mesh.
Use the base circle and the bottom band as your gauge swatch.
- After Base Round 8: the circle measures 3.5–3.8 in (8.9–9.7 cm) across.
- After Round 17: the tube is 6 in (15.2 cm) wide laid flat, and the sides are 2 in (5.1 cm) tall.
- After Mesh Round 8: the mesh section measures 4 in (10.2 cm).
- After Mesh Round 25: the body measures 14.5 in (36.8 cm) from the base edge.
If your tube is wider than 6 in (15.2 cm) laid flat, go down half a hook size. If it is narrower, go up half a size. Don’t add or remove stitches: the mesh needs exactly 48.
Base and Bottom Band
Use CC. Work in joined rounds. Start each round with ch 1 (it doesn’t count as a st) and end it with a sl st into the first sc.
- Round 1: 6 sc in a magic ring. (6)
- Round 2: 2 sc in each st. (12)
- Round 3: (sc, 2 sc in next) 6 times. (18)
- Round 4: (sc in next 2, 2 sc in next) 6 times. (24)
- Round 5: (sc in next 3, 2 sc in next) 6 times. (30)
- Round 6: (sc in next 4, 2 sc in next) 6 times. (36)
- Round 7: (sc in next 5, 2 sc in next) 6 times. (42)
- Round 8: (sc in next 6, 2 sc in next) 6 times. (48)
- Rounds 9–17: sc in each st. (48)
Rounds 9–17 turn the edge up into straight sides without a ridge, which gives the soft, rounded bottom. On the final sl st of Round 17, change to MC.
Mesh Body and Dispensing Hole
Mesh Round 1: ch 4, skip next sc, (dc in next sc, ch 1, skip next sc) 23 times. Sl st in the 3rd ch of the beginning ch-4. (24 dc + 24 ch-1 sps = 48 sts)
Mesh Round 2: ch 4, (dc in next dc, ch 1) 23 times. Join. (24 units, 48 sts)
Next, work 4 rows back and forth over 19 units to leave the hole.
Row 3 (RS): ch 4, (dc in next dc, ch 1) 17 times, dc in next dc. Turn. (19 dc, 18 ch-1 sps = 37 sts) Leave the rest of the round unworked: the ch-1 sp after dc 19 and the last 5 units, 11 sts in all.
Rows 4–6: ch 4, (dc in next dc, ch 1) 17 times, dc in the 3rd ch of the turning ch. Turn. (37 sts)
Mesh Round 7 (RS): ch 4, (dc in next dc, ch 1) 17 times, dc in the 3rd ch of the turning ch, then ch 11. Join to the 3rd ch of the beginning ch-4. (37 sts + 11 ch = 48)
Mesh Round 8: ch 4, (dc in next dc, ch 1) 18 times. Over the ch-11, work (skip 1 ch, dc in next ch, ch 1) 5 times, then skip the last ch. Join. (24 dc + 24 ch-1 sps = 48 sts)
On the ch-11, the 5 new dc use 10 chains and the final skipped chain makes 11. That rebuilds the 5 missing units, so the grid stays aligned all the way around.
Mesh Rounds 9–25: ch 4, (dc in next dc, ch 1) 23 times. Join. (48 sts) Change to CC on the final join.
Top Band and Strap
Begin each round with ch 1 and join with a sl st.
- Top Round 1 (conversion): sc in each dc and each ch-1 sp. (24 sc in dc + 24 sc in sps = 48)
- Top Rounds 2–7: sc in each st. (48) Fasten off.
The first sc of Top Round 1 sits on dc 1, so dc 19 lines up with band st 37, and the hole spans band sts 38–48, centered at about st 43.
Strap placement
– Rose version (hole on the front): join MC in band st 12. The strap uses sts 12–27, centered opposite the hole.
– Daisy version (hole on the back): join MC in band st 36. The strap uses sts 36–48 and then 1–3, centered above the hole. Don’t count the join sl st as a stitch.
Strap rows: start each row with ch 1, which doesn’t count, and turn at the end.
– Rows 1–3: sc in 16 sts. (16)
– Row 4: sc2tog, sc to the last 2, sc2tog. (14)
– Row 5: sc across. (14)
– Row 6: repeat Row 4. (12)
– Row 7: sc across. (12)
– Row 8: repeat Row 4. (10)
– Row 9: sc across. (10)
– Row 10: repeat Row 4. (8)
– Rows 11–18: sc across. (8)
The strap ends up 4 in (10.2 cm) long and 2 in (5.1 cm) wide. Fold the last 1.5 in (3.8 cm) over the wooden ring to the WS and whipstitch it in place. This leaves a 2.5 in (6.4 cm) tab between the top band and the ring.
Appliqués
Daisy (make 4): With yellow, work 10 sc in a magic ring and join. (10) Change to white. Work sl st in next sc, (hdc, 3 dc, hdc) in next sc 5 times, then join. This gives 5 petals and a daisy about 2 in (5.1 cm) across.
Bud (make 3): With white, ch 2, then work a popcorn in the 2nd ch from the hook. Ch 1 and fasten off.
Leaf (make 7 for the daisy version, 4 for the rose version): With green, ch 6. Working into the chain, sl st in the 2nd ch from the hook, then sc, hdc, dc and sc in the next 4 chains. Ch 1, turn the piece and work back along the other side of the chain with sc, dc, hdc, sc and sl st. Sl st into the tip. The leaf is about 1.25 in (3.2 cm) long.
Rolled rose (make 2 in dusty rose and 2 in blush): Ch 15. Row 1: sc in the 2nd ch from the hook and in each ch across. (14) Row 2: ch 3, 2 dc in the same st, then 3 dc in each remaining sc. (42 sts, counting the ch-3) Fasten off, leaving a long tail. Roll the strip up starting from the beginning end, then stitch through the base. The finished rose is about 1.5 in (3.8 cm) across.
Attaching: Sew the appliqués to the side opposite the strap, about 0.5 in (1.3 cm) below the top band.
– Daisy version: put 2 daisies, 1 bud and 3 leaves in the upper cluster. Starting about 4 in (10.2 cm) lower, add the second cluster: 2 daisies, 2 buds and 4 leaves.
– Rose version: cluster 4 roses and 4 leaves together, staggering the colors.
Stitch through dc posts only, so the mesh holes stay open.
Border: Hole Edging
Edging gauge is the same as the band: 4 sc per inch. Join MC at a lower corner of the hole and work one round of sc. Join.
- Bottom edge: 11 sc across the top of Mesh Round 2 (5 dc + 6 ch-1 sps). This covers the 11 sts left unworked in Row 3.
- Side edges: 2 sc in each of the 4 row-ends from Rows 3–6, so 8 sc per side.
- Top edge: 11 sc into the free loops of the ch-11.
- Total: 11 + 8 + 11 + 8 = 38 sc.
Why the math works: the hole is 11 sts wide. The bottom and top edges each get exactly one sc per stitch, so the width doesn’t flare or pucker. Dc rows are about twice as tall as sc rows, so 2 sc per row-end keeps the sides flat. Leave the corners unshaped; the stitch tension rounds them off, which gives the oval.
The top band follows the same logic. Its 48 sts are 24 sc in the dc plus 24 sc in the spaces, the same as the 48-stitch circumference.
Final Blocking
- Weave in all ends along dc posts or inside the bands.
- Wet the holder thoroughly, then gently squeeze out the water. Don’t wring it.
- Slide a 3.8 in (9.7 cm) tube or a rolled towel inside.
- Even out the mesh squares so the columns run straight up.
- Check that it measures 16 in (40.6 cm) tall and 12 in (30.5 cm) around.
- Pat the appliqués flat and pin the leaf tips.
- Let it dry completely before hanging it.
Final Quality-Control Checklist
- [ ] Every round of the bands and mesh has 48 sts.
- [ ] The mesh columns line up across Mesh Round 8.
- [ ] The hole edging has 38 sc and lies flat.
- [ ] The strap is centered and firmly sewn around the ring.
- [ ] The appliqués are secure, with no stitches pulled through the mesh openings.
- [ ] Height is 16 in (40.6 cm) and circumference is 12 in (30.5 cm).
Troubleshooting
- Base cups or ruffles: check your counts for Rounds 2–8. A cupped base usually means the hook is too small; ruffling means it’s too big.
- Mesh leans in a spiral: keep each beginning ch-4 joined exactly into its 3rd ch.
- Hole is uneven: make sure Rows 3–6 each have 19 dc.
- Strap twists: count the 16 strap stitches again from the placement stitch.
- Tube is too short: add mesh rounds before the top band, at 0.5 in (1.3 cm) per round.
Care
Hand wash in cool water, reshape the holder and lay it flat to dry. Remove the wooden ring before washing.
Final Notes
Here’s how the measurements build. The 48-stitch base is 12 in (30.5 cm) around. The bottom band adds 2 in (5.1 cm) and the 25 mesh rounds add 12.5 in (31.8 cm), for 14.5 in (36.8 cm) of body. The top band brings the total to 16 in (40.6 cm), and the strap adds a 2.5 in (6.4 cm) tab. Check each stage against these numbers and the holder will come out right.
Happy crocheting!