

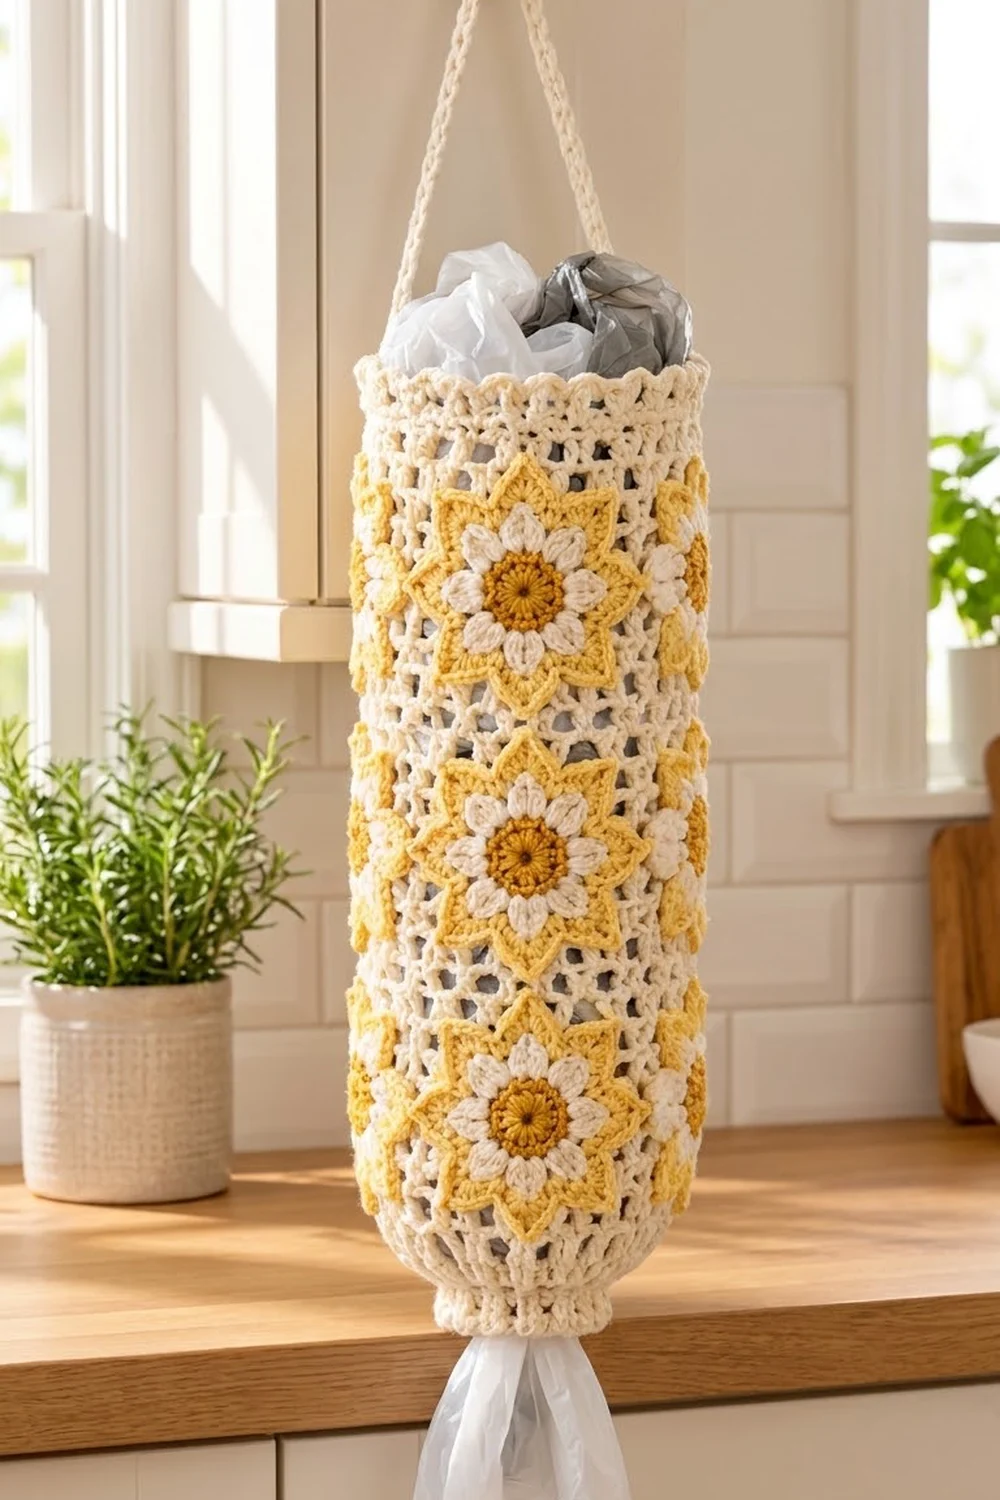
This grocery bag holder hangs in the kitchen and stores plastic bags. The body is a cream mesh tube. Nine daisy motifs, each set in a star-shaped frame, are sewn onto it in three vertical columns. Each motif has a mustard center, eight white petals, and a pale buttery-yellow eight-point star frame. Solid bands finish the top and bottom, and a slim cord strap goes over a hook.
The colors are warm and soft: cream, white, pale yellow, and golden mustard, so it suits a farmhouse or cottage kitchen. The open mesh lets you see how many bags are left. The narrow ribbed bottom lets you pull out one bag at a time.
This pattern uses US crochet terms. The finished holder is 18 in (45.7 cm) tall without the strap and 18 in (45.7 cm) around the body. That’s about 5.7 in (14.5 cm) across when it hangs. The bottom opening is 15 in (38.1 cm) around.
Construction overview: make nine motifs, then crochet the mesh tube in joined rounds from a foundation chain. Sew the motifs onto the tube. Last, work the top band, the bottom band, and the strap directly on the tube.
Finished Size and Construction
- Finished size: 18 in (45.7 cm) tall x 18 in (45.7 cm) around, plus a 10 in (25.4 cm) strap
- Skill level: Intermediate
- Terminology: US crochet terms
- Yarn weight: Worsted weight (#4) cotton
- Hook: US H-8 (5.0 mm)
- Number of pieces: 9 motifs + 1 mesh tube (the strap and bands are worked onto the tube)
- Layout: 3 columns x 3 motifs, stacked tip to tip
- Motif size: 4.5 in (11.4 cm) point to point, 3.5 in (8.9 cm) valley to valley
- Size before bands: mesh tube 15 in (38.1 cm) tall x 18 in (45.7 cm) around
- Band depth: 1.5 in (3.8 cm) each, top and bottom
Materials
Choose a smooth worsted cotton or cotton blend. Cotton holds its shape, doesn’t stretch much under the weight of the bags, and washes well. Acrylic also works, but it stretches more, so the tube may get longer over time.
- Cream (body, bands, strap): 140 g, about 238 m
- Pale yellow (star frames): 60 g, about 102 m
- White (petals): 25 g, about 43 m
- Mustard (centers): 15 g, about 26 m
These amounts assume a yarn with about 85 m per 50 g. Every quantity includes a margin of about 15% for your gauge swatch and tails.
Tools:
- US H-8 (5.0 mm) crochet hook
- Tapestry needle
- Stitch markers (at least 4)
- Rust-proof pins
- Measuring tape
- Scissors
- Blocking mat and spray bottle
Abbreviations (US Terms)
- ch – chain
- sl st – slip stitch
- sc – single crochet
- hdc – half double crochet
- dc – double crochet
- tr – treble crochet
- sc2tog – single crochet 2 together
- FPdc – front post double crochet
- BPdc – back post double crochet
- sp – space
- st(s) – stitch(es)
Special stitch – Petal: (hdc, dc, tr, dc, hdc) all in the same stitch.
Gauge and Checkpoints
Stitch gauge: 16 sc x 16 rows = 4 in (10.2 cm). 16 hdc x 12 rows = 4 in (10.2 cm).
Mesh gauge: 4 ch-4 loops = 3 in (7.6 cm) wide. 5 mesh rounds = 3 in (7.6 cm) tall.
Make one motif before anything else. It tests your tension in all four colors and is the easiest piece to measure.
Motif checkpoints:
- After Round 1: 1.25 in (3.2 cm) across
- After Round 2: 2.75 in (7.0 cm) across the petal tips
- After Round 4: 3 in (7.6 cm) across
- After Round 6: 4.5 in (11.4 cm) point to point
If your motif is too big, go down half a hook size. If it’s too small, go up half a hook size. If only the petals are off, change the hook for Round 2 only.
Tube checkpoints: The foundation ring should lie flat at 18 in (45.7 cm) around. After 5 mesh rounds, the tube should be 3 in (7.6 cm) tall.
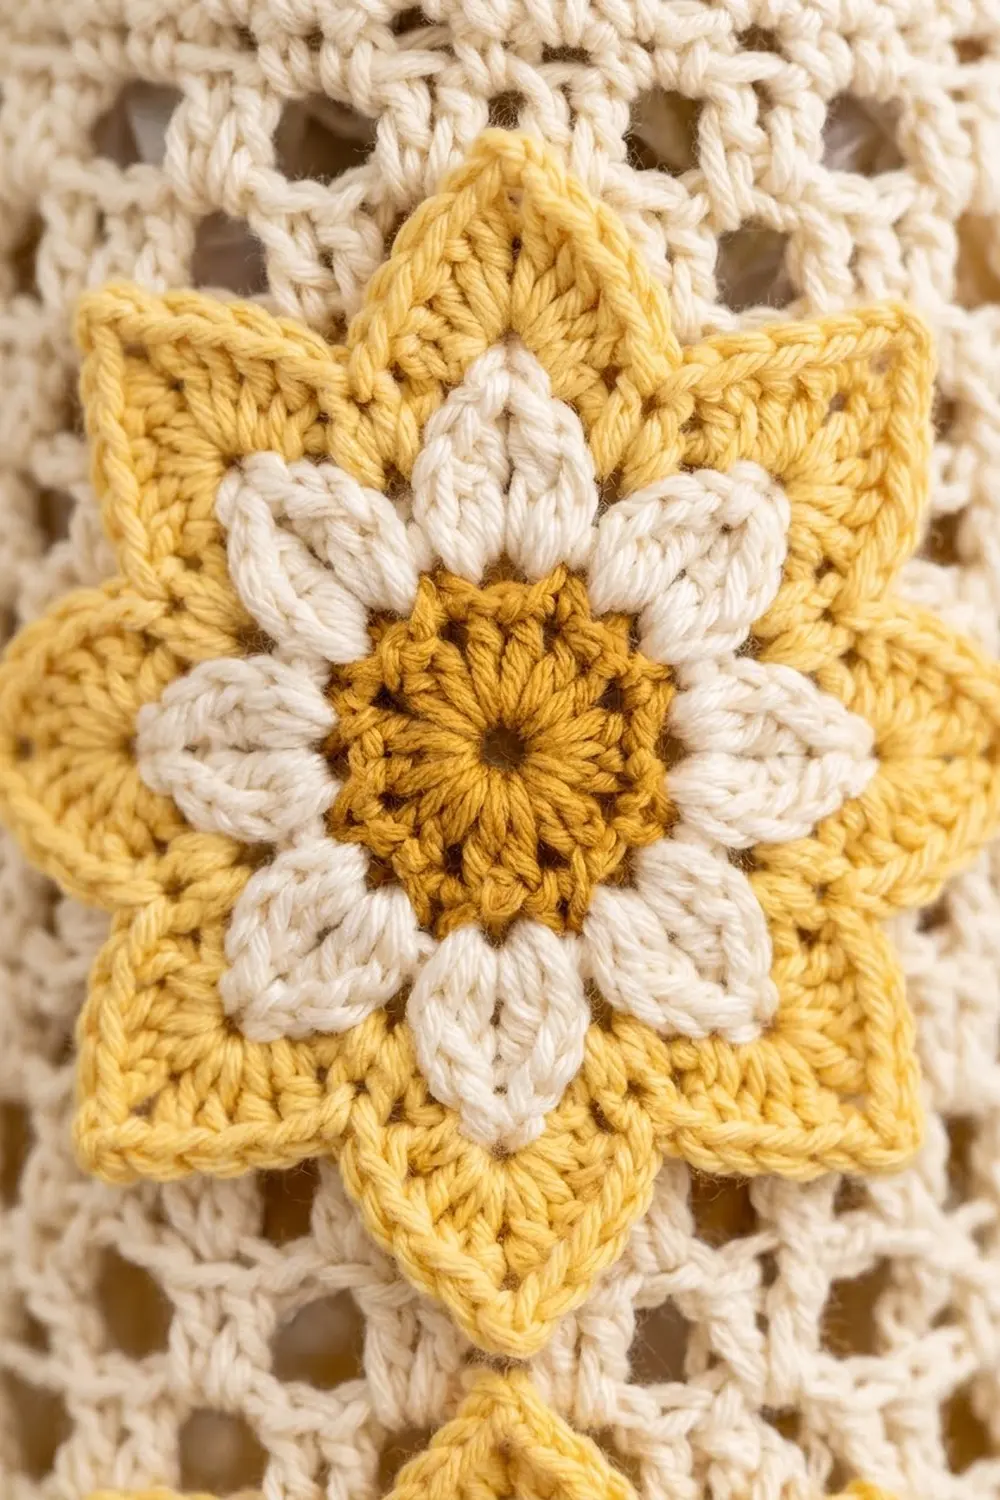
Daisy Star Motif (make 9)
Round 1 (mustard): Make a magic ring. Ch 3 (counts as dc), then work 15 dc in the ring. Sl st to the top of the ch-3 and pull the ring closed. (16 dc) Fasten off.
Round 2 (white): Join white with a sl st in any st (this counts as the first sl st). Petal in next st, sl st in next st; repeat from * 6 more times. Petal in the last st, then sl st into the joining sl st. (8 petals + 8 sl sts = 48 sts) Fasten off.
Each petal has 5 sts, and each sl st sits between two petals. The tr in the middle of each petal gives it a pointed tip.
Round 3 (pale yellow): Fold the petals toward you so you can work behind them. Join pale yellow with a sl st in any sl st between petals. Ch 5 behind the next petal, sl st in the next sl st between petals; repeat from * 7 more times, working the last sl st into the joining sl st. (8 ch-5 loops)
These loops make a hidden base behind the petals, so the petals stay loose in front.
Round 4: Sl st into the first ch-5 sp. Ch 3 (counts as dc), 5 dc in the same sp, dc in the next sl st. 6 dc in the next ch-5 sp, dc in the next sl st; repeat from * 6 more times. Sl st to the top of the ch-3. (56 dc: 8 sections of 7)
Round 5 (star points): Work the first sl st into the ch-3. Sl st in st, sc in next st, hdc in next st, (dc, tr, ch 2, tr, dc) in next st, hdc in next st, sc in next st, sl st in next st; repeat from * 7 more times. Don’t join. Go straight on to Round 6. (80 sts + 8 ch-2 sps)
Each repeat uses 7 sts from Round 4, so 8 x 7 = 56. Each point falls on the 4th dc over a petal, so the star points line up with the petal tips. The sl sts fall between the petals and form the valleys.
Round 6 (edging): Ch 1. Starting in the first st of Round 5, sc in each st (including sl sts) to the next ch-2 sp, (sc, ch 2, sc) in the ch-2 sp; repeat from * around. Sc in the remaining sts, then sl st to the first sc. (96 sc + 8 ch-2 sps)
Each point now has its 10 sts from Round 5 plus 2 added sc, for 12 sc per point. 8 x 12 = 96. Fasten off, leaving a 24 in (61.0 cm) pale yellow tail for sewing.
Weave in the other ends. The motif should measure 4.5 in (11.4 cm) point to point and 3.5 in (8.9 cm) valley to valley.
Mesh Tube Body
Foundation (cream): Ch 72. Sl st to the first ch to form a ring, making sure the chain isn’t twisted. (72 ch) The ring should measure 18 in (45.7 cm) around.
Mesh Round 1: Ch 1, sc in the same ch as the join. Ch 4, skip 2 ch, sc in next ch; repeat from * 22 more times. Ch 4, skip 2 ch, sl st to the first sc. (24 ch-4 loops)
Each repeat uses 3 foundation chains, so 24 x 3 = 72.
Mesh Round 2: Sl st in the next 2 ch to reach the middle of the first loop. Ch 1, sc in the same loop. Ch 4, sc in next loop; repeat from * 22 more times. Ch 4, sl st to the first sc. (24 ch-4 loops)
Mesh Rounds 3–25: Repeat Mesh Round 2. (24 ch-4 loops in every round)
The start of each round moves slightly to one side. This is normal for joined mesh.
Checkpoint: The tube should be 15 in (38.1 cm) tall and 18 in (45.7 cm) around, or 9 in (22.9 cm) wide when laid flat. Fasten off and weave in the ends.
Make All Pieces
You need 9 motifs in total. Each motif uses all four colors, so you’ll make:
- Mustard: 9 centers (Round 1)
- White: 9 petal rounds (Round 2)
- Pale yellow: 9 star frames (Rounds 3–6)
- Cream: 1 mesh tube, 2 bands, 1 strap
Layout grid (tube flattened, seen from the outside):
            Column A   Column B   Column C
Top row:    [ M7 ]     [ M8 ]     [ M9 ]
Middle row: [ M4 ]     [ M5 ]     [ M6 ]
Bottom row: [ M1 ]     [ M2 ]     [ M3 ]
Centered on: loop 1    loop 9     loop 17
The 24 loops divide into 3 columns of 8 loops. Each column takes up 6 in (15.2 cm) of the 18 in (45.7 cm) circumference. Each motif is 4.5 in (11.4 cm) wide, which leaves a 1.5 in (3.8 cm) strip of open mesh between columns.
Joining: Sewing the Motifs to the Tube
Method: Sew the motifs on with whip stitch, using the pale yellow tail. Before you start, slide a rolled towel or a jar about 5.5 in (14.0 cm) across into the tube so you don’t sew through both layers.
Vertical placement: Three motifs stacked tip to tip measure 3 x 4.5 in = 13.5 in (34.3 cm). The mesh is 15 in (38.1 cm) tall, which leaves 0.75 in (1.9 cm) of open mesh at the top and bottom of each column.
Stitch-to-stitch logic:
- Turn each motif so one point faces straight up and another faces straight down.
- Pin the 8 point tips and the 8 valleys to the mesh first. That gives 16 anchor points per motif.
- Whip stitch through the back loop of each Round 6 sc and over the nearest mesh strand beneath it. Catch a mesh strand at least every 3rd sc.
- Where two motifs in a column meet, sew both ch-2 tips to the same mesh strand so they touch.
Tension advice: Pull each stitch just snug. If you sew too tightly, the mesh puckers. If you sew too loosely, the star points flip up. The mesh behind each motif should lie flat, not gathered.
Checkpoint: With all nine motifs sewn on, the tube should still be 18 in (45.7 cm) around and 15 in (38.1 cm) tall. Sewing doesn’t add or remove any tube stitches, so the band counts below depend on the mesh alone.
Border: Top Band, Bottom Band, and Strap
Band gauge: 16 sts = 4 in (10.2 cm), so 72 sts = 18 in (45.7 cm) and 60 sts = 15 in (38.1 cm).
Top Band (cream)
Join cream in any ch-4 loop of Mesh Round 25.
Top Round 1: Ch 1, work 3 sc in each ch-4 loop around. Sl st to the first sc. (24 loops x 3 = 72 sc)
Top Rounds 2–4: Ch 2 (doesn’t count as a st), hdc in each st around. Sl st to the first hdc. (72 hdc)
Top Round 5: Ch 1, sc in each st around. Sl st to the first sc. (72 sc)
Why the math works: At 4 sts per inch, 72 sts = 18 in (45.7 cm), the same as the mesh, so the band won’t flare or pull in. Height: 0.25 in for the first sc round + 1 in for the 3 hdc rounds + 0.25 in for the last sc round = 1.5 in (3.8 cm).
Strap (cream)
Don’t fasten off after Top Round 5. Place markers in st 1 and st 37, which sit opposite each other.
Row 1: Ch 40. Sl st in st 37 of the top band. (40 ch)
Row 2: Turn. Sc in each ch back along the chain, then sl st in st 1. (40 sc)
Fasten off and weave in the end. The strap measures 10 in (25.4 cm).
Bottom Band (cream)
Turn the tube upside down. Join cream in the free loop of the foundation chain, at the base of any sc from Mesh Round 1.
Bottom Round 1: Ch 1, sc in each foundation ch around. Sl st to the first sc. (72 sc)
Bottom Round 2 (decrease): Ch 1. Sc in next 4 sts, sc2tog; repeat from * 11 more times. Sl st to the first sc. (72 sts − 12 = 60 sc, from 12 repeats of 5 sts)
Bottom Round 3: Ch 2 (doesn’t count as a st). FPdc around next st, BPdc around next st; repeat from * around. Sl st to the first FPdc. (60 sts: 30 FPdc + 30 BPdc)
Bottom Round 4: Ch 2. Work FPdc around each FPdc and BPdc around each BPdc. Sl st to the first st. (60 sts) Fasten off.
Why the math works: 60 sts = 15 in (38.1 cm), so the opening is about 4.8 in (12.2 cm) across. That’s small enough to hold the bags in, and the ribbing stretches enough to let one bag through. Height: 0.25 + 0.25 + 0.5 + 0.5 = 1.5 in (3.8 cm).
Total height: 1.5 + 15 + 1.5 = 18 in (45.7 cm).
Final Blocking
- Weave in all remaining ends through stitches of the same color.
- Soak the holder in cool water for 10 minutes, then press the water out gently. Don’t wring it.
- Roll it in a towel to remove more water.
- Slide a tall container or rolled towel about 5.7 in (14.5 cm) across into the tube.
- Pin each star point outward and shape the petals with your fingers.
- Check that the tube is 18 in (45.7 cm) tall and the mesh loops are even.
- Let it dry completely, then hang it so the strap can settle.
Final Quality-Control Checklist
- Each motif has 16 dc, 8 petals, 8 star points, and an edge of 96 sc + 8 ch-2 sps
- Star points line up with the petal tips
- Every mesh round has 24 loops
- Columns are centered on loops 1, 9, and 17
- Motifs are stacked tip to tip with 0.75 in (1.9 cm) of open mesh at the top and bottom
- Top band: 72 sts, 1.5 in (3.8 cm) deep
- Bottom band: 60 sts, 1.5 in (3.8 cm) deep
- Strap: 10 in (25.4 cm), attached at opposite points
- Total height: 18 in (45.7 cm)
Troubleshooting
Petals are cupping. The magic ring is too tight or Round 1 is too small. Redo Round 1 with a looser ring.
Star points are rounded. Make sure Round 5 uses tr for the points and Round 6 works (sc, ch 2, sc) into each point. Pin the points sharply when blocking.
Mesh is spiraling. Joined mesh shifts naturally. Use a ruler to keep the motif columns straight instead of counting loops on each round.
Tube is narrower at the top. Your later rounds are tighter. Go up one hook size for the last 5 mesh rounds.
Bottom opening is too loose. Add another ribbing round, or repeat the decrease round as sc in next 3, sc2tog.
Strap stretches. Work a row of sl sts along the strap to make it stiffer.
Care
Hand wash, or machine wash on a gentle cold cycle in a laundry bag, then reshape and dry flat. Don’t tumble dry, because heat can shrink the cotton motifs unevenly.
Final Notes
Here’s how all the measurements fit together. Each motif is 4.5 in (11.4 cm), and three stacked tip to tip make 13.5 in (34.3 cm), which fits inside the 15 in (38.1 cm) mesh body. The 72 foundation chains make 24 mesh loops and an 18 in (45.7 cm) circumference, which three 6 in (15.2 cm) columns fill. The top band keeps all 72 sts, and the bottom band decreases to 60 sts for a 15 in (38.1 cm) opening. Each band adds 1.5 in (3.8 cm), so the finished holder is 18 in (45.7 cm) tall. Check each measurement as you go, and the holder will come out the right size.
Happy crocheting!