

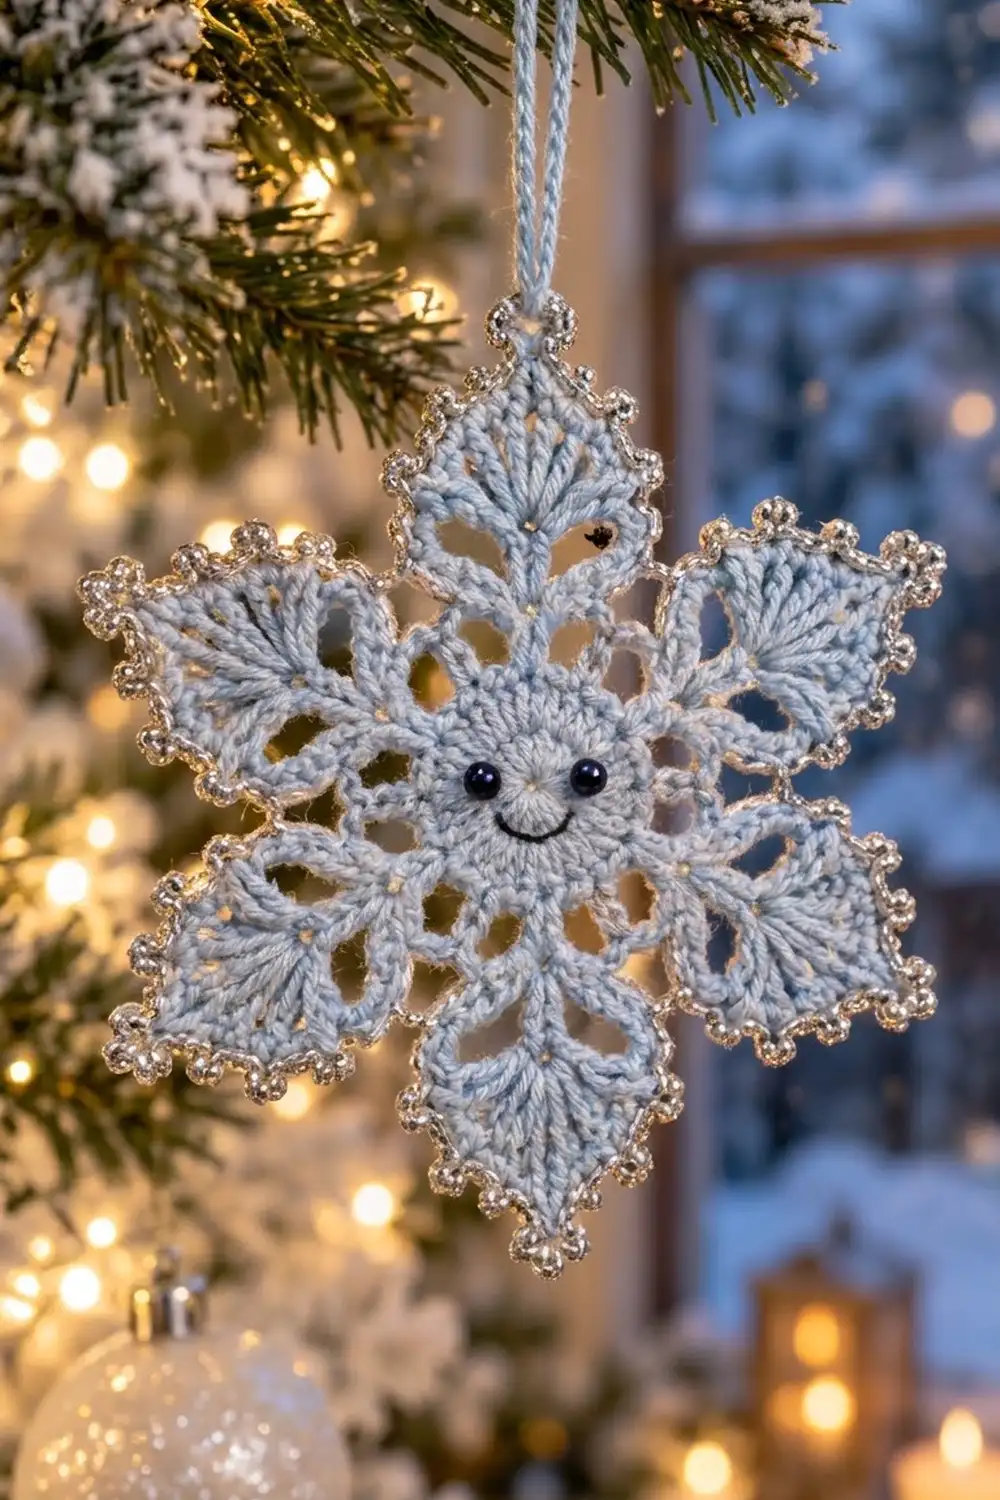
This little snowflake has a face. A smooth round center holds two shiny bead eyes and a stitched smile. Six pointed petals fan out around it, and a silver picot edge catches the tree lights.
The ornament is worked in pale powder-blue cotton thread with a silver metallic thread for the edging. It is soft and wintry, and it looks good on a tree, in a window, or tied onto a gift.
This pattern uses US crochet terms. The finished ornament measures 5 in (12.7 cm) from point to point. Before the edging it measures 4.5 in (11.4 cm).
You make it as one piece, in joined rounds from the center out. You start with a solid face disc, add a ring of chain arches, then a shell round. Next come six long chain loops that become the petals. A silver picot round finishes the edge, and a chain hanging loop goes on last.
Finished Size and Construction
- Finished size: 5 in (12.7 cm) point to point
- Skill level: Intermediate (easy repeats, but thread work needs steady tension)
- Terminology: US crochet terms
- Yarn weight: Size 3 cotton crochet thread / light fingering (#1 Super Fine)
- Hook: 2.25 mm (B-1)
- Number of pieces: 1 single motif
- Layout: One standalone six-pointed snowflake
- Piece size: 5 in (12.7 cm) point to point, after edging
- Size before border: 4.5 in (11.4 cm) point to point
- Border depth: 0.25 in (0.6 cm) beyond each blue point
Materials
Use mercerized cotton thread. It has crisp stitch definition and a slight sheen, and it holds its shape when blocked and starched. Avoid fuzzy or acrylic-blend threads, because they blur the open windows.
Yarn
– Pale blue (main color): 8 g, about 25 m (27 yd)
– Silver metallic thread (edging): 3 g, about 15 m (16 yd), fine or fingering weight
– Dark navy or black embroidery floss (smile): about 12 in (30.5 cm)
All quantities include a margin for swatching and weaving in ends.
Tools
– 2.25 mm (B-1) crochet hook
– Two 4 mm black round beads (or safety-free French knots for a child-safe version)
– Fine beading needle or sharp sewing needle and black thread
– Tapestry needle
– Stitch marker
– Blocking board or foam mat, rustproof pins
– Fabric stiffener or spray starch
– Ruler or tape measure
Abbreviations (US Terms)
- ch – chain
- sl st – slip stitch
- sc – single crochet
- hdc – half double crochet
- dc – double crochet
- tr – treble crochet
- sp(s) – space(s)
- st(s) – stitch(es)
- rep – repeat
Special stitch: picot. Ch 3, then sl st into the 3rd ch from the hook. This makes a tiny round bump that looks like a silver bead.
Gauge and Checkpoints
Gauge matters less here than in a garment, but it decides whether the snowflake comes out at 5 in (12.7 cm). Make the face disc first (Rounds 1–3) and measure it before you go on.
Gauge: Rounds 1–3 = 1 in (2.5 cm) across.
Measurement checkpoints (lay flat, measure without stretching):
– After Round 3: 1 in (2.5 cm) across
– After Round 4: 1.75 in (4.4 cm) across
– After Round 5: 2.25 in (5.7 cm) across
– After Round 6: 3.5 in (8.9 cm) loop tip to loop tip, gently straightened
– After Round 7: 4.5 in (11.4 cm) point to point
– After Round 8 and blocking: 5 in (12.7 cm) point to point
If your disc is too big (over 1.1 in / 2.8 cm), change to a 2.0 mm hook or tighten your tension. If it is too small (under 0.9 in / 2.3 cm), change to a 2.5 mm hook. A difference of 0.1 in (0.3 cm) at the disc grows to about 0.5 in (1.3 cm) at the points, so fix it early.
Pattern: Face Disc
Work in joined rounds with the right side facing. Do not turn.
Round 1: With pale blue, make a magic ring. Ch 1, work 8 sc into the ring, then sl st to the first sc to join. Pull the ring closed tightly. (8 sc)
Round 2: Ch 1, work 2 sc in each st around and join. (16 sc)
Round 3: Ch 1, sc in next st, 2 sc in next st. Rep from * 7 more times and join. (24 sc)
Check the disc against your 1 in (2.5 cm) gauge now. This solid, smooth circle is the snowflake’s face.
Pattern: Arch Ring and Shells
Round 4 (arch ring): Ch 1, sc in the same st as the join, ch 5, skip 3 sts. Sc in next st, ch 5, skip 3 sts. Rep from * 4 more times, then sl st to the first sc to join. (6 sc, 6 ch-5 sps)
Each repeat uses exactly 4 sts of Round 3, and 6 × 4 = 24. These arches form the ring of small openings around the face.
Round 5 (shells): Sl st into the first ch-5 sp. Ch 3 (counts as dc), then work (dc, ch 2, 2 dc) in the same sp, ch 1. In the next ch-5 sp work (2 dc, ch 2, 2 dc), ch 1. Rep from * 4 more times. Sl st to the top of the beginning ch-3 to join. (24 dc, 6 ch-2 sps, 6 ch-1 sps)
The ch-2 sp at the center of each shell is the base of a petal. The ch-1 sps between shells become the valleys between petals.
Pattern: Petal Loops
Round 6: Sl st in the next dc and into the ch-2 sp. Ch 1, then in the ch-2 sp work (sc, ch 11, sc), ch 3, sc in the next ch-1 sp, ch 3. Rep from * 5 more times. Sl st to the first sc to join. (18 sc, 6 ch-11 loops, 12 ch-3 sps)
Per repeat that is 2 sc at the loop base and 1 sc in the valley, so 3 sc × 6 = 18 sc. The ch-11 loops stick out like six spokes. Straighten them gently and check for about 3.5 in (8.9 cm) from tip to tip.
Pattern: Leaf Petals
This round turns each chain loop into a pointed leaf. Because you pack the stitches around the loop rather than into individual chains, they fan out. The loop’s center stays open as the petal’s window.
Round 7: Sl st into the next ch-11 loop. *Work these sts around the ch-11 loop:
- Side A: 2 sc, 2 hdc, 3 dc, 5 tr (12 sts)
- Tip: ch 3
- Side B: 5 tr, 3 dc, 2 hdc, 2 sc (12 sts)
Then skip the ch-3 sp, sl st in the valley sc, and skip the next ch-3 sp.* Rep from * 5 more times. The last sl st goes into the valley sc before the first loop. Fasten off and weave in the ends.
Stitch count per petal: 12 sts on each side, 24 sts in total, plus a ch-3 tip.
Round total: 144 sts (6 × 24), 6 ch-3 tips, and 6 valley sl sts.
The 5 tr on each side climb toward the tip and make the fanned lines you see in each petal. The skipped ch-3 sps stay as small openings near the base of each petal. The valley sl st pulls each gap into a sharp V.
Checkpoint: 4.5 in (11.4 cm) from point to point, measured from opposite tips. Each petal sticks out about 1.1 in (2.8 cm) beyond the shell round.
Border: Silver Picot Edge
Border gauge: One picot every 2 sts. That is roughly one picot every 0.2 in (0.5 cm) along each petal side. The edge adds 0.25 in (0.6 cm) beyond each blue point.
Round 8: Join the silver metallic thread with a sl st in the first st of Side A on any petal. Ch 1. Then, for each petal:
- Side A: 2 sc (1 in each of the next 2 sts), picot. Rep 6 times in total. (12 sc, 6 picots)
- Tip: In the ch-3 sp, work (sc, picot, sc). (2 sc, 1 picot)
- Side B: 2 sc, picot. Rep 6 times in total. (12 sc, 6 picots)
- Valley: Sl st into the valley sl st of Round 7.
Rep for all 6 petals, then join to the first sc. Fasten off.
Counts per petal: 26 sc, 13 picots, 1 sl st.
Round total: 156 sc, 78 picots, 6 sl sts.
Why the math works: Each petal side has exactly 12 sts from Round 7. Working 1 sc per st gives 12 sc, and those split evenly into six 2-sc groups, so the picots stay evenly spaced with nothing left over. The tip gets 2 extra sc around a center picot, so the point stays sharp and lies flat. The valley sl st adds no height, so the V stays deep and crisp.
If you would rather use real beads, pre-string 78 silver 3 mm seed beads onto the metallic thread. In place of each picot, slide one bead up and work a ch 1 around it.
Hanging Loop
Join pale blue in the tip picot of the petal you want at the top. Ch 36, which is about 4 in (10.2 cm), then sl st into the same picot. Fasten off and weave the end into the petal. The doubled loop hangs about 2 in (5.1 cm) above the tip.
Face Details
Do this after Round 8, before blocking.
- Hold the snowflake with the hanging loop at the top.
- Eyes: Sew one 4 mm bead on each side of center, in Round 2, about 0.4 in (1.0 cm) apart. Go through each bead twice and knot it on the back.
- Smile: Thread the floss and backstitch a shallow curve along Round 2, below the eyes and about 0.4 in (1.0 cm) wide. Use 3–4 short backstitches.
- Weave all floss tails into the back of the disc.
For a child-safe ornament, make the eyes as French knots, wrapping the floss 3 times.
Final Blocking
- Wet the snowflake in cool water and press out the excess in a towel.
- Lay it right side up on a blocking mat.
- Pin the center disc flat with 2 pins.
- Pin the 6 petal tips in opposite pairs, 5 in (12.7 cm) apart, spacing them evenly at 60°.
- Pin the 6 valleys so each V points straight back toward the center.
- Open each petal window and the arch openings with a pin or toothpick.
- Apply fabric stiffener or spray starch generously and let it soak in.
- Leave it to dry completely, at least 12 hours. Unpin it only when it feels stiff.
Final Quality-Control Checklist
- [ ] The ornament measures 5 in (12.7 cm) from point to point on all three tip-to-tip lines
- [ ] Round 3 disc is smooth, flat, and 1 in (2.5 cm) across
- [ ] All 6 arch openings are the same size
- [ ] Every petal has 12 sts per side and a ch-3 tip
- [ ] Each petal window is open and centered
- [ ] Round 8 has 6 picots per side and 1 tip picot per petal, 13 per petal
- [ ] The valleys form sharp V shapes
- [ ] The eyes are level and the smile is centered under them
- [ ] The hanging loop sits on a tip, not in a valley
- [ ] All ends are woven in invisibly
Troubleshooting
The face disc cups. Your tension is too tight. Remake Round 3 a little looser, or move up 0.25 mm in hook size.
The disc ruffles. You have too many sts, or your tension is loose. Recount: the disc should have 24 sc.
The petals curl. Round 7 is packed too tightly into the loop. Spread the sts evenly along the full ch-11 loop, and starch firmly when blocking.
The petals are uneven lengths. Check that every loop in Round 6 has exactly 11 ch.
The metallic thread twists or frays. Work from the center of the spool, let the thread hang to untwist every few picots, and keep your ends 6 in (15.2 cm) long for weaving.
The picots flop over. Pull each picot sl st snug, then pin the picots outward when blocking.
The ornament is under 5 in (12.7 cm). Re-wet it and stretch the tips to the correct measurement before you starch.
Care
Dust it gently, or spot-clean with a damp cloth. If it softens over time, re-starch and re-block it. Store it flat between tissue paper.

Final Notes
The measurement chain is short and easy to check. The face disc is 1 in (2.5 cm). The arch ring brings it to 1.75 in (4.4 cm), and the shells to 2.25 in (5.7 cm). The petal loops reach 3.5 in (8.9 cm), and the leaves reach 4.5 in (11.4 cm) point to point. The silver picot edge adds 0.25 in (0.6 cm) at each tip, for a finished 5 in (12.7 cm) snowflake. If you check each stage as you go, your snowflake will block to size with sharp, even points.
Happy crocheting!