

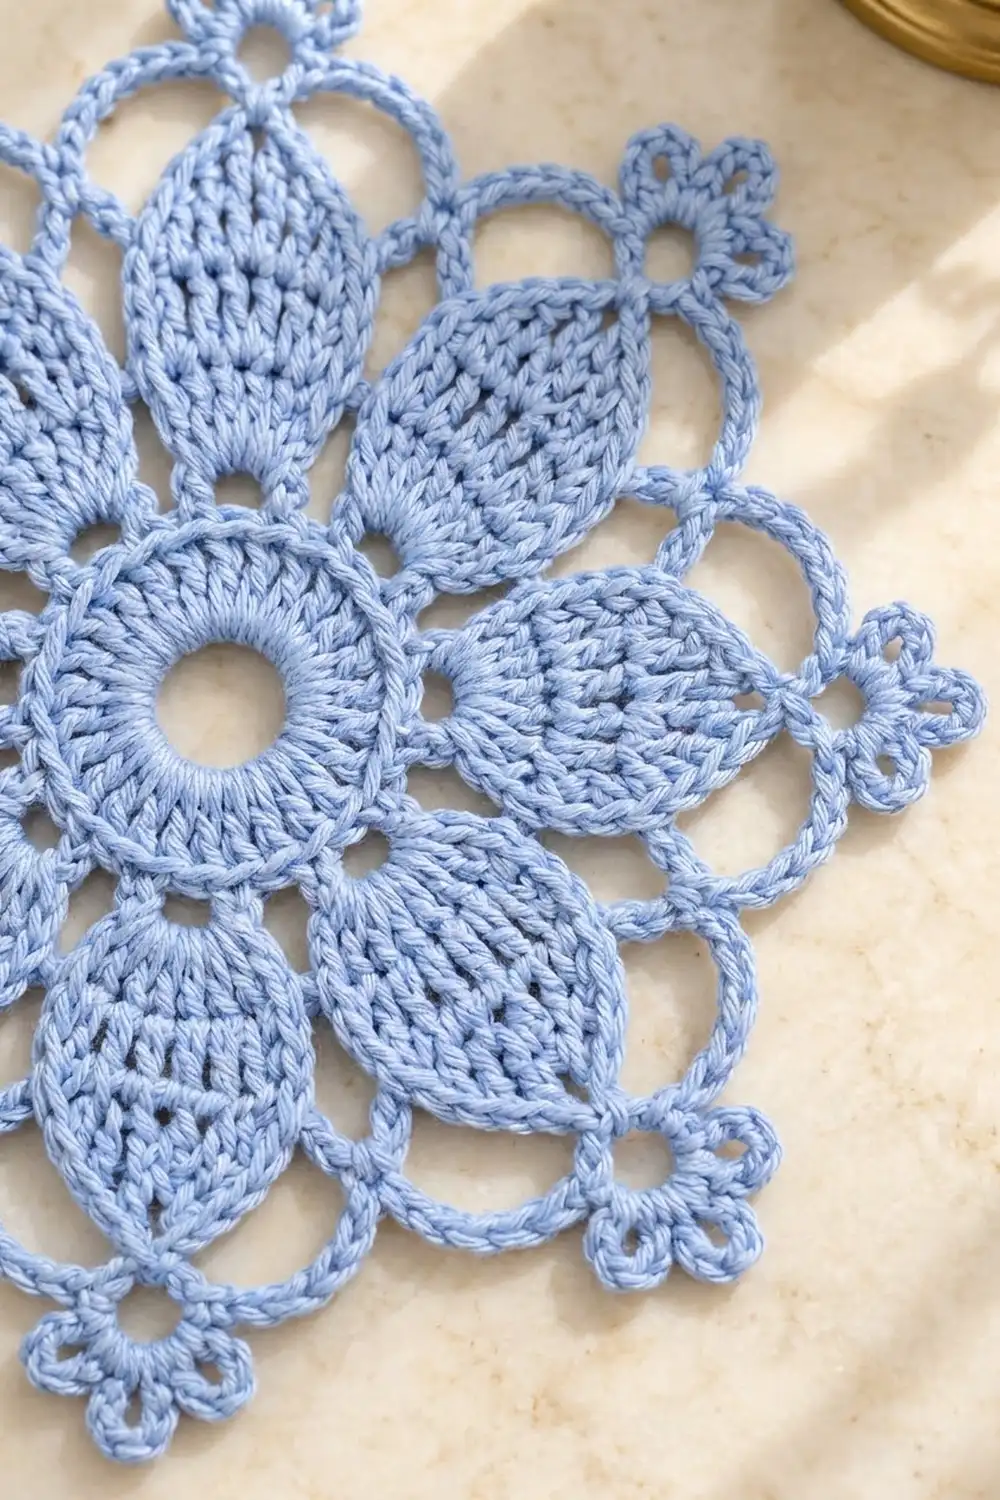
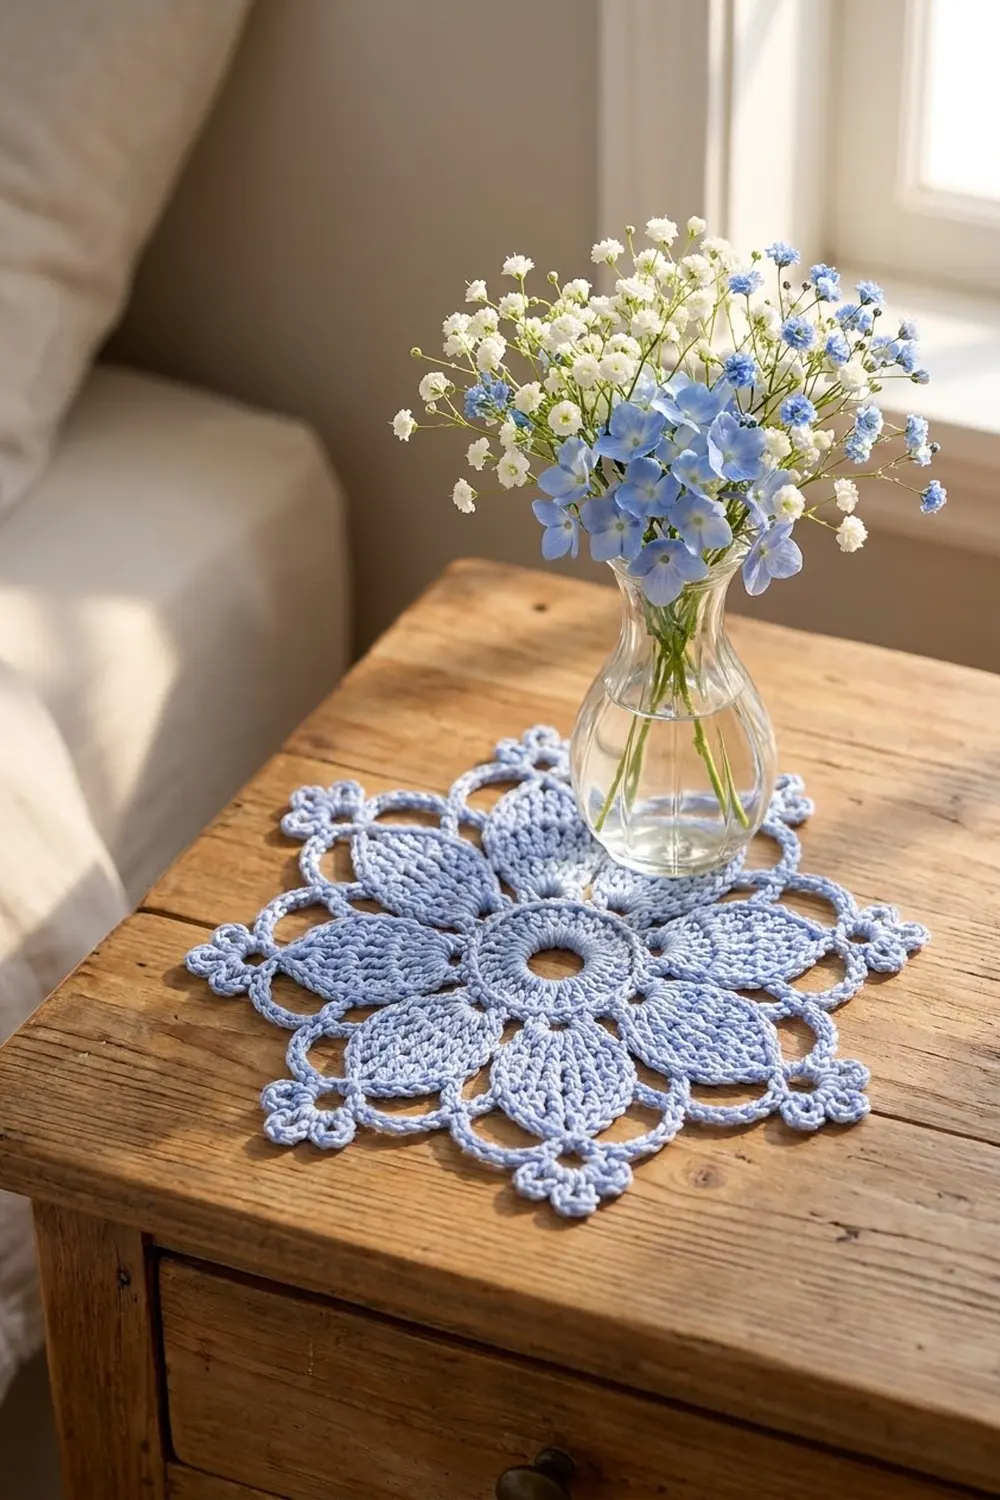
The Bluebell Halo Doily is a light, airy round doily made in one soft periwinkle blue. A small open ring sits at its center. Eight pointed petals surround it, each built from stacked double crochet columns that give a gentle ribbed texture.
Outside the petals, curved chain arches run from tip to tip, which leaves the spaces between petals open and lacy. Each petal tip ends in a small trefoil picot, so the outline looks like a flower with a scalloped edge.
This pattern uses US crochet terms. The finished doily measures 8.75 in (22.2 cm) across from trefoil to trefoil. It looks good on a vanity, under a vase, or as a gift topper.
The construction is simple. You start with a chain ring and work two center rounds. Then you work each petal in short rows, directly into the center. Last comes a three-round border: chain arches, a single crochet round that covers them, and a trim round that adds the trefoils.
Finished Size and Construction
- Finished size: 8.75 in (22.2 cm) across, trefoil tip to trefoil tip
- Skill level: Intermediate
- Terminology: US crochet terms
- Yarn weight: Sport weight (#2) cotton
- Hook: 3.0 mm
- Number of pieces: 1 (single doily)
- Layout: Single round motif with 8 petals; no joining
- Piece size: 8.75 in (22.2 cm)
- Size before border: 7 in (17.8 cm), petal tip to petal tip
- Border depth: 0.875 in (2.2 cm) at each tip
Materials
Yarn: Use a smooth, mercerized sport weight cotton. Mercerized cotton shows stitch definition crisply and blocks flat. Avoid fuzzy or very stretchy fibers, because the open arches need a yarn that holds its shape.
- Light periwinkle blue: 25 g (approx. 78 m)
Tools:
- 3.0 mm crochet hook
- Tapestry needle
- Scissors
- 8 locking stitch markers
- Blocking mat and rust-proof pins
- Spray bottle with water
- Ruler or tape measure
The quantity above includes a safety margin of about 25%, which covers a gauge swatch and weaving in ends.
Abbreviations (US Terms)
- ch – chain
- sl st – slip stitch
- sc – single crochet
- dc – double crochet
- dc2tog – double crochet 2 together
- dc3tog – double crochet 3 together
- st(s) – stitch(es)
- sp – space
- rep – repeat
Special stitch – Trefoil:
1. Ch 3. These chains are the stem.
2. *Ch 4, sl st in the top stem ch (the third ch you made). Rep from * 2 more times, giving 3 small ch-4 rings that fan out from the top of the stem.
3. Sl st in each of the 2 remaining stem ch, working back toward the base.
The trefoil is not counted as a stitch.
Gauge and Checkpoints
Gauge: 20 dc and 13 rows = 4 in (10.2 cm) in dc worked flat.
Gauge matters most in the petals. Make the center and one complete petal first, then measure before you go on.
Checkpoints:
- After Rnd 1: 1.5 in (3.8 cm) across, with a center hole of about 0.5 in (1.3 cm).
- After Rnd 2: 2 in (5.1 cm) across. The piece should lie flat, with no cupping or ruffling.
- After Petal 1: 2.5 in (6.4 cm) long from base to tip, and 1.75 in (4.4 cm) wide at Rows 3–4.
- After all 8 petals: 7 in (17.8 cm) from petal tip to opposite petal tip.
- After Border Rnd 2: 7.75 in (19.7 cm) tip to tip.
- After Border Rnd 3: 8.75 in (22.2 cm) trefoil to trefoil.
If your first petal is longer than 2.5 in (6.4 cm), go down to a 2.75 mm hook. If it is shorter, go up to a 3.25 mm hook. Change the hook, not the stitch counts. The border math relies on the counts staying exactly as written.
Center
Foundation: Ch 10, then sl st to the first ch to form a ring.
Rnd 1: Ch 3 (counts as dc). Work 23 dc into the ring, then sl st to the top of the beginning ch-3. (24 dc)
Rnd 2: Ch 1. 2 sc in each of the next 2 sts, sc in next st. Rep from * 8 times total. Sl st to the first sc. (40 sc)*
Each repeat is 3 stitches worked into 5 sc, and there are 8 repeats. That is 24 sts worked into 40 sc, which gives exactly 5 sc for each of the 8 petals.
Place a marker in every 5th sc, counting the first sc of the round as stitch 1. That gives markers in sc 1, 6, 11, 16, 21, 26, 31 and 36. Each marker shows where a petal begins.
Checkpoint: the center is 2 in (5.1 cm) across and lies flat.
Petals
Each petal is worked in rows into 5 sc of Rnd 2, then fastened off. Keep the turning chains snug. Neat edges make the petal outline sharp.
Petal 1
Do not fasten off after Rnd 2. Work Row 1 straight away, starting in the sl st join and the first marked sc.
Row 1: Ch 3 (counts as dc), dc in next 4 sc. Turn. (5 dc)
Row 2: Ch 3 (counts as dc), dc in first st, dc in next 3 sts, 2 dc in top of turning ch. Turn. (7 dc)
Row 3: Ch 3 (counts as dc), dc in first st, dc in next 5 sts, 2 dc in top of turning ch. Turn. (9 dc)
Row 4: Ch 3 (counts as dc), dc in next 8 sts. Turn. (9 dc)
Row 5: Ch 2 (does not count). Dc2tog over first 2 sts, dc in next 5 sts, dc2tog over last 2 sts. Turn. (7 sts)
Row 6: Ch 2 (does not count). Dc2tog, dc in next 3 sts, dc2tog. Turn. (5 sts)
Row 7: Ch 2 (does not count). Dc2tog, dc in next st, dc2tog. Turn. (3 sts)
Row 8: Ch 2 (does not count). Dc3tog. (1 st – petal tip)
Fasten off and leave a 4 in (10.2 cm) tail.
Because each row stacks its dc directly on top of the dc below, the stitches line up in vertical columns. That is what gives the petal its ribbed texture. The petal widens over Rows 1–3, holds its width for Rows 3–4, and narrows to a point over Rows 5–8, which makes the pointed oval shape.
Checkpoint: the petal is 2.5 in (6.4 cm) long and 1.75 in (4.4 cm) at its widest.
Petals 2–8
Join the yarn with a sl st in the next marked sc of Rnd 2. Work Rows 1–8 exactly as for Petal 1, then fasten off. Repeat this until all 8 petals are done.
Each petal uses its own 5 sc, so the petal bases sit side by side around the center with no gaps and no shared stitches.
Checkpoint: 8 petals; 7 in (17.8 cm) from tip to opposite tip.
Weave in the petal tails now, along each petal’s own side edge. Then lightly press or pin the petals flat before you start the border. This helps the arches sit evenly.
Border
Border gauge: In the border, 19 sc fit evenly across one ch-17 arch. A finished arch, measured flat along its curve, is about 3 in (7.6 cm) long.
In this pattern, a “side” means one section of the border, running from one petal tip to the next petal tip. There are 8 sides.
Rnd 1 (arch round):
1. Join the yarn with sc in the top of the dc3tog at any petal tip.
2. *Ch 17, sc in the top of the dc3tog at the next petal tip. Rep from * around, but on the final repeat replace the last sc with a sl st to the first sc.
(8 sc + 8 ch-17 arches)
Each side now has 1 tip sc and 1 ch-17 arch. The arches bow outward between the petals and leave large open spaces.
Rnd 2 (covering round – conversion):
1. Ch 1. Sc in the same sc as the join, then 19 sc in the next ch-17 sp.
2. *Sc in the next tip sc, 19 sc in the next ch-17 sp. Rep from * 6 more times.
3. Sl st to the first sc.
(160 sc = 8 sc worked 1-per-stitch into the tip sc + 152 sc worked into the arches [17 chains + 2 extra, × 8])
That is 20 sc per side: 1 tip sc and 19 arch sc.
Checkpoint: 7.75 in (19.7 cm) tip to tip.
Rnd 3 (trefoil trim round – trim):
1. Ch 1. In the first sc (a tip sc), work sc, trefoil, sc. Then sc in each of the next 19 sc.
2. *In the next tip sc, work sc, trefoil, sc. Sc in each of the next 19 sc. Rep from * 6 more times.
3. Sl st to the first sc and fasten off.
(168 sc = 160 sc worked 1-per-stitch + 8 extra sc, one at each tip; plus 8 trefoils)
That is 21 sc per side: 2 sc at the tip and 19 along the arch.
Why the math works:
– A ch-17 arch is slightly longer than the straight line between two neighboring tips, which is about 2.7 in (6.9 cm). That extra length makes it bow outward instead of pulling the petals together.
– Working 19 sc over 17 chains (2 extra per arch) keeps the covered arch from tightening into a straight line.
– Rnd 3 adds only one stitch per side. It is the second sc at each tip, which centers the trefoil on the petal point. The arch edges get no extra stitches, so the outline stays flat and does not ruffle.
Checkpoint: 8.75 in (22.2 cm) trefoil to trefoil.
Final Blocking
- Weave in all remaining ends, keeping them inside petal columns or along the sc of the border.
- Soak the doily in cool water for 10 minutes, then gently press the water out using a towel. Do not wring it.
- Lay it right side up on the blocking mat.
- Pin the center ring into a circle 2 in (5.1 cm) across.
- Pin each petal tip outward so that opposite tips are 7 in (17.8 cm) apart.
- Pin the middle of each arch outward into a smooth curve.
- Open each trefoil and pin its 3 rings into a clover shape, so opposite trefoils are 8.75 in (22.2 cm) apart.
- Let it dry completely before you unpin it. For a crisper finish, mist it with light spray starch while it is still pinned.
Final Quality-Control Checklist
- Center hole is open and round, about 0.5 in (1.3 cm) across
- Rnd 1 has 24 dc and Rnd 2 has 40 sc
- All 8 petals have 8 rows and end in a single dc3tog point
- Petals are evenly spaced, with 5 sc of Rnd 2 under each
- 8 arches of ch 17 each, attached only at the petal tips
- Rnd 2 of the border has 20 sc per side (160 total)
- Rnd 3 of the border has 21 sc per side (168 total) and 8 trefoils
- Each trefoil has 3 even rings centered on its petal tip
- The doily lies flat and measures 8.75 in (22.2 cm) across
- All ends are woven in securely and cannot be seen from the front
Troubleshooting
The center cups. Your Rnd 2 is too tight. Go up 0.25 mm for that round only, or check that you made 16 increases.
The center ruffles. Your Rnd 1 stitches are too loose. Pull the foundation tail to close the ring slightly before you work Rnd 2.
The petals are different lengths. Your turning chains may be uneven. Keep each ch-3 the same height as a dc, and recount every row.
The petal tips are rounded, not pointed. Make sure Row 8 is a dc3tog worked over all 3 stitches, and pull it snug.
The arches pull the petals inward. Your chains are too tight. Remake Rnd 1 with a slightly looser chain, or use ch 18 and work 20 sc in Rnd 2. If you do this, the per-side count rises by 1 in Rnds 2 and 3.
The arches ripple. You worked too many sc in Rnd 2. Check that each arch has exactly 19 sc.
The trefoils are lopsided. Make all 3 rings into the same top stem chain, and keep each ch-4 the same tension.
Care
Hand wash in cool water with a mild soap, then lay flat and pin to dry. Re-starch it if needed to bring back the crisp arches and trefoils.
Final Notes
The measurement chain is short and easy to check:
- Center: 1.5 in (3.8 cm) after Rnd 1, 2 in (5.1 cm) after Rnd 2
- Petals: each 2.5 in (6.4 cm) long, 7 in (17.8 cm) tip to tip once all 8 are done
- Border: 7.75 in (19.7 cm) after Rnd 2, finishing at 8.75 in (22.2 cm) after the trefoil round
If you hit each checkpoint in turn, the arches, trefoils and petals will line up neatly. Take your time with the first petal, because it sets the rhythm for the whole doily.
Happy crocheting!