

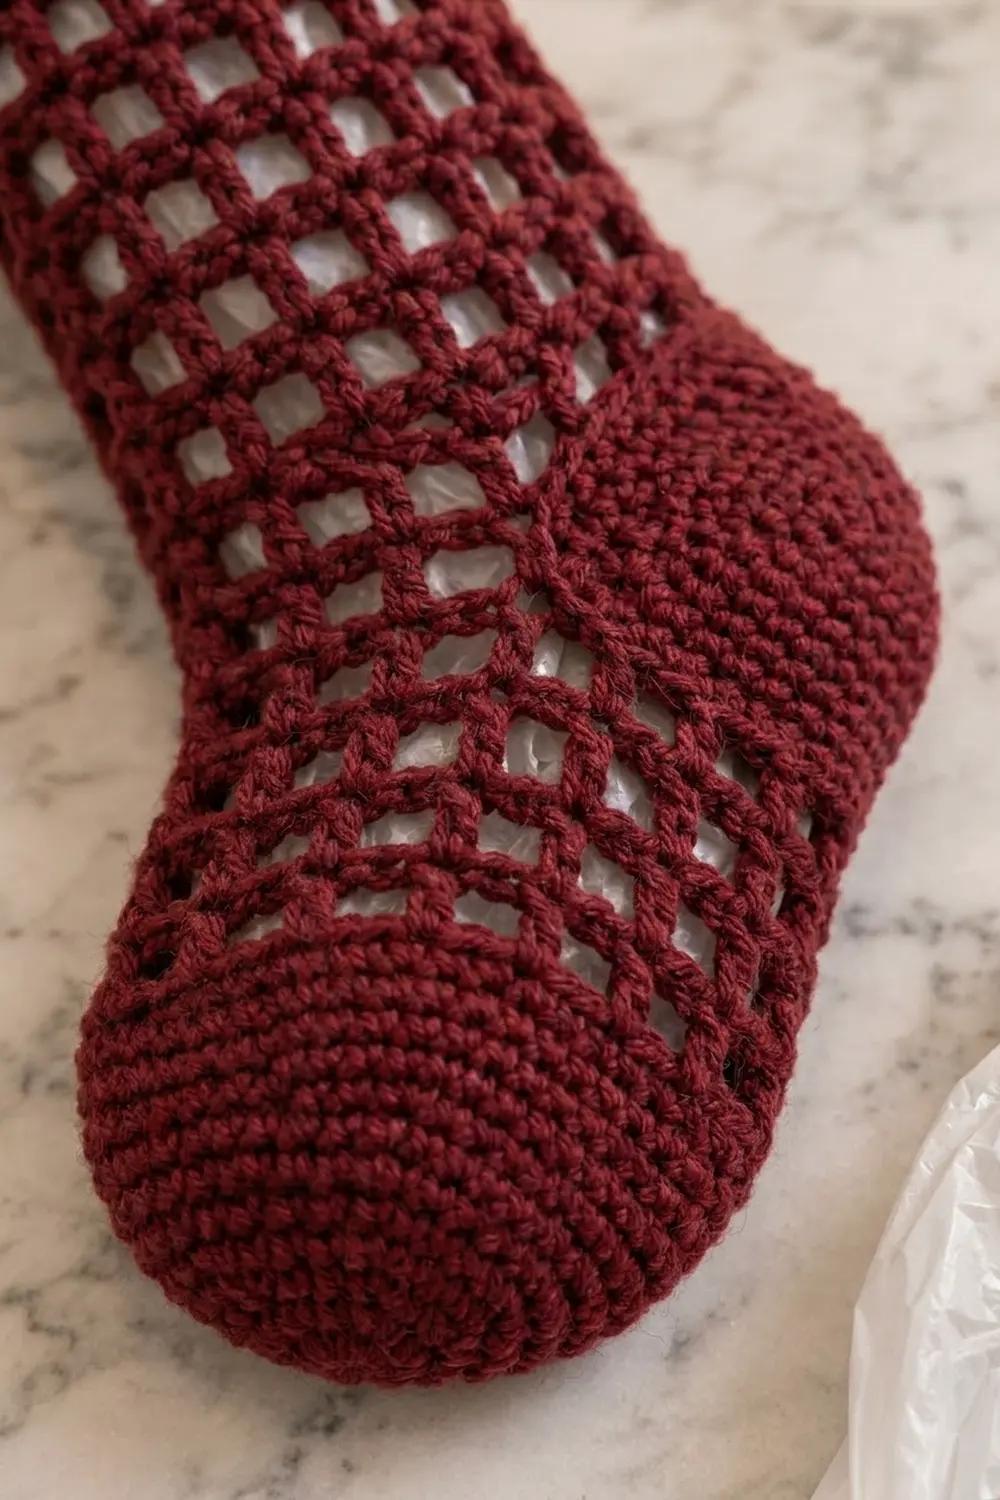
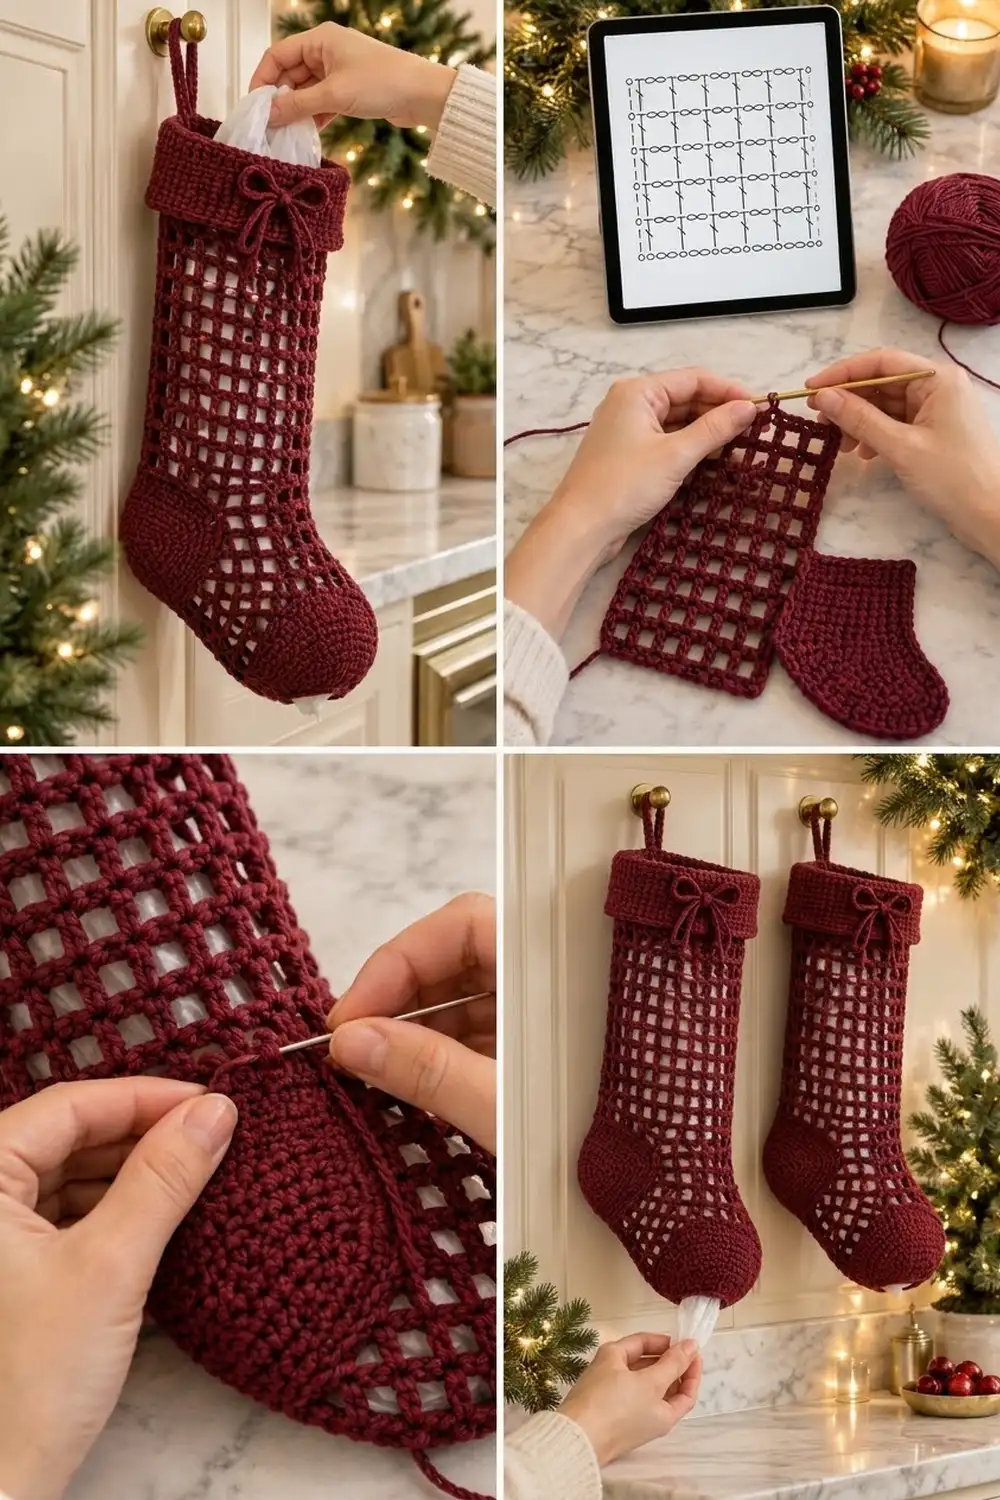
The Cranberry Lattice Stocking is a Christmas stocking with a practical job: it holds plastic grocery bags. You stuff bags in at the top and pull them out one at a time through a small opening in the toe. The open filet mesh shows the bags inside, and the solid cuff, heel, and toe give it a clean, classic stocking outline.
The sample uses a single deep burgundy, so the texture does all the work. The design has an upright double-crochet grid on the leg and foot, a dense single-crochet heel and toe, a folded cuff, a slim hanging loop, and a chain-cord bow at the front. It looks good on a kitchen cabinet knob, a pantry door, or a hook by the back door.
This pattern uses US crochet terms. The finished stocking measures about 6 in (15.2 cm) wide laid flat at the leg. It’s about 15 in (38.1 cm) long from the folded top edge to the toe tip, measured down the front, and about 8 in (20.3 cm) from heel to toe.
Construction is top-down and seamless. You start with a chain ring and work the mesh leg in joined rounds. Next comes a short-row heel worked in rows over the back half, then mesh rounds for the foot and decreasing single-crochet rounds for the toe. Last, you work the cuff into the starting chain and fold it down, then add the loop and bow. There’s no sewing apart from weaving in ends and tacking on the bow.
Finished Size and Construction
- Finished size: 6 in (15.2 cm) wide flat at the leg, 6.5 in (16.5 cm) wide flat at the cuff, about 15 in (38.1 cm) long
- Skill level: Easy-Intermediate (joined rounds, short rows)
- Terminology: US
- Yarn weight: Worsted (#4)
- Hook: 4.0 mm (US G-6)
- Number of pieces: 1 stocking worked in one piece, plus 1 separate chain cord for the bow
- Layout: Single piece; no assembly grid
- Piece size: Leg circumference 12 in (30.5 cm), 16 mesh squares around
- Size before border (cuff): 6 in (15.2 cm) wide flat, open top edge
- Border depth: The folded cuff hangs 2 in (5.1 cm)
Materials
Use a smooth worsted-weight yarn so the mesh squares stay crisp. Cotton or a cotton blend holds its shape best when bags are pulled through it again and again. Acrylic works too, but it stretches more at the toe opening. Avoid fuzzy or brushed yarns, because they blur the grid.
- Burgundy (main and only color): 150 g, about 270 m (295 yd)
Tools:
– 4.0 mm (US G-6) crochet hook
– Yarn needle
– 2 locking stitch markers
– Scissors
– Measuring tape
– Spray bottle and blocking pins
The quantities include a margin of about 20% for gauge testing and differences in tension.
Abbreviations (US Terms)
- ch – chain
- sl st – slip stitch
- sc – single crochet
- dc – double crochet
- sc2tog – single crochet 2 together
- sp – space
- st(s) – stitch(es)
- rnd – round
- beg – beginning
- RS / WS – right side / wrong side
Mesh square: A mesh square is 1 dc plus the ch-2 sp beside it, which equals 3 sts. When the pattern says “16 squares,” that means 16 dc + 32 ch = 48 sts.
Mesh-to-solid conversion: Work 1 sc in each dc and 2 sc in each ch-2 sp. Each square becomes 3 sc.
Gauge and Checkpoints
- Single crochet: 16 sts and 18 rows = 4 in (10.2 cm)
- Mesh: 4 squares (12 sts) = 3 in (7.6 cm) wide; 5 mesh rnds = 3 in (7.6 cm) tall
Both gauges work out to 4 sts per inch. That’s why the mesh leg and the solid toe and cuff line up without any extra increases.
Test the stocking itself rather than a separate swatch. Work the foundation and Rnds 1–5 of the leg, then lay the tube flat without stretching it.
Checkpoints:
1. After Leg Rnd 5: the flat width is 6 in (15.2 cm), and the height is 3 in (7.6 cm).
2. After Leg Rnd 14: the leg is 8.4 in (21.3 cm) tall.
3. After the heel: the center of the heel is about 3.8 in (9.7 cm) tall, and the side edges are only 1–2 rows tall.
4. After Foot Rnd 7: the foot mesh is 4.2 in (10.7 cm) long.
5. After the toe: the toe is 2.2 in (5.6 cm) long, and the opening is about 1.4 in (3.6 cm) across.
Too big? Go down one hook size (3.75 mm). Too small? Go up one hook size (4.5 mm). Don’t add or remove stitches, because the square count controls the shape. If your width matches but your mesh rounds are too tall, pull up less yarn on each dc.
Leg (Filet Mesh)
Foundation: Ch 48. Without twisting the chain, sl st in the first ch to form a ring.
The point where each round joins is one side edge of the stocking. Place a marker there and move it up as you go.
Rnd 1 (RS): Ch 5 (counts as dc + ch 2), skip next 2 ch, [dc in next ch, ch 2, skip next 2 ch] 15 times, sl st in 3rd ch of beg ch-5.
(16 dc + 32 ch = 48 sts; 16 squares)
Rnd 2: Ch 5 (counts as dc + ch 2), [dc in next dc, ch 2] 15 times, sl st in 3rd ch of beg ch-5.
(48 sts; 16 squares)
Rnds 3–14: Repeat Rnd 2.
(48 sts; 16 squares)
Don’t fasten off. The leg now measures 8.4 in (21.3 cm).
Squares 1–8 (sts 1–24) form the back of the stocking. Squares 9–16 (sts 25–48) form the front.
Heel (Short Rows, Solid)
You work the heel in rows over the back 24 sts only, while the front 24 sts wait. The short rows add height at the center back, which bends the stocking into its boot shape.
Row 1 (RS): Ch 1, sc in the same st as the join, 2 sc in next ch-2 sp, [sc in next dc, 2 sc in next ch-2 sp] 7 times, turn.
(8 sc worked 1 per dc + 16 sc worked 2 per sp = 24 sc)
Row 2: Ch 1, sc in each of the next 23 sts, turn. Leave the last st unworked.
(23 sc)
Rows 3–9: Ch 1, sc in each st across, stopping 1 st before the end of the previous row, turn.
Each row has 1 fewer sc than the row before. The totals are Row 3: 22, Row 4: 21, Row 5: 20, Row 6: 19, Row 7: 18, Row 8: 17, Row 9: 16. After Row 9, 4 unworked sts remain at each end.
Row 10: Ch 1, sc in each of the 16 sts of the previous row. Then sc in the next unworked st, inserting the hook under that st and the ch-1 of the row above it to close the gap. Turn.
(17 sc)
Rows 11–17: Repeat Row 10, picking up 1 more unworked st at the end of each row.
The totals are Row 11: 18, Row 12: 19, Row 13: 20, Row 14: 21, Row 15: 22, Row 16: 23, Row 17: 24.
Row 17 ends at st 24, right next to the first dc of the front. Don’t turn.
Foot (Filet Mesh)
Rnd 1: Sl st in the next dc (the first front dc). Ch 5 (counts as dc + ch 2), [dc in next dc, ch 2] 7 times across the front. Then work across the heel’s Row 17: [dc in next sc, ch 2, skip next 2 sc] 8 times. Sl st in 3rd ch of beg ch-5.
(8 front squares + 8 heel squares = 16 squares; 48 sts)
The heel squares should sit directly below the leg’s back squares. If they drift by one stitch, it won’t affect the size.
Rnds 2–7: Ch 5, [dc in next dc, ch 2] 15 times, sl st in 3rd ch of beg ch-5.
(48 sts; 16 squares)
The foot mesh measures 4.2 in (10.7 cm).
Toe (Solid, with Dispenser Opening)
Rnd 1: Ch 1, sc in the same st, 2 sc in next ch-2 sp, [sc in next dc, 2 sc in next ch-2 sp] 15 times, sl st in first sc.
(16 sc worked 1 per dc + 32 sc worked 2 per sp = 48 sc)
Rnds 2–4: Ch 1, sc in each st around, sl st in first sc.
(48 sc)
Rnd 5: Ch 1, [sc in next 6 sts, sc2tog] 6 times, sl st in first sc.
(42 sc)
Rnd 6: Ch 1, [sc in next 5 sts, sc2tog] 6 times, join.
(36 sc)
Rnd 7: Ch 1, [sc in next 4 sts, sc2tog] 6 times, join.
(30 sc)
Rnd 8: Ch 1, [sc in next 3 sts, sc2tog] 6 times, join.
(24 sc)
Rnd 9: Ch 1, [sc in next 2 sts, sc2tog] 6 times, join.
(18 sc)
Rnd 10 (reinforcement): Sl st loosely in each st around.
(18 sl st)
Fasten off and weave in the end. The 18-st opening is 4.5 in (11.4 cm) around, or about 1.4 in (3.6 cm) across. That’s wide enough to pull a bag through and small enough to hold the rest inside.
Border: Cuff, Hanging Loop, and Bow
Border gauge: 16 sc = 4 in (10.2 cm), with 18 rnds = 4 in (10.2 cm).
Cuff: Turn the stocking WS out so the RS of the cuff faces out once you fold it down. Join yarn at the marked side edge, in the free loops of the foundation chain.
Rnd 1: Ch 1, sc in each free loop of the foundation ch, sl st in first sc.
(48 sc; 24 per side when flattened)
Rnd 2: Ch 1, [sc in next 11 sts, 2 sc in next st] 4 times, join.
(52 sc; 26 per side when flattened)
Rnds 3–9: Ch 1, sc in each st around, join.
(52 sc)
Fasten off. Turn the stocking RS out and fold the cuff down over the outside. The fold becomes the top edge.
Why the math works: Rnd 1 matches the leg’s 48 sts exactly, so the top edge stays 12 in (30.5 cm) around, with no ruffling or pulling. Rnd 2 adds 4 sts to bring the cuff to 13 in (33.0 cm), which is 6.5 in (16.5 cm) flat. That extra 1 in (2.5 cm) of circumference lets the cuff lie over the leg without squeezing it. Nine rnds at 4.5 rnds per inch give the 2 in (5.1 cm) drop.
Hanging loop: Find the center back of the folded top edge. That’s foundation st 12, half of the 24 back sts. Join yarn through both layers of the fold, ch 24, and sl st in the same st. Then sl st in each of the 24 ch for a firm cord. The loop stands about 2.4 in (6.1 cm) tall. Fasten off and weave the ends into the cuff.
Bow: Ch 90, which is about 18 in (45.7 cm). Sl st in the back bump of the 2nd ch from the hook and in each ch across. (89 sl st) Tie a bow with 1 in (2.5 cm) loops and leave the tails hanging about 3.5 in (8.9 cm) over the mesh. With a yarn needle, tack the knot to the center front of the cuff.
Final Blocking
- Weave in all ends along the solid sections, where they hide best.
- Stuff the stocking firmly with plastic bags or a rolled towel.
- Lay it flat and shape the heel curve and the round toe with your hands.
- Pin the leg to 6 in (15.2 cm) wide, lining up the mesh columns so they run straight.
- Mist lightly until damp and leave to dry completely.
- Steam the cuff fold gently for a crisp top edge. Don’t press acrylic.
- Unpin, shake out, and fill with bags.
Final Quality-Control Checklist
- 16 mesh squares around the leg and foot, with no twisted columns
- Heel Row 17 has 24 sc, and there are no gaps at the heel corners
- Toe stitch counts are 48, 42, 36, 30, 24, and 18
- The toe opening is about 1.4 in (3.6 cm) across and reinforced
- The cuff has 52 sc and hangs 2 in (5.1 cm)
- The loop is at center back, and the bow is centered on the front
- The stocking hangs straight from the knob without twisting
Troubleshooting
Mesh columns lean. Joined rounds tend to drift. Keep the ch-5 snug and block with the columns pinned straight.
Holes at the heel corners. On Rows 10–17, insert the hook under both the unworked st and the ch-1 above it. Close any leftover gaps with the yarn tail.
Bags fall out of the toe. Your tension is loose. Work Toe Rnd 10 a little tighter, or add a second rnd of sl st.
Bags won’t come out. Work Rnd 10 looser, or stop the toe after Rnd 8 (24 sc).
Cuff flares. Use the smaller hook for the cuff only.
Cuff pulls the leg in. Make sure Rnd 2 reached 52 sts.
Stocking twists on the knob. Check that the loop is exactly at center back, foundation st 12.
Care
Hand wash in cool water and lay flat to dry. Reshape the heel and toe while damp.
Final Notes
The measurement chain is simple. Everything runs on 4 sts per inch, so 48 sts make the 12 in (30.5 cm) tube. Fourteen mesh rnds build the 8.4 in (21.3 cm) leg. The 24-st short-row heel turns the corner, and 7 foot rnds add 4.2 in (10.7 cm). The toe decreases from 48 to 18 sts over 2.2 in (5.6 cm), and the 52-st cuff finishes the top with a 2 in (5.1 cm) fold. If you check each stage against its checkpoint, the stocking will come out at the size shown.
Happy crocheting!