

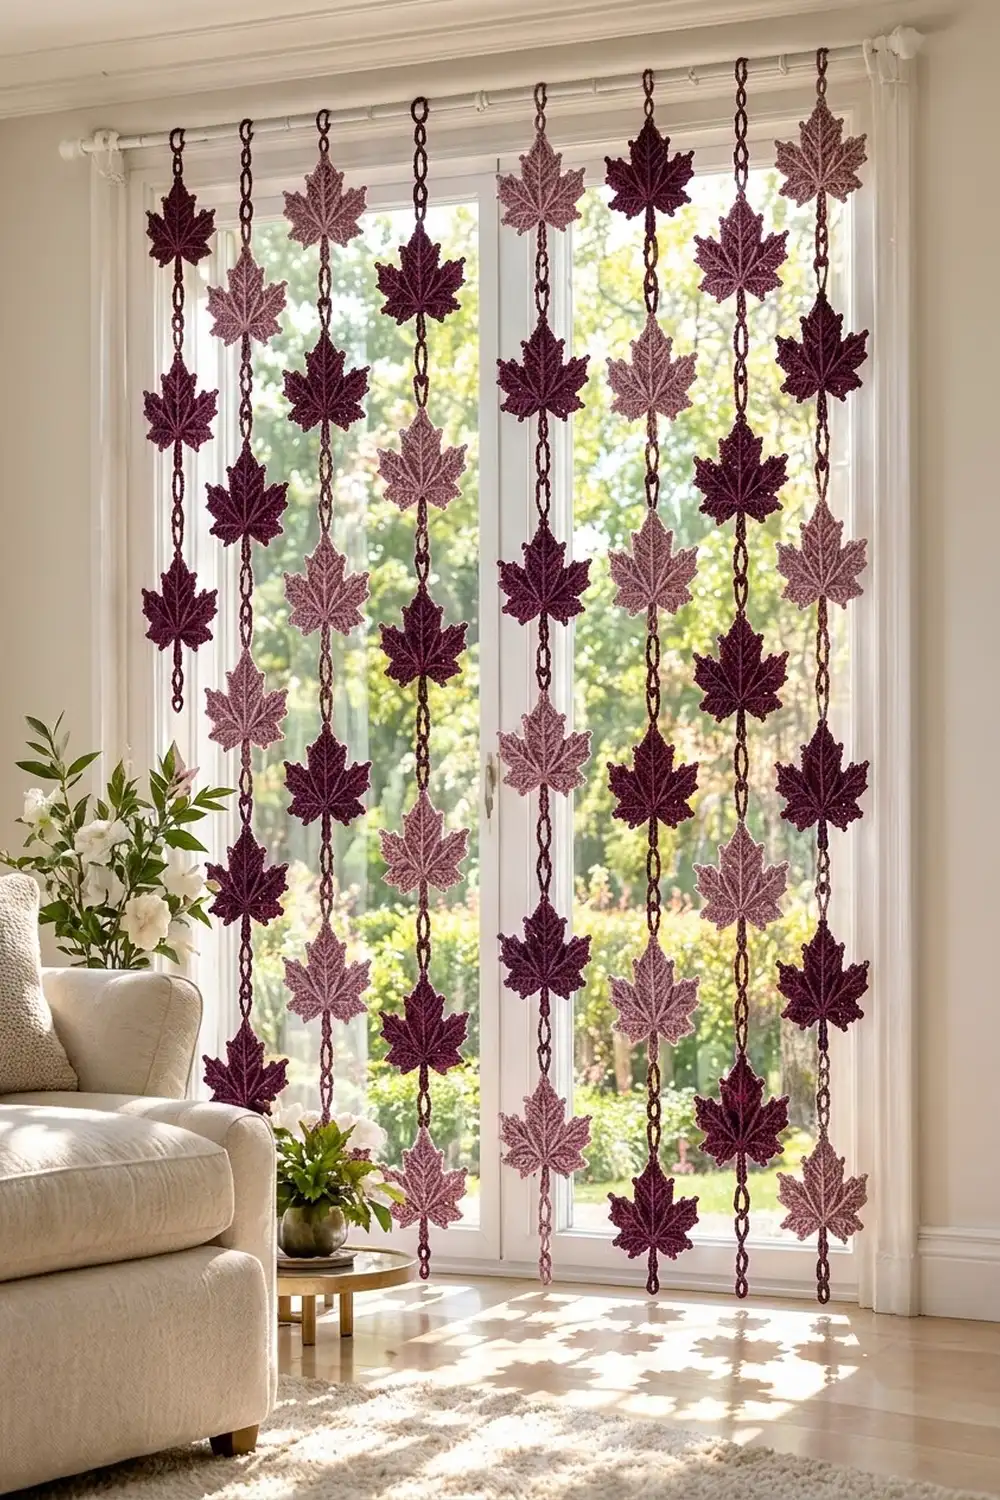
This curtain is a soft screen of crocheted maple leaves. Each leaf has five pointed lobes, a ridged surface, raised slip-stitch veins and a small picot edge that gives the outline a gently serrated look. The leaves hang on chain-ring links, so light passes freely between them.
Two colors alternate down every strand: deep plum and dusty mauve. Neighboring strands start with opposite colors, so the curtain reads as a staggered checkerboard of dark and light leaves. The style is calm and seasonal, and modern enough to stay up long after autumn.
The pattern uses US crochet terms. The finished curtain measures about 36 in (91.4 cm) wide and 72 in (182.9 cm) long. It is made of 8 strands with 9 leaves each. Each finished leaf is about 4.5 in (11.4 cm) wide and 4 in (10.2 cm) tall, plus a 1 in (2.5 cm) stem.
Construction is simple and repetitive. You work a small half-circle fan and grow five lobes from it in short rows. Then you add a picot edging and a looped stem, and surface-crochet the veins. Finished leaves are linked into strands with closed chain rings, and each strand gets a hanging loop for the rod.
Finished Size and Construction
- Finished curtain: 36 in (91.4 cm) wide x 72 in (182.9 cm) long
- Skill level: Intermediate (short rows, decreases, surface slip stitch)
- Terminology: US
- Yarn weight: Worsted (#4), cotton or cotton blend
- Hook: 4.5 mm (US 7)
- Number of pieces: 72 leaves (36 plum, 36 mauve), plus chain rings
- Layout: 8 vertical strands x 9 leaves, colors alternating
- Piece size: 4.5 in (11.4 cm) wide x 4 in (10.2 cm) tall, plus 1 in (2.5 cm) stem
- Size before border: 4 in (10.2 cm) wide x 3.5 in (8.9 cm) tall
- Border depth: 0.25 in (0.6 cm) picot edging on each leaf
Materials
Choose a smooth worsted cotton, either mercerized or matte. Cotton holds the pointed lobes crisply, keeps the veins defined and does not stretch much when hung. Avoid fuzzy acrylic or mohair, which blur the ridges.
- Color A, deep plum: 300 g (about 510 m), for 36 leaves plus all chain rings and hangers
- Color B, dusty mauve: 250 g (about 425 m), for 36 leaves
Each leaf uses about 6 g (10 m). Yardage is based on a cotton of roughly 170 m per 100 g. Quantities include a margin of about 15–20% for gauge swatching and differences in tension.
Tools:
- 4.5 mm (US 7) crochet hook
- Tapestry needle
- Scissors
- Locking stitch markers
- Ruler or tape measure
- Blocking mat and rust-proof pins
- Spray bottle
- Curtain rod or tension rod
Abbreviations (US Terms)
- ch – chain
- sl st – slip stitch
- sc – single crochet
- hdc – half double crochet
- BLO – back loop only
- hdc2tog – (yarn over, insert hook in next st BLO, yarn over and pull up a loop) twice, yarn over and pull through all 5 loops
- hdc3tog – same as hdc2tog, worked over 3 sts, then pull through all 7 loops
- p (picot) – ch 3, sl st in 3rd ch from hook
- st(s) – stitch(es)
- rep – repeat
Special stitch – surface slip stitch: Hold the working yarn behind the leaf. Insert the hook from front to back through the fabric, pull up a loop, then pull it through the loop on your hook. Repeating this along a line makes a raised chain on the front, which forms each vein.
Gauge and Checkpoints
Gauge: 14 hdc BLO and 10 rows = 4 in (10.2 cm). Each hdc row is about 0.4 in (1.0 cm) tall.
Make one complete leaf before committing to 72. Check it at each stage:
- After fan Row 1: straight edge about 0.8 in (2.0 cm) across
- After fan Row 2: about 1.6 in (4.1 cm) across
- After fan Row 3: about 2.4 in (6.1 cm) across
- After all lobes: 4 in (10.2 cm) wide x 3.5 in (8.9 cm) tall
- After edging: 4.5 in (11.4 cm) wide x 4 in (10.2 cm) tall
If your leaf is too big, go down 0.5 mm in hook size. If it is too small, go up 0.5 mm. A difference of 0.25 in (0.6 cm) per leaf is acceptable, but check it now, because small differences add up over 9 leaves on a strand.
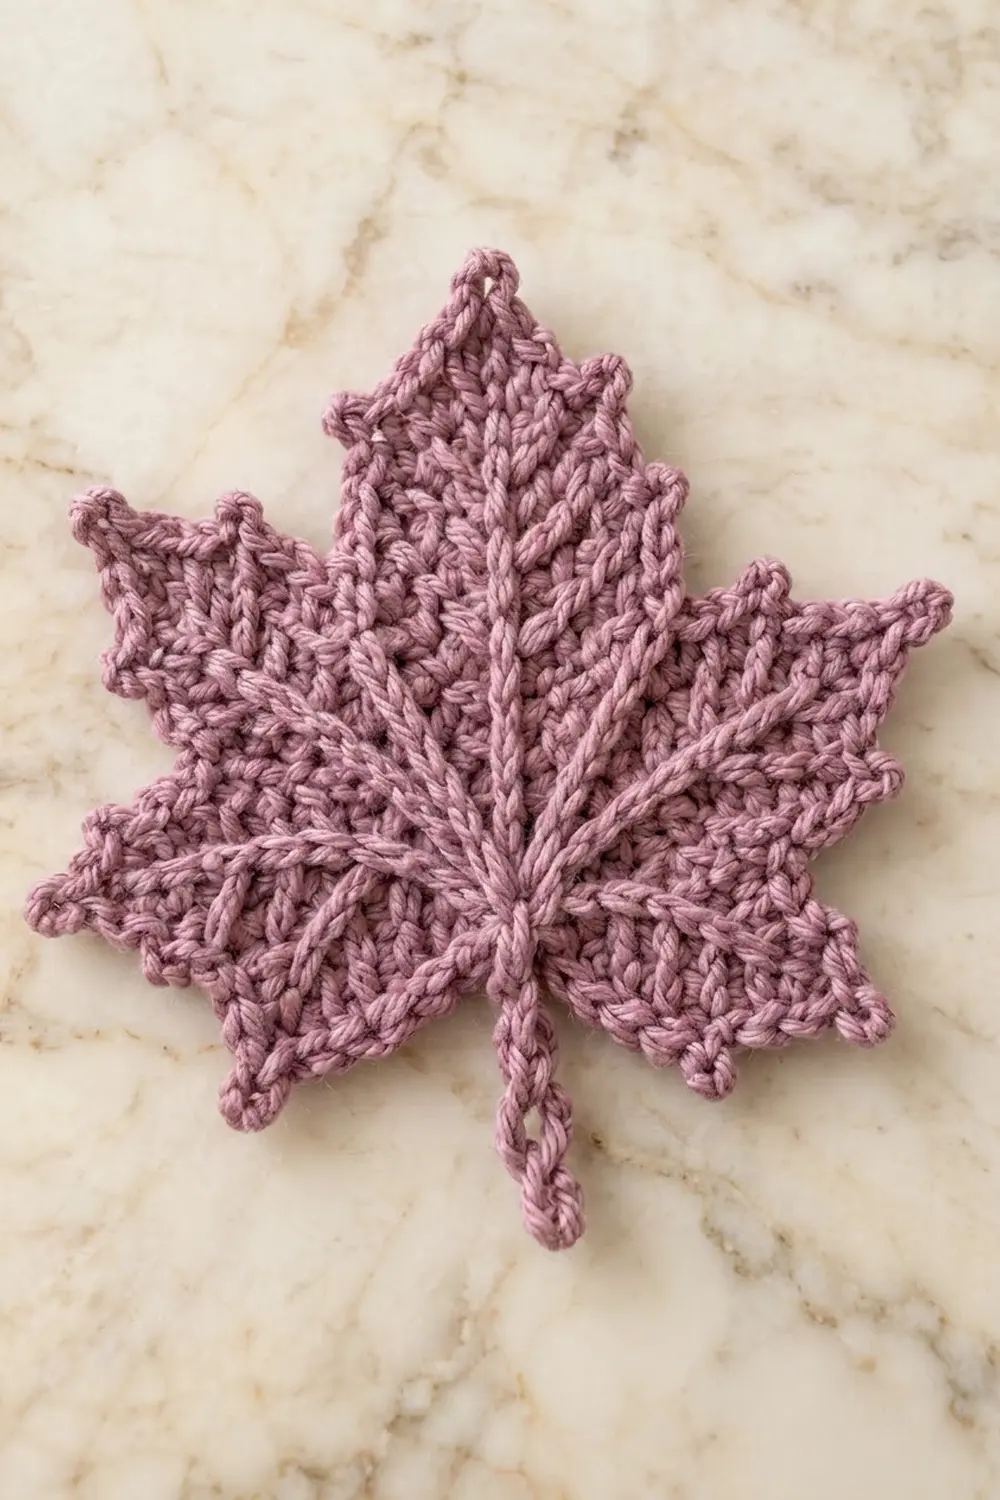
Leaf Pattern (Make 72)
Work every hdc in the back loop only, including decreases. The ch 2 at the start of a row does not count as a stitch.
Base Fan
Row 1: Make a magic ring, ch 2, work 9 hdc into the ring. Pull the ring closed, but do not join. (9 sts)
Row 2: Ch 2, turn. Work 2 hdc BLO in each st across. (18 sts)
Row 3: Ch 2, turn. 2 hdc BLO in next st, hdc BLO in next st, 2 hdc BLO in next st; rep from * 5 more times. (30 sts)*
You now have a half circle about 2.4 in (6.1 cm) across. The magic ring sits at the center of the straight edge and becomes the base of the leaf. Do not fasten off.
Lobes
The 30 stitches of Row 3 are divided into 5 groups. Place a marker after each group so you can see them clearly:
4 sts (bottom lobe) – 7 sts (side lobe) – 8 sts (center lobe) – 7 sts (side lobe) – 4 sts (bottom lobe) = 30 sts
Each lobe is worked in short rows over its own group only. After each lobe tip, you slip stitch down the side of the lobe to reach the next group, so there is nothing to fasten off.
First bottom lobe (over 4 sts):
- R1: Ch 2, turn. Hdc BLO in each of the 4 sts. (4)
- R2: Ch 2, turn. Hdc2tog twice. (2)
- R3: Ch 2, turn. Hdc2tog. (1 – tip)
Sl st down the side of the lobe closest to the next group, 1 sl st in each row-end of R2 and R1. (2 sl sts)
First side lobe (over next 7 sts):
- R1: Ch 2. Hdc BLO in each of next 7 sts. (7)
- R2: Ch 2, turn. Hdc in each st. (7)
- R3: Ch 2, turn. Hdc2tog, hdc in next 3 sts, hdc2tog. (5)
- R4: Ch 2, turn. Hdc2tog, hdc in next st, hdc2tog. (3)
- R5: Ch 2, turn. Hdc3tog. (1 – tip)
Sl st down the side toward the next group, 1 sl st in each row-end of R4 to R1. (4 sl sts)
Center lobe (over next 8 sts):
- R1: Ch 2. Hdc BLO in each of next 8 sts. (8)
- R2: Ch 2, turn. Hdc in each st. (8)
- R3: Ch 2, turn. Hdc2tog, hdc in next 4 sts, hdc2tog. (6)
- R4: Ch 2, turn. Hdc2tog, hdc in next 2 sts, hdc2tog. (4)
- R5: Ch 2, turn. Hdc2tog twice. (2)
- R6: Ch 2, turn. Hdc2tog. (1 – tip)
Sl st down the side toward the next group, 1 sl st in each row-end of R5 to R1. (5 sl sts)
Second side lobe (over next 7 sts): Work exactly as the first side lobe, then sl st down 4 row-ends.
Second bottom lobe (over last 4 sts): Work R1–R3 as for the first bottom lobe. Do not slip stitch down and do not fasten off. Continue straight into the border from the tip.
Checkpoint: the leaf should now measure 4 in (10.2 cm) across the side lobes and 3.5 in (8.9 cm) from the magic ring to the center tip.
Border: Picot Edging
The border is worked once around each leaf, in the same color, and adds 0.25 in (0.6 cm) to every edge. Border gauge is 1 sc per hdc row-end. This lies flat at this gauge because the picots take up the extra length on the outer curve of each lobe.
Work 1 sc in each row-end. On the slip-stitched sides, work into the sl sts. At each lobe tip, work (sc, p, sc) into the single tip stitch. At each of the 4 notches between lobes, work 1 sl st into the gap. This sl st does not count as a sc.
Continuing from the second bottom lobe tip, work in this order:
- Second bottom lobe: (sc, p, sc) in tip; down the side, sc in R2 row-end, p, sc in R1 row-end. (4 sc, 2 p)
- Base edge: sc in each row-end of fan Rows 3, 2 and 1. (3 sc)
- Stem: at the magic ring, ch 12, sl st in 8th ch from hook to form a loop, sl st in each of the next 4 ch back to the leaf, then sl st into the ring.
- Other base edge: sc in each row-end of fan Rows 1, 2 and 3. (3 sc)
- First bottom lobe: sc, p, sc over the 2 row-ends; (sc, p, sc) in tip; sc, p, sc over the 2 row-ends. (6 sc, 3 p), then notch sl st.
- Side lobe: work the 4 row-ends as (sc, p, sc) twice; (sc, p, sc) in tip; work the other 4 row-ends as (sc, p, sc) twice. (10 sc, 5 p), then notch sl st.
- Center lobe: work the 5 row-ends as (sc, p, sc) twice, then sc; (sc, p, sc) in tip; work the other 5 row-ends as sc, then (sc, p, sc) twice. (12 sc, 5 p), then notch sl st.
- Second side lobe: as step 6. (10 sc, 5 p), then notch sl st.
- Second bottom lobe, remaining side: sc, p, sc over the 2 row-ends. (2 sc, 1 p)
Sl st in the first sc of the border and fasten off.
Per-lobe totals:
- Each bottom lobe: 6 sc and 3 picots (steps 1 and 9 together complete the second one)
- Each side lobe: 10 sc and 5 picots
- Center lobe: 12 sc and 5 picots
- Each base edge: 3 sc
Total: 6 + 6 + 10 + 10 + 12 + 3 + 3 = 50 sc; 3 + 3 + 5 + 5 + 5 = 21 picots; plus 4 notch sl sts.
Why the math works: each side count matches the lobe’s row-ends exactly: 2, 4 and 5 per side. Every lobe has one more row than it has row-ends per side, because the last row is the single tip stitch. The fan has 3 rows, so each base edge gets 3 sc. Nothing is added or skipped, so the edging should not ripple or cup.
Veins
Cut an 18 in (45.7 cm) strand of the same color. Start at the magic ring on the front. Work surface sl sts in a straight line to each lobe tip, about 1 sl st per row:
- Center vein: 3 sl sts through the fan + 6 up the center lobe = 9
- Side veins: 3 + 5 = 8 each
- Bottom veins: 3 + 3 = 6 each
On the center and side lobes, add two short branch veins of 3 sl sts each. Start them at R2 and angle them out from the main vein toward the edge. Pull the yarn to the back after each vein and weave in.
Make All Pieces
- Color A, deep plum: 36 leaves
- Color B, dusty mauve: 36 leaves
Strands 1, 3, 5 and 7 start with plum (5 plum, 4 mauve). Strands 2, 4, 6 and 8 start with mauve (4 plum, 5 mauve). That gives 4 x 5 + 4 x 4 = 36 leaves of each color.
Layout grid (P = plum, M = mauve; columns are strands, rows are leaf positions from the top):
     S1 S2 S3 S4 S5 S6 S7 S8
1    P  M  P  M  P  M  P  M
2    M  P  M  P  M  P  M  P
3    P  M  P  M  P  M  P  M
4    M  P  M  P  M  P  M  P
5    P  M  P  M  P  M  P  M
6    M  P  M  P  M  P  M  P
7    P  M  P  M  P  M  P  M
8    M  P  M  P  M  P  M  P
9    P  M  P  M  P  M  P  M
Joining
Leaves are linked with closed chain rings in Color A. Each ring is made directly through the loops it connects, so no sewing is needed.
Ring logic: each connector between two leaves is 2 interlocked rings.
- Ch 14. Pass the chain through the stem loop of the upper leaf, then sl st in the first ch to close the ring. Fasten off.
- Ch 14. Pass the chain through the first ring and through the tip picot of the center lobe on the next leaf. Sl st in the first ch to close. Fasten off.
Every ring uses the same 14 chains, so all gaps hang the same length: about 3 in (7.6 cm) from the bottom of one stem loop to the next leaf tip.
Hanger: ch 28, pass the chain through the tip picot of the top leaf, then sl st in the first ch to close. It hangs about 3 in (7.6 cm) and slides over a rod up to 1 in (2.5 cm) thick.
Tension: keep the ring chains firm and even. Loose chains stretch under the weight of the leaves below and make the strands uneven.
Length math per strand: 3 in hanger + 9 leaves x 5 in (leaf plus stem) + 8 connectors x 3 in = 3 + 45 + 24 = 72 in (182.9 cm).
Checkpoint: after the hanger and 3 leaves, the strand should measure 3 + 15 + 6 = 24 in (61.0 cm). If it is longer, tighten your ring chains or drop to 12 chains per ring.
Hang the strands 4.5 in (11.4 cm) apart, center to center. The total width is 8 x 4.5 = 36 in (91.4 cm).
Final Blocking
- Pin each leaf flat on the mat, right side up.
- Pin each of the 5 tips outward to sharpen the points.
- Check the size: 4.5 in (11.4 cm) wide x 4 in (10.2 cm) tall.
- Mist evenly with water until damp, not soaked.
- Press the veins lightly with your fingers so they stand up.
- Let dry completely, for at least 12 hours.
- Unpin and link the leaves into strands.
Final Quality-Control Checklist
- 72 leaves, 36 in each color
- Every leaf 4.5 in (11.4 cm) x 4 in (10.2 cm), within 0.25 in (0.6 cm)
- 50 sc and 21 picots on every border
- 5 main veins on every leaf, all straight
- All connector rings closed with 14 chains
- All 8 strands 72 in (182.9 cm) long
- Color order matches the grid
- All ends woven in securely
Troubleshooting
- Fan cups: Row 3 is too tight. Go up one hook size for the fan only.
- Fan ruffles: check that Row 3 has exactly 30 sts, not more.
- Lobes curl: you may be working the decreases through both loops. Keep every stitch in the back loop.
- Tips are blunt: pin them sharply during blocking and pull the tip picot firm.
- Veins sink: work the surface sl sts a little looser so they sit on top of the fabric.
- Strands twist: block all leaves first and keep the tip picot centered on each ring.
Care
Hand wash in cool water with mild soap, press the water out in a towel and dry flat. Dust the curtain now and then with a hair dryer on the cool setting.
Final Notes
The measurement chain is short and easy to track. Three fan rows give 2.4 in (6.1 cm). The lobes bring the leaf to 4 in (10.2 cm) x 3.5 in (8.9 cm). The picot border adds 0.25 in (0.6 cm) per edge, for a 4.5 in (11.4 cm) x 4 in (10.2 cm) leaf. Nine leaves, eight connectors and a hanger make a 72 in (182.9 cm) strand, and eight strands make a 36 in (91.4 cm) curtain.
Check your first leaf and keep your ring chains firm; the rest is calm repetition.
Happy crocheting!