

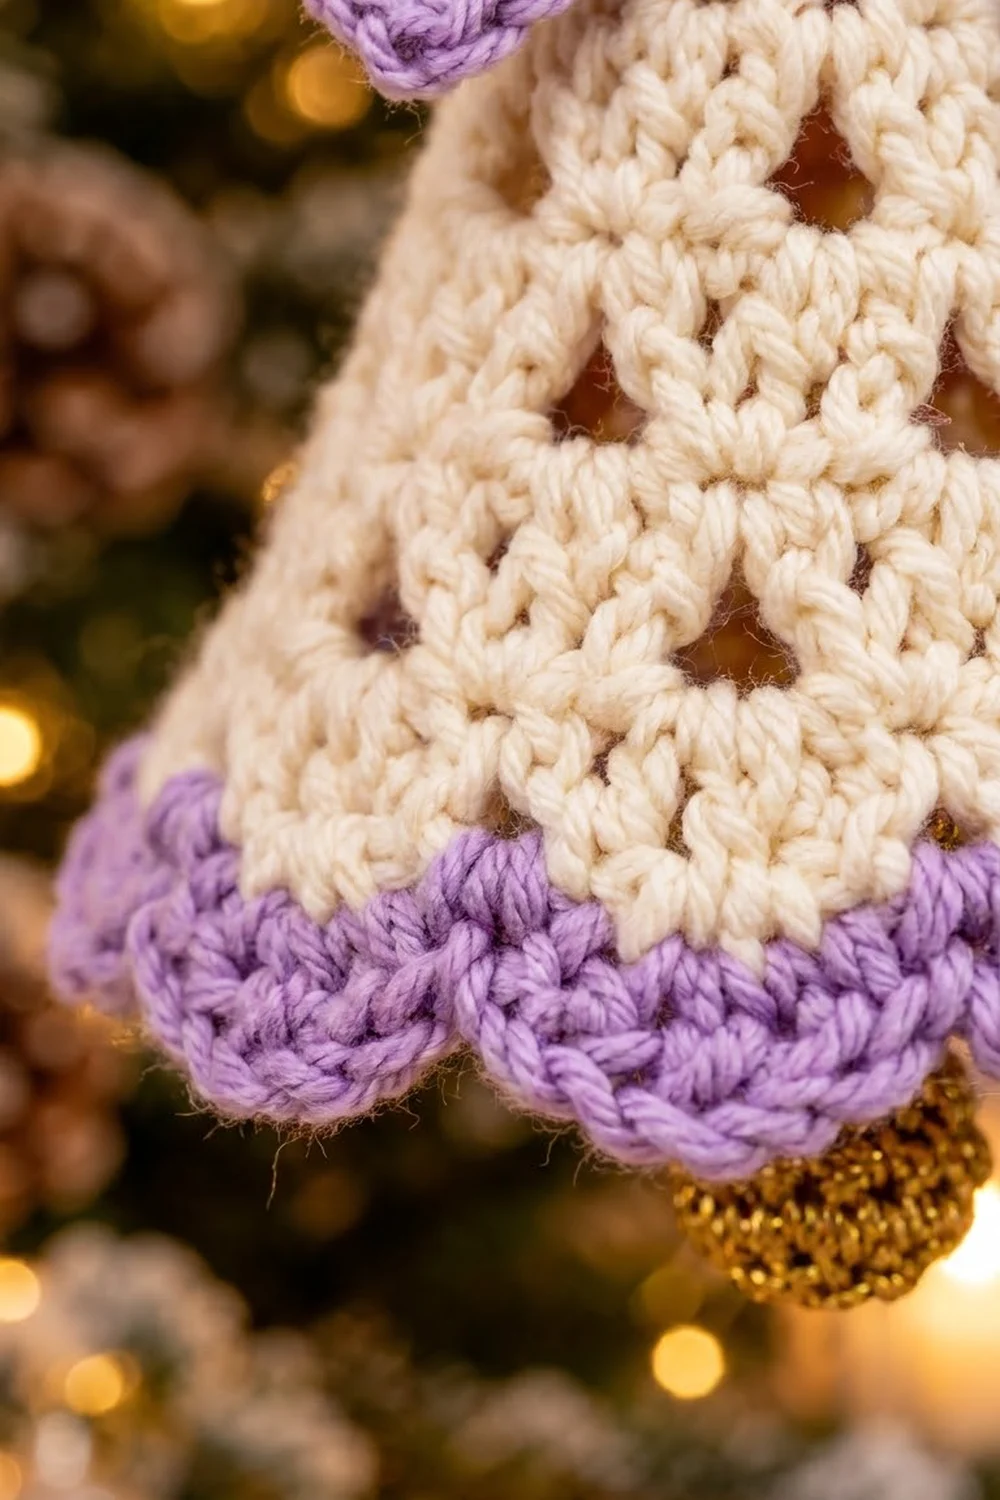
The Lavender Lace Bell is a small, elegant Christmas ornament. It has a soft cream body, a lavender scalloped hem, a lavender bow with three pearls, and a gold clapper peeking out from underneath. A gold twisted cord makes the hanging loop, so the bell is ready for the tree as soon as it is finished.
The body is worked in double crochet with three tiers of small triangular eyelets. Each tier is offset from the one above it, so the holes form a staggered lace pattern that catches the light from the tree. The palette is cream, lavender, metallic gold and pearl white: festive, but quieter than classic red and green.
This pattern uses US crochet terms. The finished bell measures about 3.4 in (8.6 cm) tall from the crown to the scallop tips and 4 in (10.2 cm) wide across the flattened lower edge.
You will work the bell in joined rounds from the top down, adding the purple border directly onto the last cream round. After that you crochet a small ball clapper and a three-part bow, make a twisted cord, and assemble everything.
Finished Size and Construction
- Finished size: 3.4 in (8.6 cm) tall × 4 in (10.2 cm) wide, flattened
- Skill level: Easy-intermediate
- Terminology: US crochet terms
- Yarn weight: DK (weight 3) cotton or cotton blend
- Hook: 3.5 mm (E-4)
- Number of pieces: 1 bell body, plus trims (1 clapper, 1 bow in 3 small parts, 1 cord)
- Layout: Single ornament, worked in the round
- Bell size before border: 2.8 in (7.1 cm) tall × 3.6 in (9.1 cm) wide, flattened
- Border depth: 0.6 in (1.5 cm)
Materials
A smooth mercerized cotton works best here. It gives crisp eyelets and well-defined scallops, and it holds the bell shape after blocking. If you prefer a softer look, a cotton-acrylic blend works too. For the gold, choose a metallic DK yarn or a gold cotton with a slight sheen.
- Cream (Color A): 8 g / 19 m, for the bell body
- Lavender (Color B): 5 g / 12 m, for the border and bow
- Metallic gold (Color C): 4 g / 10 m, for the clapper and hanging cord
- Tools and notions:
- 3.5 mm (E-4) crochet hook
- Tapestry needle
- Sewing needle and cream or white thread
- 3 white pearl beads, 6 mm
- Small pinch of fiberfill
- Stitch marker
- Scissors
- Spray bottle and pins for blocking
All quantities include a margin of about 20% for gauge differences and swatching.
Abbreviations (US Terms)
- ch – chain
- sl st – slip stitch
- sc – single crochet
- sc2tog – single crochet 2 together
- dc – double crochet
- sp – space
- st(s) – stitch(es)
- Rnd – round
- * * – repeat the section between asterisks as directed
Special stitch: scallop. Work 5 dc into the same stitch. On the next round, this fan is outlined with single crochet to make it rounded and thick.
Counting note: In eyelet rounds, every chain in a ch-2 space counts as one stitch. A starting ch-3 counts as a dc.
Gauge and Checkpoints
Gauge: 20 dc and 10 rounds = 4 in (10.2 cm), so each dc round is about 0.4 in (1.0 cm) tall. For the bow, 20 sc and 24 rows = 4 in (10.2 cm).
Make one bell body first and measure it at each checkpoint before you crochet the trims. Lay the bell flat with the eyelets centered on the front.
- After Rnd 2: The flat crown circle is about 1 in (2.5 cm) across.
- After Rnd 5: Flattened width is 2.4 in (6.1 cm), and the height from the crown is 1.2 in (3.0 cm).
- After Rnd 7: Flattened width is 3 in (7.6 cm), and the height is 2 in (5.1 cm).
- After Rnd 9: Flattened width is 3.6 in (9.1 cm), and the height is 2.8 in (7.1 cm).
If your bell is too big, go down to a 3.25 mm hook. If it is too small, go up to 3.75 mm. Don’t change the stitch counts, because the eyelet stagger and the scallop math depend on them.
Bell Body
Work with Color A (cream). Join each round with a sl st to the first stitch or to the top of the starting ch-3. Do not turn.
Crown
Rnd 1: Make a magic ring, ch 1, work 6 sc in the ring and join. (6 sts)
Rnd 2: Ch 1, work 2 sc in each st around and join. (12 sts) Leave the ring a little loose for now, because the hanging cord will pass through it later. Then tighten it partway.
Rnd 3: Ch 3 (counts as dc), dc in the same st, dc in the next st. *2 dc in the next st, dc in the next st*; repeat from * to * 4 more times and join. (18 dc)
This round begins the turn from the flat crown down into the bell walls. Gently cup the piece with your fingers so it starts to dome.
Lace Tier 1
Rnd 4 (eyelet round): Ch 3 (counts as dc), dc in the next st, ch 2, skip the next st. *Dc in the next 2 sts, ch 2, skip the next st*; repeat from * to * 4 more times and join. (24 sts: 12 dc + 6 ch-2 sps)
Each skipped stitch is narrow at the top and the ch-2 is wide at the bottom, so every hole becomes a small triangle pointing upward.
Rnd 5 (closing round): Ch 3 (counts as dc), dc in the next dc, 2 dc in the ch-2 sp. *Dc in the next 2 dc, 2 dc in the ch-2 sp*; repeat from * to * 4 more times and join. (24 dc)
Lace Tier 2
Rnd 6 (eyelet round): Ch 5 (counts as dc + ch 2), skip the next st, dc in the next 2 sts. *Dc in the next st, ch 2, skip the next st, dc in the next 2 sts*; repeat from * to * 4 more times and join to the 3rd ch of the beginning ch-5. (30 sts: 18 dc + 6 ch-2 sps)
These holes sit between the Tier 1 holes, which creates the stagger.
Rnd 7 (closing round): Ch 3 (counts as dc), 2 dc in the ch-2 sp, dc in the next 2 dc. *Dc in the next dc, 2 dc in the ch-2 sp, dc in the next 2 dc*; repeat from * to * 4 more times and join. (30 dc)
Lace Tier 3
Rnd 8 (eyelet round): Ch 3 (counts as dc), dc in the next 3 sts, ch 2, skip the next st. *Dc in the next 4 sts, ch 2, skip the next st*; repeat from * to * 4 more times and join. (36 sts: 24 dc + 6 ch-2 sps)
These holes line up roughly under the Tier 1 holes, so the three tiers alternate.
Rnd 9 (closing round): Ch 3 (counts as dc), dc in the next 3 dc, 2 dc in the ch-2 sp. *Dc in the next 4 dc, 2 dc in the ch-2 sp*; repeat from * to * 4 more times and join. (36 dc)
Fasten off Color A and weave in the ends. Check the measurements: 3.6 in (9.1 cm) wide and 2.8 in (7.1 cm) tall.
Gold Clapper
Work with Color C (gold), in continuous rounds. Use a stitch marker to keep track of the first stitch.
Rnd 1: Work 6 sc in a magic ring. (6 sc)
Rnd 2: Work 2 sc in each st around. (12 sc)
Rnds 3–4: Sc in each st around. (12 sc)
Rnd 5: Work sc2tog 6 times. (6 sc)
Stuff the ball lightly before Rnd 5 is finished. Then thread the tail through the 6 front loops and pull it closed. The ball should be about 0.75 in (1.9 cm) across. Leave the tail long.
Bow
Work all three bow parts with Color B (lavender).
Bow loops band
Row 1: Ch 26, sc in the 2nd ch from the hook and in each ch across. (25 sc)
Rows 2–5: Ch 1, turn, sc in each st across. (25 sc)
The band should measure 5 in (12.7 cm) × about 0.8 in (2.0 cm). Fasten off.
Tails
Row 1: Ch 16, sc in the 2nd ch from the hook and in each ch across. (15 sc)
Rows 2–3: Ch 1, turn, sc in each st across. (15 sc)
The strip should be 3 in (7.6 cm) long. Fasten off.
Center wrap
Row 1: Ch 5, sc in the 2nd ch from the hook and in each ch across. (4 sc)
Rows 2–8: Ch 1, turn, sc in each st across. (4 sc)
The wrap should be about 1.3 in (3.3 cm) long. Leave a long tail.
Assemble the bow
- Fold both short ends of the loops band to the center so they overlap slightly, and tack them in place. The bow is now 2.5 in (6.4 cm) wide.
- Fold the tails strip at its midpoint into an upside-down V, with each leg 1.5 in (3.8 cm) long. Place it behind the loops.
- Pinch the center of both layers together, wrap the center piece around them, and sew the ends of the wrap at the back.
- Sew the 3 pearls onto the wrap in a small triangle: 2 on top and 1 below.
Border
Border gauge: 1 sc per stitch, with Rnd 10 measuring 0.2 in (0.5 cm) tall and the scallop round 0.4 in (1.0 cm) tall.
Rnd 10: Join Color B with a sc in any stitch of Rnd 9, then sc in each st around and join. (36 sc; 18 sc on each flattened side)
Rnd 11: Ch 1, sc in the first st, skip the next st, 5 dc in the next st, skip the next st. *Sc in the next st, skip the next st, 5 dc in the next st, skip the next st*; repeat from * to * 7 more times and join. (9 scallops; 54 sts: 9 sc + 45 dc)
Rnd 12: Ch 1. *Sl st in the sc, sc in the next dc, 2 sc in each of the next 3 dc, sc in the next dc*; repeat from * to * 8 more times and join. (81 sts: 9 sl sts + 72 sc; 9 sts per scallop)
Fasten off and weave in the ends.
Why the math works: Each scallop uses exactly 4 stitches (1 sc, skip, 5 dc, skip), and 36 ÷ 4 = 9, so the scallops close evenly with no leftover stitches. That puts 4.5 scallops on each flattened side. Rnd 12 adds 3 stitches over each 5-dc fan. That small increase makes the hem flare from 3.6 in (9.1 cm) to 4 in (10.2 cm) wide, and the border adds 0.6 in (1.5 cm) of depth.
Hanging Cord and Final Assembly
- Cut 2 strands of Color C, each 24 in (61.0 cm) long. Twist them tightly, then fold the twisted length in half and let it twist back on itself. The finished cord is about 8 in (20.3 cm) long. Knot the loose ends together.
- Fold the cord to make a 2.5 in (6.4 cm) loop. Thread both cord ends down through the center of the magic ring into the bell, then tighten the ring snugly around the cord.
- Tie the clapper onto the cord ends inside the bell so that it hangs about 0.25 in (0.6 cm) below the scallop tips. Trim any extra cord and secure the knot with a few stitches.
- Sew the bow to the front of the bell over Rnds 2–4, with its top edge level with the crown.
Final Blocking
- Lightly spray the bell with water until it is damp, but not wet.
- Stuff the bell firmly with plastic wrap or a small cone of paper to hold its shape.
- Pin each of the 9 scallops outward to an even curve.
- Open each eyelet with a blunt needle so the triangles look sharp.
- Fluff the bow loops with your fingers and press the tails into a neat V.
- Let everything dry completely, then remove the stuffing and pins.
- Measure again: the bell should be 3.4 in (8.6 cm) tall and 4 in (10.2 cm) wide.
Final Quality-Control Checklist
- The final counts match: 36 dc in Rnd 9 and 81 sts in Rnd 12.
- There are three tiers of 6 eyelets each, and the tiers are clearly offset.
- There are 9 evenly spaced scallops.
- The crown is closed around the cord, with no gap.
- The clapper is centered and sits just below the rim.
- The bow is level, and all 3 pearls are secure.
- All ends are woven in, with nothing showing through the eyelets.
Troubleshooting
- The eyelets look like slits instead of triangles: Your ch-2 is too tight. Chain a little more loosely, or work the chains with a hook one size larger.
- The bell flares too early: Rnd 3 is too loose. Use a tighter tension on the crown and first rounds.
- The scallops cup or ruffle: Check that you skipped exactly 1 stitch on each side of every 5-dc fan. A ruffle usually means you worked one scallop too many.
- The holes stack in straight lines: You probably placed the repeat in Rnd 6 wrong. It should begin with “ch 5, skip”.
- The bow droops: Add a few extra tacking stitches between the bow wrap and the bell.
- The clapper twists: Knot the cord twice inside the crown before you tie on the ball.
Care
Spot clean or hand wash gently in cool water, then reshape the bell and dry it flat with the clapper and bow facing up. Don’t use an iron directly on the pearls or the metallic yarn.

Final Notes
Here is the measurement chain in summary. Check your gauge of 20 dc = 4 in (10.2 cm) first. The crown is 1 in (2.5 cm) across after Rnd 2. The flattened width grows from 2.4 in (6.1 cm) after Rnd 5 to 3 in (7.6 cm) after Rnd 7 and 3.6 in (9.1 cm) after Rnd 9. The 9-scallop border then adds 0.6 in (1.5 cm) of depth, for a finished bell of 3.4 in (8.6 cm) × 4 in (10.2 cm). If each stage matches, your lace bell will hang straight and look tidy on the tree.
Happy crocheting!