

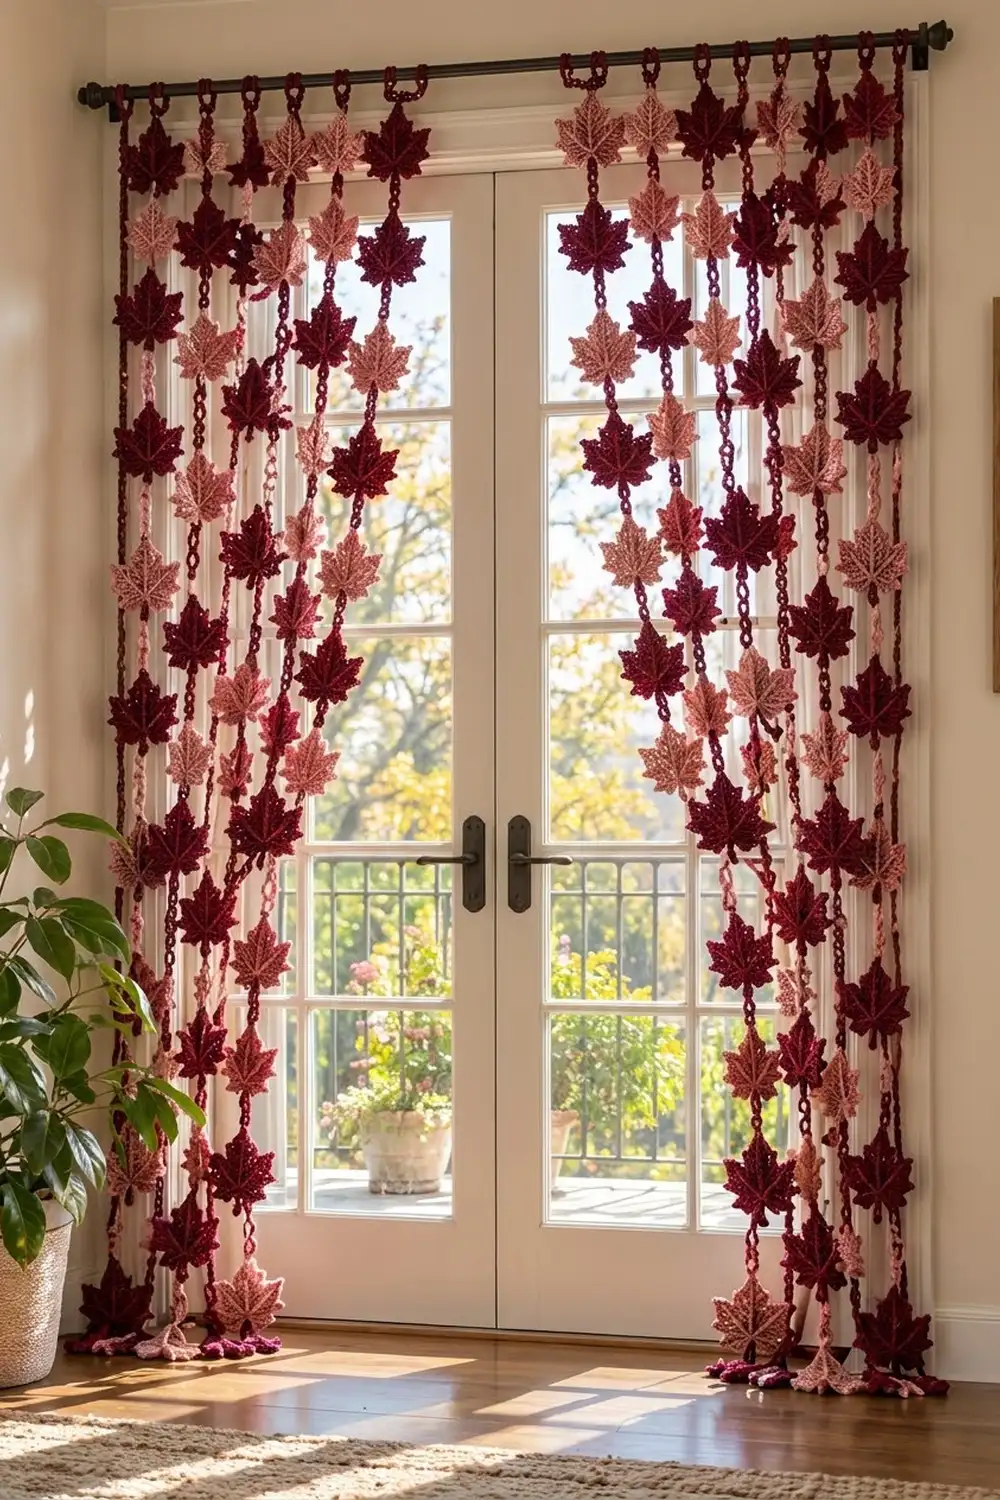
This curtain is a waterfall of crocheted maple leaves. Deep burgundy and soft dusty-rose leaves alternate down 14 vertical cords, so the colors form a staggered checkerboard when the curtain hangs over a door or window. It lets the light through and moves a little whenever someone walks past.
Each leaf has a solid round center, five pointed lobes with picot tips, raised surface-stitch veins and a short stem ending in a small loop. The look is cozy and seasonal, but the soft wine-and-rose palette means you can leave it up well past autumn.
The pattern uses US crochet terms. The finished curtain measures 63 in (160.0 cm) wide and 87 in (221.0 cm) long, including the hanging loops. Each leaf is 4.5 in (11.4 cm) tall and wide.
You’ll make all the leaves first. Then you’ll crochet each burgundy cord from the top down, joining leaves as you go. The cord runs behind each leaf from its top picot to its stem loop. A return pass of slip stitches makes the cord firm and locks every join in place.
Finished Size and Construction
- Finished size: 63 in (160.0 cm) wide x 87 in (221.0 cm) long
- Skill level: Easy-intermediate (tall stitches, picots, surface slip stitch)
- Terminology: US crochet terms
- Yarn weight: Worsted (#4 medium)
- Hook: 4.5 mm (US 7)
- Number of pieces: 196 leaves (98 burgundy, 98 rose) plus 14 cords
- Layout: 14 strands across x 14 leaves down, colors alternating in a checkerboard
- Piece size: 4.5 in (11.4 cm) x 4.5 in (11.4 cm) per leaf, stem included
- Size before border: 84 in (213.4 cm) of leaf strand per cord
- Border depth: 3 in (7.6 cm) hanging loop at the top of each cord. There is no fabric header.
Materials
Yarn: Use a smooth, plied worsted yarn so the stitches show clearly. Cotton-acrylic blends hang well and don’t stretch much under their own weight. Avoid fuzzy or very stretchy yarn, because long strands will grow.
- Burgundy (B): 800 g / about 1,464 m (1,600 yd), for 98 leaves and all 14 cords
- Dusty Rose (R): 700 g / about 1,281 m (1,400 yd), for 98 leaves
These amounts include a margin of roughly 10 to 15 percent for gauge differences and swatching.
Tools:
- 4.5 mm (US 7) hook
- Tapestry needle
- Scissors
- Stitch markers
- Measuring tape
- Blocking mats and rust-proof pins
- Spray bottle
- Curtain rod, up to 1.5 in (3.8 cm) in diameter
Abbreviations (US Terms)
- ch: chain
- sl st: slip stitch
- sc: single crochet
- hdc: half double crochet
- dc: double crochet
- tr: treble crochet (yarn over 2 times)
- dtr: double treble crochet (yarn over 3 times)
- trtr: triple treble crochet (yarn over 4 times)
- MR: magic ring
- st(s): stitch(es)
Special stitch – Picot: Ch 3, then sl st in the 3rd ch from the hook. The picot does not count as a stitch.
Special stitch – Surface slip stitch: Hold the yarn behind the work. Insert the hook from front to back between stitches, pull up a loop, and draw it through the loop on the hook.
Gauge and Checkpoints
Make one complete leaf before you start production. This leaf is your gauge swatch.
- Rounds 1–3: 3 in (7.6 cm) across
- Chain gauge: 4 ch = 1 in (2.5 cm), measured on a relaxed chain
Checkpoints:
- After Round 1: 1.25 in (3.2 cm) across
- After Round 2: 2.25 in (5.7 cm) across
- After Round 3: 3 in (7.6 cm) across
- Finished leaf, side tip to side tip: 4.5 in (11.4 cm)
- Finished leaf, top picot to stem loop: 4.5 in (11.4 cm)
If your leaf is too big, go down to a 4 mm (US G-6) hook. If it’s too small, go up to a 5 mm (US H-8) hook. Even 0.25 in (0.6 cm) per leaf adds up: across 14 leaves, it changes the strand length by 3.5 in (8.9 cm).
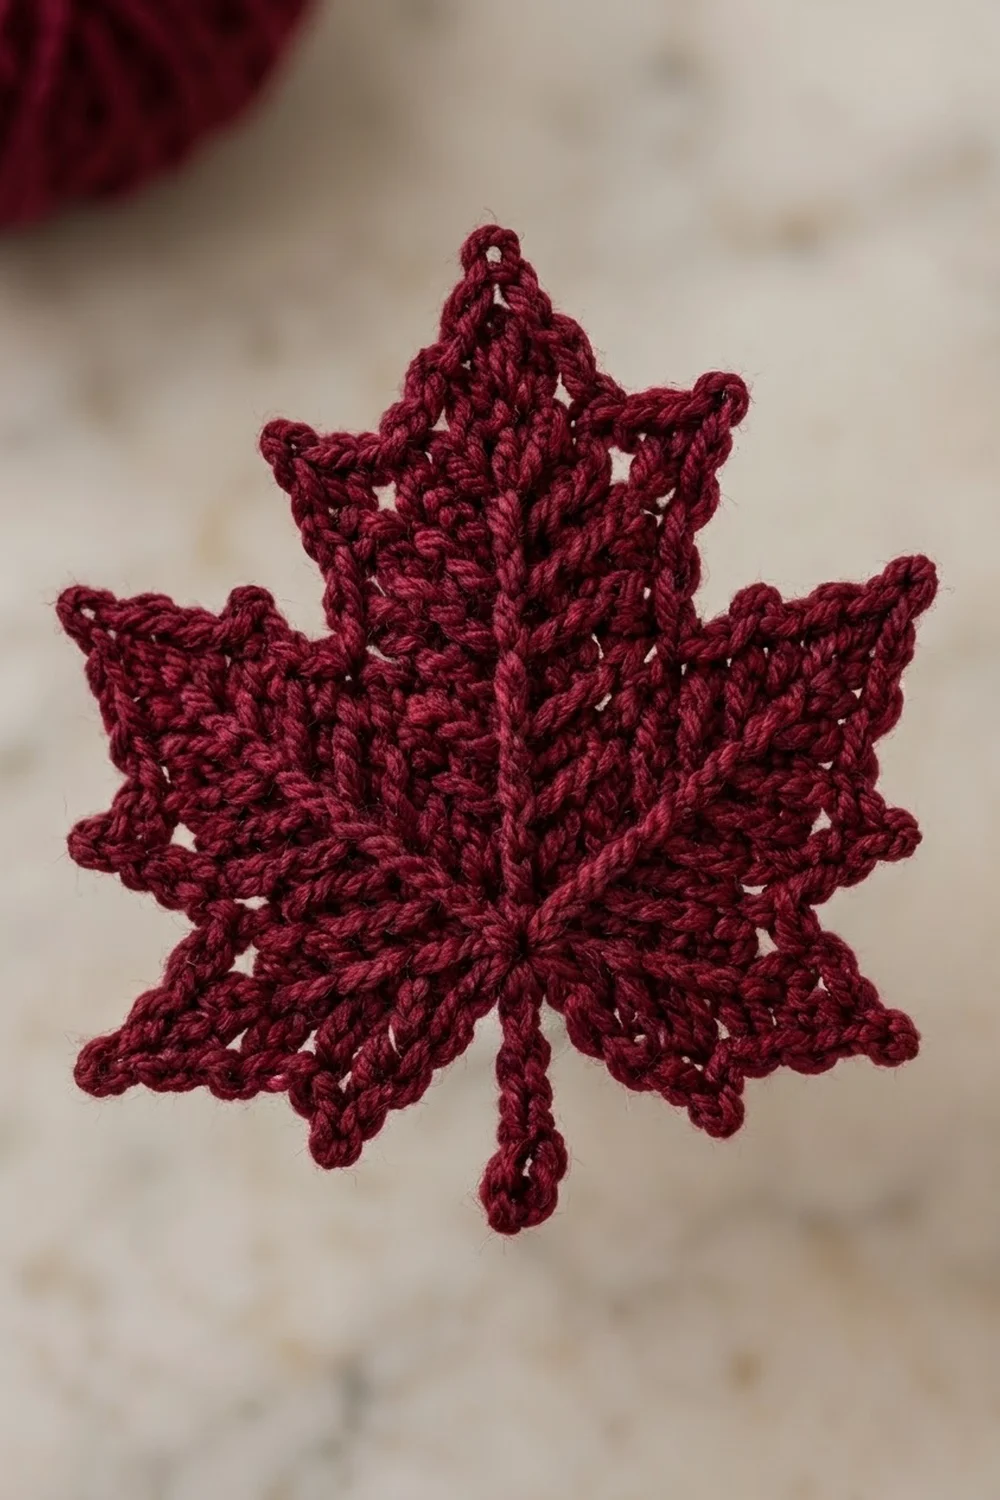
Leaf (Make 196)
Make 98 leaves in B and 98 leaves in R. The leaf is worked in joined rounds without turning.
Round 1: Make an MR. Ch 3 (counts as dc), work 11 dc in the ring, and sl st to the top of the beginning ch-3. Pull the ring closed. (12 dc)
Round 2: Ch 3 (counts as dc), dc in the same st, then work 2 dc in each st around. Sl st to the top of the beginning ch-3. (24 dc)
Round 3: Ch 3 (counts as dc), 2 dc in the next st. Dc in the next st, 2 dc in the next st. Repeat from * to * around and sl st to the top of the beginning ch-3. (36 dc)
Number the 36 stitches of Round 3, starting with the beginning ch-3 as stitch 1. Stitch 1 is the bottom of the leaf, where the stem will go. Put a marker in it.
Round 4 (lobes): This round is worked in both loops.
- Stem stitch: Ch 1 and work 1 sc in the same st as the join (stitch 1).
- Lower lobe (stitches 2–6): Hdc in the next st, dc in the next st, then work (tr, picot, tr) in the next st. Dc in the next st, hdc in the next st.
- Sinus: Sl st in the next st (stitch 7).
- Side lobe (stitches 8–14): Hdc in the next st, dc in the next st, tr in the next st, then work (dtr, picot, dtr) in the next st. Tr in the next st, dc in the next st, hdc in the next st.
- Sinus: Sl st in the next st (stitch 15).
- Top lobe (stitches 16–22): Dc in the next st, tr in the next st, dtr in the next st, then work (trtr, picot, trtr) in the next st. Dtr in the next st, tr in the next st, dc in the next st.
- Sinus: Sl st in the next st (stitch 23).
- Side lobe (stitches 24–30): Repeat step 4.
- Sinus: Sl st in the next st (stitch 31).
- Lower lobe (stitches 32–36): Repeat step 2.
- Sl st to the first sc.
Round 4 count: 41 stitches plus 5 picots. That is 1 sc, 4 sinus sl sts, 6 sts in each lower lobe (12), and 8 sts in each of the three larger lobes (24): 1 + 4 + 12 + 24 = 41.
To check the base stitches used: 1 + 5 + 1 + 7 + 1 + 7 + 1 + 7 + 1 + 5 = 36. That uses every stitch of Round 3 exactly once.
Stem: Ch 7, then sl st in the 4th ch from the hook to form a small loop. Sl st in each of the remaining 3 ch, then sl st in the stem sc. Fasten off and leave a 20 in (50.8 cm) tail.
The stem adds 0.75 in (1.9 cm). Each lobe gets taller toward its picot, and the sl-st sinuses pull in to make the notches between lobes.
Veins: Use the long tail with the hook on the right side. Work surface slip stitches from the center ring straight out to each of the 5 picot tips. Bring the yarn back to the center under the stitches on the wrong side before you start each new vein. Then work one more line from the center down to the stem.
Keep the surface stitches loose. Each vein should lie flat, raised just above the surface, without puckering the lobe. Weave in the ends.
Leaf checkpoint: 4.5 in (11.4 cm) wide x 4.5 in (11.4 cm) tall. That is 3.75 in (9.5 cm) of leaf body plus the 0.75 in (1.9 cm) stem.
Make All Pieces
- Burgundy leaves: 98
- Rose leaves: 98
- Cords: 14, all in B
Block all the leaves before you join them (see Final Blocking). Then sort them into 14 stacks of 14 leaves. Odd-numbered strands start with B and even-numbered strands start with R. Within each strand, the colors alternate.
Layout grid (S = strand; read each column top to bottom):
                       S1 S2 S3 S4 S5 S6 S7 S8 S9 S10 S11 S12 S13 S14
Leaves 1,3,5,...,13:   B  R  B  R  B  R  B  R  B  R   B   R   B   R
Leaves 2,4,6,...,14:   R  B  R  B  R  B  R  B  R  B   R   B   R   B
Each strand has 7 B and 7 R leaves: 14 strands x 7 = 98 of each color.
Joining
Each cord is worked top down in B, and the leaves are joined as you go.
Start: Ch 24 and sl st in the first ch to form a ring. This is the hanging loop.
Leaf unit (repeat 14 times):
- Ch 5.
- With the leaf right side facing you and the top lobe pointing up, sl st through the top-lobe picot.
- Ch 17. Let this chain run straight down behind the leaf, along the vein that goes from the center to the stem.
- Sl st through the stem loop.
Each unit is 24 sts: 5 ch + 1 sl st + 17 ch + 1 sl st. At 4 sts per inch, that measures 6 in (15.2 cm). The 18 sts between the two joins (the picot sl st plus 17 ch) match the leaf’s 4.5 in (11.4 cm) height. The 6 sts above each leaf make a 1.5 in (3.8 cm) gap between leaves. Fourteen units give 84 in (213.4 cm) of strand.
Return pass: After the last stem join, ch 1 and turn. Sl st in the back bump of every chain, all the way back up to the hanging loop, and skip the join sl sts. That is 22 sl sts per unit, or 308 sl sts for the whole strand. You’ll finish at the hanging loop (see Border).
The return pass doubles the cord’s thickness to about 0.25 in (0.6 cm) and keeps the joins from sliding.
Tension: Crochet the chains at the same relaxed tension as your gauge chain. If the chain is too tight behind a leaf, the leaf will cup. If it’s too loose, the cord will sag below the stem. The return slip stitches must stay loose, or the strand will shorten and twist.
Size checkpoint: After 3 units, measure from the base of the hanging loop to the third stem loop. It should be 18 in (45.7 cm). A finished strand measures 87 in (221.0 cm) laid flat: 3 in (7.6 cm) of loop plus 84 in (213.4 cm) of strand.
Border
This curtain has no stitched border. The finishing edge is the row of 14 hanging loops, so this section covers the loop math.
Border gauge: 4 ch = 1 in (2.5 cm), the same as the cord.
Loop Round 1: Ch 24 and join with a sl st. (24 ch) The loop measures 6 in (15.2 cm) around, so it hangs 3 in (7.6 cm) deep when folded flat.
Loop Round 2: This round is part of the return pass. When the return pass reaches the top, sl st in the back bump of each of the 24 loop ch. (24 sl sts) Then sl st in the base of the loop and fasten off.
Why the math works: A 1.5 in (3.8 cm) rod is about 4.7 in (11.9 cm) around, so a 6 in (15.2 cm) loop slides easily. Space the loops 4.5 in (11.4 cm) apart, center to center. That gives 13 gaps x 4.5 in = 58.5 in (148.6 cm). Add half a leaf at each end (one full 4.5 in, or 11.4 cm) and the panel is 63 in (160.0 cm) wide. Because the leaves are exactly as wide as the spacing, the side tips of neighboring leaves just touch without overlapping.
Final Blocking
- Block the leaves in batches before joining them.
- Mist each leaf until it is evenly damp, but not soaked.
- Pin it to 4.5 in (11.4 cm) wide x 4.5 in (11.4 cm) tall.
- Pin out each of the 5 picots to a sharp point.
- Push a pin into each sinus so the notches stay deep.
- Straighten the stem and open the stem loop.
- Let the leaves dry completely.
- After joining, hang the curtain and lightly mist the cords. Let them settle under the leaves’ weight overnight.
Final Quality-Control Checklist
- Every leaf has 41 stitches and 5 picots in Round 4.
- All leaves are 4.5 in (11.4 cm) square within 0.25 in (0.6 cm).
- The veins lie flat and run center-to-tip on every lobe.
- The colors follow the checkerboard grid.
- Every unit is 24 sts, measuring 6 in (15.2 cm).
- The return pass is complete, with no loose joins.
- All strands are 87 in (221.0 cm) long and match within 0.5 in (1.3 cm).
- All ends are woven in securely.
Troubleshooting
The leaf ruffles: Round 3 has too many stitches. Recount it to 36, or go down a hook size.
The leaf cups: Your tension is tight. Loosen the tall stitches, or go up a hook size.
The lobes are lopsided: Recount from stitch 1. Every sinus must fall on stitches 7, 15, 23 and 31.
The veins pucker: Pull out the veins and redo them with longer surface loops.
The strands are uneven: Measure each strand after 3 units and fix it early.
The leaves twist on the cord: Make sure the chain behind each leaf follows the center vein and isn’t off to one side.
Care
Hand wash in cool water and lay flat to dry, keeping each strand straight. Don’t hang wet strands, because the weight of the water will stretch them.
Final Notes
The measurement chain is simple. Rounds 1–3 measure 3 in (7.6 cm). The finished leaf is 4.5 in (11.4 cm). Each 24-st unit is 6 in (15.2 cm), and 14 units give 84 in (213.4 cm) of strand. Add the 3 in (7.6 cm) loop and each strand is 87 in (221.0 cm) long. Fourteen strands spaced 4.5 in (11.4 cm) apart make a 63 in (160.0 cm) wide curtain.
Check every link in that chain and the curtain will hang straight and even.
Happy crocheting!