

These lacy ornaments bring a soft, frosty look to a Christmas tree. The set has seven separate pieces: four six-pointed stars and three four-pointed diamonds. Every piece is worked in light lavender/periwinkle thread, and each hangs from a thin white cord tied at its top point.
Each ornament starts with a flower-like cluster of petals at the center. Open chain spaces surround the flower, and a picot edge finishes the perimeter so every point ends in a small decorative tip. The stars use a six-petal center. The diamonds use a four-petal center.
This pattern uses US crochet terms. A finished star measures 4 in (10.2 cm) from point to point. A finished diamond measures 4.5 in (11.4 cm) tall by 3.5 in (8.9 cm) wide.
Each ornament is worked in the round from a magic ring and gets a picot border in its last round. Starch, block, and add a hanging cord. The ornaments are not joined to each other. Each one hangs on its own.
Finished Size and Construction
- Finished size: Star 4 in (10.2 cm) point to point. Diamond 4.5 in (11.4 cm) tall x 3.5 in (8.9 cm) wide.
- Skill level: Easy-intermediate
- Terminology: US
- Yarn weight: Size 3 mercerized cotton crochet thread (lace, CYC 0)
- Hook: 2.25 mm (US B-1)
- Number of pieces: 7 separate ornaments (4 stars, 3 diamonds)
- Layout: Each ornament hangs individually. There is no assembly.
- Size before border: Star 3.5 in (8.9 cm). Diamond 4 in (10.2 cm) x 3 in (7.6 cm).
- Border depth: 0.25 in (0.6 cm)
Materials
Yarn advice: Use a smooth mercerized cotton thread. It shows the stitch definition clearly and holds starch well. Avoid fuzzy or acrylic thread, because it won’t block into crisp points.
- Lavender/periwinkle, size 3 thread: 35 g (about 88 m). This covers about 4 g per star (16 g) and 4 g per diamond (12 g).
- White, size 10 thread or fine cord (hanging loops): 2 g (about 2 m). You need seven cords cut at 8 in (20.3 cm) each.
Tools:
– 2.25 mm (US B-1) hook
– Tapestry needle
– Scissors
– Fabric stiffener or spray starch
– Blocking board and rust-proof pins
– Ruler or tape measure
All quantities include a margin of about 20% for gauge swatching and weaving in ends.
Abbreviations (US Terms)
- ch – chain
- sl st – slip stitch
- sc – single crochet
- dc – double crochet
- tr – treble crochet
- sp – space
- st(s) – stitch(es)
- beg – beginning
- [ ] – repeat the instructions inside the brackets the stated number of times
Special stitches:
- 3-dc cluster (3dc-cl): Yarn over, insert hook in the stitch, pull up a loop, yarn over, pull through 2 loops. Work from * to * 3 times in the same stitch. Then yarn over and pull through all 4 loops.
- Beginning cluster (beg cl): Ch 3. Then work a 2-dc cluster in the same stitch (the same steps as above, done twice, finishing through 3 loops).
- Picot: Ch 3, sl st in the 3rd ch from the hook.
- Tip picot: Ch 4, sl st in the 4th ch from the hook.
Gauge and Checkpoints
Make one complete star before you start the full set. Your gauge sets the size of every ornament.
Star checkpoints (measured flat, unblocked):
– After Rnd 1: 0.75 in (1.9 cm) across
– After Rnd 3: 1.75 in (4.4 cm) across
– After Rnd 4: 2.25 in (5.7 cm) across
– After Rnd 5: 3 in (7.6 cm) point to point
– After Rnd 6: 3.5 in (8.9 cm) point to point
– After border: 4 in (10.2 cm) point to point
Diamond checkpoints:
– After Rnd 3: 1.75 in (4.4 cm) corner to corner
– After Rnd 4: 2.75 in (7.0 cm) tall x 2.25 in (5.7 cm) wide
– After Rnd 5: 4 in (10.2 cm) tall x 3 in (7.6 cm) wide
– After border: 4.5 in (11.4 cm) tall x 3.5 in (8.9 cm) wide
Border gauge: 7 sc = 1 in (2.5 cm) along a straight edge.
If your piece is too big, switch to a 2.0 mm hook. If it is too small, switch to a 2.5 mm hook. Unblocked pieces can be up to 0.25 in (0.6 cm) under size, because blocking opens the lace.
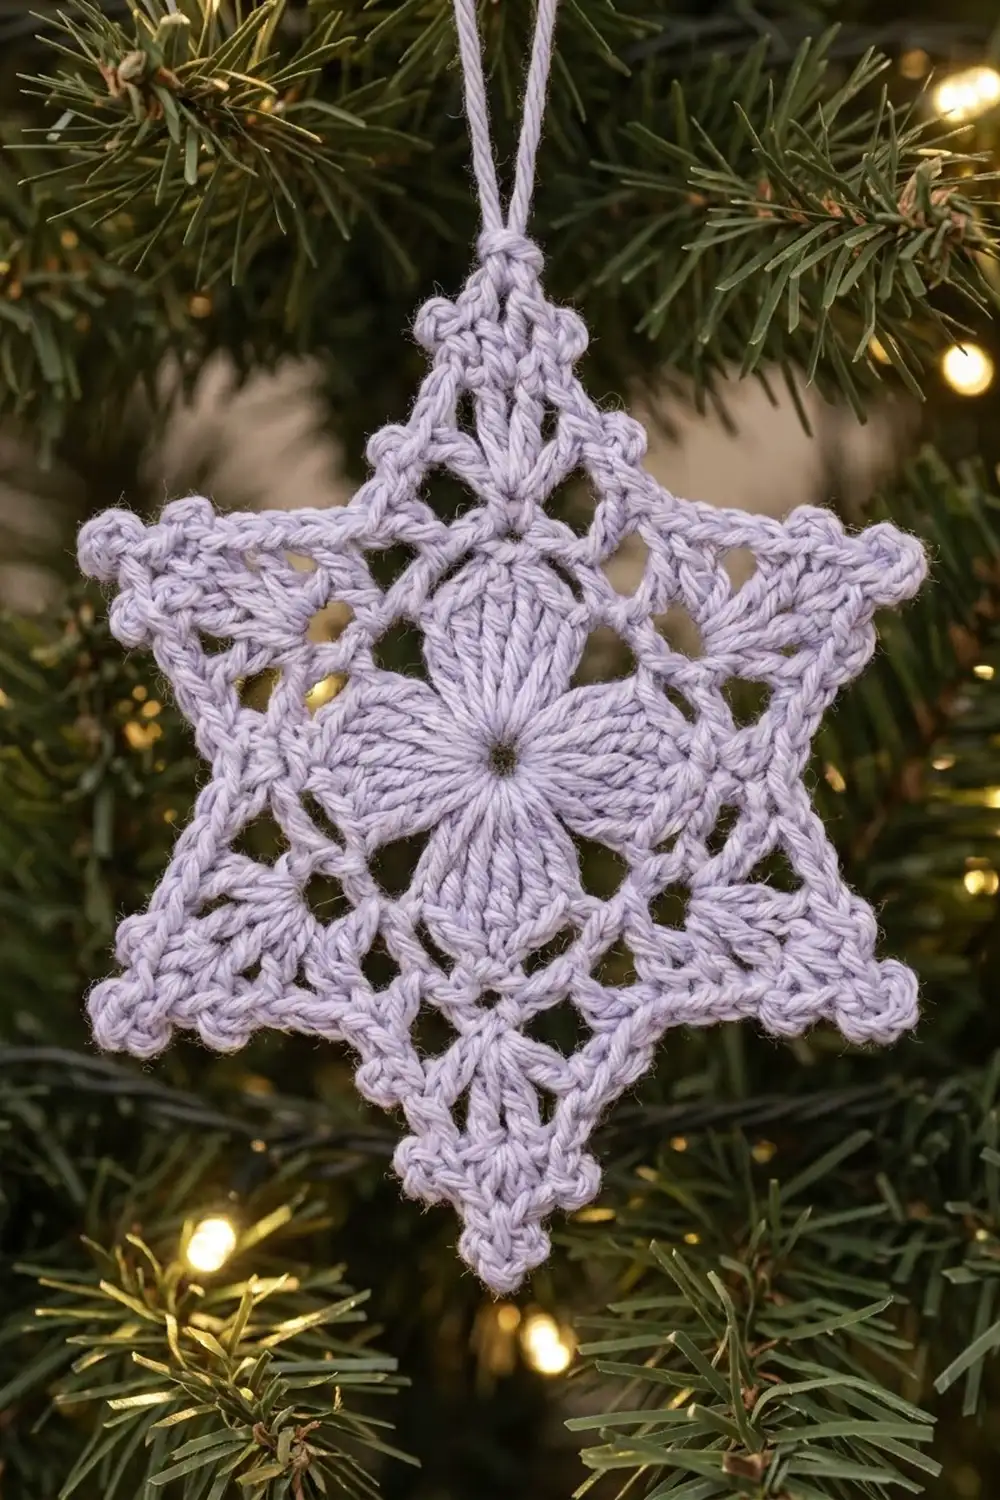
Star Ornament (Make 4)
Make a magic ring.
Rnd 1: Ch 3 (counts as dc), 11 dc in the ring. Sl st to the top of the ch-3. Pull the ring tight. (12 dc)
Rnd 2 (petals): Beg cl in the same st, ch 3, skip next dc. [3dc-cl in next dc, ch 3, skip next dc] 5 times. Sl st to the top of the beg cl. (6 clusters, 6 ch-3 sps)
Rnd 3: Ch 1, sc in the top of the same cluster, ch 5. [Sc in the top of the next cluster, ch 5] 5 times. Sl st to the first sc. (6 sc, 6 ch-5 loops)
Rnd 4: Sl st into the first ch-5 loop. Ch 3 (counts as dc), then work (2 dc, ch 2, 3 dc) in the same loop, ch 1. [(3 dc, ch 2, 3 dc) in the next loop, ch 1] 5 times. Sl st to the top of the ch-3. (36 dc, 6 ch-2 sps, 6 ch-1 sps)
Rnd 5: Sl st in the next 2 dc and into the ch-2 sp. Ch 3 (counts as dc), then work (dc, ch 3, 2 dc) in the same sp, ch 2, sc in the next ch-1 sp, ch 2. [(2 dc, ch 3, 2 dc) in the next ch-2 sp, ch 2, sc in the next ch-1 sp, ch 2] 5 times. Sl st to the top of the ch-3. (24 dc, 6 sc, 6 ch-3 tips, 12 ch-2 sps)
The ch-2 spaces skip over the 3-dc groups below them. This creates the openwork ring around the flower.
Rnd 6: Sl st in the next dc and into the ch-3 tip. Ch 3 (counts as dc), then work (2 dc, ch 3, 3 dc) in the same tip, ch 3, sc in the next sc, ch 3. [(3 dc, ch 3, 3 dc) in the next ch-3 tip, ch 3, sc in the next sc, ch 3] 5 times. Sl st to the top of the ch-3. (36 dc, 6 sc, 6 ch-3 tips, 12 ch-3 sps)
This round’s count stands on its own. Each point now has 3 dc on each side of its tip. Each valley is a single sc with a ch-3 on either side. Go on to the Border section for Rnd 7.
Diamond Ornament (Make 3)
Make a magic ring.
Rnd 1: Ch 3 (counts as dc), 11 dc in the ring. Sl st to the top of the ch-3. (12 dc)
Rnd 2 (petals): Beg cl in the same st, ch 4, skip next 2 dc. [3dc-cl in next dc, ch 4, skip next 2 dc] 3 times. Sl st to the top of the beg cl. (4 clusters, 4 ch-4 sps)
Rnd 3: Sl st into the first ch-4 sp. Ch 3 (counts as dc), 4 dc in the same sp, ch 3 (this is a corner and sits over the next cluster). [5 dc in the next ch-4 sp, ch 3] 3 times. Sl st to the top of the ch-3. (20 dc, 4 ch-3 corner sps)
Mark the first and third corners as A (top and bottom). The other two corners are B (sides).
Rnd 4: Sl st in the next 4 dc and into corner A.
– Ch 4 (counts as tr), then work (ch 5, tr) in the same sp.
– Side: ch 2, skip next dc, dc in next dc, ch 2, skip next dc, dc in next dc, ch 2, skip next dc.
– Corner B: (dc, ch 3, dc) in the corner sp.
– Work the side again.
– Corner A: (tr, ch 5, tr).
– Work the side, then corner B, then the final side.
– Sl st to the top of the beg ch-4.
(4 tr, 12 dc, 12 ch-2 sps, 2 ch-5 sps, 2 ch-3 sps)
Rnd 5: Sl st into the ch-5 sp of corner A.
– Ch 4 (counts as tr), then work (2 tr, ch 3, 3 tr) in the same sp.
– Side: dc in the next corner st, [2 dc in the next ch-2 sp, dc in the next dc] 2 times, 2 dc in the next ch-2 sp, dc in the next corner st. (10 dc)
– Corner B: (2 dc, ch 2, 2 dc).
– Work the side again.
– Corner A: (3 tr, ch 3, 3 tr).
– Work the side, then corner B, then the final side.
– Sl st to the top of the beg ch-4.
(60 sts: 12 tr, 48 dc)
Each side has 3 corner tr, 10 side dc, and 2 corner dc, for 15 sts. The taller tr at the A corners stretch the shape into a tall diamond.
Make All Pieces
Every piece is worked in lavender/periwinkle.
- Stars: 4 pieces, about 4 g each (16 g)
- Diamonds: 3 pieces, about 4 g each (12 g)
- Hanging cords: 7 white cords, 8 in (20.3 cm) each
Here is a suggested tree layout for display, with each ornament hanging freely:
TIER 1: DIAMOND  STAR  DIAMOND
TIER 2: STAR  DIAMOND
TIER 3: STAR  STAR
Joining
The ornaments are not joined to each other. The only attachment is the hanging cord at each top point.
- Choose the top. On a star, this is the tip picot of any point. On a diamond, it is the tip picot of an A corner.
- Thread one 8 in (20.3 cm) cord through the tip picot’s ring, then fold it in half.
- Tie an overhand knot about 1 in (2.5 cm) from the cut ends. This leaves a loop of about 3 in (7.6 cm).
- Keep the tension relaxed. Don’t cinch the cord so tight that it distorts the picot.
Size checkpoint: Hang the ornament. A star should still measure 4 in (10.2 cm) and a diamond 4.5 in (11.4 cm) tall. If the top point stretches, starch it again.
Border
Border gauge: 7 sc = 1 in (2.5 cm). This border is worked only in sc, with picots added at set points.
Star Border
Rnd 7:
– Ch 1. Sc in the same st and in the next 2 dc.
– Tip: (2 sc, tip picot, 2 sc) in the ch-3 tip.
– Sc in the next 3 dc, picot, 3 sc in the next ch-3 sp, sc in the next sc, 3 sc in the next ch-3 sp, picot.
– [Sc in the next 3 dc, (2 sc, tip picot, 2 sc) in the tip, sc in the next 3 dc, picot, 3 sc in the ch-3 sp, sc in the sc, 3 sc in the ch-3 sp, picot] 5 times.
– Sl st to the first sc. Fasten off.
Per point: 3 + 2 + 2 + 3 + 3 + 1 + 3 = 17 sc, with 2 picots and 1 tip picot.
Total: 17 x 6 = 102 sc, 12 picots, and 6 tip picots.
Why the math works: Each point edge, from the valley to the tip, has about 8.5 sc. At 7 sc per in, that edge measures about 1.2 in (3.0 cm). A 4 in (10.2 cm) six-pointed star needs a point edge of about 1.15 in (2.9 cm). The extra length is taken up by the picots, so the edge lies flat without ruffling or cupping.
Diamond Border
Rnd 6:
– Sl st in the next 2 tr and into the ch-3 sp of corner A.
– Ch 1, then work (2 sc, tip picot, 2 sc) in the same sp.
– Side: sc in the next 5 sts, picot, sc in the next 5 sts, picot, sc in the next 5 sts. (15 sc)
– Corner B: (sc, picot, sc) in the ch-2 sp.
– Work the side again.
– Corner A: (2 sc, tip picot, 2 sc).
– Work the side, then corner B, then the final side.
– Sl st to the first sc. Fasten off.
Per side: 2 corner A sc + 15 side sc + 1 corner B sc = 18 sc, with 2 side picots.
Total: 18 x 4 = 72 sc. Checking another way: 60 sts worked 1 per st, plus 8 extra sc at the A corners, plus 4 extra sc at the B corners, also equals 72. The border has 12 picots in all (8 side picots, 2 B corner picots, and 2 tip picots).
Why the math works: At 7 sc per in, 18 sc measure about 2.6 in (6.6 cm), and the 2 picots add about 0.25 in (0.6 cm). A 4.5 in x 3.5 in (11.4 x 8.9 cm) diamond has sides of about 2.85 in (7.2 cm), so the border matches the shape.
Final Blocking
- Weave in all ends before blocking. Leave the tails uncut.
- Soak each ornament in fabric stiffener, or mist it heavily with starch.
- Press out the excess with a towel.
- Draw guides on paper under your blocking board. Use a 4 in (10.2 cm) circle for stars and a 4.5 x 3.5 in (11.4 x 8.9 cm) diamond outline for the diamonds.
- Pin each tip picot first, then each valley or side picot.
- Open each petal and chain space with a pin tip.
- Let the pieces dry completely, for 12 to 24 hours.
- Unpin, trim the tails, and add the cords.
Final Quality-Control Checklist
- [ ] 4 stars and 3 diamonds are completed.
- [ ] The star center has 6 clusters. The diamond center has 4 clusters.
- [ ] Star Rnd 6 has 36 dc and 6 sc. Diamond Rnd 5 has 60 sts.
- [ ] The star border has 102 sc. The diamond border has 72 sc.
- [ ] All picots are present and the same size.
- [ ] Stars measure 4 in (10.2 cm). Diamonds measure 4.5 x 3.5 in (11.4 x 8.9 cm).
- [ ] Each piece hangs straight from a tip picot.
- [ ] Ends are woven in securely.
Troubleshooting
- Center won’t lie flat: Your Rnd 1 stitches are too tight. Pull the magic ring snug, and work the dc slightly looser.
- Points curl inward: The border is too tight. Work the sc more loosely, or go up 0.25 mm for the border only.
- Edges ruffle: The border is too loose. Go down one hook size for the border.
- Diamond looks square: Check that the A corners use tr and ch-5 in Rnd 4, and 3 tr in Rnd 5.
- Clusters look uneven: Pull up each loop of the cluster to the same height.
- Ornament hangs tilted: Move the cord to the exact tip picot, then re-block that point.
Care
Spot clean only with cool water. Re-starch and re-block if an ornament softens. Store flat in tissue between seasons.
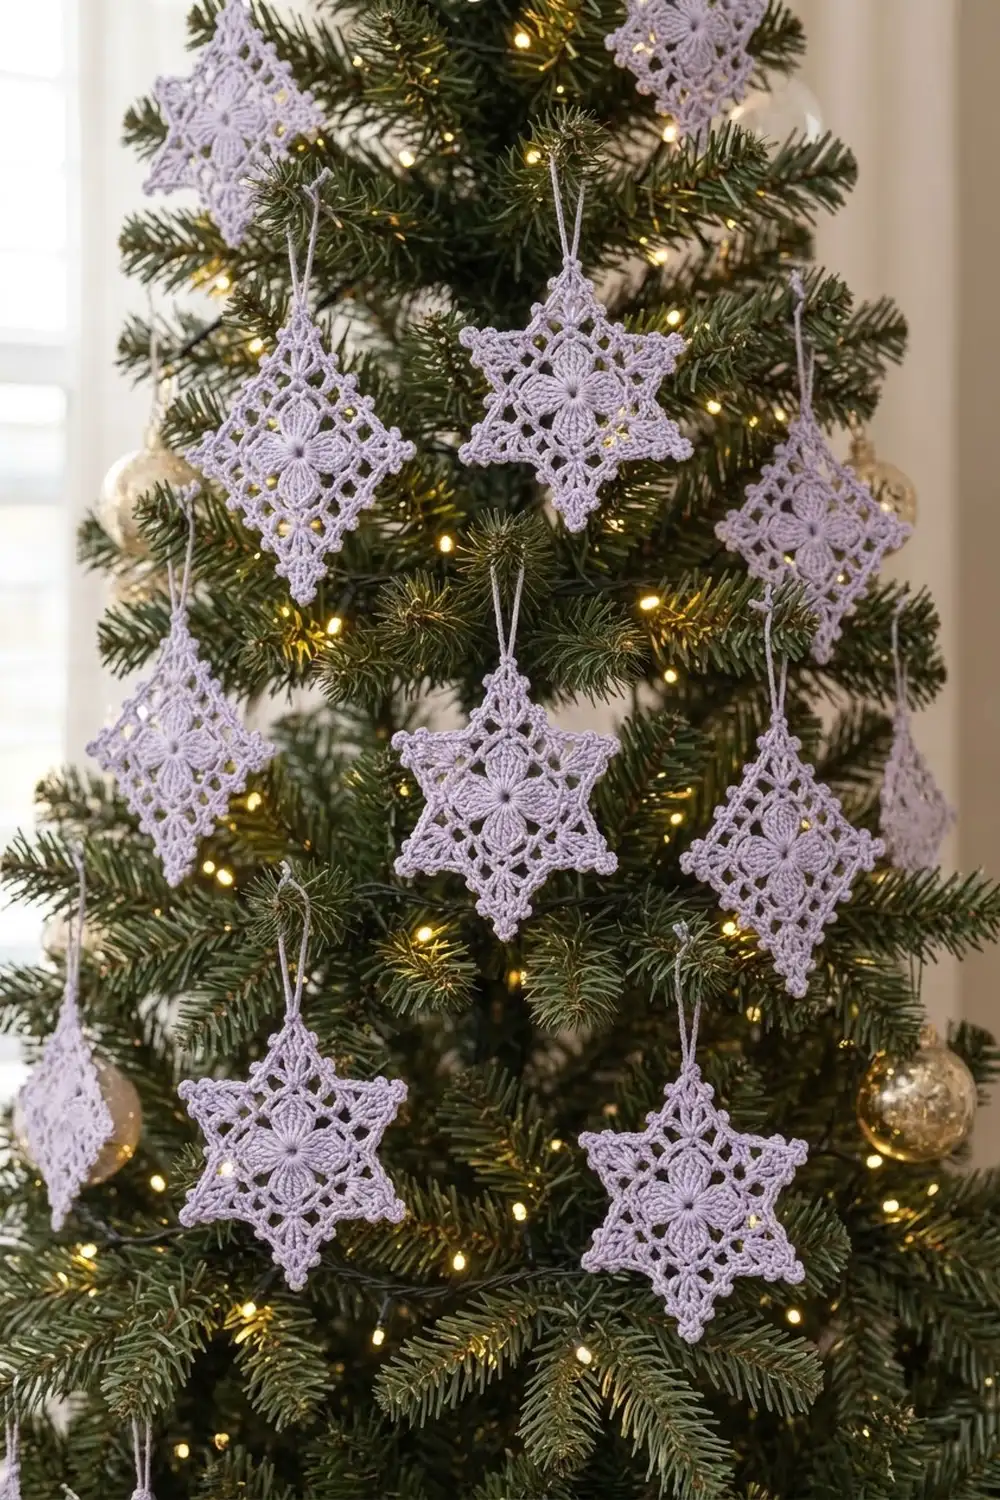
Final Notes
Here is the measurement chain to keep in mind. For the star, a 0.75 in (1.9 cm) first round grows to 3.5 in (8.9 cm) before the border, and the 102-sc picot border finishes it at 4 in (10.2 cm). For the diamond, the piece reaches 4 x 3 in (10.2 x 7.6 cm) before the border, and the 72-sc border finishes it at 4.5 x 3.5 in (11.4 x 8.9 cm). Check your gauge on the first star, block every piece to its paper guide, and your seven lavender ornaments will match.
Optional: For a fuller tree, repeat the set in the same proportions.
Happy crocheting!