

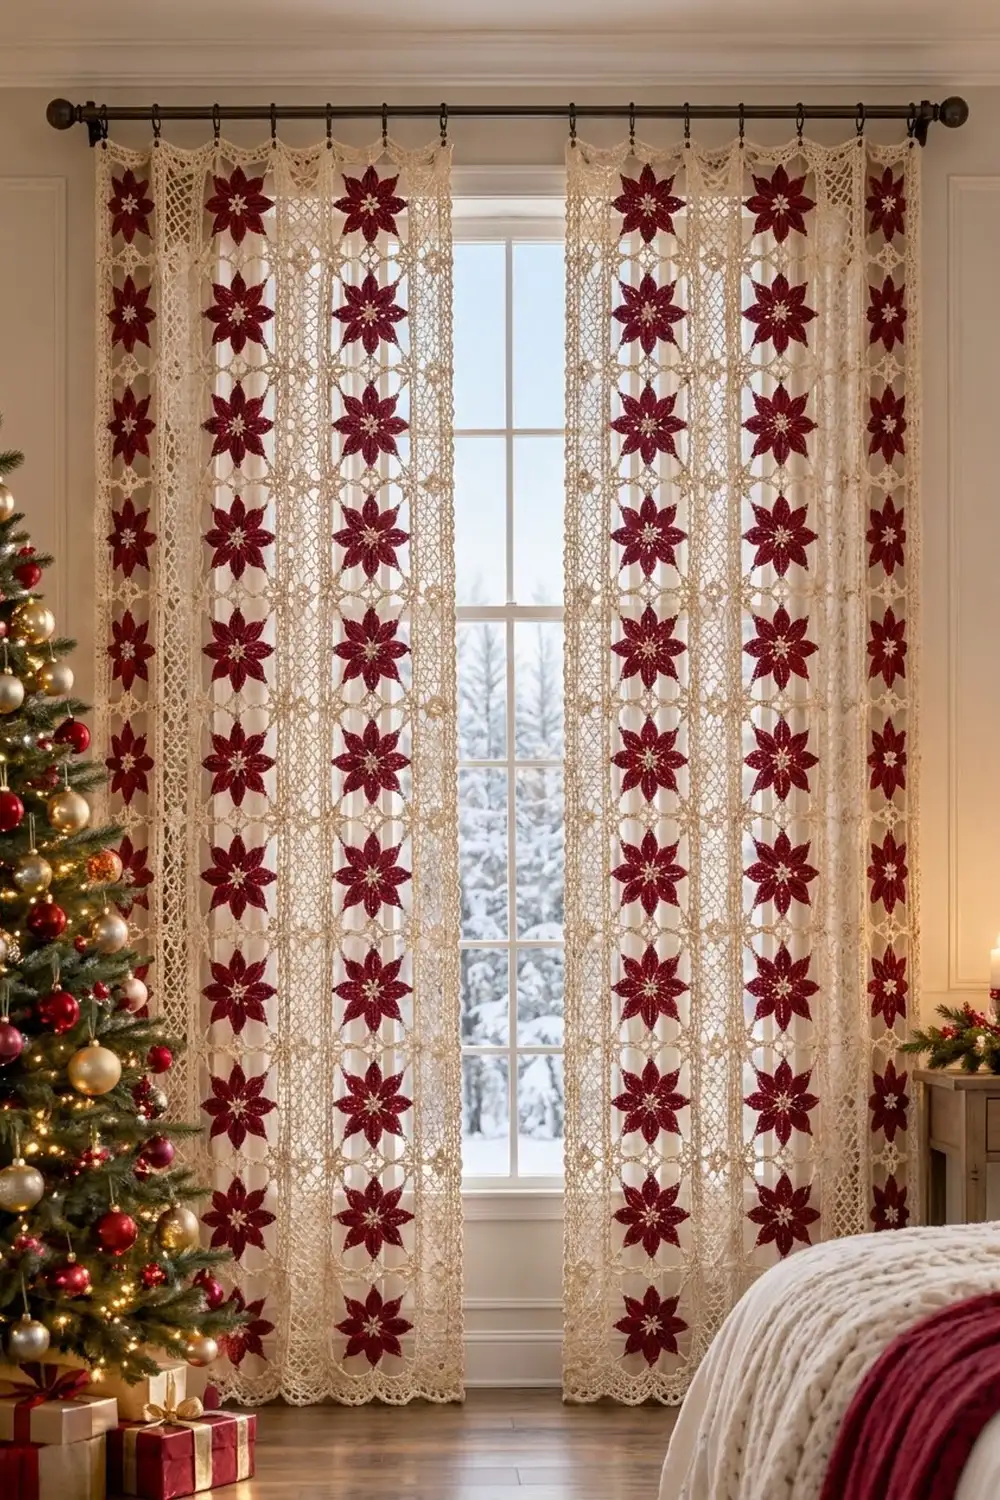
These curtain panels let winter light through a cream lace lattice, with deep cranberry poinsettias set in neat rows. Each flower has eight long, veined petals and a small cream star at its center. When the panels hang, the red blooms look like they float in the window.
The palette is two colors: cranberry red for the petals and warm cream for the centers, frames, and border. The style is classic thread-lace look worked in DK cotton, so it goes faster than true thread crochet but keeps a delicate finish. This pattern uses US crochet terms throughout.
Each finished panel measures 31 x 87 in (78.7 x 221.0 cm) after blocking. The pattern makes a matching pair.
Construction is simple and modular. You crochet square poinsettia blocks one at a time, join them with slip stitch seams into a grid of 4 x 12 blocks, and then work a four-round border with a shell edge around each panel.
Finished Size and Construction
- Finished panel size: 31 x 87 in (78.7 x 221.0 cm)
- Skill level: Intermediate
- Terminology: US crochet terms
- Yarn weight: DK / light (#3) cotton or cotton blend
- Hook: 4.0 mm (G-6)
- Number of pieces: 48 blocks per panel, 96 blocks for the pair
- Layout: 4 blocks wide x 12 blocks tall per panel
- Block size: 7 x 7 in (17.8 x 17.8 cm)
- Panel size before border: 28 x 84 in (71.1 x 213.4 cm)
- Border depth: 1.5 in (3.8 cm) on every side
Materials
Choose a smooth mercerized or combed cotton in DK weight, about 112 m per 50 g. Cotton holds the petal points and blocks crisply, and it won’t stretch much as the curtain hangs. Avoid fuzzy yarns, which blur the lace.
Yarn for the pair (halve these amounts for one panel):
- Color A, Cranberry Red: 650 g (about 1,460 m), or 13 balls of 50 g
- Color B, Cream: 1,050 g (about 2,350 m), or 21 balls of 50 g
For one panel: Color A 325 g (about 730 m), Color B 525 g (about 1,175 m).
These quantities include a margin of roughly 10% for gauge differences and swatching.
Tools:
- 4.0 mm (G-6) crochet hook
- Tapestry needle
- Stitch markers
- Blocking mats and rustproof pins
- Spray bottle
- Measuring tape
- Curtain rod or clip rings for hanging
Abbreviations (US Terms)
- ch: chain
- sl st: slip stitch
- sc: single crochet
- hdc: half double crochet
- dc: double crochet
- tr: treble crochet
- dtr: double treble crochet (yo 3 times, then work off the loops in pairs)
- sp: space
- st(s): stitch(es)
- FLO / BLO: front loop only / back loop only
- RS / WS: right side / wrong side
- rep: repeat
Special stitches:
- Picot: ch 3, then sl st in the 3rd ch from the hook.
- Petal: worked on both sides of a short chain, then finished with surface slip stitches that form the center vein. Full instructions are in Round 4.
Gauge and Checkpoints
Gauge: 18 sc and 20 rows = 4 in (10.2 cm) in sc with Color B.
Make one complete block before you buy all your yarn or start production. Every later measurement depends on this block, so check each stage:
- After Round 3: the center is about 1 in (2.5 cm) across.
- After Round 4: the flower is about 5.5 in (14.0 cm) from petal tip to opposite petal tip. Each petal is about 2 in (5.1 cm) long.
- After Round 6: the block is about 6.5 in (16.5 cm) square.
- After Round 7: the block is 7 in (17.8 cm) on each side, measured from corner to corner after light blocking.
If your block is too big, go down to a 3.75 mm hook. If it’s too small, go up to a 4.5 mm hook. If only the frame is off, by more than 0.25 in (0.6 cm) while the flower is on target, change the ch-7 arches in Round 5 to ch 6 or ch 8 instead of changing the hook.
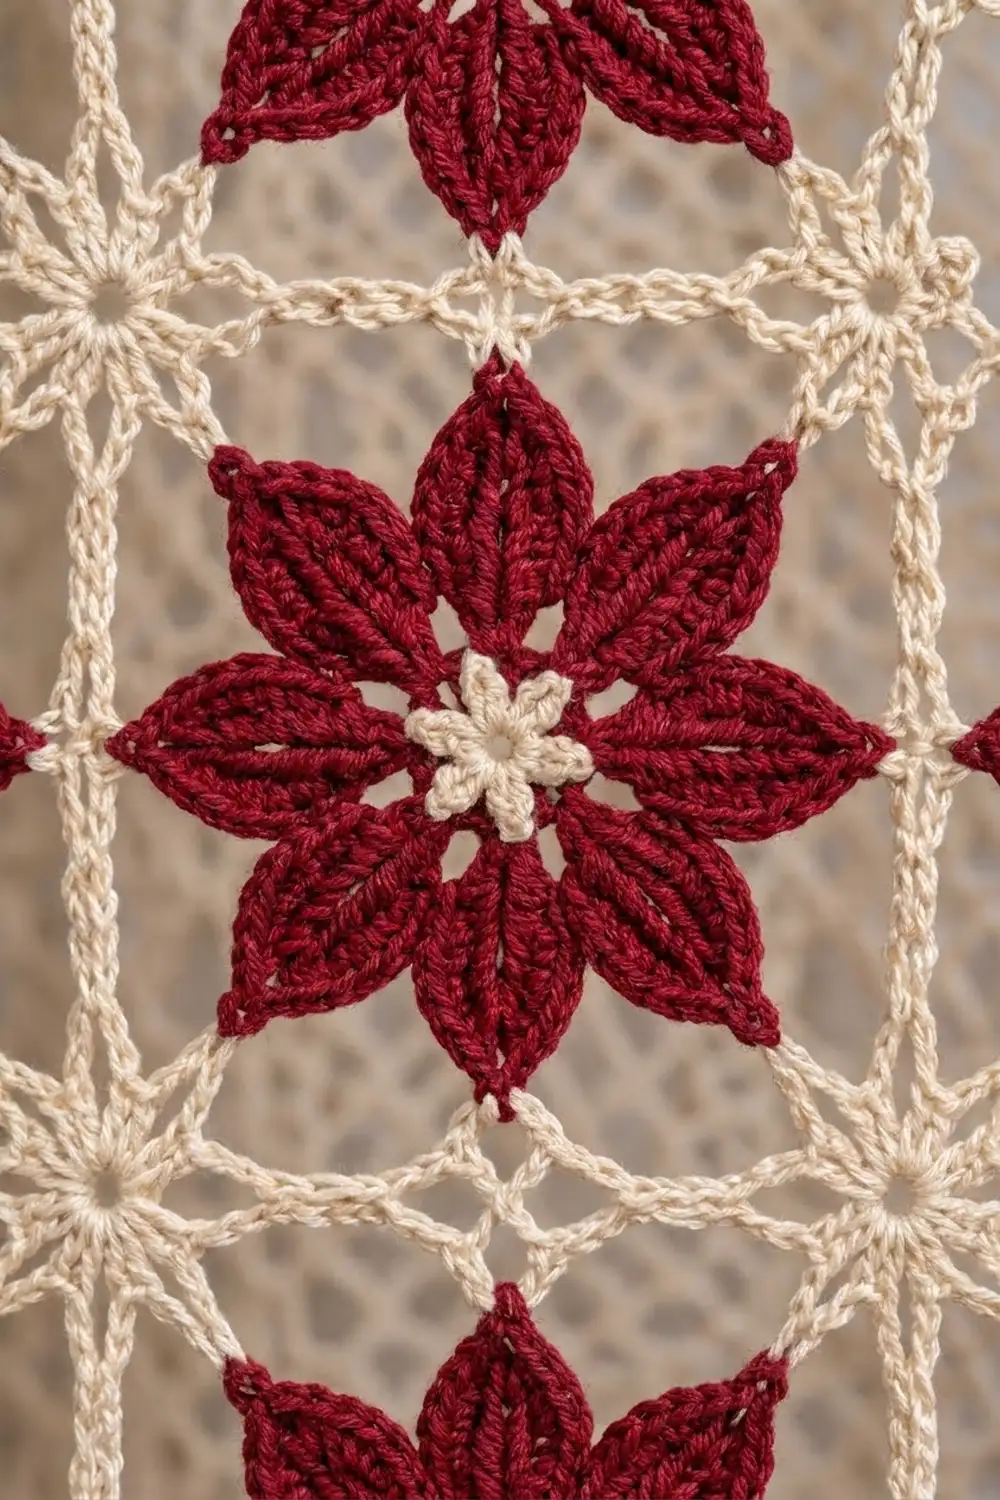
Poinsettia Block (make 96)
Center (Color B)
Round 1: Make a magic ring, ch 1, work 8 sc in the ring. Pull the ring closed and sl st in the first sc to join. (8 sc)
Round 2: Working in the FLO, (sl st, ch 3, sl st) in the next st 8 times. Join with a sl st in the first sl st. (8 small picot points) Fasten off.
This forms the small cream star. The back loops of Round 1 stay free for the petals.
Petals (Color A)
Round 3: With RS facing, join Color A in the back loop of any Round 1 st. Ch 1, then work 2 sc in each back loop around. Join with a sl st in the first sc. (16 sc)
Round 4 (petals): Sl st in the first sc of Round 3. This is the base of Petal 1.
Work Petal:
- Ch 9.
- Working in the back bumps and starting in the 2nd ch from the hook, work sc, hdc, dc, tr, tr, dc, hdc, sc. (8 sts)
- Sl st in the same base st of Round 3.
- Rotate the petal. Working in the free loops on the other side of the chain, work sc, hdc, dc, tr, tr, dc, hdc, sc. (8 sts)
- In the skipped tip ch, work (sl st, picot, sl st).
- Working on the RS surface, sl st down the center line between the two halves of the petal, back to the base. (8 surface sl sts) These form the raised vein.
Sl st in the next 2 sts. Work Petal. Rep from * 7 times total, so you finish 8 petals. After the 8th petal, sl st in the next st and join to the first sl st. (8 petals, each based on every other Round 3 st)
Fasten off. Pin the petals flat into a star shape so they point evenly at 45-degree intervals.
Lace Frame (Color B)
The 8 petal tips play two roles. Four of them become side midpoints and four become corners, alternating around the flower.
Round 5: Join Color B with a sc in any petal-tip picot. This is a side tip.
Ch 7, (dtr, ch 5, dtr) in the next tip picot for a corner, ch 7, sc in the next tip picot. Rep from * 4 times, but skip the final sc and join to the first sc instead.
(4 sc, 8 dtr, 8 ch-7 sps, 4 ch-5 corner sps)
Round 6: Ch 6. This counts as a dc plus ch 3.
(Dc, ch 3, dc) in the next ch-7 sp, ch 3, (2 dc, ch 3, 2 dc) in the corner ch-5 sp, ch 3, (dc, ch 3, dc) in the next ch-7 sp, ch 3, dc in the next sc, ch 3. Rep from * 3 more times, ending the last rep at **. Join with a sl st in the 3rd ch of the beginning ch-6.
(36 dc, 24 side ch-3 sps, 4 corner ch-3 sps)
Between corner shells, each side now has 9 dc and 6 ch-3 spaces.
Round 7: Ch 1. Sc in each dc, 3 sc in each side ch-3 sp, and 3 sc in each corner ch-3 sp. Join with a sl st in the first sc.
(120 sc: 4 sides x [9 + 18 + 3] = 120)
Each side has 31 sc counting both corner center sts: 1 corner center + 29 side sts + 1 corner center. Check the math: 4 x 31 = 124, minus 4 shared corners = 120.
Fasten off, leaving a 6 in (15.2 cm) tail. Weave in all ends.
Make All Pieces
Each block uses about 6 g of Color A and 7 g of Color B.
- Per panel: 48 blocks
- For the pair: 96 blocks
Every block is identical: a cream center, red petals, and a cream frame. Block each one lightly to 7 x 7 in (17.8 x 17.8 cm) before joining. Same-size blocks make the seams much easier.
Layout (one panel; P = poinsettia block):
Row 1:  P  P  P  P
Row 2:  P  P  P  P
Row 3:  P  P  P  P
  ...  (repeat)
Row 12: P  P  P  P
You get 4 columns x 12 rows = 48 blocks, at 28 x 84 in (71.1 x 213.4 cm).
Joining
Method: Slip stitch join through the back loops.
- Hold two blocks with RS together and the corners lined up.
- Join Color B in both corner center sts.
- Sl st through the back loop of each matching pair of sts along the side. Each seam takes 31 sl sts, one for each of the 31 sts on the side, corner centers included.
The front loops stay free on the RS, so the seam lies flat and frames the lace.
Order:
- Join the blocks into 12 horizontal strips of 4 blocks.
- Join the strips together with long vertical seams. Each long seam is 12 x 31 = 372 sl sts.
- Where four corners meet, work through all corner sts so the junction stays square.
The meeting corner shells from Round 6 form the small cream star junctions you see in the lattice.
Tension: Your slip stitches should be as loose as your sc. If a seam puckers, go up to a 4.5 mm hook for joining only.
Size checkpoint: A joined strip of 4 blocks should measure 28 in (71.1 cm). Two stacked blocks should measure 14 in (35.6 cm). The full joined panel should be 28 x 84 in (71.1 x 213.4 cm).
Border
Border gauge: The border keeps the block gauge of about 4.43 sts per inch, which is 31 sts per 7 in (17.8 cm).
Starting counts: No seam stitches are added at the joins.
- Top and bottom: 4 blocks x 31 = 124 sts
- Long sides: 12 blocks x 31 = 372 sts
The 4 panel corner sts appear in both adjacent counts, so the panel perimeter is 2 x 124 + 2 x 372 − 4 = 988 sts.
Round 1 (sc): With RS facing, join Color B in any panel corner st. Sc in each st around, working (sc, ch 2, sc) in each panel corner st. Join.
- Per side, between the corner ch-2 sps: top and bottom 124 sc, long sides 372 sc
- Total: 988 sts worked one per existing st, plus 4 extra = 992 sc, plus 4 ch-2 sps
Round 2 (mesh): Sl st into the corner ch-2 sp. Ch 3 (counts as dc), then ch 3 and dc in the same sp.
Along each side, ch 1, skip 1 st, (dc in the next st, ch 1, skip 1 st) to the last st, dc in the last st, ch 1. Work (dc, ch 3, dc) in the corner sp. Rep around and join.
Reading the counts as dc and ch together:
- Top and bottom: 1 corner dc + 62 (ch 1, dc) + ch 1 + 1 corner dc = 127
- Long sides: 1 + 186 x 2 + 1 + 1 = 375
- Total: 992 worked one per existing st, plus 12 extra = 1,004, plus 4 ch-3 corner sps
Round 3 (sc): Ch 1. Sc in each dc and each ch-1 sp, and work (sc, ch 2, sc) in each corner ch-3 sp. Join.
- Per side, between the corner ch-2 sps: top and bottom 129, long sides 377
- Total: 1,004 worked one per existing st, plus 8 extra = 1,012 sc
Round 4 (shells): Sl st into the corner ch-2 sp and work 7 dc there.
Along each side, sc in the next st, then (skip 1, 5 dc in the next st, skip 1, sc in the next st) to the corner. Work 7 dc in the corner ch-2 sp. Rep around and join. Fasten off.
- Top and bottom: 1 + 32 x 4 = 129 sts, which makes 32 shells
- Long sides: 1 + 94 x 4 = 377 sts, which makes 94 shells
- Per panel: 252 shells, counting the 4 corner shells
Why the math works: Round 1 takes exactly one sc per block-edge st, so the border matches the panel gauge and won’t ruffle or pull. The only extra stitches are a few corner and end stitches per side, and they exist just to turn the corners flat. The final side counts (129 and 377) are each 1 more than a multiple of 4, so the 4-st shell repeat starts and ends with a sc on both sides.
Hanging: Weave the curtain rod in and out of the Round 2 ch-1 spaces along the top edge, or attach 12 to 14 clip rings evenly spaced along that edge.
Final Blocking
- Weave in any remaining ends along the seams, not through the open lace.
- Lay the panel RS up on mats. Work in sections if your space is small.
- Pin out the straight edges first, to 31 x 87 in (78.7 x 221.0 cm).
- Pin each petal tip and each corner junction so the lattice lines run straight.
- Pin each bottom-edge shell into a rounded scallop.
- Mist evenly until damp, but not soaked.
- Let it dry completely, at least 24 hours, before unpinning.
- Repeat for the second panel, matching its pin positions to the first.
Final Quality-Control Checklist
- Every block has 8 petals with a raised vein and a tip picot.
- Every block has 31 sts per side, counting the corners.
- Each panel has 4 x 12 blocks with straight seams and square junctions.
- Border counts are 129 sts on the top and bottom and 377 on the long sides before the shells.
- Each panel has 32 shells on the top and bottom and 94 on each long side.
- Each panel measures 31 x 87 in (78.7 x 221.0 cm).
- Both panels match within 0.5 in (1.3 cm).
Troubleshooting
- Petals curl or twist: Your foundation chain is too tight. Work the ch-9 more loosely, or make it with a hook one size larger.
- Frame cups: Lengthen the ch-7 arches in Round 5 to ch 8.
- Frame ruffles: Shorten the ch-7 arches in Round 5 to ch 6.
- Corners sit lower than the sides: Make sure you used dtr, not tr, in the corner tips.
- Seams pucker: Loosen your slip stitches or use a larger hook for joining.
- Border waves: Recount Round 1. Each side should hold exactly one sc per edge st.
- Panels hang at different lengths: Re-block the shorter panel with gentle vertical tension.
Care
Hand wash cold with mild detergent, press the water out in a towel, and dry flat to shape. Don’t wring the panels, and don’t hang them while wet.
Final Notes
The measurement chain is short and reliable:
- A 7 in (17.8 cm) block with 31 sts per side
- 4 x 12 blocks joined to 28 x 84 in (71.1 x 213.4 cm)
- A 1.5 in (3.8 cm) border all around
- A finished panel of 31 x 87 in (78.7 x 221.0 cm)
Check your first block carefully, and the rest of the project will follow those numbers. Happy crocheting!