

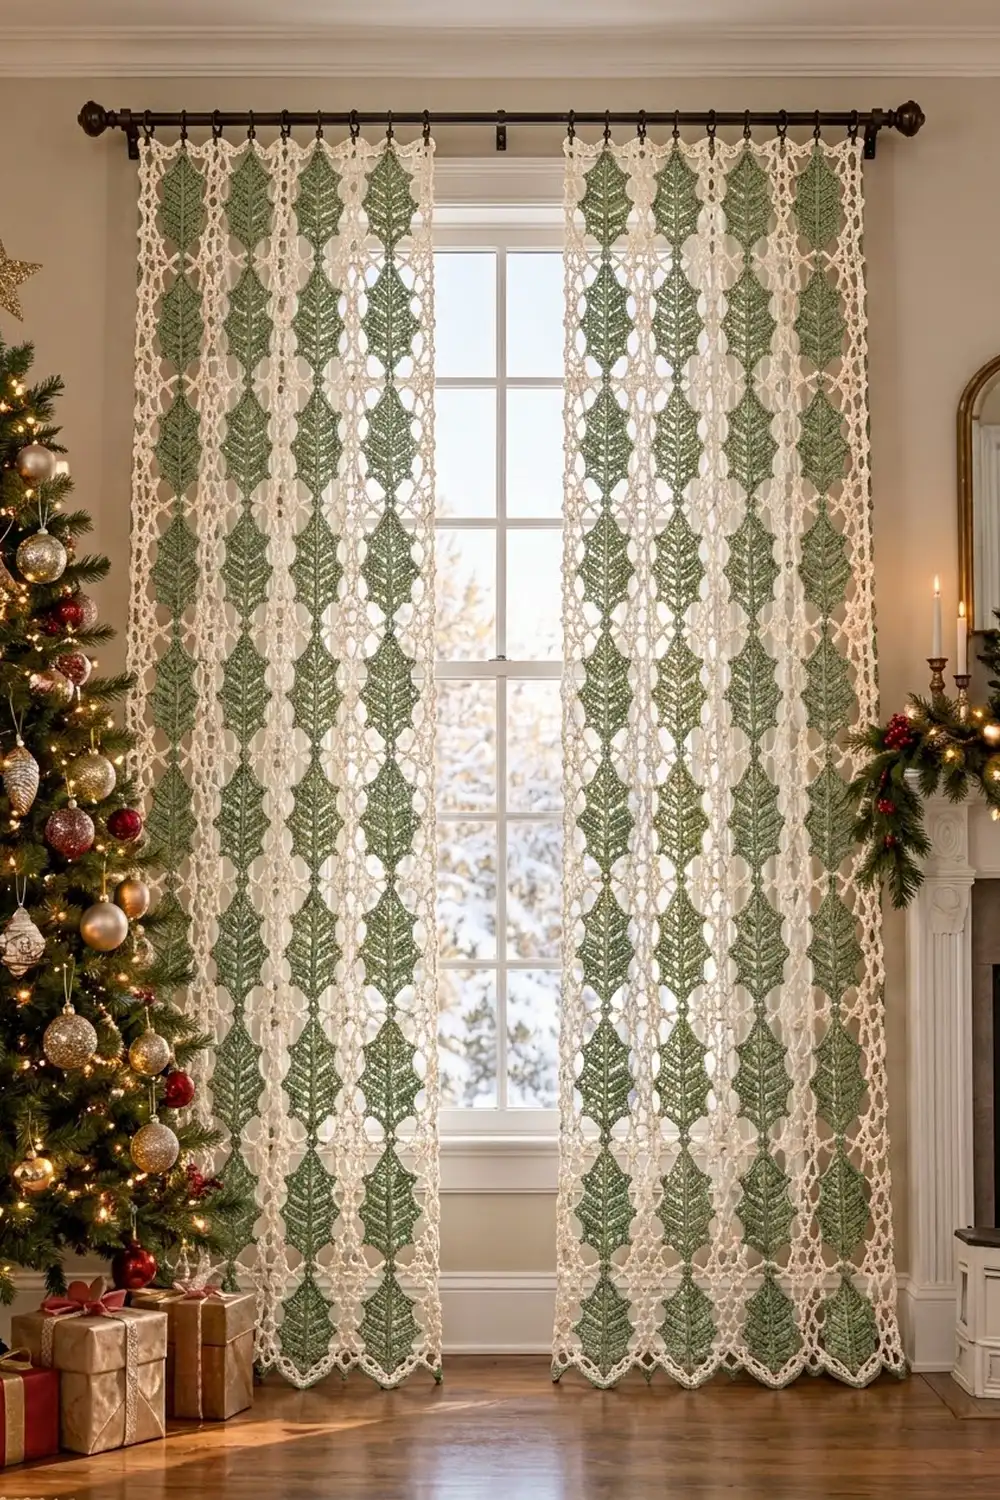
This curtain panel combines solid sage-green leaves with airy cream lace. Each leaf has scalloped holly points, a raised center vein, and ribs that fan out from the middle. Every leaf is framed in open chain mesh, so daylight comes through between the leaf columns while the leaves stay crisp and textured.
There are two colors: sage green for the leaves and cream for the mesh, joins, and border. The result looks quietly festive. It suits a holiday window but is subtle enough to leave up all winter.
The pattern uses US crochet terms. One finished panel measures 42.75 in (108.6 cm) wide by 84.75 in (215.3 cm) long at the side edges, and 86 in (218.4 cm) long at the tips of the bottom points. The photo shows two matching panels; make two panels for a pair.
You make each piece in two stages: a green leaf (Rnds 1–3), then cream mesh rounds that turn the oval leaf into a rectangular block (Rnds 4–7). Forty-five blocks are joined into a grid that is 5 blocks wide by 9 blocks tall. A three-round border then finishes the panel, with shallow points along the bottom edge.
Finished Size and Construction
- Finished size: 42.75 x 84.75 in (108.6 x 215.3 cm); 86 in (218.4 cm) long at the point tips
- Skill level: Intermediate
- Terminology: US
- Yarn weight: DK (weight 3) cotton
- Hook: 4.5 mm (US 7)
- Number of pieces: 45 leaf blocks per panel
- Layout: 5 blocks across x 9 blocks down
- Leaf size (after Rnd 3): 3.5 x 7 in (8.9 x 17.8 cm)
- Block size (after Rnd 7): 8.25 x 9.25 in (21.0 x 23.5 cm)
- Size before border: 41.25 x 83.25 in (104.8 x 211.5 cm)
- Border depth: 0.75 in (1.9 cm); the bottom points add another 1.25 in (3.2 cm)
Materials
Use a smooth, mercerized DK cotton or cotton blend. Cotton shows stitch definition well, blocks crisply, and doesn’t stretch much while the curtain hangs. Avoid fuzzy yarns, because they blur the mesh. Quantities below are for one panel, based on 50 g / 115 m balls.
- Sage green (leaves): 450 g / 1,035 m (9 balls)
- Cream (mesh, joins, border): 850 g / 1,955 m (17 balls)
These quantities already include a margin of about 10%. Double them for a pair of panels.
Tools:
– 4.5 mm (US 7) crochet hook
– Tapestry needle
– Stitch markers
– Scissors
– Measuring tape
– Blocking mats, rustproof pins, and a spray bottle
– Curtain clip rings for hanging (optional)
Abbreviations (US Terms)
- ch – chain
- sl st – slip stitch
- sc – single crochet
- hdc – half double crochet
- dc – double crochet
- tr – treble crochet
- dtr – double treble crochet
- FPdc – front post double crochet
- sk – skip
- sp(s) – space(s)
- st(s) – stitch(es)
- RS – right side
Special stitches
- Picot: Ch 3, then sl st in the 3rd ch from the hook.
- Point Unit (P): Hdc in the next st, dc in the next st, (dc, picot, dc) in the next st, dc in the next st, hdc in the next st. A Point Unit uses 5 sts and makes 6 sts plus 1 picot.
- Tip Group: (Hdc, dc, picot, dc, hdc) in the same space. This makes 4 sts plus 1 picot.
Gauge and Checkpoints
Make one complete block before you start the rest. Every later measurement depends on it.
- Edge gauge: After blocking, 16 sts of Rnd 7 measure 4 in (10.2 cm) along the block edge.
- Checkpoint 1 (after Rnd 3): The leaf measures 3.5 x 7 in (8.9 x 17.8 cm), including the tip picots.
- Checkpoint 2 (after Rnd 7, blocked): The block measures 8.25 x 9.25 in (21.0 x 23.5 cm).
If your block is too big, go down one hook size (4.0 mm). If it’s too small, go up one hook size (5.0 mm). Change the hook for the cream rounds first, because the mesh controls most of the block size. Only change the hook for the leaf if the leaf itself is off by more than 0.5 in (1.3 cm).
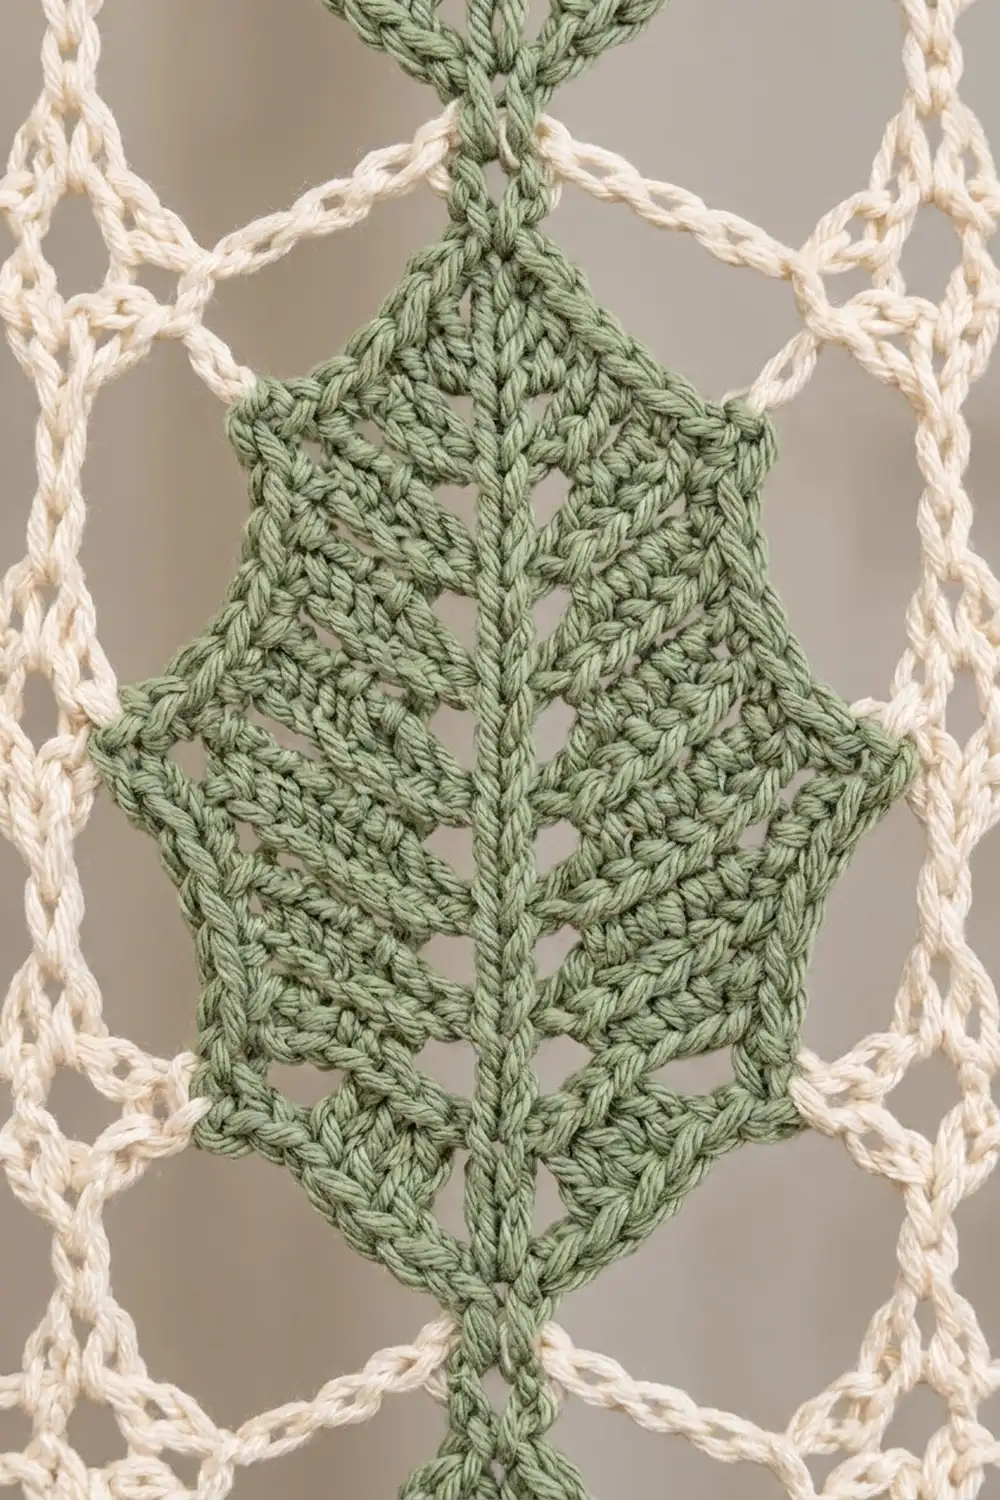
Leaf (Sage Green)
Work every round with the RS facing you. Do not turn. A beginning ch 1 does not count as a stitch.
Foundation: Ch 26.
Rnd 1: Sc in the 2nd ch from the hook, hdc in the next ch, dc in the next 21 ch, hdc in the next ch, sc in the last ch, ch 2 for the top tip. Rotate the piece and work along the opposite side of the foundation chain: sc in the first ch, hdc in the next ch, dc in the next 21 ch, hdc in the next ch, sc in the last ch, ch 2 for the bottom tip. Join with a sl st to the first sc.
(50 sts: 25 per side, plus 2 ch-2 tip sps.)
Rnd 2 (rib round): Ch 1. Sc in the first sc, hdc in the next hdc, [FPdc around the next dc, dc in the next dc] 10 times, FPdc around the next dc, hdc in the next hdc, sc in the next sc. In the tip sp work (2 sc, ch 2, 2 sc). Repeat the side sequence along the second side. In the last tip sp work (2 sc, ch 2, 2 sc). Join.
(58 sts: 25 per side plus 4 at each tip, plus 2 ch-2 sps.)
The 11 FPdc on each side stand up as raised ribs that start at the center vein. Because the tips widen, the ribs fan outward.
Rnd 3 (holly points round): Ch 1. Sc in the first st, [P, sc in the next st] 4 times. Sc in the next 2 sc, work a Tip Group in the ch-2 sp, sc in the next 2 sc. Sc in the next st, [P, sc in the next st] 4 times, sc in the next 2 sc, work a Tip Group in the last ch-2 sp, sc in the last 2 sc. Join and fasten off.
(74 sts: 29 on each side and 8 at each tip, plus 10 picots: 4 per side and 1 at each tip.)
Center vein: With the RS facing you and green yarn held behind the leaf, work surface sl sts along the foundation chain from tip to tip. Weave in the ends.
Block Mesh (Cream)
Number the picots 1 to 10, starting with the top tip as picot 1. The bottom tip is picot 6. The ch-5 sps after picots 1, 5, 6, and 10 each touch a tip, and they become the corners of the block. In these instructions they are called corner loops.
Rnd 4: Join cream with a sc in picot 1. [Ch 5, sc in the next picot] 9 times, ch 5. Join to the first sc.
(10 sc, 10 ch-5 sps.)
Rnd 5: Ch 1, sc in the first sc. Ch 5, (sc, ch 7, sc, ch 7, sc) in the corner loop, ch 5. [Sc in the next sc, ch 5, (sc, ch 5, sc) in the next ch-5 sp, ch 5] 3 times. Sc in the next sc, ch 5, (sc, ch 7, sc, ch 7, sc) in the corner loop, ch 5. Sc in the next sc (bottom tip), ch 5, (sc, ch 7, sc, ch 7, sc) in the corner loop, ch 5. Repeat from * to * once. Join.
(34 sc, 34 loops: each regular section makes 3 loops and each corner section makes 4.)
Rnd 6 (squaring round): Sl st into the next loop. Ch 1, sc in the same loop, ch 3. [Sc in the next loop, ch 3] twice. Tr in the next loop, ch 3 for the corner, tr in the next loop, ch 3. [Sc in the next loop, ch 3] 7 times, tr in the next loop, ch 3 for the corner, tr in the next loop, ch 3. [Sc in the next loop, ch 3] 6 times, tr in the next loop, ch 3 for the corner, tr in the next loop, ch 3. Repeat from * to * once more, but stop after the last corner and its following tr and ch 3. Then [sc in the next loop, ch 3] 3 times. Join.
(34 sts and 34 ch-3 sps. Stitches per side: 8 on the top, 9 on the right, 8 on the bottom, 9 on the left.)
The tr pairs on each side of the corners lift the mesh into square corners above and below the narrow leaf tips.
Rnd 7: Ch 1. Sc in each st and 3 sc in each ch-3 sp. In each corner sp, the middle sc of the 3 is the corner st. Join and fasten off.
(136 sts.)
Per-side counts, including both corner sts:
– Top and bottom: 1 + 1 + 8 + (7 sps x 3) + 1 + 1 = 33 sts
– Left and right: 1 + 1 + 9 + (8 sps x 3) + 1 + 1 = 37 sts
– Check: (2 x 33) + (2 x 37) − 4 shared corner sts = 136. ✓
Block the test piece now and confirm Checkpoint 2.
Make All Pieces
- Green: 45 leaves (Rnds 1–3)
- Cream: Add Rnds 4–7 to all 45 leaves
Make all 45 blocks with the leaf tips pointing up and down. Lay them out in a grid that is 5 blocks across and 9 blocks down:
Row 1:  [L][L][L][L][L]
Row 2:  [L][L][L][L][L]
Row 3:  [L][L][L][L][L]
Row 4:  [L][L][L][L][L]
Row 5:  [L][L][L][L][L]
Row 6:  [L][L][L][L][L]
Row 7:  [L][L][L][L][L]
Row 8:  [L][L][L][L][L]
Row 9:  [L][L][L][L][L]
Every block is the same. Because each leaf is centered in its block, the leaves line up tip to tip in 5 continuous columns.
Joining
Method: Flat slip stitch join through the back loops, using cream yarn.
- Join the blocks into 5 vertical strips of 9 blocks each. Hold two blocks with their wrong sides together and their 33-st top and bottom edges lined up. Sl st through the back loop of each block, one st at a time, from corner st to corner st. That is 33 joins per seam.
- Join the strips along their long edges. Each long edge has 9 x 37 = 333 sts. Join them stitch to stitch the same way. Where four blocks meet, match corner st to corner st. Don’t add any chains at the seams.
Tension: Keep the slip stitches as loose as the block stitches. Once a seam is finished, lay it flat; it should be exactly as long as the block edge beside it. If the seam puckers, take it out and redo it with a 5.0 mm hook.
Checkpoint 3: One finished strip measures 83.25 in (211.5 cm) long. Two joined strips measure 16.5 in (41.9 cm) wide. The finished grid measures 41.25 x 83.25 in (104.8 x 211.5 cm).
Border (Cream)
Border gauge: 16 sc = 4 in (10.2 cm), the same as the block edges.
Starting counts: The top and bottom edges each have 5 x 33 = 165 sts. The left and right edges each have 9 x 37 = 333 sts. These totals include the corner sts at each seam and at each corner of the panel.
Rnd 1: Join with a sl st in the top-right corner st of the panel. Ch 1, (sc, ch 2, sc) in the same st. Sc in each st to the next panel corner, then work (sc, ch 2, sc) in that corner st. Repeat around and join.
(165 sc on the top and bottom, 333 sc on each side, plus 4 ch-2 corner sps. Each panel-corner st splits into one sc for each side, so the side counts stay the same.)
Rnd 2: Sl st into the corner sp. Ch 1, (sc, ch 3, sc) in the same sp. Along each side: ch 3, sk the first st, [sc in the next st, ch 3, sk the next st]. Repeat the brackets to the end of the side: 82 times on the top and bottom, 166 times on the left and right. Work (sc, ch 3, sc) in each corner sp. Join.
(83 ch-3 sps on the top and bottom, 167 ch-3 sps on each side, and 4 corner sps.)
Rnd 3:
– Top and sides: 3 sc in each ch-3 sp, and (2 sc, ch 2, 2 sc) in each corner sp.
(Top: 253 sts between the corner ch-2 sps. Each side: 505 sts.)
– Bottom: 3 sc in each of the next 2 sps. [Point, 3 sc in the next sp] 4 times. Point, then 3 sc in each of the last 2 sps.
Point (worked over 15 sps):
– Sps 1–2: 3 sc in each
– Sps 3–4: 3 hdc in each
– Sps 5–6: 3 dc in each
– Sp 7: 3 tr
– Sp 8: (tr, dtr, ch 4, sl st in the 4th ch from the hook, dtr, tr)
– Sp 9: 3 tr
– Sps 10–11: 3 dc in each
– Sps 12–13: 3 hdc in each
– Sps 14–15: 3 sc in each
Each Point is 46 sts plus 1 picot. The bottom edge totals (8 valley sps x 3) + (5 x 46) = 254 sts, plus 2 sc at each corner, for 258.
Why the math works:
– Every side count is the number of blocks along that side times the per-side count, with nothing added at the seams.
– In Rnd 2, the odd side counts (165 and 333) divide evenly into “sk 1, sc 1” pairs after the first skipped stitch.
– On the bottom edge, 83 sps = 2 + (5 x 15) + 4 + 2, so the 5 points are spread symmetrically, one under each leaf column.
Final Blocking
- Weave in all the ends and trim them close.
- Soak the panel in cool water for 15 minutes, then gently press out the water. Don’t wring it.
- Roll the panel in towels to remove more water.
- Lay it flat on mats. Pin the corners first, so the panel measures 42.75 x 84.75 in (108.6 x 215.3 cm).
- Pin along each seam line so the block grid stays straight.
- Pin each bottom point at its picot, 1.25 in (3.2 cm) below the border edge.
- Open the mesh diamonds and pin out the leaf tips as needed.
- Leave it to dry completely before unpinning.
Final Quality-Control Checklist
- All 45 blocks measure 8.25 x 9.25 in (21.0 x 23.5 cm).
- Each leaf has 10 picots and a center vein that runs straight.
- The leaves form 5 straight columns, tip to tip.
- Every seam lies flat, with no puckering or gaps.
- The border counts are correct: 165 / 333 / 165 / 333 in Rnd 1.
- There are 5 bottom points, each roughly centered under a column.
- The panel measures 42.75 x 84.75 in (108.6 x 215.3 cm).
- All ends are secured.
Troubleshooting
- The leaf curls: The Rnd 1 dc are too tight. Go up a hook size for Rnd 1 only.
- The ribs look flat: Make sure each FPdc is worked around the post from the front, with the RS facing you.
- The block corners are rounded: Check that you worked tr, not dc, on each side of the corner sps in Rnd 6. Pin the corners firmly when blocking.
- The block is wider than it is tall: You probably swapped the top and side counts in Rnd 6. The sides need 9 sts.
- The border ripples: Your Rnd 1 tension is loose. Use a hook one size smaller for the border.
- A point leans to one side: Recount the 15 sps under it, and make sure the dtr pair sits in sp 8.
Care
Hand wash in cool water with a mild detergent, and dry flat. To refresh the panel between washes, steam it lightly while it hangs.
Final Notes
The size of this panel comes from a short chain of measurements:
– Leaf: 3.5 x 7 in (8.9 x 17.8 cm)
– Block: 8.25 x 9.25 in (21.0 x 23.5 cm), with 33 and 37 sts per side
– Joined grid: 41.25 x 83.25 in (104.8 x 211.5 cm)
– Bordered panel: 42.75 x 84.75 in (108.6 x 215.3 cm)
If you check your size at each stage, the finished panel will hang straight with its leaf columns lined up. Make a second panel for a matching pair.
Happy crocheting!