

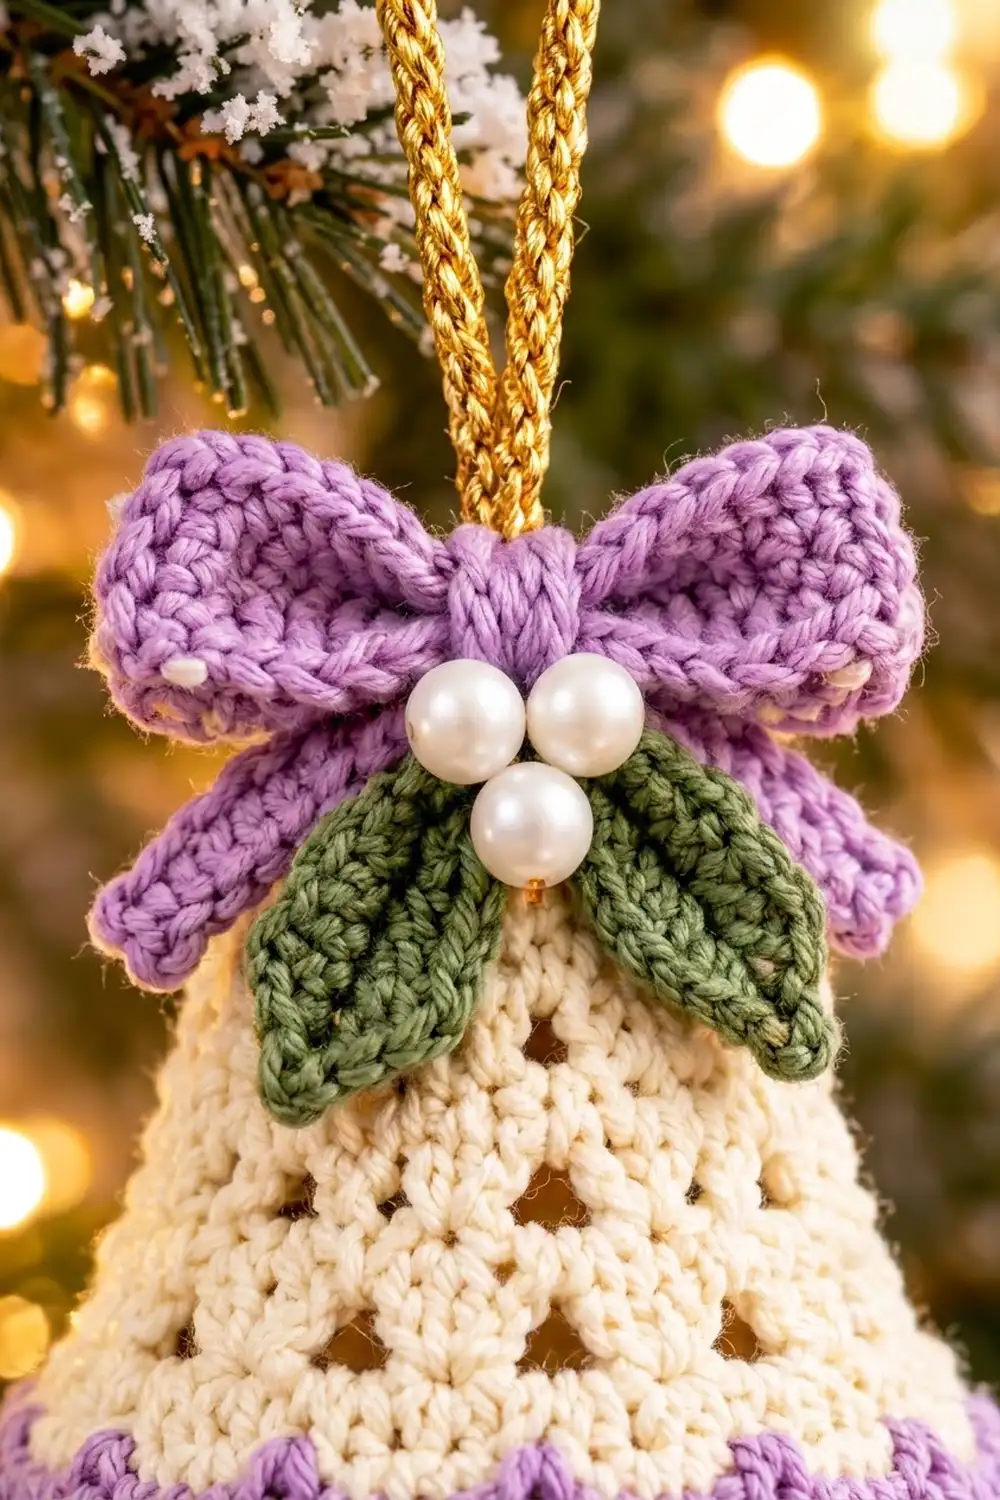
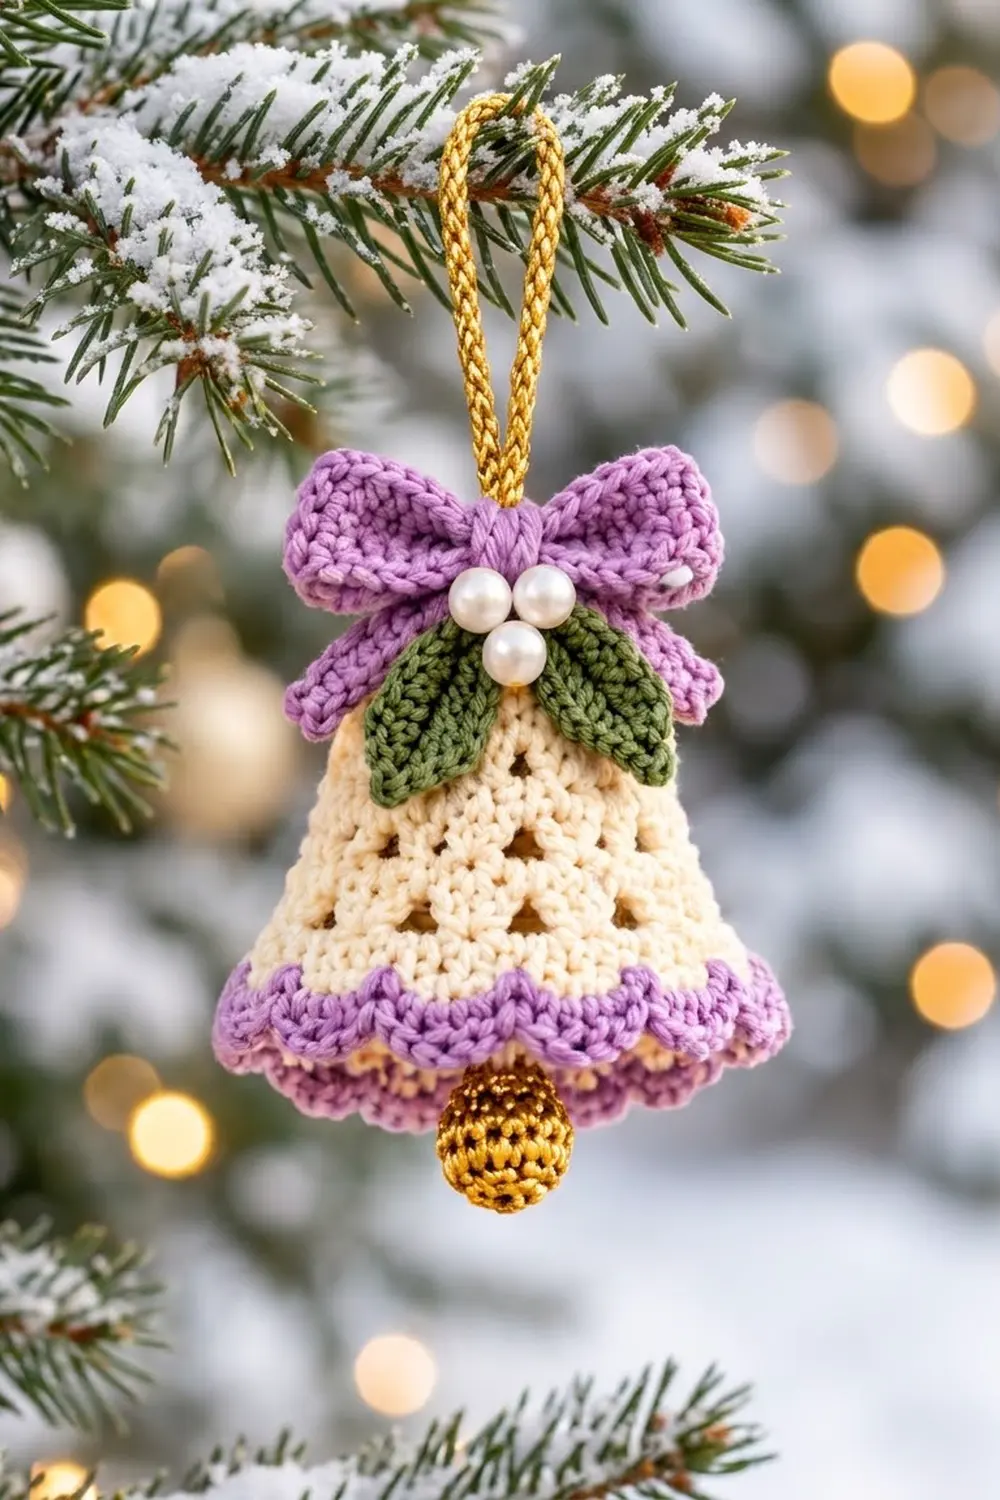
This little bell is made for the tree. The cream body is covered in staggered triangular eyelets that let the lights glow through, and two lavender scalloped ruffles finish the hem in layers. A soft lavender bow, two sage-green leaves and a cluster of three pearls sit on top. A gold cord loop and a tiny gold clapper finish it.
The colors are cream, lavender, sage green and metallic gold. Together they look vintage and gentle, a nice change from bright red and green. The style is lacy without being fussy. Every lace round is plain double crochet with chain-1 spaces.
This pattern uses US crochet terms. The finished bell is about 3.5 in (8.9 cm) tall and 4 in (10.2 cm) wide at the scalloped hem, not counting the hanging loop or clapper.
You’ll work the bell top-down in joined rounds. Eyelet rounds alternate with solid rounds that fill in the spaces and add the flare. The first lavender ruffle is worked into the front loops of the last body round. The cream lower skirt is then worked into the back loops behind it and ends with the second lavender scallop. The bow, leaves and clapper are small separate pieces that you sew on.
Finished Size and Construction
- Finished size: 3.5 in (8.9 cm) tall × 4 in (10.2 cm) wide at the hem
- Skill level: Easy-intermediate
- Terminology: US
- Yarn weight: Sport (#2) cotton or cotton blend
- Hook: 3.0 mm (C/D)
- Number of pieces: 1 bell, plus small sewn-on appliqués (1 bow, 2 leaves, 1 clapper)
- Layout: One ornament, worked in the round
- Bell body (before trim): 64 stitches around, 10.75 in (27.3 cm) circumference, about 2.5 in (6.4 cm) tall
- Trim depth: about 1 in (2.5 cm) added below the body
Materials
Choose a smooth, mercerized sport-weight cotton so the stitches and eyelets stay crisp. Fuzzy yarn will blur the triangles.
- Cream (A): 10 g / 31 m
- Lavender (B): 7 g / 22 m
- Sage green (C): 2 g / 6 m
- Gold metallic sport or fingering yarn (D): 3 g / 10 m (clapper and sewing)
These quantities include a margin of about 20%.
Tools and notions:
– 3.0 mm crochet hook
– Tapestry needle
– 3 white pearl beads, 8 mm
– 7 in (17.8 cm) of gold twisted cord, about 1/8 in thick
– A pinch of fiberfill
– Spray starch or a fabric stiffener (optional)
– Scissors and a few stitch markers
Abbreviations (US Terms)
- ch – chain
- sl st – slip stitch
- sc – single crochet
- hdc – half double crochet
- dc – double crochet
- sc2tog – single crochet 2 together
- sk – skip
- sp – space
- MR – magic ring
- FLO / BLO – front loop only / back loop only
- st(s) – stitch(es)
Scallop: sc in next st, sk 1 st, 5 dc in next st, sk 1 st. One scallop uses 4 stitches.
Standing stitch: Start with a slip knot on the hook, then work the stitch as usual into the stitch you’re told to use.
Throughout the bell, the beginning ch-3 counts as 1 dc. Join each round with a sl st to the top of the beginning chain.
Gauge and Checkpoints
Gauge: 24 dc and 12 rounds = 4 in (10.2 cm). For sc: 25 sc = 4 in (10.2 cm).
Because this is a single small ornament, the bell is your gauge test. Work Rounds 1–3, then measure.
Checkpoints:
– Round 1: about 0.75 in (1.9 cm) across
– Round 3: 5.25 in (13.3 cm) around
– Round 5: 8 in (20.3 cm) around
– Round 7: 9.25 in (23.5 cm) around
– Round 9: 10.75 in (27.3 cm) around, about 3.4 in (8.6 cm) across, and 2.5 in (6.4 cm) tall
– Round 13: 12 in (30.5 cm) around, about 3.8 in (9.7 cm) across
Measure the circumference with a soft tape around the outside of the last round.
Too big? Go down to a 2.75 mm hook. Too small or stiff? Go up to a 3.25 mm hook. Don’t change any stitch counts, because the scallop math depends on them.
Bell Body
Use cream (A).
Round 1: Make a MR. Ch 3, 15 dc in the ring. Pull the ring closed until only a tiny hole is left for the cord, then join. (16 dc)
Round 2 (eyelet): Ch 3, dc in next dc, ch 1, dc in next 2 dc, ch 1; repeat from * 7 more times; join. (16 dc, 8 ch-1 sps)
Round 3 (solid, growth): Ch 3, dc in next dc, 2 dc in ch-1 sp, dc in next 2 dc, 2 dc in next ch-1 sp; repeat from * 7 more times; join. (32 dc)
This round’s count is 16 dc worked into stitches + 16 dc worked into spaces = 32.
Round 4 (eyelet, offset): Ch 4 (counts as dc and ch-1 sp), dc in next 3 dc, dc in next dc, ch 1, dc in next 3 dc; repeat from * 7 more times; join to the 3rd ch of the beginning ch-4. (32 dc, 8 ch-1 sps)
The new holes sit halfway between the Round 2 holes, which starts the staggered triangle look.
Round 5 (solid, growth): Ch 3, 2 dc in next ch-1 sp, dc in next 3 dc, dc in next dc, 2 dc in next ch-1 sp, dc in next 3 dc; repeat from * 7 more times; join. (48 dc)
Count: 32 + 16 = 48, or 6 dc per repeat.
Round 6 (eyelet, offset): Ch 3, dc in next 4 dc, ch 1, dc in next dc, dc in next 5 dc, ch 1, dc in next dc; repeat from * 7 more times; join. (48 dc, 8 ch-1 sps)
Round 7 (solid, growth): Ch 3, dc in next 4 dc, dc in ch-1 sp, dc in next dc, dc in next 5 dc, dc in next ch-1 sp, dc in next dc; repeat from * 7 more times; join. (56 dc)
Count: 48 + 8 = 56, or 7 dc per repeat.
Round 8 (eyelet, offset): Ch 3, dc in next dc, ch 1, dc in next 5 dc, dc in next 2 dc, ch 1, dc in next 5 dc; repeat from * 7 more times; join. (56 dc, 8 ch-1 sps)
Round 9 (solid, growth): Ch 3, dc in next dc, dc in ch-1 sp, dc in next 5 dc, dc in next 2 dc, dc in next ch-1 sp, dc in next 5 dc; repeat from * 7 more times; join. (64 dc)
Count: 56 + 8 = 64, or 8 dc per repeat. Fasten off cream and check the Round 9 measurements.
You now have four staggered rows of eyelets (Rounds 2, 4, 6 and 8) on a flared, domed cone.
Border: Layered Scalloped Hem
The hem is the border of this piece. On a round piece there are no sides, so the counts below are given per round and per repeat.
Border gauge: One scallop over 4 stitches measures about 0.67 in (1.7 cm) at the base. Six scallops are about 4 in (10.2 cm).
Round 10 (lavender, upper ruffle base): Make a standing sc in B in the FLO of any Round 9 st. Work sc FLO in each remaining st; join to the first sc. (64 sc)
This is a 1-per-stitch round, so the count stays at 64. The back loops of Round 9 are left free for the lower skirt.
Round 11 (lavender, upper scallops): Ch 1, sc in next st, sk 1, 5 dc in next st, sk 1; repeat from * 15 more times; join to the first sc. Fasten off. (16 scallops: 16 sc + 80 dc = 96 sts)
Round 12 (cream, lower skirt): Fold the ruffle up out of the way. Make a standing dc in A in the free BLO of any Round 9 st. Dc BLO in next 6 sts, 2 dc BLO in next st, dc BLO in next 7 sts, 2 dc BLO in next st; repeat from * 6 more times; join. (72 dc)
Count: 64 stitches worked once + 8 extra = 72.
Round 13 (cream): Ch 3, dc in each st around; join. Fasten off. (72 dc)
Round 14 (lavender): Make a standing sc in B in any st. Sc in each st around; join. (72 sc)
Round 15 (lavender, lower scallops): Ch 1, sc in next st, sk 1, 5 dc in next st, sk 1; repeat from * 17 more times; join. Fasten off. (18 scallops: 18 sc + 90 dc = 108 sts)
Why the math works: Each scallop uses exactly 4 base stitches. 64 ÷ 4 = 16 scallops, and 72 ÷ 4 = 18 scallops, so neither scallop round has a leftover stitch or a squashed scallop. The 8 increases in Round 12 (one per lace repeat) give the lower skirt enough flare to sit just beneath the upper ruffle without cupping.
Bow
Use lavender (B).
Bow body: Ch 21.
– Row 1: Sc in 2nd ch from hook and in each ch across. (20 sc)
– Rows 2–5: Ch 1, turn, sc in each st across. (20 sc)
Fasten off and leave a long tail. The strip is about 3.25 in × 0.75 in (8.3 cm × 1.9 cm).
Fold both short ends to the center so they overlap by 0.25 in (0.6 cm), and tack them down. This makes two loops.
Tails: Ch 13.
– Row 1: Sc in 2nd ch from hook and in each ch across. (12 sc)
– Row 2: Ch 1, turn, sc in each st across. (12 sc)
Fasten off. Fold the strip into a V and sew the point to the back of the bow body so the tails angle outward and down.
Center wrap: Ch 7.
– Row 1: Sc in 2nd ch from hook and in each ch across. (6 sc)
– Row 2: Ch 1, turn, sc in each st across. (6 sc)
Wrap this piece tightly around the bow center, over the tails, and sew the ends together at the back. Cinching it tightly is what gives the loops their pinch.
Leaves (Make 2)
Use sage green (C). Ch 8.
Round 1: Working into the 7 remaining chains:
1. Sc in 2nd ch from hook, hdc in next ch, dc in next 2 ch, hdc in next ch, sc in next ch.
2. In the last ch, work (sc, ch 2, sc) for the tip.
3. Rotate and work along the other side of the foundation chain: sc in next ch, hdc in next ch, dc in next 2 ch, hdc in next ch, sc in next ch.
4. Sl st to the first sc.
Count: 6 sts + tip (sc, ch-2, sc) + 6 sts. Fasten off. Each leaf is about 1.25 in (3.2 cm) long.
For a center vein, work a surface sl st line down the middle in C. This is optional.
Gold Clapper
Use gold (D).
- Round 1: MR, 6 sc in ring. (6 sc)
- Round 2: 2 sc in each st. (12 sc)
- Rounds 3–4: Sc in each st. (12 sc)
- Round 5: Sc2tog 6 times. (6 sc)
Stuff the ball lightly, then close the opening with the tail. The ball is about 0.75 in (1.9 cm) across.
Assembly
- Hanger: Fold the gold cord in half. Push both ends down through the Round 1 center hole, knot them together inside the bell, and trim. Leave a loop of about 2.5 in (6.4 cm) above the crown.
- Clapper: Thread a 6 in (15.2 cm) length of D through the top of the ball. Bring it up through the Round 1 center from inside and knot it around the cord knot. Adjust it so the ball hangs 0.5 in (1.3 cm) below the lower scallops.
- Leaves: Sew the wide ends of both leaves just below the crown. Point one down to the left and one down to the right at about a 45° angle.
- Bow: Center the bow over the leaf bases, covering the cord base, and sew it on through the center wrap.
- Pearls: Sew the 3 pearls in a small triangle on the center wrap, two above and one below.
Final Blocking
- Lightly mist the bell with water or spray starch.
- Stuff the bell firmly with a rolled cloth or plastic bag until it holds a smooth cone shape.
- Use your fingers to open each eyelet into a clean triangle.
- Pull each scallop down and out so the upper ruffle overlaps the top of the lower skirt.
- Pin the bow loops open and the leaf tips flat.
- Let it dry completely, then remove the stuffing.
- Check the final size: 3.5 in (8.9 cm) tall and 4 in (10.2 cm) wide at the hem.
Final Quality-Control Checklist
- Rounds 3, 5, 7 and 9 counted to 32, 48, 56 and 64 dc
- Four rows of eyelets, each row offset from the one before
- 16 upper scallops and 18 lower scallops, all evenly spaced
- The upper ruffle sits in front of the lower skirt rather than inside it
- No gap at the crown, and the cord knot is hidden
- The clapper hangs centered, just below the hem
- Bow tails are even and the pearls are secure
- All tails are woven in on the inside
Troubleshooting
- The bell cups inward: Your tension is too tight on the solid rounds. Go up a hook size for the body.
- The bell ruffles at Round 9: Your gauge is too loose. Go down a hook size.
- The eyelets line up in columns: You missed an offset. Check where the ch-1 falls in Rounds 4, 6 and 8.
- Scallops are uneven: The base count is off. Recount Round 10 (64) and Round 14 (72).
- The joining seam drifts: Always join into the top of the beginning chain, not the next stitch.
- The bow looks flat: Re-wrap the center more tightly.
Care
Spot clean with cool water and mild soap, then reshape and let it dry flat or stuffed. Store the bell with tissue inside so it keeps its shape.
Final Notes
The measurement chain is simple. Round 1 is 0.75 in (1.9 cm) across. Round 9 has 64 dc and measures 10.75 in (27.3 cm) around. Round 13 has 72 dc and measures 12 in (30.5 cm) around. The finished ornament is 3.5 in × 4 in (8.9 cm × 10.2 cm). If each checkpoint matches, the scallops fit with no adjustments. Make one bell, then make a few more for the tree.
Happy crocheting!