

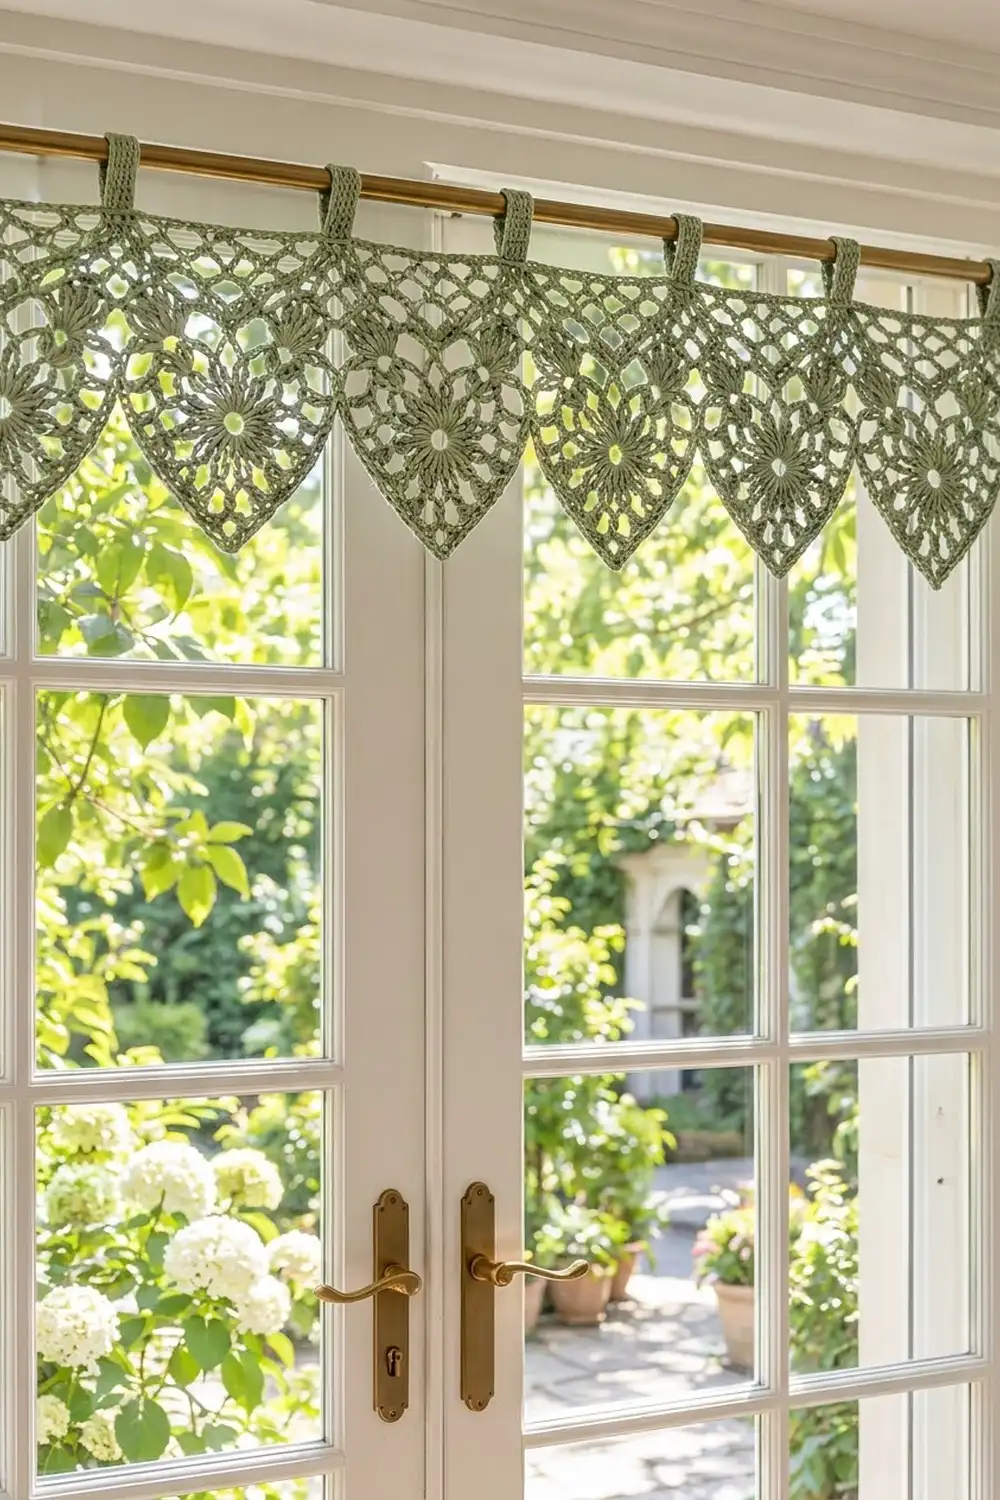
This valance is a row of pointed lace pendants under a light mesh header, and it hangs from tab tops. Each pendant has a small open flower at its center, with eight soft cluster petals inside a ring of chain loops. A lacy net below the flower narrows into a neat point.
The sample is worked in one sage green cotton, which looks fresh and cottage-style against a sunny window. All terms are US crochet terms. The finished valance is 28 in (71.1 cm) wide and 8.5 in (21.6 cm) tall, not counting the tabs. With the tab loops it measures about 10 in (25.4 cm).
Construction is simple. You make seven identical motifs, each a lace square with a pointed net worked off one side. Then you slip-stitch the motifs together side by side, crochet a mesh header across the top, and add eight hanging tabs.
Finished Size and Construction
- Finished size: 28 in wide x 8.5 in tall (71.1 x 21.6 cm), plus tab loops
- Skill level: Intermediate
- Terminology: US
- Yarn weight: DK / light (#3) cotton
- Hook: 4 mm (G-6)
- Number of pieces: 7 pointed motifs
- Layout: 1 row of 7, joined side by side
- Motif size: square section 4 x 4 in (10.2 x 10.2 cm); 7 in (17.8 cm) long including the point
- Size before border: 28 x 7 in (71.1 x 17.8 cm)
- Border (header) depth: 1.5 in (3.8 cm), plus tabs
Materials
Yarn: Use a smooth, mercerized or matte DK cotton, or a cotton blend. Cotton keeps the lace crisp and the points sharp after blocking. Avoid fuzzy yarns, because they blur the mesh.
- Sage green: 100 g / about 230 m (250 yd)
The quantity includes a margin of roughly 25%. The sample used about 75 g.
Tools:
- 4 mm (G-6) crochet hook
- Tapestry needle
- Rust-proof pins and a blocking mat
- Spray bottle
- Measuring tape
- Stitch markers
Abbreviations (US Terms)
- ch – chain
- sl st – slip stitch
- sc – single crochet
- hdc – half double crochet
- dc – double crochet
- tr – treble crochet
- sk – skip
- sp – space
- st(s) – stitch(es)
- RS / WS – right side / wrong side
Special stitch: 3-dc cluster (cl). Yarn over, insert the hook in the stitch, pull up a loop, yarn over and pull through 2 loops. Repeat twice more in the same stitch (4 loops on the hook), then yarn over and pull through all 4.
Beginning cluster: Ch 2, then work a 2-dc cluster in the same stitch. Together these count as one cl.
Gauge and Checkpoints
Make one complete motif, including its point, before you commit to the whole valance. Use these checkpoints:
- After Round 1: 1.25 in (3.2 cm) across
- After Round 3: 2.5 in (6.4 cm) across, loop tip to loop tip
- After Round 4: 3.25 in (8.3 cm) square
- After Round 6: 4 in (10.2 cm) square, which works out to 19 sts per 4 in (10.2 cm)
- After the point: 3 in (7.6 cm) from the square edge to the tip, so 7 in (17.8 cm) in total
If your motif is too big, go down 0.5 mm in hook size. If it is too small, go up 0.5 mm. Being off by more than 0.25 in per motif adds up quickly: across seven motifs it changes the valance width by almost 2 in.
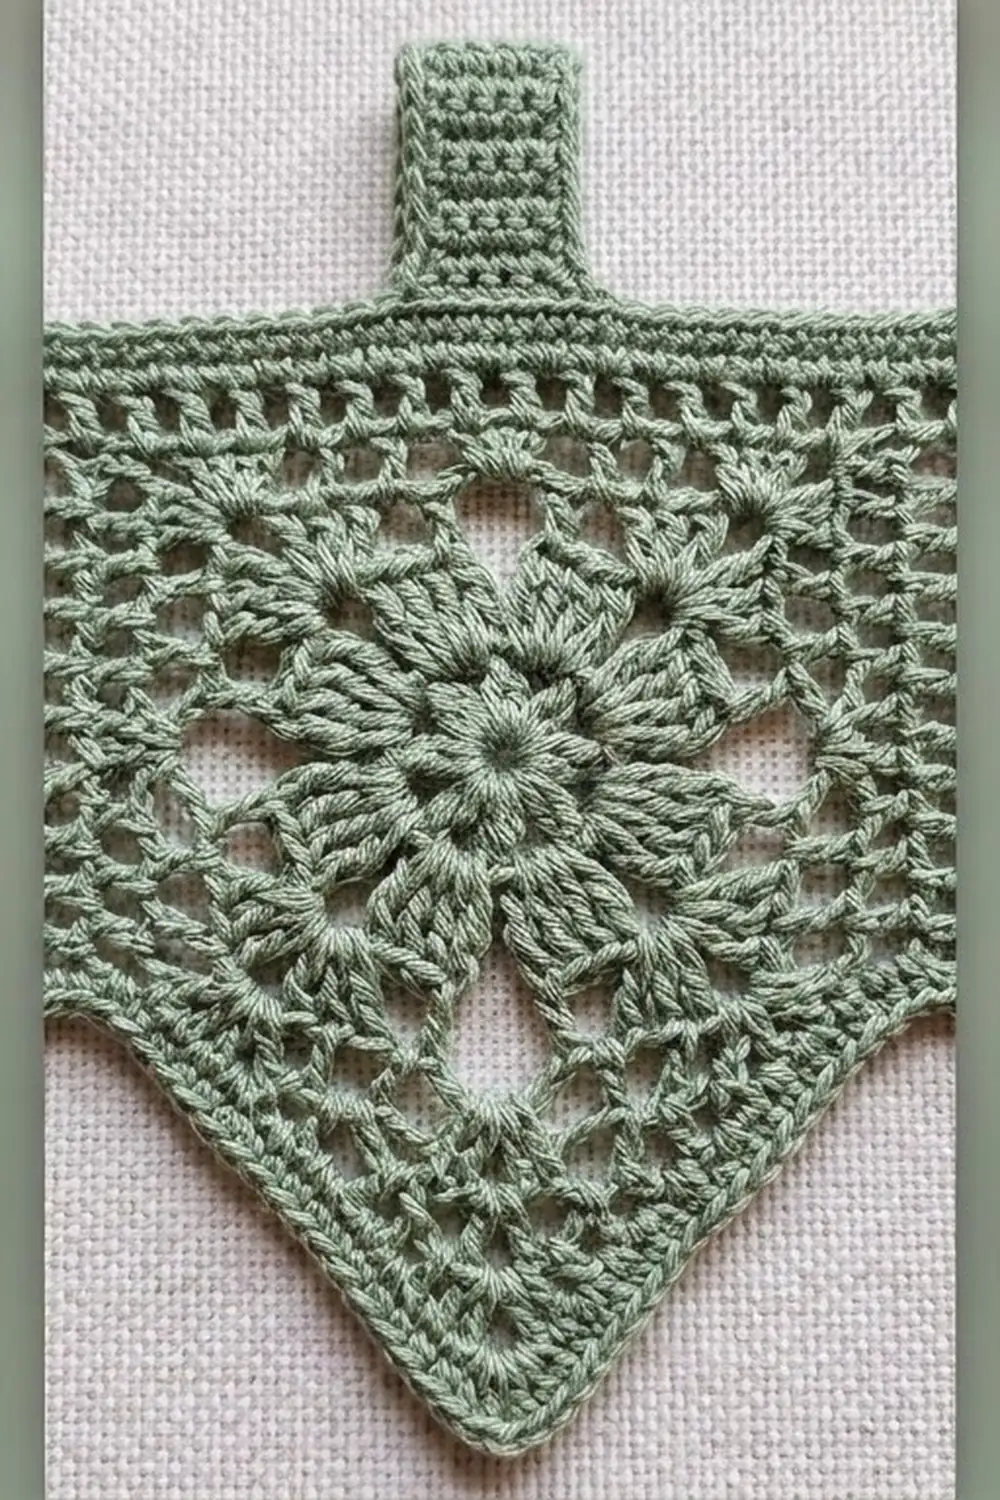
Motif (Make 7)
Flower Center
Round 1: Make a magic ring. Ch 3 (counts as dc), then work 15 dc in the ring. Pull the ring snug, leaving a small open center, and join with a sl st to the top of the ch-3. (16 dc)
Round 2: Work a beginning cluster in the same st, ch 3, sk 1. Work 1 cl in the next st, ch 3, sk 1. Repeat from * 6 more times. Join with a sl st to the top of the first cl. (8 cl, 8 ch-3 sps)
Round 3: Ch 1, then sc in the top of the same cl and ch 5. Sc in the top of the next cl, ch 5. Repeat from * 6 more times. Join to the first sc. (8 sc, 8 ch-5 loops)
These loops frame the petals. Corner and side loops alternate around the round.
Squaring the Motif
Round 4: Sl st into the first ch-5 loop. Ch 4 (counts as tr), then work (2 tr, ch 3, 3 tr) in the same loop. This is the first corner. Work 5 hdc in the next loop. In the next loop work (3 tr, ch 3, 3 tr); in the following loop work 5 hdc. Repeat from * 2 more times. Join to the top of the ch-4.
Count: 24 tr + 20 hdc = 44 sts, plus 4 corner ch-3 sps. Each side has 11 sts between corners (3 tr + 5 hdc + 3 tr).
Round 5: Sl st in the next 2 tr and into the corner ch-3 sp. Ch 3 (counts as dc), then work (dc, ch 2, 2 dc) in the same sp.
- Each side: Dc in the first st, then (ch 1, sk 1, dc in the next st) 5 times. This uses all 11 sts and gives 6 dc and 5 ch-1 sps.
- Each remaining corner: Work (2 dc, ch 2, 2 dc) in the ch-3 sp.
Join to the top of the beginning ch-3.
Count: 16 corner dc + 24 side dc = 40 dc, plus 20 ch-1 sps and 4 ch-2 corner sps.
Round 6 (trim round): Ch 1. Work 1 sc in each dc and in each ch-1 sp, and 3 sc in each corner ch-2 sp. Join to the first sc.
Count: 60 sts worked one per existing st or sp (40 dc + 20 sps), plus 12 corner sc (3 x 4) = 72 sc.
The middle sc of each 3-sc corner is the corner stitch. Each side has 19 sts, including both corner sts. Do not fasten off.
Checkpoint: The square should measure 4 x 4 in (10.2 x 10.2 cm).
Pointed Net
Work the point in rows across one side of the square. This side becomes the bottom of the motif. If you are not already there, sl st along to the corner st at the start of that side.
Row 1: Ch 1, then sc in the corner st. Ch 4, sk 2, sc in the next st. Repeat from * 5 more times, ending in the opposite corner st. This covers 1 + (6 x 3) = 19 sts. (6 loops)
Row 2: Turn. Sl st in the first 2 ch of the first loop, ch 1, and sc in the same loop. Ch 4, sc in the next loop. Repeat from * across. (5 loops)
Rows 3–6: Repeat Row 2. Each row has one loop fewer than the last, ending with 4, 3, 2, then 1 loop.
Row 7 (tip): Turn. Sl st into the single loop and ch 1. Work (3 sc, ch 3, 3 sc) in the loop.
Point edging, first side: Do not turn. Rotate the work and work 3 sc around each row end, from Row 6 back to Row 1. That is 6 row ends, so 18 sc. Sl st in the square’s corner st and fasten off.
Point edging, second side: Join the yarn at the other bottom corner of the square. Work 3 sc around each row end from Row 1 to Row 6 (18 sc), then sl st to the first sc of Row 7. Fasten off.
Checkpoint: The point measures 3 in (7.6 cm) from the square edge to the tip, so the whole motif is 7 in (17.8 cm) long.
Weave in all ends.
Make All Pieces
You need 7 motifs, all in sage green, about 8 g each. Block them lightly before joining so the squares are true and the points lie flat.
Layout (seen from the RS, points down):
[1][2][3][4][5][6][7]
 V  V  V  V  V  V  V
Joining
Lay Motifs 1 and 2 RS together, with the square sections lined up and the points hanging the same way.
- Join with a sl st through both corner sts at the top of the shared side.
- Sl st through the outer loop only of each pair of matching sts down the side. Work stitch to stitch: 19 sts on one motif meet 19 sts on the other, for 19 sl sts per seam.
- Stop at the bottom corner st. The point edges stay free, which creates the V notches.
- Fasten off. Repeat for the remaining 5 seams, so you have 6 seams in total.
Keep the slip stitches loose, about as loose as your sc. A tight seam will pucker the top edge. If needed, go up one hook size for the joining only.
Checkpoint: The joined strip measures 28 in (71.1 cm) across the top edge and 7 in (17.8 cm) from the top edge to the points.
Border: Mesh Header and Hanging Tabs
Border gauge: 19 sc = 4 in (10.2 cm). This matches the motif edge, so the header lies flat without ruffling or pulling.
Starting count: The top edge has 7 motifs x 19 sts per side = 133 sts. Both corner sts at each seam are used, and no stitches are added at the seams.
Row 1: With the RS facing, join the yarn in the top-right corner st of Motif 1. Ch 1, then sc in each of the 133 sts across. (133 sc)
Row 2: Turn. Ch 4 (counts as dc + ch 1), sk 1, dc in the next st. Ch 1, sk 1, dc in the next st. Repeat from * across. (67 dc, 66 ch-1 sps = 133)
Row 3: Turn. Ch 4 (counts as dc + ch 1), then dc in the next dc. Ch 1, dc in the next dc. Repeat from * across, working the last dc in the 3rd ch of the turning ch. (67 dc, 66 ch-1 sps = 133)
Row 4: Turn. Ch 1, then sc in each dc and each ch-1 sp across. (133 sc)
Why the math works: The filet mesh needs an odd stitch count, because it is 1 dc plus pairs of (ch 1, dc). Since 19 is odd, any odd number of motifs gives an odd total: 133 = 1 + (66 x 2). Each mesh row also takes up exactly one stitch or space per stitch, so the edge stays at 133 throughout.
Checkpoint: The header is 1.5 in (3.8 cm) deep, and the valance is now 28 x 8.5 in (71.1 x 21.6 cm).
Tabs (Make 8)
Mark these stitch groups on Row 4: 1–6, 17–22, 36–41, 55–60, 74–79, 93–98, 112–117, 128–133. Each inner tab is centered on a motif seam (sts 19, 38, 57, 76, 95, and 114 are the last stitches of Motifs 1–6), and the end tabs sit at the edges.
For each tab:
Row 1: Join the yarn in the first marked st, ch 1, and sc in each of the 6 sts. (6 sc)
Rows 2–12: Turn, ch 1, and sc across. (6 sc)
Fasten off with a 10 in (25.4 cm) tail. Each tab is about 1.25 in (3.2 cm) wide and 3 in (7.6 cm) long.
Fold each tab to the WS and whipstitch its last row along the top of header Row 2. This makes a loop about 1.5 in (3.8 cm) tall, which fits rods up to about 1 in (2.5 cm) across.
Final Blocking
- Soak the valance in cool water for 10 minutes, then gently press out the water. Do not wring it.
- Roll it in a towel to remove the excess moisture.
- Lay it flat on blocking mats, RS up.
- Pin the top edge straight to 28 in (71.1 cm).
- Pin each square section to 4 in (10.2 cm) wide.
- Pin each point tip straight down, 7 in (17.8 cm) below the top of the motif.
- Open the flower centers and chain loops with your fingertips.
- Let it dry completely, then unpin. Do not block the tabs flat; leave them folded.
Final Quality-Control Checklist
- 7 motifs, each with 72 sts in Round 6 and 19 sts per side
- 6 seams of 19 sl sts each, with all points free
- 133 sts in every header row
- 8 tabs, evenly placed and securely sewn
- Top edge 28 in (71.1 cm), total height 8.5 in (21.6 cm)
- All ends woven in on the WS
Troubleshooting
- Motif cups: Round 4 corners are too tight. Loosen your tr, or go up a hook size for that round.
- Motif ruffles: Your ch-5 loops in Round 3 are too long. Chain more firmly.
- Points twist or lean: Make sure each net row starts in the center of the first loop. Then re-block with the tip pinned straight down.
- Header ruffles: Your header gauge is looser than the motif edge. Work Rows 1–4 with a hook 0.5 mm smaller.
- Header puckers at the seams: The joining slip stitches are tight. Redo the seams more loosely.
- The mesh count is off: Count 67 dc in Rows 2 and 3. A missed turning chain is the usual cause.
Care
Hand wash in cool water with mild soap and lay flat to dry. Re-pin the points if needed. Press lightly with a warm iron through a cloth to refresh the lace.
Final Notes
The whole valance depends on one measurement chain. Each motif square is 19 sts and 4 in (10.2 cm) per side. Seven motifs make 133 sts and 28 in (71.1 cm). Each point adds 3 in (7.6 cm), so the motifs are 7 in (17.8 cm) long, and the 1.5 in (3.8 cm) header brings the valance to 8.5 in (21.6 cm). Check the first motif carefully, and every later step will line up.
To make a wider valance, add motifs in pairs. The total stays odd, so the mesh header still works: 9 motifs give 171 sts and 36 in (91.4 cm).
Happy crocheting!