

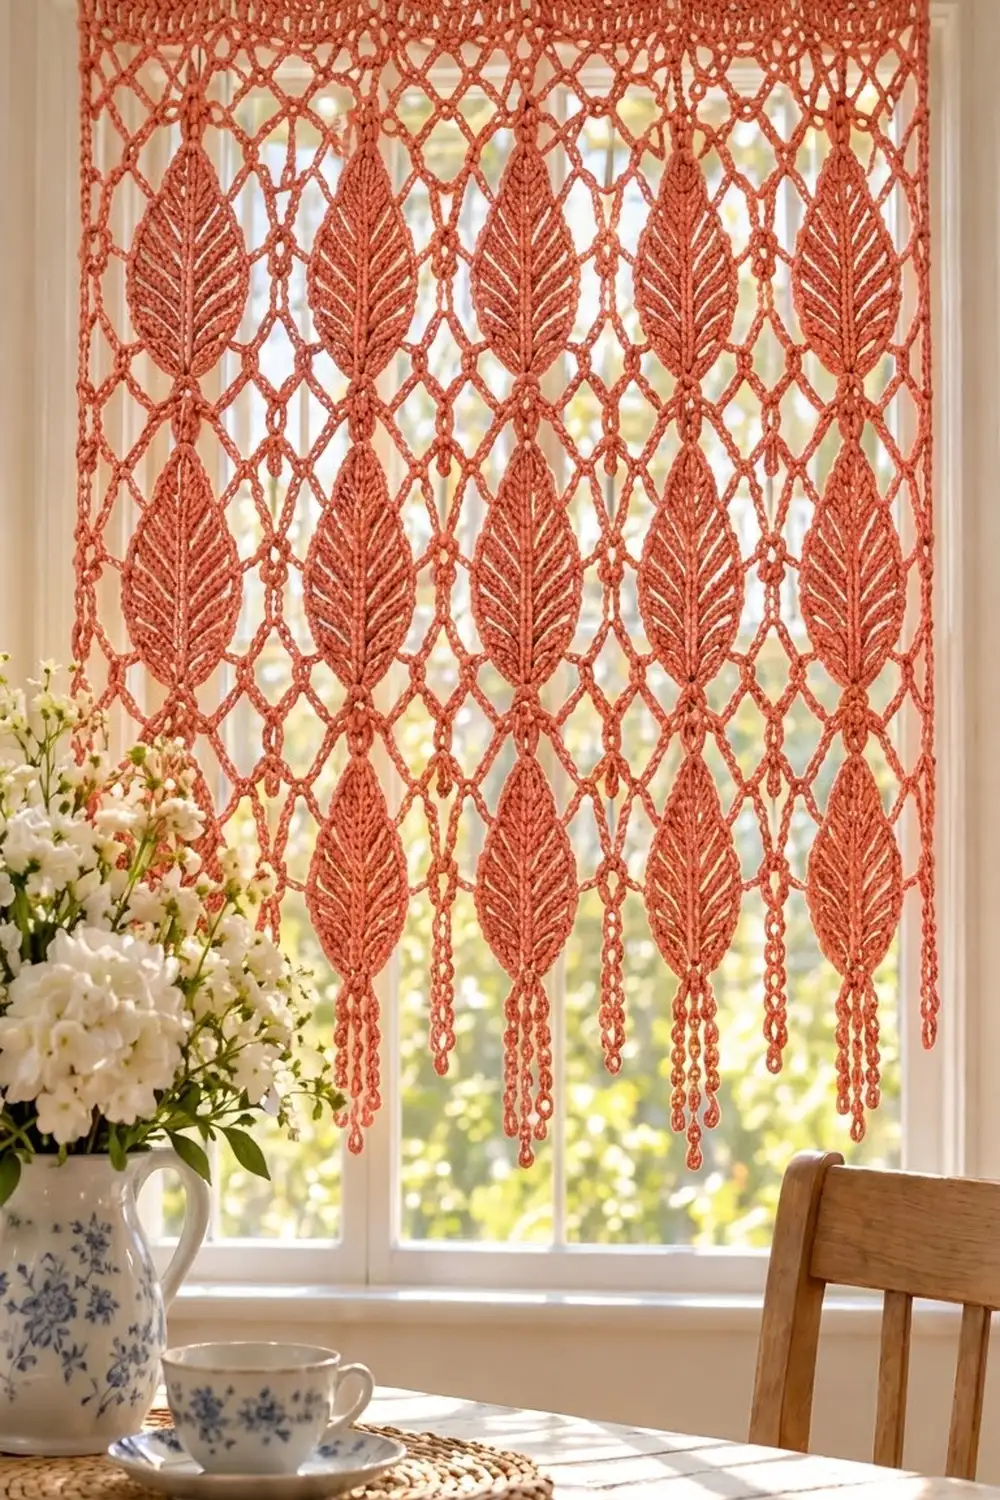
The Coral Grove Leaf Curtain is a lace window panel in warm terracotta coral. Fifteen ridged leaves hang in five columns inside an open diamond mesh. Small knotted rings mark every mesh junction, and a fringe of chain strands ending in tiny rings softens the bottom edge.
The look is boho and airy, but the construction is orderly. The leaves get their herringbone ridges from back-loop single crochet, and a slip-stitch vein runs up the center of each one. The header band has gentle arches between nine hanging loops, so the panel hangs straight from standard curtain rings.
This pattern uses US crochet terms. The finished panel measures 30¼ in (76.8 cm) wide by 34 in (86.4 cm) long including the fringe.
To make it, you crochet the header band and the mesh net as one piece, worked from the top down. Then you make 15 leaves separately and tack them onto the net. Last, you add the side edging, the arched hanging edge and the fringe.
Finished Size and Construction
- Finished size: 30¼ in (76.8 cm) wide × 34 in (86.4 cm) long, including the 2 in (5.1 cm) header and the 7 in (17.8 cm) fringe
- Skill level: Intermediate
- Terminology: US
- Yarn weight: Worsted (#4) cotton
- Hook: 5.0 mm (H-8)
- Number of pieces: 16 (1 net panel and 15 leaves)
- Layout: 5 columns × 3 tiers of leaves
- Large leaf: 4 × 8 in (10.2 × 20.3 cm), 10 needed
- Small leaf: 3 × 6 in (7.6 × 15.2 cm), 5 needed
- Body size before border: 30¼ × 26¾ in (76.8 × 67.9 cm), which is the header body plus the net
- Border depth: top trim 0.25 in (0.6 cm), side edging 1 sc wide, fringe 7 in (17.8 cm)
Materials
Yarn: Use a smooth, mercerized or combed worsted cotton, about 190 m per 100 g. Cotton holds the leaf ridges crisply and doesn’t stretch out of shape in sunlight the way acrylic can.
- Coral (terracotta coral): 250 g, about 475 m
The quantities include a margin of about 45%. The panel itself uses about 172 g.
Tools:
– 5.0 mm (H-8) crochet hook
– Yarn needle
– Locking stitch markers (about 20)
– Tape measure
– Rust-proof pins and a blocking surface
– Spray bottle
– 9 curtain rings or rod clips
Abbreviations (US Terms)
- ch: chain
- sl st: slip stitch
- sc: single crochet
- hdc: half double crochet
- dc: double crochet
- BLO: back loop only
- sk: skip
- st(s): stitch(es)
Special stitch: Knot. Work (sc, ch 3, sc) all in the same stitch. A knot counts as 1 anchor point.
Gauge and Checkpoints
- Solid gauge: 16 sc × 18 rows = 4 in (10.2 cm)
- Chain gauge: 4 ch = 1 in (2.5 cm)
- Mesh gauge: one 6-stitch loop repeat = 1.5 in (3.8 cm) wide, and each net row = about 1 in (2.5 cm) tall when hung
Test one large leaf first. It uses every gauge-sensitive skill in the pattern.
- After Row 1, the leaf should be about 7.75 in (19.7 cm) long.
- After Row 5, it should be about 2.25 in (5.7 cm) wide.
- After Row 9, it should be 4 × 8 in (10.2 × 20.3 cm).
If the leaf is too big, go down 0.5 mm in hook size. If it is too small, go up 0.5 mm. Then check the header: Row 1 must measure 30¼ in (76.8 cm).
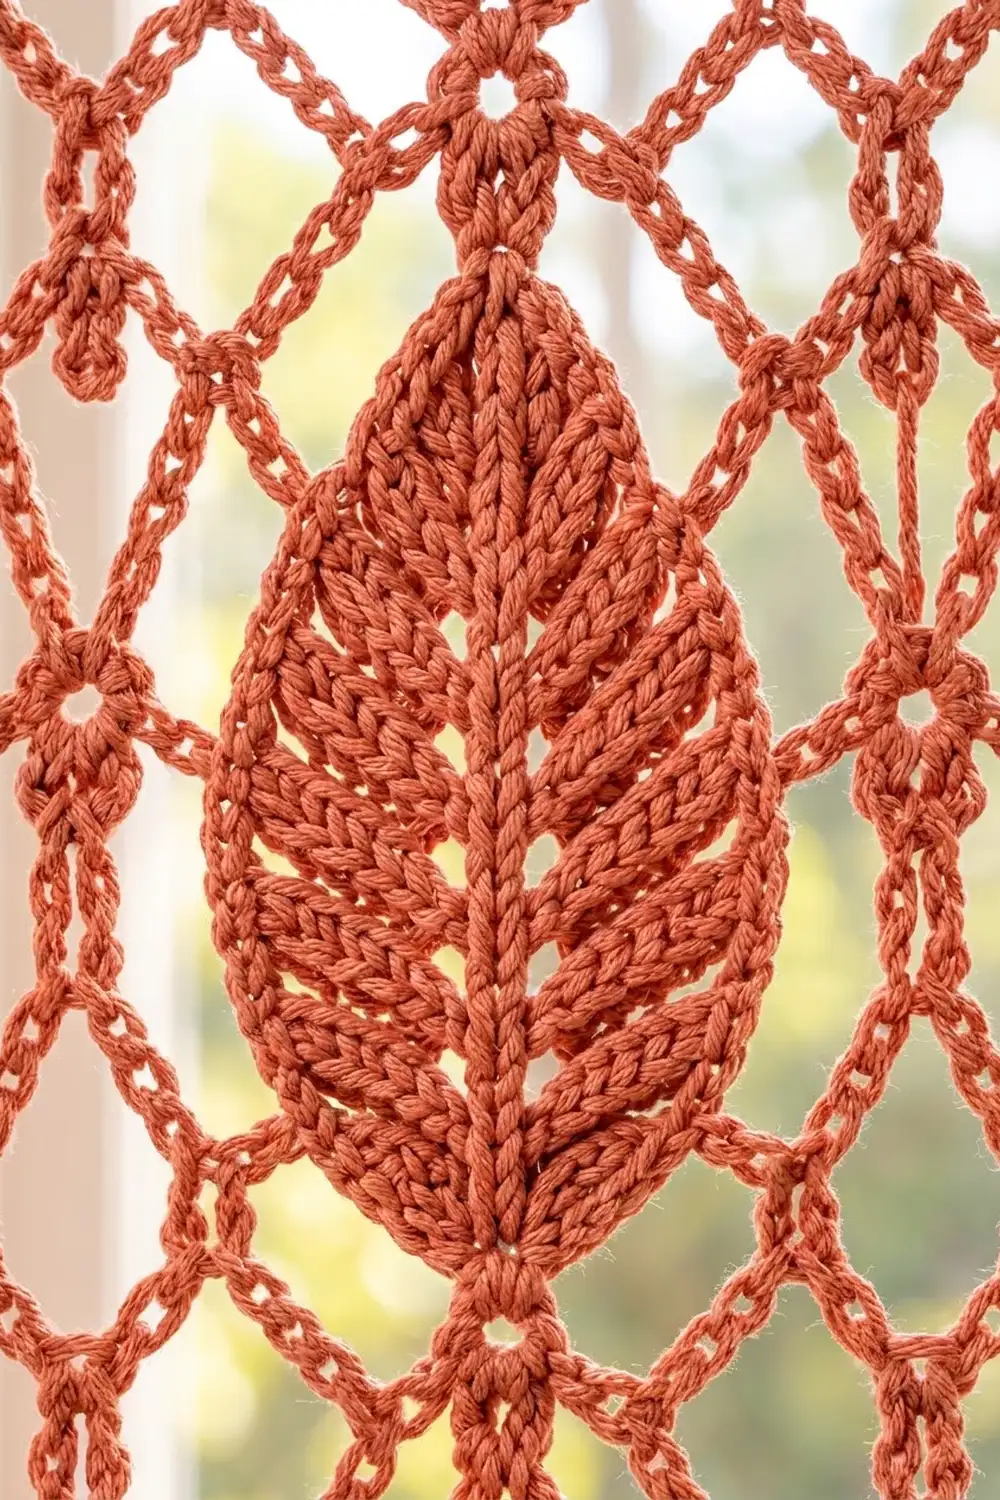
Large Leaf (make 10)
You work the leaf around both sides of a foundation chain. Each row turns around the tip and leaves 3 stitches unworked at the base. This builds the stepped, rounded base and the ridged herringbone texture.
Ch 31.
Row 1: Sc in the 2nd ch from the hook and in the next 28 ch. Work 3 sc in the last ch (this is the tip). Working along the opposite side of the foundation chain, sc in each of the next 29 ch. (61 sts)
Row 2: Ch 1 and turn. Working in BLO, sc in each st up to the center sc of the tip. Work 3 sc in the center sc. Sc in each st down the other side, leaving the last 3 sts unworked. (60 sts)
Rows 3–9: Repeat Row 2. Each row gains 2 stitches at the tip and leaves 3 unworked, so each row has 1 stitch fewer than the row before.
| Row | Stitches |
|---|---|
| 3 | 59 sts |
| 4 | 58 sts |
| 5 | 57 sts |
| 6 | 56 sts |
| 7 | 55 sts |
| 8 | 54 sts |
| 9 | 53 sts |
Fasten off, leaving an 18 in (45.7 cm) tail for tacking.
Vein: Join yarn at the base. Surface sl st along the foundation-chain line to the tip, working about 30 sl sts. Fasten off and weave in the ends.
Small Leaf (make 5)
Ch 23.
Row 1: Sc in the 2nd ch from the hook and in the next 20 ch. Work 3 sc in the last ch. Sc in each of the 21 ch along the opposite side. (45 sts)
Rows 2–7: Work the same as Large Leaf Row 2.
| Row | Stitches |
|---|---|
| 2 | 44 sts |
| 3 | 43 sts |
| 4 | 42 sts |
| 5 | 41 sts |
| 6 | 40 sts |
| 7 | 39 sts |
Checkpoints: About 5.75 in (14.6 cm) long after Row 1. The finished leaf measures 3 × 6 in (7.6 × 15.2 cm).
Leave an 18 in (45.7 cm) tail. Add the vein the same way as on the large leaf, using about 22 sl sts.
Header Band
Ch 122.
Row 1: Sc in the 2nd ch from the hook and in each ch across. (121 sc)
Checkpoint: Row 1 should measure 30¼ in (76.8 cm).
Row 2: Ch 3 (counts as dc) and turn. Dc in each st across. (121 dc)
Row 3: Ch 1 and turn. Sc in each st across. (121 sc)
Rows 4–5: Repeat Rows 2–3. (121 sts in each row)
Checkpoint: The header body should be about 1.75 in (4.4 cm) deep. Don’t fasten off. Continue straight into the net.
Mesh Net
The net has 25 rows.
- Odd rows have 21 anchors (sc or knots) and 20 ch-9 loops.
- Even rows have 20 knots, 19 full loops and a half loop at each end.
Row 1: Ch 1 and turn. Sc in the first st. Ch 9, sk 5 sts, sc in the next st. Repeat from * to * 20 times. (21 sc, 20 loops)
This row uses 1 + (20 × 6) = 121 sts, so it fits the header exactly.
Row 2 (even): Ch 7 (counts as dc and ch 4) and turn. Work a knot in the 5th ch of the first loop. Ch 9, work a knot in the 5th ch of the next loop. Repeat from * to * 19 times. Ch 4, then dc in the last sc. (20 knots, 19 full loops, 2 half loops)
Row 3 (odd): Ch 1 and turn. Sc in the first dc. Ch 9, work a knot in the 5th ch of the next full loop. Repeat from * to * 19 times. Ch 9, then sc in the 3rd ch of the turning chain. (2 sc and 19 knots = 21 anchors, 20 loops)
Rows 4–25: Repeat Rows 2–3 eleven more times. End after an odd row, Row 25. Fasten off.
Checkpoints:
| After | Depth below header |
|---|---|
| Row 5 | 5 in (12.7 cm) |
| Row 11 | 10 in (25.4 cm) |
| Row 25 | 25 in (63.5 cm) |
Measure with the piece hanging, or pinned under light tension. The header body and net together measure 30¼ × 26¾ in (76.8 × 67.9 cm).
Make All Pieces
- Large leaves: 10
- Small leaves: 5
- Net panel: 1
All pieces are coral.
Column:   1    2    3    4    5
Tier 1:   L    L    L    L    L
Tier 2:   L    L    L    L    L
Tier 3:   S    S    S    S    S
Each column is 6 in (15.2 cm) wide, so a 4 in (10.2 cm) leaf leaves 1 in (2.5 cm) of open mesh on each side.
The column centers fall on anchors 3, 7, 11, 15 and 19 of the odd rows, counting from the right edge with Row 1 facing. These anchors sit 3, 9, 15, 21 and 27 in (7.6, 22.9, 38.1, 53.3 and 68.6 cm) from that edge.
Mark these five anchors in Rows 3, 11, 19 and 25 with stitch markers.
Joining
Lay the net flat with the header at the top. Place each leaf base up and tip down.
| Tier | Base tacked to | Tip tacked to | Position below header |
|---|---|---|---|
| 1 | Row 3 anchor | Row 11 anchor | 2–10 in (5.1–25.4 cm) |
| 2 | Row 11 anchor | Row 19 anchor | 10–18 in (25.4–45.7 cm) |
| 3 (small) | Row 19 anchor | Row 25 anchor | 18–24 in (45.7–61.0 cm) |
Leaves in tiers 1 and 2, and in tiers 2 and 3, share an anchor. This creates the base-to-tip knot you see in the photo.
How to tack each leaf: Use the leaf’s tail and a yarn needle.
- Tack the center base stitch to the column anchor with 3 small whipstitches.
- Tack the center tip stitch to the lower anchor the same way.
- At the widest point on each side, tack the outer edge stitch to the nearest mesh chain with 2 whipstitches.
That gives 4 tack points per leaf, 60 in total.
Tension: Keep the leaf sitting on the mesh without pulling the chains toward it. If the diamonds next to a leaf pucker, loosen the stitches.
Checkpoint: The body should still measure 30¼ × 26¾ in (76.8 × 67.9 cm).
Border
The border goes onto the net panel only, so the leaves don’t change any border counts. Border gauge is the same as the solid gauge: 4 sc = 1 in (2.5 cm).
Step 1: Side edging. With the right side facing, join yarn at the top of the right side edge and work down to the bottom.
- Header rows: 1 sc around each sc row-end and 2 sc around each dc row-end. That is 3 × 1 + 2 × 2 = 7 sc.
- Net: 4 sc around each row-end stitch (each sc or dc and its turning chain). That is 25 × 4 = 100 sc.
- Total: 107 sc. Fasten off.
Repeat on the left side, working from the bottom to the top. (107 sc per side)
Why it works: 107 ÷ 4 = 26.75 in (67.9 cm), which matches the 1.75 in (4.4 cm) header plus the 25 in (63.5 cm) net. The sides won’t flare or pull in.
Step 2: Arched hanging edge. Join yarn in the first free loop of the foundation chain on the top of the header.
- Loop st: (sc, ch 10, sl st in the same st). The loop drops about 1.25 in (3.2 cm), which is enough room for a curtain ring.
- Pattern: Loop st in the first st. Sc in the next st, hdc in the next 2 sts, dc in the next 8 sts, hdc in the next 2 sts, sc in the next st, loop st in the next st. Repeat from * to * 8 times.
Count: 121 sts worked 1 per existing stitch, plus 9 ch-10 loops added. That is 9 loop sts and 8 × 14 arch sts = 121.
The loops sit 15 sts apart, which is 3.75 in (9.5 cm). Fasten off.
Step 3: Fringe. Join yarn in the 5th ch of the first ch-9 loop of Row 25.
- One strand: Ch 29, sl st in the 6th ch from the hook to form an end ring, then sl st in each of the 23 remaining ch back up to the loop.
- To continue: Sl st along the chain to the 5th ch of the next loop.
- Total: Repeat across for 20 strands, 4 per column.
Each strand measures 7 in (17.8 cm).
Final Blocking
- Lightly spray the whole panel with water until it is damp.
- Pin the body to 30¼ × 26¾ in (76.8 × 67.9 cm), starting with the four corners.
- Pin each net row straight across, keeping the diamonds even.
- Shape each leaf with your fingers, pressing the vein into a straight line and pinning the tip into a point.
- Lay the fringe straight and pin each end ring open.
- Pin the arches into even curves between the hanging loops.
- Let it dry completely, ideally for 24 hours.
Final Quality-Control Checklist
- [ ] The header has 121 sts and 9 evenly spaced loops.
- [ ] The net has 25 rows, with 21 anchors on every odd row.
- [ ] All 15 leaves are tacked at 4 points each.
- [ ] Leaves line up vertically, and each pair meets at a shared knot.
- [ ] Each side edge has 107 sc and lies flat.
- [ ] There are 20 fringe strands, each 7 in (17.8 cm) long.
- [ ] The total length is 34 in (86.4 cm).
- [ ] All ends are woven in securely.
Troubleshooting
- The header is wider than 30¼ in (76.8 cm): Your chain is loose. Redo Row 1 with a smaller hook for the foundation only.
- The diamonds look flat instead of diamond-shaped: You may have skipped too many stitches in Row 1. Check that every repeat is ch 9, sk 5.
- The leaf curls: Your BLO rows are tight. Go up 0.5 mm in hook size, or block the leaf firmly.
- The leaf base looks lopsided: Make sure you leave exactly 3 sts unworked at the end of every row.
- The fringe twists: Slip stitch loosely back up the chain, then steam it lightly.
- The panel sags between rings: Some dip is normal. If it bothers you, add a ring at the center of each arch.
Care
Hand wash in cool water with mild soap. Press out the water in a towel and dry flat, pinning to the blocked measurements. Wash and dry away from direct sun to protect the coral color.
Final Notes
The measurement chain is simple:
- A 4-stitch-per-inch gauge gives a 121-stitch header that measures 30¼ in (76.8 cm).
- That header holds 20 mesh repeats of 1.5 in (3.8 cm) each.
- 25 net rows of 1 in (2.5 cm) frame three tiers of leaves: 8 in, 8 in and 6 in (20.3, 20.3 and 15.2 cm).
- 107 edge stitches per side match the 26¾ in (67.9 cm) body.
- The 2 in (5.1 cm) header and 7 in (17.8 cm) fringe bring the panel to 34 in (86.4 cm).
Check each stage against these numbers and the panel will hang straight in your window.
Happy crocheting!