

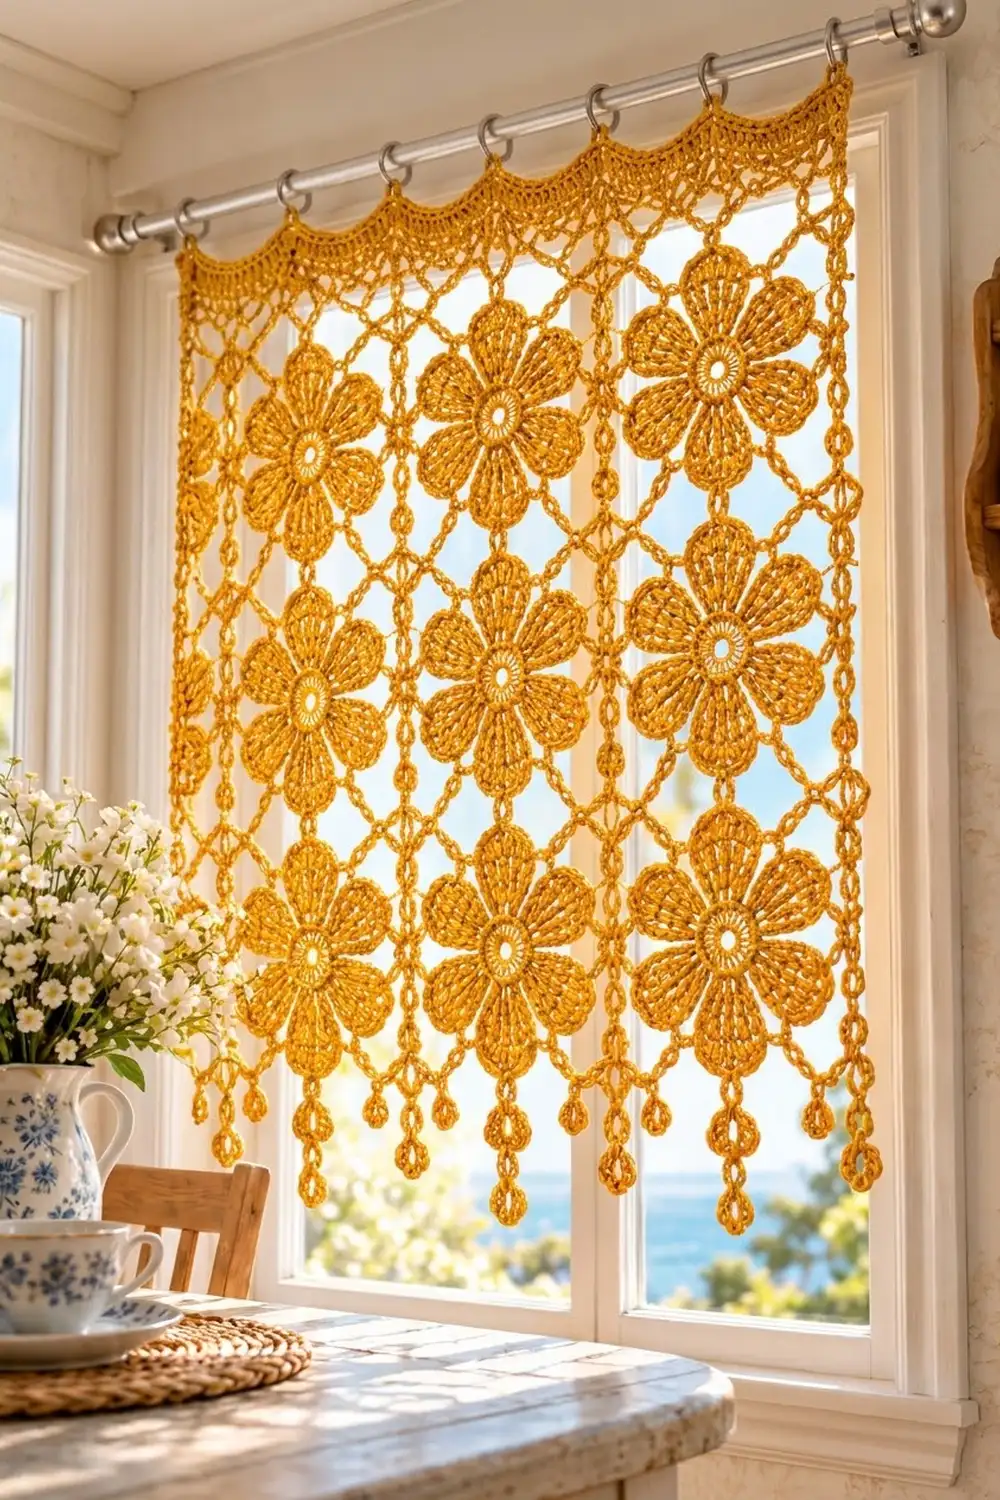
This café curtain brings a window to life with nine mustard-yellow daisies set in an airy chain mesh. Light pours through the open net between the flowers, while the solid petals give the panel enough body to hang neatly.
The design uses one color, a warm mustard cotton, so it looks bright but not busy. A scalloped header across the top and a row of chain-and-ring dangles along the bottom give it a vintage cottage feel that suits a kitchen, bathroom, or cabin window.
The pattern is written in US crochet terms. The finished panel measures about 18.5 in (47.0 cm) wide and 20.25 in (51.4 cm) long from the top of the scallops to the bottom edge, or about 24 in (61.0 cm) including the longest dangles.
Construction is simple. You crochet nine flower motifs in the round, each ending in a square chain-loop frame. Motifs 2 through 9 are joined as you go on their last round. One round of single crochet then firms all four edges, a three-row header goes along the top, and a fringe row with dangles finishes the bottom.
Finished Size and Construction
- Finished size: 18.5 in (47.0 cm) wide x 20.25 in (51.4 cm) long, plus dangles up to 3.75 in (9.5 cm)
- Skill level: Intermediate
- Terminology: US crochet terms
- Yarn weight: DK / light (#3), cotton or cotton blend
- Hook: 4.0 mm (US G-6)
- Number of pieces: 9 flower motifs
- Layout: 3 motifs across x 3 motifs down
- Motif size: 6 x 6 in (15.2 x 15.2 cm), blocked
- Size before border: 18 x 18 in (45.7 x 45.7 cm)
- Border depth: 0.25 in (0.6 cm) on the sides; 1.75 in (4.4 cm) in total at the top including the header; 0.5 in (1.3 cm) at the bottom plus dangles
Materials
Choose a smooth mercerized or combed cotton in DK weight. Cotton holds the petal shape, keeps the mesh crisp, and stands up to sunlight and washing better than acrylic. Avoid fuzzy yarns, because they blur the open net.
- Mustard yellow: 150 g, about 340 m (372 yd) of DK cotton (based on 225 m per 100 g)
These quantities include a margin of about 20 percent for swatching and gauge differences.
Tools:
- 4.0 mm (US G-6) crochet hook
- Tapestry needle
- Stitch markers (4–6)
- Scissors
- Rustproof pins and a blocking mat
- Spray bottle
- 12 curtain clip rings and a tension rod or café rod
Abbreviations (US Terms)
- ch – chain
- sl st – slip stitch
- sc – single crochet
- hdc – half double crochet
- dc – double crochet
- tr – treble crochet (yo twice)
- dtr – double treble crochet (yo 3 times, insert hook, pull up a loop, [yo, pull through 2 loops] 4 times)
- sp – space
- st(s) – stitch(es)
- RS / WS – right side / wrong side
Special stitch – Drop dangle: Ch the stated number, sl st in 6th ch from hook to form a ring, work 9 sc into the ring, sl st in first sc of the ring, then sl st in each remaining ch back up the stem, and sl st into the base sc.
Gauge and Checkpoints
Make one complete motif before anything else, then wet block it. Gauge matters here because nine motifs multiply any small difference by three in each direction.
Checkpoints for one motif (lightly stretched flat):
- After Round 1: about 1.25 in (3.2 cm) across
- After Round 2: about 2.25 in (5.7 cm) across
- After Round 3: flower about 4.75 in (12.1 cm) across, tip to tip
- After Round 4: about 5.5 in (14.0 cm) across
- After Round 5, blocked: 6 x 6 in (15.2 x 15.2 cm)
Border gauge: about 19 sc = 4 in (10.2 cm), which is 29 sc per 6 in (15.2 cm) motif side.
If your blocked motif is larger than 6.25 in (15.9 cm), go down one hook size. If it is smaller than 5.75 in (14.6 cm), go up one hook size. The tall stitches in Round 3 stretch more than you expect, so measure after blocking, not straight off the hook.
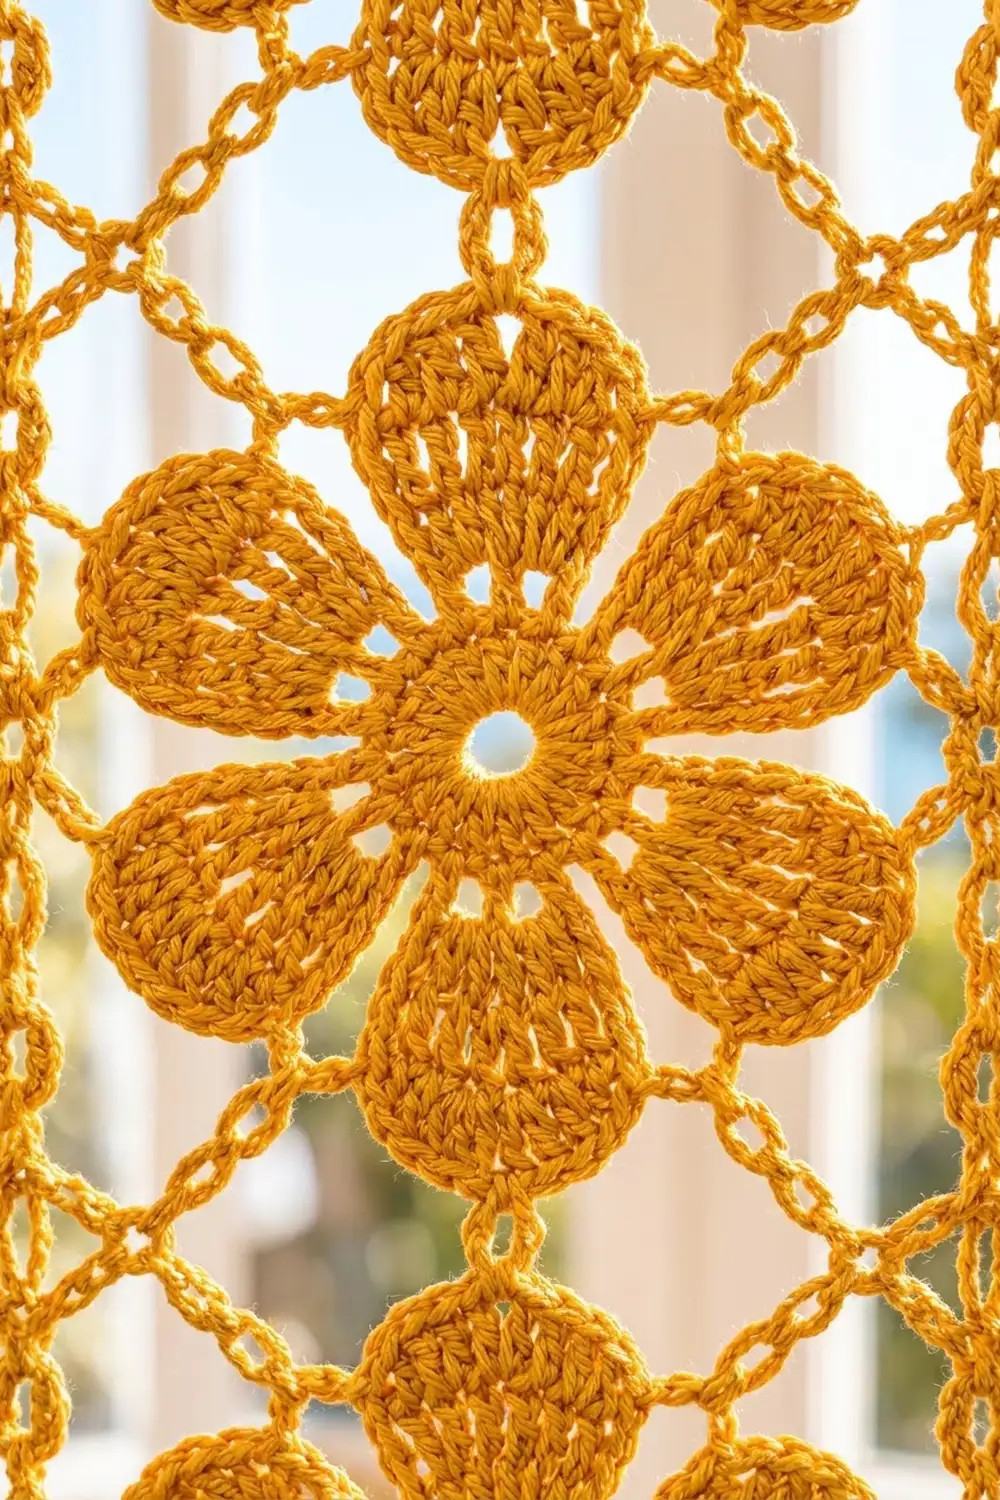
Flower Motif (make 9)
Round 1: Make a magic ring. Ch 3 (counts as dc), 17 dc in ring. Pull the ring closed, leaving a small open center. Sl st in top of ch-3 to join. (18 dc)
Round 2: Ch 1, sc in same st, ch 5, skip next 2 dc, sc in next dc, ch 5, skip next 2 dc; repeat from * 4 more times. Sl st in first sc to join. (6 sc, 6 ch-5 sps)
Round 3 (petals): Sl st in first ch-5 sp. In each ch-5 sp around, work (sc, hdc, 2 dc, 5 tr, 2 dc, hdc, sc). Sl st in first sc to join. (6 petals, 13 sts each, 78 sts)
The petal tip is the 3rd tr, which is the 7th stitch of each petal. Mark one tip.
Round 4 (anchor round): Sl st in each of next 6 sts to reach the first petal tip. Ch 1, sc in same st, ch 6, dtr in the Round 2 sc between this petal and the next (insert the hook between the 2 petals), ch 6, sc in tip of next petal, ch 6, dtr in Round 2 sc between petals, ch 6; repeat from * 4 more times. Sl st in first sc to join. (6 sc, 6 dtr, 12 ch-6 loops; 84 sts)
You now have 12 anchor stitches: 6 petal tips and 6 dtr between petals. The dtr rises close to petal height, so the outline stays round.
Round 5 (square frame): Ch 1. In the same sc work (sc, ch 3, sc) for the first corner. [Ch 6, sc in next ch-6 loop] 3 times, ch 6, (sc, ch 3, sc) in the next anchor st for corner; repeat from * 2 more times, then [ch 6, sc in next ch-6 loop] 3 times, ch 6, sl st in first sc to join. Fasten off.
The corners fall on petal tip 1, the dtr between petals 3 and 4, petal tip 4, and the dtr between petals 6 and 1, so they are spaced 3 anchors apart. Your stitch markers help here.
Stitch count for Round 5: Each side is corner sc, ch 6, sc, ch 6, sc, ch 6, sc, ch 6, corner sc. That is 5 sc + 24 ch = 29 sts per side, including both corner sc. The ch-3 corner spaces are not part of that count. Round total: 4 x 29 + 4 x 3 = 128 sts (20 sc, 16 ch-6 loops, 4 ch-3 corners).
Number the stitches of one side 1 to 29. The corner sc are sts 1 and 29, and the mesh anchors are sts 8, 15, and 22. You will use these positions for the fringe.
Make All Pieces
Make Motif 1 complete. Make Motifs 2–9 through Round 4, then join them on Round 5.
- Mustard yellow: 9 motifs
Layout grid (front view):
[1] [2] [3]
[4] [5] [6]
[7] [8] [9]
Joining
Use join-as-you-go on Round 5, in the order shown in the grid. Work each new motif’s Round 5 as written until you reach the side that touches a finished motif.
Joining a ch-6 loop: Ch 3, sl st into the matching ch-6 loop of the finished motif, ch 3. The loop still holds 6 ch, so stitch counts do not change.
Joining a corner: Instead of ch 3, work ch 1, sl st into the neighbor’s corner ch-3 sp, ch 1. Where four motifs meet, sl st into the same point the earlier joins used, so all four corners share one join.
Stitch-to-stitch logic: Each joined side has 4 loops matched to 4 loops and 3 sc lined up opposite 3 sc. Corner meets corner. Nothing is added or skipped, so the diamond mesh continues evenly from one motif into the next.
Tension: Keep the joining sl st loose, the same height as a chain. A tight sl st pulls the loops into a pucker and narrows the panel.
Size checkpoint: Lay the joined panel flat. It should measure 18 x 18 in (45.7 x 45.7 cm), with every motif 6 in (15.2 cm) square. Fix any size problem now, before adding the border.
Border
Border gauge: about 19 sc = 4 in (10.2 cm), so 29 sc fill one 6 in (15.2 cm) motif side.
Round 1 (all four sides): With RS facing, join yarn in any outer corner sc. Ch 1, sc in each sc and each ch along the edge. At each seam between motifs, skip the joined corner spaces and go straight from one motif’s corner sc to the next motif’s corner sc. At each of the 4 outer corners, ch 2 over the corner ch-3 sp. Sl st in first sc to join. Fasten off.
- Each side: 3 motifs x 29 sts = 87 sc
- Round total: 4 x 87 = 348 sc + 4 ch-2 corners
No stitches are added at the seams. The corner sc are already part of each motif’s 29, so they are not counted again.
Header Row 2 (top edge only, RS): Join yarn in the first sc of the top edge. Ch 3 (counts as dc), dc in each sc across. Turn. (87 dc)
Header Row 3 (WS, conversion row): Ch 1, 2 sc in first dc, sc in each of next 85 dc, 2 sc in last dc. Turn. (87 sc worked one per dc + 2 extra sc = 89 sc)
Header Row 4 (RS, scallops): Ch 1, sc in first sc, skip next 3 sc, 9 dc in next sc, skip next 3 sc, sc in next sc; repeat from * 10 more times. Fasten off. (11 scallops; 12 sc + 99 dc = 111 sts)
Why the header math works: Each scallop uses an 8-stitch repeat, and the row needs one extra sc to close it, so the row needs a multiple of 8 plus 1. 87 does not fit, but 87 + 2 = 89 = 8 x 11 + 1. The two extra sc at the ends also square the top corners slightly.
Fringe Row (bottom edge only, RS): Join yarn in the first sc of the bottom edge. Ch 1, sc in each sc across. In the following sts, work a drop dangle right after the sc:
- Long dangle (ch 21: 6-ch ring + 15-ch stem) in sts 15, 44, and 73
- Short dangle (ch 15: 6-ch ring + 9-ch stem) in sts 8, 22, 37, 51, 66, and 80
Fasten off. (87 sc, 3 long and 6 short dangles)
Why the fringe math works: Motif 2 starts at st 30 and Motif 3 at st 59. The anchors at sts 8, 15, and 22 of each motif land at 8/15/22, 37/44/51, and 66/73/80. That puts every dangle directly below a mesh point, with the long one centered under each flower.
Final Blocking
- Weave in all ends along the dc or sc rows, not through the open mesh.
- Soak the panel in cool water for 10 minutes, then press out the water in a towel. Do not wring.
- Lay it flat on a blocking mat, RS up.
- Pin the four corners so the panel is 18.5 in (47.0 cm) wide and 18.5 in (47.0 cm) tall between the outer edges of Border Round 1.
- Pin each motif corner so each square measures 6 in (15.2 cm).
- Open each petal with your fingers and smooth it into a rounded fan shape.
- Pin each scallop into a neat arch and pull each dangle straight down.
- Let it dry completely, at least 24 hours, before unpinning.
Final Quality-Control Checklist
- Nine motifs, each 6 x 6 in (15.2 x 15.2 cm)
- Every flower has 6 petals and an open center
- All 12 joined sides lie flat, with no puckered loops
- Border Round 1 has 87 sc on each side
- Header has 87 dc, 89 sc, and 11 even scallops
- Fringe row has 87 sc, with 9 dangles under the mesh points
- Panel is 18.5 in (47.0 cm) wide and 20.25 in (51.4 cm) long, not counting dangles
- All ends are woven in and trimmed
Troubleshooting
Petals curl forward: Your Round 2 loops are too short. Loosen the ch-5 or use ch 6.
Motif is not square: Check that the corners fall exactly 3 anchors apart in Round 5, then block firmly at the corners.
Mesh puckers at joins: The joining sl st is too tight. Rework it loosely.
Top edge ruffles: You have too many sts. Recount the 87 sc in Round 1, or go down a hook size for the header.
Top edge pulls in: Go up a hook size for Row 2 only.
Dangles twist: Wet them and pin them straight while blocking.
Panel too wide or narrow: Fix motif gauge first. The border cannot correct a size problem in the motifs.
Care
Hand wash in cool water with mild soap, roll in a towel, and dry flat, re-pinning the scallops if needed. Cotton may fade in strong sun, so rotate the curtain now and then.
Final Notes
The measurement chain is simple. A 6 in (15.2 cm) motif with 29 sts per side, times 3 motifs, gives an 18 in (45.7 cm) panel with 87 sc per side. The border brings the width to 18.5 in (47.0 cm). The top adds 1.75 in (4.4 cm) including the header, and the bottom border and fringe row add 0.5 in (1.3 cm), for a length of 20.25 in (51.4 cm). The long dangles hang another 3.75 in (9.5 cm). Check each step against these numbers and the curtain will hang straight and even.
Clip one ring at each of the 12 sc valleys between the scallops, slide the rings onto your rod, and enjoy the sunshine through the daisies.
Happy crocheting!