

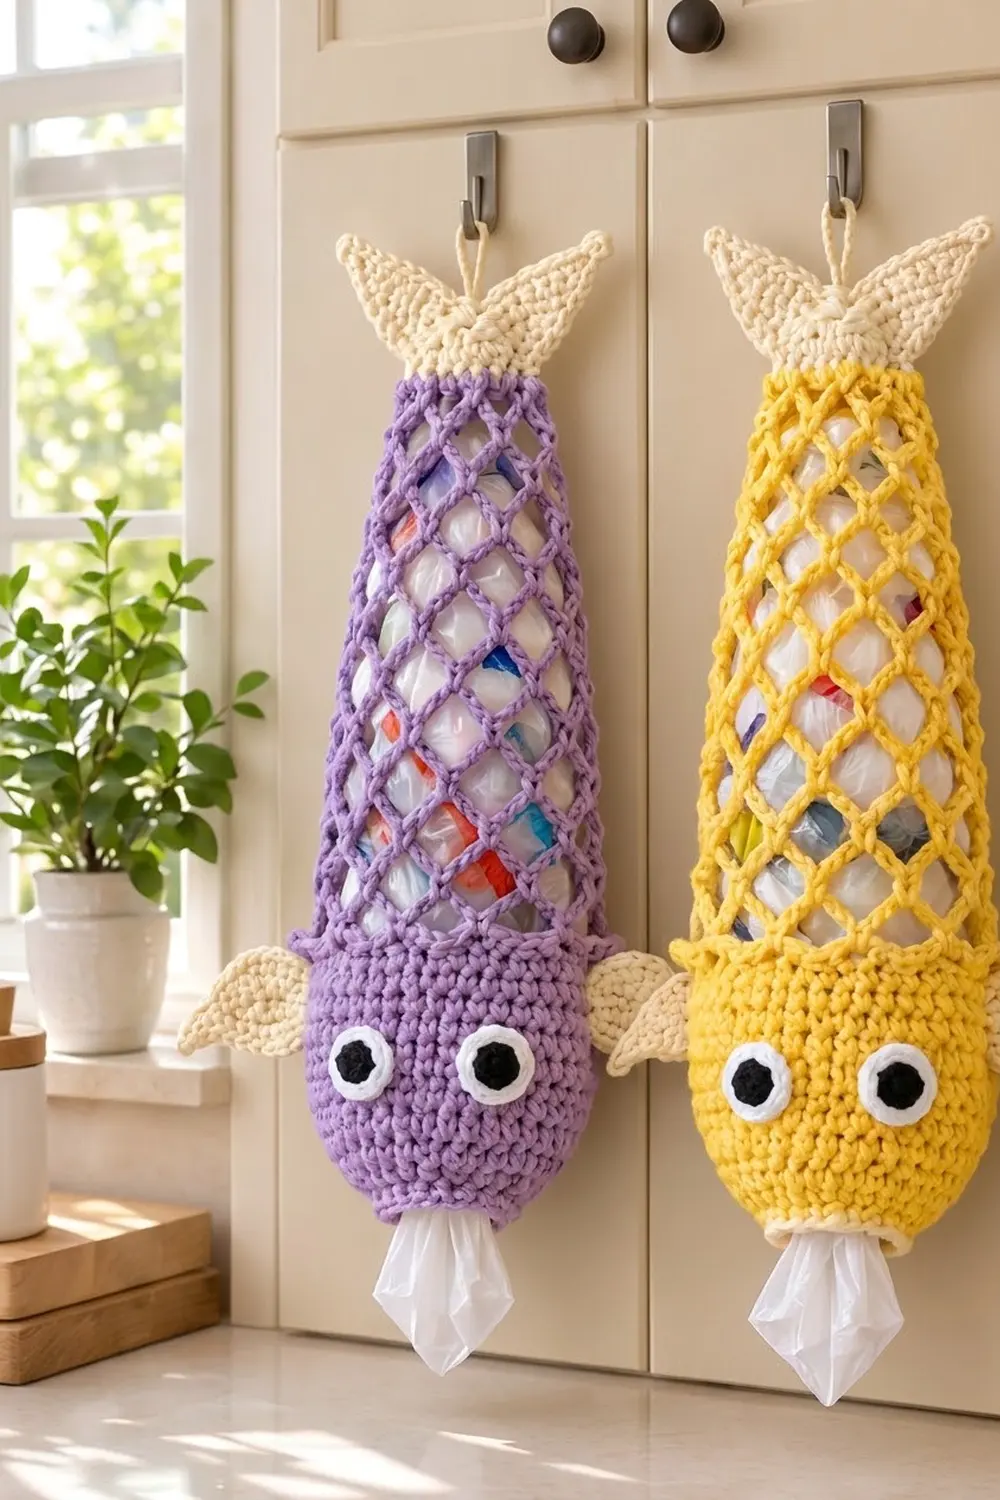
Plastic grocery bags pile up fast. This holder turns the pile into a cheerful lavender fish that hangs from a cabinet hook. You stuff bags in through the open mesh body and pull them out one at a time through the round mouth at the bottom.
The fish has a solid single crochet head, a diamond-mesh body, and a cream tail band that ends in a two-pointed tail with a hanging loop. Two cream leaf-shaped side fins and two white-and-black eyes are sewn to the head. It looks just as good in sunny yellow.
This pattern uses US crochet terms. Not counting the hanging loop, the finished fish is about 20.75 in (52.7 cm) long. It is 7 in (17.8 cm) wide at the head and 10.5 in (26.7 cm) across the side fins.
You work the head upward from the mouth in joined rounds, then switch to chain-loop mesh and taper it. Next you change to cream for the band and tail. The fins and eyes are made separately and sewn on, and a short edging finishes the mouth.
Finished Size and Construction
- Finished size: 20.75 in (52.7 cm) long x 7 in (17.8 cm) wide at the head; 10.5 in (26.7 cm) across the fins
- Skill level: Easy / advanced beginner
- Terminology: US crochet terms
- Yarn weight: Medium worsted (#4) cotton or cotton blend
- Hook: 5.0 mm (US H-8)
- Number of pieces: 1 continuous body (head, mesh, band, tail), plus 2 side fins and 2 eyes sewn on
- Layout: Vertical; hangs from the tail loop with the mouth at the bottom
- Piece sizes: Head 4 in (10.2 cm) tall; mesh 13.25 in (33.7 cm); band about 1 in (2.5 cm); tail about 2.25 in (5.7 cm); side fin 2.25 in (5.7 cm) x 1.5 in (3.8 cm); eye 1.25 in (3.2 cm) across
- Size before border: 20.5 in (52.1 cm) long
- Border depth: 0.25 in (0.6 cm), at the mouth only
Materials
Choose a smooth worsted-weight cotton or cotton blend. Cotton holds the mesh shape, doesn’t sag under the weight of bags, and stands up to washing. A yarn with about 170 m per 100 g matches these quantities.
- Lavender (main color): 70 g, 120 m
- Cream (fins and tail): 20 g, 35 m
- White (eye rings): 3 g, 5 m
- Black (eye centers): 2 g, 3 m
For the yellow version, use the same amount of yellow in place of the lavender.
Tools: 5.0 mm (US H-8) hook, tapestry needle, 2 stitch markers, scissors, measuring tape, rust-proof pins, spray bottle.
All quantities include a margin of about 15-20% for swatching and differences in tension.
Abbreviations (US Terms)
- ch: chain
- sl st: slip stitch
- sc: single crochet
- hdc: half double crochet
- dc: double crochet
- inc: 2 sc in the same stitch
- sc2tog: single crochet 2 together
- sp(s): space(s)
- st(s): stitch(es)
- rnd(s): round(s)
- picot: ch 3, sl st in first ch
Mesh round closing: To end a mesh round in the middle of a loop, replace the last loop with a shorter chain plus a taller stitch worked into the first sc:
– ch-5 loop: ch 2, dc
– ch-4 loop: ch 1, dc
– ch-3 loop: ch 1, hdc
The next round begins with an sc around the post of that stitch.
Gauge and Checkpoints
Solid gauge: 16 sc x 18 rnds = 4 in (10.2 cm).
Mesh gauge: 1 ch-5 diamond = about 1 in (2.5 cm) wide and 1 in (2.5 cm) tall, measured relaxed.
The head is your test piece. Check these measurements as you go:
- After Rnd 1: 6 in (15.2 cm) around; 3 in (7.6 cm) wide flattened.
- After Rnd 5: 14 in (35.6 cm) around; 7 in (17.8 cm) wide flattened.
- After Rnd 18: 4 in (10.2 cm) tall.
- After Rnd 28: mesh about 10 in (25.4 cm) tall.
- After Rnd 33: mesh about 13.25 in (33.7 cm) tall; 3.5 in (8.9 cm) wide flattened at the top.
Too big: go down to a 4.5 mm hook. Too small: go up to a 5.5 mm hook. The mouth checkpoint matters most, because a tight mouth makes bags hard to pull out.
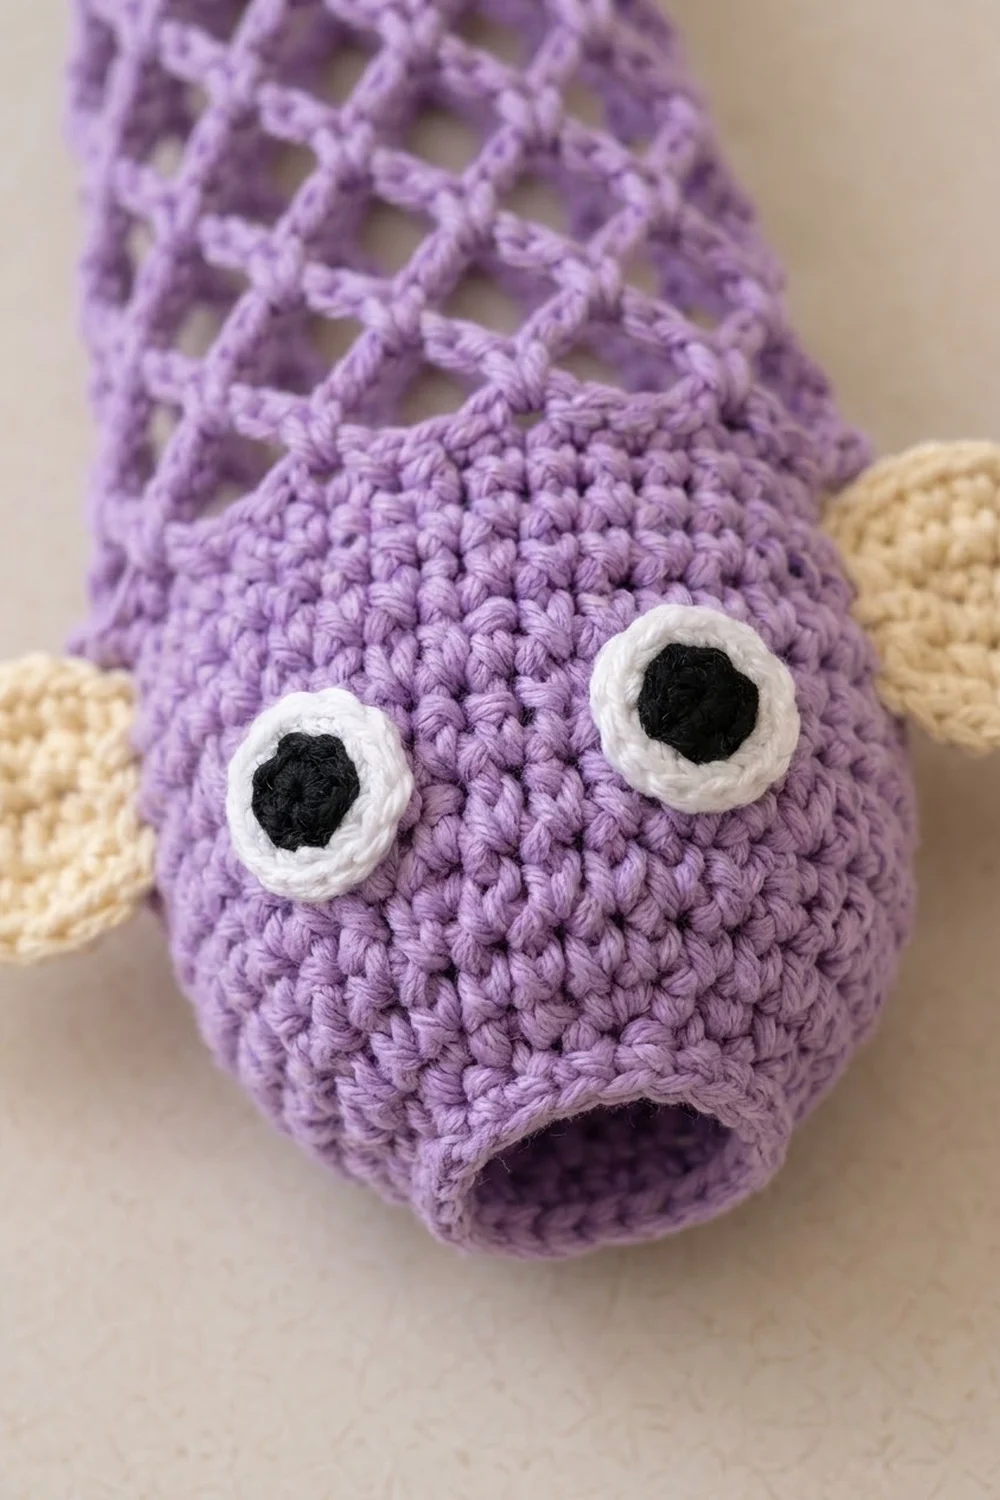
Head (Lavender)
Work in joined rounds from the mouth up, without turning. Join each round with a sl st to the first sc. Mark the first stitch.
Foundation: Ch 24, sl st to the first ch to form a ring, without twisting.
Rnd 1: Ch 1, sc in each ch around, join. (24 sts)
Rnd 2: Ch 1, [sc in next 2 sts, inc] 8 times, join. (32 sts)
Rnd 3: Ch 1, [sc in next 3 sts, inc] 8 times, join. (40 sts)
Rnd 4: Ch 1, [sc in next 4 sts, inc] 8 times, join. (48 sts)
Rnd 5: Ch 1, [sc in next 5 sts, inc] 8 times, join. (56 sts)
Check: 7 in (17.8 cm) wide flattened.
Rnds 6-18: Ch 1, sc in each st around, join. (56 sts each round)
The head is now a rounded dome with the small mouth open at the bottom, 4 in (10.2 cm) tall. Don’t fasten off.
Mesh Body (Lavender)
Every round keeps 14 loops. Only the loop length changes, and that is what narrows the tube.
Rnd 19 (setup): Ch 1, sc in first st, [ch 5, skip 3 sts, sc in next st] 13 times, ch 2, skip last 3 sts, dc in first sc. (14 sc + 14 loops)
Math check: 1 sc + (13 x 4) = 53 sts used, + 3 skipped under the closing loop = 56.
Rnds 20-28: Ch 1, sc around post of closing dc, [ch 5, sc in next ch-5 sp] 13 times, ch 2, dc in first sc. (14 loops each round)
Each sc sits in the middle of the loop below it, so the loops stagger into diamonds. Check: about 10 in (25.4 cm) of mesh.
Rnds 29-31: Ch 1, sc around post of closing dc, [ch 4, sc in next sp] 13 times, ch 1, dc in first sc. (14 loops each round)
Each round adds about 0.75 in (1.9 cm).
Rnd 32: Ch 1, sc around post of closing dc, [ch 3, sc in next sp] 13 times, ch 1, hdc in first sc. (14 loops)
Rnd 33: Ch 1, sc around post of closing hdc, [ch 3, sc in next sp] 13 times, ch 3, sl st to first sc. (14 loops)
Each ch-3 round adds about 0.5 in (1.3 cm). Fasten off lavender.
Check: 10 + 2.25 + 1 = 13.25 in (33.7 cm) of mesh, 3.5 in (8.9 cm) wide flattened at the top.
Tail Band (Cream)
Rnd 34 (conversion): Join cream in any ch-3 sp. Ch 1, 2 sc in each ch-3 sp around, join. (14 sc, 1 per space, + 14 extra sc = 28 sts)
At 4 sc per inch, 28 sts measure 7 in (17.8 cm) around. That matches the 3.5 in (8.9 cm) flattened width of Rnd 33.
Rnd 35: Ch 1, [sc in next 2 sts, sc2tog] 7 times, join. (21 sts)
Rnd 36: Ch 1, [sc in next st, sc2tog] 7 times, join. (14 sts)
Rnds 37-38: Ch 1, sc in each st around, join. (14 sts each round)
The gathered band is about 1 in (2.5 cm) tall and 1.75 in (4.4 cm) wide flattened.
Tail Fin (Cream)
Flatten the band so the joining seam sits at one side edge. You’ll have 7 sts on the front and 7 on the back.
Row 1: Ch 1, working through both layers, sc in each pair of sts across, turn. (7 sts) This row closes the top of the holder.
Row 2: Ch 1, 2 sc in first st, sc in next 5 sts, 2 sc in last st, turn. (9 sts)
Row 3: Ch 1, 2 sc in first st, sc in next 7 sts, 2 sc in last st, turn. (11 sts)
Row 4: Ch 1, 2 sc in first st, sc in next 9 sts, 2 sc in last st, turn. (13 sts)
The tail is now 3.25 in (8.3 cm) wide. Mark the center (7th) st. The tail splits as 6 + 1 center st + 6 = 13.
First lobe, Row 5: Ch 1, sc in next 6 sts, turn, leaving the rest unworked. (6 sts)
Row 6: Ch 1, sc2tog, sc in next 4 sts, turn. (5 sts)
Row 7: Ch 1, sc2tog, sc in next 3 sts, turn. (4 sts)
Row 8: Ch 1, sc2tog, sc in next 2 sts, turn. (3 sts)
Row 9: Ch 1, sc2tog, sc in next st, turn. (2 sts)
Row 10: Ch 1, sc2tog. (1 st) Fasten off.
The decreases fall on alternating edges, which shapes a pointed triangle.
Second lobe: Skip the marked center st. Join cream in the next st and repeat Rows 5-10 over the last 6 sts. Fasten off.
Hanging loop: Join cream in the center st of Row 4. Ch 16, sl st in the same st, fasten off. The loop stands about 2 in (5.1 cm) tall between the lobes, and the finished tail is about 2.25 in (5.7 cm) tall.
Side Fins (Make 2, Cream)
Ch 9.
Rnd 1: Starting in the 2nd ch from the hook, work sc, hdc, then dc in each of the next 3 chs, then hdc, sc, and 3 sc in the last ch. Working along the other side of the chain, work sc, hdc, then dc in each of the next 3 chs, then hdc and sc. Picot, sl st in first sc. (17 sts + 1 picot)
That’s 7 sts on side one + 3 base sc + 7 sts on side two = 17. The 3 sc round the base, and the picot makes the pointed tip.
Fasten off, leaving a 12 in (30.5 cm) tail. Check: 2.25 in (5.7 cm) long including the picot, 1.5 in (3.8 cm) wide.
Eyes (Make 2)
Rnd 1 (black): Magic ring, ch 1, 6 sc in ring, join. Pull tight. (6 sts) Fasten off.
Rnd 2 (white): Join white in any st. Ch 1, 2 sc in each st around, join. (12 sts)
Fasten off, leaving a 10 in (25.4 cm) tail. Check: 1.25 in (3.2 cm) across.
Attaching Fins and Eyes
Lay the body flat with the head’s joining seam at the center back.
- Eyes: Place them on the front between Rnds 9 and 13, about 1 in (2.5 cm) apart. Whipstitch around the white edge.
- Side fins: Place one on each side fold of the head, between Rnds 12 and 17. Sew the rounded base flat so the tip points outward and slightly up.
- Weave in all ends on the inside of the head.
Border
The only border is at the mouth, where bags are pulled out. It firms up the edge and gives it a neat rim.
Border gauge: The same as the head, 4 sc per inch. The mouth has 24 sts, or 12 per side when flattened.
Border Rnd 1 (conversion): Turn the head upside down. Join lavender in any free loop of the foundation chain. Ch 1, sc in each free loop around, join. (24 sc, 1 per free loop, + 0 extra = 24 sts; 12 per flattened side)
Border Rnd 2: Ch 1, sl st in each st around, join. (24 sts; 12 per flattened side) Fasten off.
Why the math works: The foundation has 24 chains, and the border works exactly 1 stitch into each one. That keeps the rim at 6 in (15.2 cm) around. Extra stitches would make the mouth ruffle and let bags slip out, and skipped stitches would make it too tight. The border adds 0.25 in (0.6 cm), so the length goes from 20.5 in (52.1 cm) to 20.75 in (52.7 cm).
Final Blocking
- Spray the fish lightly until it is damp but not soaked.
- Fill the mesh loosely with a rolled towel so the diamonds open evenly.
- Shape the head into a smooth dome, 7 in (17.8 cm) wide flattened.
- Pin the tail lobes open, 3.25 in (8.3 cm) across at the widest row.
- Pin each side fin flat with its tip pointing outward.
- Check the length: 20.75 in (52.7 cm) from mouth rim to tail tips.
- Let it dry completely, then remove the towel and pins.
Final Quality-Control Checklist
- The mouth is 6 in (15.2 cm) around and doesn’t ruffle.
- The head has 56 sts and is 7 in (17.8 cm) wide flattened.
- Every mesh round has 14 loops.
- The mesh tapers smoothly from ch-5 to ch-4 to ch-3 loops.
- The band has 14 sts and is closed with 7 sc through both layers.
- Both tail lobes end in a point, with the loop centered between them.
- The eyes and fins are level and symmetrical.
- All ends are woven in on the inside.
Troubleshooting
The mesh spirals. This is normal for joined chain mesh. Block it over a rolled towel; the weight of the bags also straightens it.
You have 13 or 15 loops. A space was missed or worked twice. Count the loops at the end of every round.
The mouth is too tight. Chain the foundation with a hook one size larger, then switch back for Rnd 1.
The lobes lean. Start the second lobe in the stitch right after the center stitch.
The fins flop. Sew across the full width of the base.
Bags fall out. Work Border Rnd 2 with a smaller hook.
Care
Hand wash, or machine wash cold on a gentle cycle inside a laundry bag. Reshape and lay flat to dry.
Final Notes
Here is the measurement chain from start to finish:
- The 24-stitch mouth gives a 6 in (15.2 cm) opening.
- The head grows to 56 stitches for a 7 in (17.8 cm) width and rises 4 in (10.2 cm).
- Fourteen mesh loops carry through 15 rounds and taper to 3.5 in (8.9 cm) wide over 13.25 in (33.7 cm).
- The cream band turns the 14 spaces into 28 stitches, gathers them to 14, and closes into a 7-stitch base for the tail.
- The mouth border keeps 24 stitches and adds 0.25 in (0.6 cm), for a finished fish of 20.75 in (52.7 cm).
Make one in lavender and another in yellow, and give your bag pile a new home. Happy crocheting!