

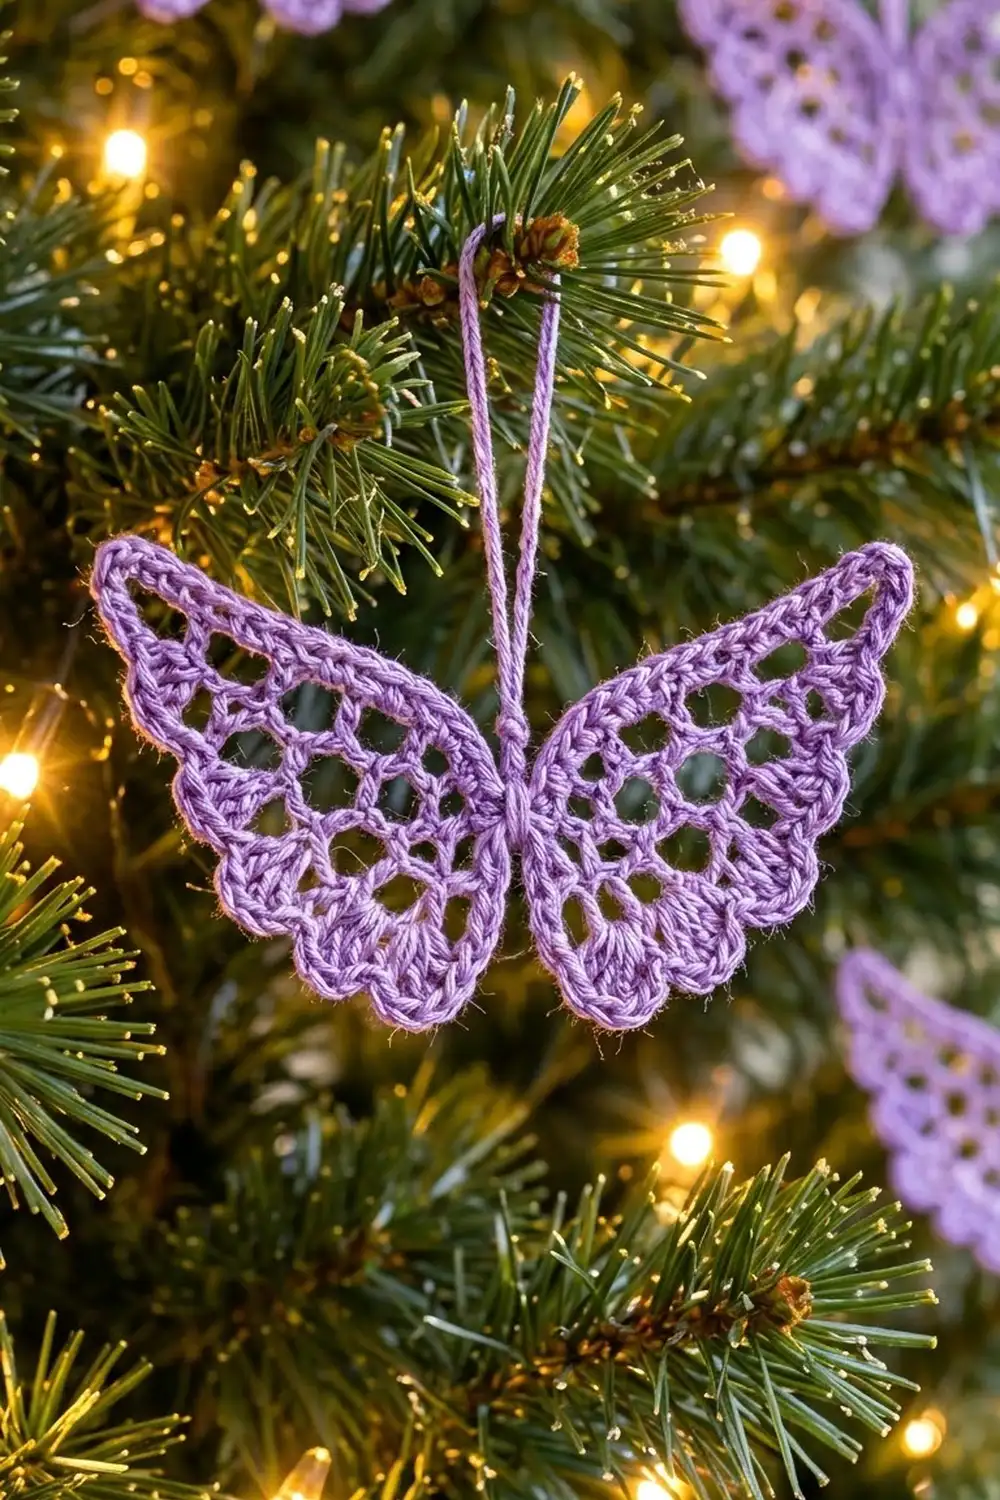
The Lilac Whisper Butterfly is a small, airy ornament worked in a single shade of lavender thread. Each wing starts with a solid fan of double crochet near the body. The fan opens into a honeycomb mesh of chain loops and ends in three soft scallops along the lower outer edge.
A twisted outline of reverse single crochet frames each wing and gives the edges a crisp, cord-like look. A cinched, wrapped body joins the two wings, and a slim folded loop lets the butterfly hang from a tree, a window, or a gift.
This pattern uses US crochet terms. The finished ornament measures 4.8 in (12.2 cm) wide by 3.2 in (8.1 cm) tall, not counting the 2.75 in (7.0 cm) hanging loop.
Construction overview: you make two identical wings, working rows from the body outward. Each wing gets its own two-round outline. Then you sew the wings together at their base points, wrap the center to form the body, and attach a chain hanging loop.
Finished Size and Construction
- Finished size: 4.8 in (12.2 cm) wide x 3.2 in (8.1 cm) tall
- Skill level: Easy-intermediate (thread work, chain-loop mesh)
- Terminology: US
- Yarn weight: Size 3 crochet cotton thread (fingering weight)
- Hook: 2.25 mm (US B-1)
- Number of pieces: 2 wings, plus 1 hanging loop
- Layout: 2 wings side by side, joined at the base points
- Piece size (one wing, bordered): 2.4 in (6.1 cm) wide x 3.2 in (8.1 cm) tall
- Wing size before border: 2.25 in (5.7 cm) wide x 2.9 in (7.4 cm) tall
- Border depth: 0.15 in (0.4 cm)
Materials
Thread: Use a mercerized size 3 cotton crochet thread, about 150 yd (137 m) per 100 g. Mercerized cotton shows the mesh clearly, blocks well, and keeps its shape on a tree. Avoid fuzzy or very stretchy fibers, because they blur the open loops.
- Lavender: 12 g, about 16 m (17.5 yd) per ornament
The quantity includes a margin of about 15% for the gauge swatch, the tails, and the body wrap. For a set of 6 ornaments, buy 72 g (96 m).
Tools:
- 2.25 mm (US B-1) crochet hook
- Tapestry needle with a small eye
- Rust-proof pins and a foam blocking mat
- Spray bottle with clean water
- Optional: fabric stiffener or a light starch spray
- Scissors and a ruler
Abbreviations (US Terms)
- ch – chain
- sl st – slip stitch
- sc – single crochet
- dc – double crochet
- rev sc – reverse single crochet
- sk – skip
- sp – space
- st(s) – stitch(es)
- tch – turning chain
- RS / WS – right side / wrong side
Special stitch – reverse single crochet (rev sc): Work from left to right (left-handed crocheters work from right to left). Insert the hook into the next stitch to the right, yarn over, and pull up a loop. Yarn over again and pull through both loops on the hook. This makes the twisted, cord-like outline.
Gauge and Checkpoints
Gauge: 9 sc and 10 sc rows = 1 in (2.5 cm) with size 3 thread and a 2.25 mm hook.
Make one full wing, including the border, before you commit to a set. Measure along a straight edge, from the base point (foundation chain) out to the edge.
- After Row 2: straight edge is 0.6 in (1.5 cm)
- After Row 5: straight edge is 1.85 in (4.7 cm)
- After Row 6: straight edge is 2.2 in (5.6 cm). The wing measures 2.25 in (5.7 cm) x 2.9 in (7.4 cm) when lightly pinned.
- After the border: straight edge is 2.35 in (6.0 cm). The wing measures 2.4 in (6.1 cm) x 3.2 in (8.1 cm).
If the wing is too big, go down to a 2.0 mm hook. Also check that your chain loops are not loose.
If the wing is too small or cups, go up to a 2.5 mm hook.
A difference of up to 1/8 in (0.3 cm) is fine, because blocking evens it out.
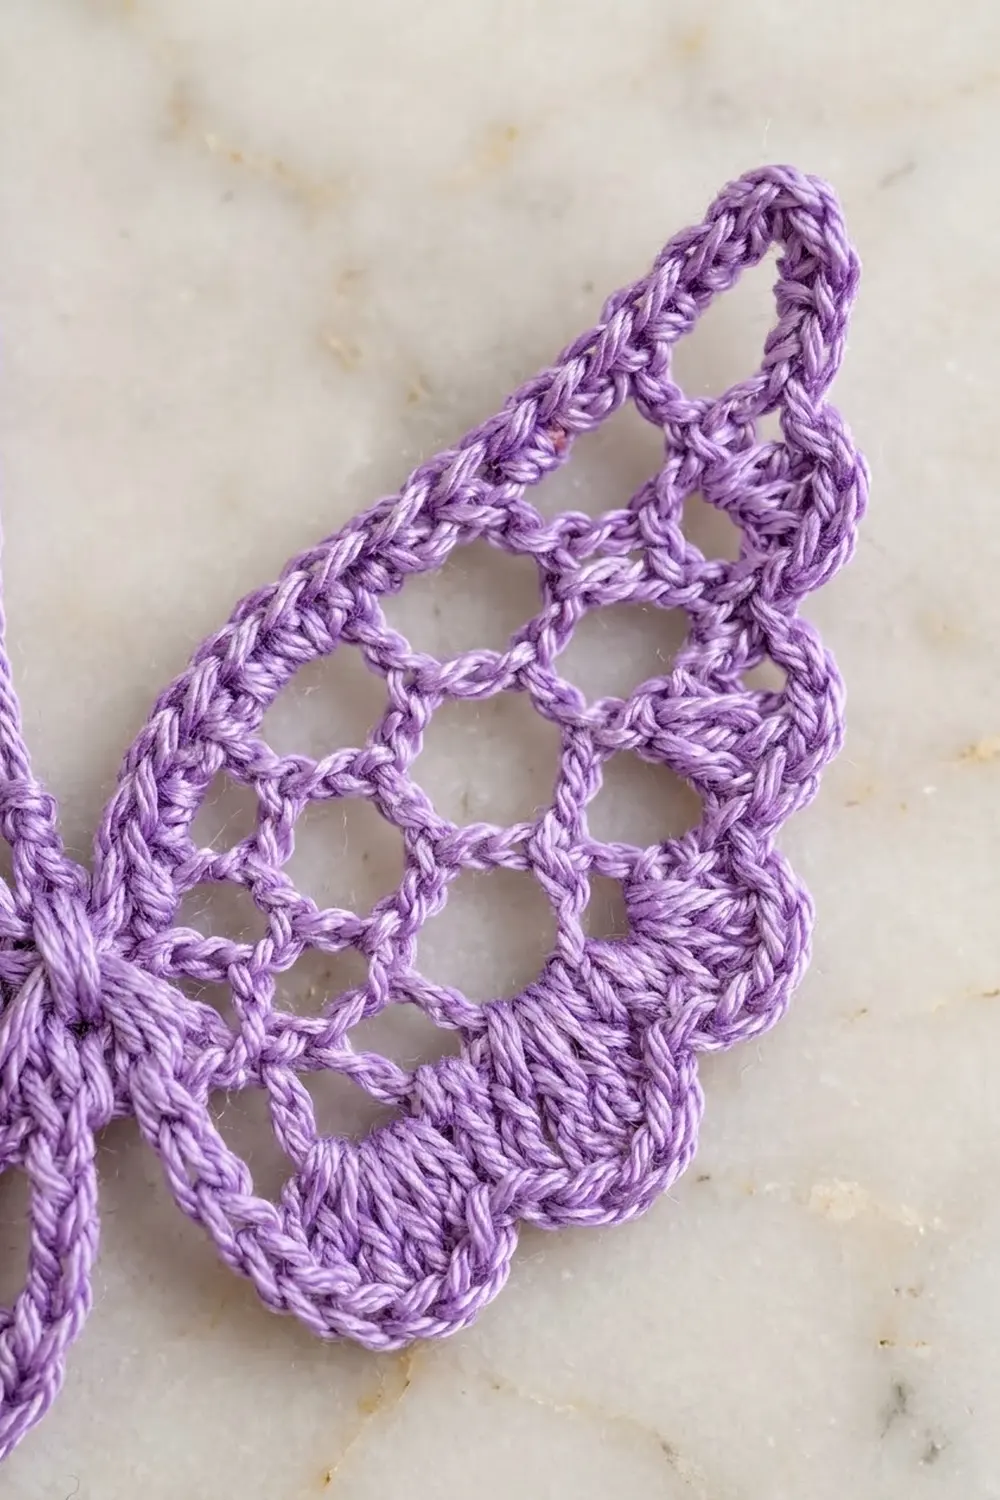
Wing (Make 2)
Each wing is worked in rows that fan out from a single foundation point.
Foundation: Ch 4.
Row 1 (RS): 6 dc in the 4th ch from the hook. Turn. (7 dc: the skipped 3 ch count as the first dc.)
Row 2: Ch 3 (counts as dc). Dc in the same st, 2 dc in each of the next 5 dc, then 3 dc in the top of the tch. Turn. (15 dc)
This solid fan forms the dense area beside the body.
Row 3 (mesh begins): Ch 1. Sc in the first dc, ch 5, sk 1 dc, sc in the next dc. Repeat from * 7 times. Turn. (8 sc, 7 ch-5 loops)
Row 4: Ch 7 (counts as dc + ch 4). Sc in the first ch-5 loop, ch 6, sc in the next ch-5 loop. Repeat from * 6 times. Ch 4, dc in the last sc. Turn. (7 sc, 6 ch-6 loops, plus a ch-4 sp at each end = 8 sps)
The two short end spaces widen the fan without distorting the mesh.
Row 5: Ch 1. Sc in the first dc, ch 7, sc in the next sp. Repeat from * 8 times; the 8th sp is the ch-4 sp of the tch. Ch 7, sc in the 3rd ch of the tch. Turn. (10 sc, 9 ch-7 loops)
Row 6 (scallops): Ch 1. 3 sc in the next ch-7 loop, 9 dc in the next ch-7 loop, 3 sc in the next ch-7 loop. Repeat from * 2 more times. Do not turn. (3 scallops of 15 sts each = 45 sts)
Each scallop uses 3 loops of Row 5, and 9 loops ÷ 3 = 3 scallops exactly. The sc between the Row 5 loops are skipped, so the scallops sit smoothly on the mesh.
Continue straight into the border without fastening off.
Make All Pieces
- Lavender: 2 wings, made from the same instructions
The piece is fully reversible. Turn one wing over before joining so the two wings mirror each other.
Layout grid (RS facing):
[ Wing A (flipped) ] • [ Wing B ]
                     ^
            base points meet here
Border (Each Wing, Worked Before Joining)
Border gauge: 9 sc = 1 in (2.5 cm), the same as the main gauge. Rev sc is worked one per stitch and adds no stitches.
The wing has four edges:
- Arc: the Row 6 scallops
- Top straight edge: row ends, running from the tip to the base
- Base point: the foundation chain
- Inner straight edge: row ends, running from the base back to the arc
Row-end rule: work 2 sc in the side of each dc row (Rows 1, 2, and 4). Work 1 sc in the side of each sc row (Rows 3, 5, and 6). That gives 3 x 2 + 3 x 1 = 9 sc per straight edge.
Round 7 (sc outline): With the RS facing, ch 1 and work around the wing as follows:
- Arc: 2 sc in the first st of Row 6, 1 sc in each of the next 43 sts, and 2 sc in the last st. (47 sc: 45 sts + 2 corner increases)
- Top straight edge: 9 sc across the row ends, following the row-end rule. (9 sc)
- Base point: 1 sc into the foundation ch, at the base of Row 1. (1 sc)
- Inner straight edge: 9 sc across the row ends. (9 sc)
Sl st to the first sc to join. (47 + 9 + 1 + 9 = 66 sc)
The 2 corner increases sit inside the 47 arc count. Don’t add them again on the straight edges.
Round 8 (twisted edge): Ch 1. Rev sc in each sc around. Sl st to the first rev sc to join. (66 rev sc)
Fasten off, leaving a 6 in (15.2 cm) tail on one wing for joining. Weave in the other tail.
Why the math works: Round 7 places 1 sc per stitch on the arc, plus 1 extra at each corner so the scallops and the tip stay flat. The 9 sc per straight edge follows the row heights: dc rows are about twice as tall as sc rows. Round 8 matches Round 7 one-for-one, so the outline adds 0.15 in (0.4 cm) of depth and no ruffling.
Joining
Method: whipstitch with the tapestry needle.
- Lay both wings RS up, with the flipped wing on the left. Each wing’s base point should face the center and its top straight edge should point upward and outward.
- Find the 3 center stitches on each wing: the base-point stitch, plus the last stitch of the top edge on one side and the first stitch of the inner edge on the other. These are the 3 rev sc that cover those Round 7 stitches.
- Match them stitch to stitch: top-edge stitch to top-edge stitch, base to base, and inner-edge stitch to inner-edge stitch. That is 3 stitches joined to 3 stitches, with nothing added.
- Using the 6 in (15.2 cm) tail, whipstitch through the back loops of each matched pair twice.
Tension: pull just firmly enough to close the gap. If you pull too tight, the wings curl toward each other.
Body wrap: cut 40 in (101.6 cm) of thread. Wrap it tightly around the joined center 10 times, covering about 0.5 in (1.3 cm) vertically. This forms a slim, cinched body. Knot the ends at the back.
Hanging loop: ch 60, about 5.5 in (14.0 cm). Fold the chain in half and sew both ends to the top of the body wrap. This gives a 2.75 in (7.0 cm) loop.
Size checkpoint: the joined ornament measures 4.8 in (12.2 cm) wide, because 2 wings x 2.4 in (6.1 cm) = 4.8 in (12.2 cm). It stands 3.2 in (8.1 cm) tall.
Final Blocking
- Weave in all remaining tails along the outline. Don’t trim them until after blocking.
- Mist the ornament until it is evenly damp, but not dripping.
- Lay it RS up on the blocking mat.
- Pin the base points together at the center. Pin each wing tip so the top straight edge angles upward and outward.
- Pin into every chain loop of the mesh, opening each loop into a rounded hexagon.
- Pin the center of each scallop outward so all 3 scallops are even.
- Check the measurements: 4.8 in (12.2 cm) wide and 3.2 in (8.1 cm) tall.
- For a firmer ornament, brush on diluted fabric stiffener or spray light starch. Let it dry completely, at least 6 hours.
- Unpin, then trim the woven tails close.
Final Quality-Control Checklist
- Row 2 has 15 dc, and Row 3 has 7 ch-5 loops.
- Row 5 has 9 ch-7 loops, and Row 6 has 3 even scallops of 15 sts each.
- Round 7 has 66 sc: 47 on the arc, 9 on each straight edge, and 1 at the base.
- Round 8 has 66 rev sc, with no ruffling or cupping.
- The two wings mirror each other and are the same size within 1/8 in (0.3 cm).
- The joining stitches are hidden under the body wrap.
- The ornament measures 4.8 in (12.2 cm) x 3.2 in (8.1 cm).
- The hanging loop is centered, and the butterfly hangs level.
Troubleshooting
Wing ruffles at the scallops: your dc are too loose. Work Row 6 with tighter tension, or go down 0.25 mm in hook size.
Wing cups or curls: your chain loops are too tight. Chain more loosely, or use the next hook size up for Rows 3–5 only.
Outline puckers: Round 7 needs fewer stitches. Re-check the row-end rule, and use exactly 9 sc per straight edge.
Rev sc looks flat: don’t twist the hook. Insert, pull up the loop, and finish each stitch before moving right.
Wings hang crooked: re-sew the hanging loop exactly at the center of the body wrap.
Mesh loops are different sizes: block with a pin in every loop and let it dry fully.
Care
Hand wash in cool water with mild soap, roll it in a towel, and re-block it flat to dry. If you used stiffener, refresh it after washing.
Final Notes
The measurement chain is short and easy to check:
- Gauge: 9 sc = 1 in (2.5 cm)
- Straight edge: 0.6 in (1.5 cm) after Row 2, 1.85 in (4.7 cm) after Row 5, and 2.2 in (5.6 cm) after Row 6
- Each bordered wing: 2.4 in (6.1 cm) x 3.2 in (8.1 cm)
- Joined ornament: 4.8 in (12.2 cm) wide
If each checkpoint matches, the finished butterfly will match too. Make one, block it, and then make a whole flutter of them for the tree.
Happy crocheting!