

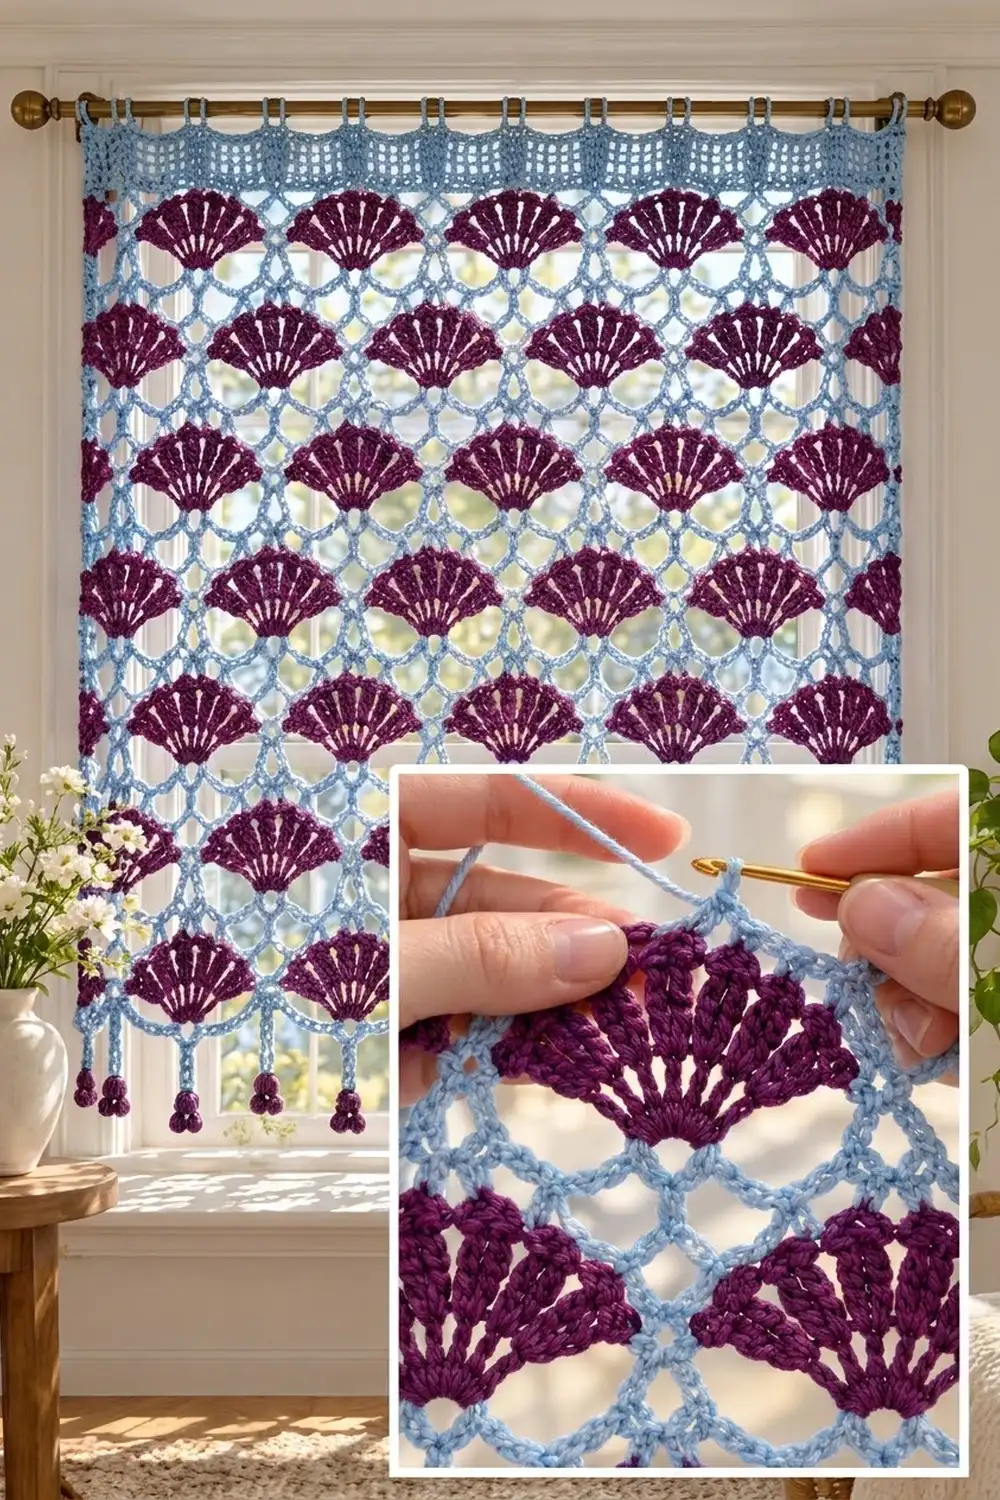
This café curtain pairs a sky-blue chain-loop lattice with rows of deep plum fan shells. The fans are staggered from row to row like overlapping scales, and light comes through the open mesh around them. At the top, a blue filet mesh band carries nine chain tabs for the curtain rod. At the bottom, small blue arches hang under the first fans, and nine chain drops end in plum berry clusters.
There are only two colors: light sky blue for the lattice, header, edging and drops, and plum for the fans and berries. The look is airy and a little vintage.
The pattern uses US crochet terms. The finished panel measures 28.5 in (72.4 cm) wide and 24 in (61.0 cm) tall. The drops add 3 in (7.6 cm) below that, and the tabs rise about 1.75 in (4.4 cm) above the top edge.
The curtain is one piece worked flat from the bottom up. You make a foundation net, then seven bands of fans, then the filet header and the tab row. To finish, you edge both sides and work the arches and drops into the underside of the foundation chain.
Finished Size and Construction
- Finished size: 28.5 in x 24 in (72.4 x 61.0 cm), plus 3 in (7.6 cm) of drops and 1.75 in (4.4 cm) tabs
- Skill level: Intermediate
- Terminology: US
- Yarn weight: Worsted (#4), cotton recommended
- Hook: 5.0 mm (H-8)
- Number of pieces: 1
- Layout: One panel worked flat in rows, bottom to top
- Piece size: 28 in x 24 in (71.1 x 61.0 cm) after the tab row
- Size before border: 28 in x 24 in (71.1 x 61.0 cm)
- Border depth: 0.25 in (0.6 cm) on each side; 3 in (7.6 cm) of drops at the bottom
Materials
Choose a smooth, mercerized worsted cotton or cotton blend. Cotton keeps the fans crisp, blocks well and holds up in sunlight. The amounts below assume about 95 m per 50 g.
- Color A, Light Sky Blue: 120 g, about 228 m
- Color B, Plum: 50 g, about 95 m
Both amounts include a margin for your swatch and yarn tails.
Tools:
- 5.0 mm (H-8) crochet hook
- Tapestry needle
- Scissors
- 4 to 6 locking stitch markers
- Tape measure
- Blocking mats, rust-proof pins and a spray bottle
- Curtain rod, 0.5 to 1 in (1.3 to 2.5 cm) thick
Abbreviations (US Terms)
- ch – chain
- sl st – slip stitch
- sc – single crochet
- dc – double crochet
- sk – skip
- st(s) – stitch(es)
- sp – space
- lp – ch-5 loop
- yo – yarn over
Special stitches:
- Standing dc: With a slip knot on the hook, yo, insert hook in the indicated st and finish a dc as usual.
- Fan: 9 dc in the indicated lp.
- Half fan: 5 dc in the indicated st.
- Bobble: (Yo, insert hook in the indicated st, yo and pull up a loop, yo and pull through 2 loops) 4 times, then yo and pull through all 5 loops on the hook.
- Berry cluster: With Color B, join with a sl st in the tip of a drop. [Ch 3, bobble in 3rd ch from hook, sl st in tip of drop] 3 times. Fasten off.
Gauge and Checkpoints
- Lattice gauge: 1 pattern repeat (12 foundation ch, 3 lps) = 3.5 in (8.9 cm) wide. One full 3-row fan band = 3 in (7.6 cm) tall.
- Header gauge: 14 dc and 8 rows = 4 in (10.2 cm).
- Border gauge: 4 sc = 1 in (2.5 cm) along the side edges.
Swatch first. Ch 26 and work Row 1, then Fan Row 1, Net Row A and Shift Row A as written below. Your swatch has 2 fans, and every repeat count works out the same way as on the full panel. It should measure 7 in (17.8 cm) wide and 3.5 in (8.9 cm) tall.
- If the swatch is wider than 7.25 in (18.4 cm), go down half a hook size.
- If it is narrower than 6.75 in (17.1 cm), go up half a hook size.
- If the width is right but the band is taller than 3.25 in (8.3 cm) or shorter than 2.75 in (7.0 cm), change how firmly you work your chains instead of changing hooks.
Height checkpoints on the panel:
- After Row 1: 0.5 in (1.3 cm)
- After Row 4: 3.5 in (8.9 cm)
- After Row 7: 6.5 in (16.5 cm)
- After Row 10: 9.5 in (24.1 cm)
- After Row 13: 12.5 in (31.8 cm)
- After Row 16: 15.5 in (39.4 cm)
- After Row 19: 18.5 in (47.0 cm)
- After Row 21: 20.25 in (51.4 cm)
- After Row 28: 23.75 in (60.3 cm)
- After Row 29: 24 in (61.0 cm)
The width should stay at 28 in (71.1 cm) all the way up.
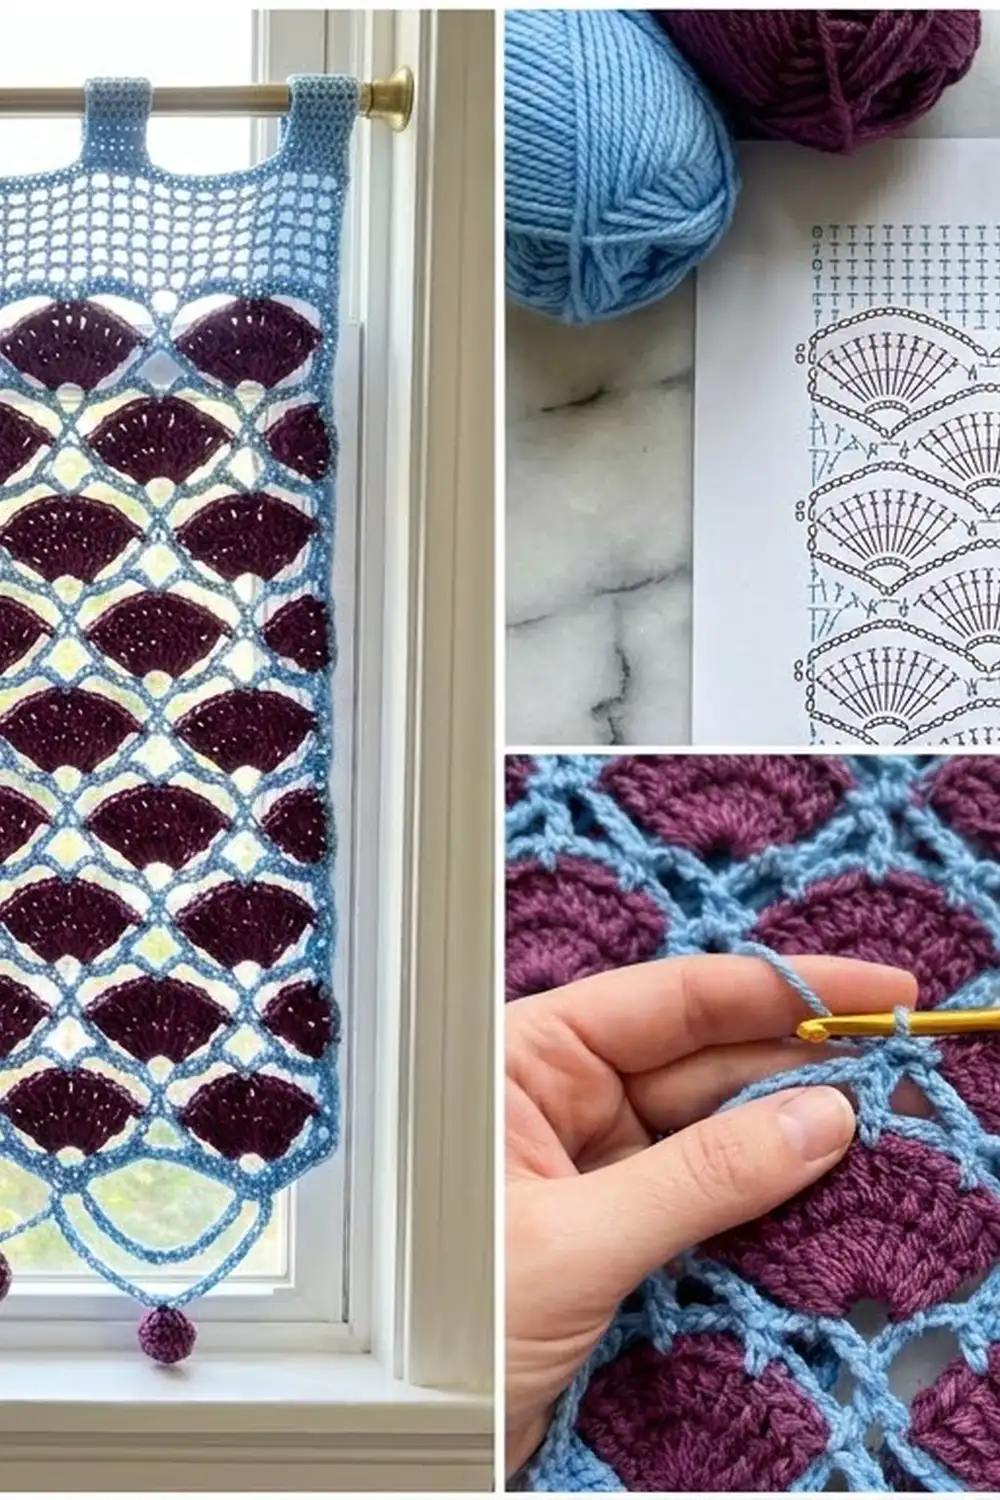
Pattern Notes
- Edge Y is the edge where Row 1 ends. Every fan row starts at Edge Y.
- Work fan rows in Color B. Start each one with a standing dc and fasten off at the end.
- Don’t turn after a fan row. Pick up the Color A loop waiting at Edge Y, place a marker in it, and work the net row in the same direction as the fan row. Turn, then work the shift row, which brings Color A back to Edge Y.
- The fabric looks almost the same on both sides. After Row 1, mark one side as the RS for the edging.
The Panel
Foundation: With Color A, ch 98.
Row 1 (net): Sc in 2nd ch from hook, ch 5, sk 3 ch, sc in next ch 24 times. Drop A and mark the loop. This end is Edge Y. (25 sc, 24 lps)
Band Type 1 (Fans Centered Over Lps)
Fan Row 1 (Color B): Turn. Standing dc in first sc, sc in next lp, fan in next lp, sc in next lp; repeat from * 7 more times, working ch 1 between repeats; dc in last sc. Fasten off B. (8 fans, 16 sc, 7 ch-1 bridges, 2 edge dc)
Net Row A (Color A, don’t turn): Pick up A at Edge Y. Ch 1, sc in edge dc, ch 5, sc in 3rd dc of next fan, ch 5, sc in 7th dc of same fan, ch 5, sc in next ch-1 bridge; repeat from * 6 more times, ch 5, sc in 3rd dc of last fan, ch 5, sc in 7th dc of same fan, ch 5, sc in edge dc. Turn. (25 sc, 24 lps)
The sc sit on the 2 edge dc, on 2 points of each fan top, and on each bridge: 2 + 16 + 7 = 25.
Shift Row A: Ch 5 (counts as dc and ch 2), sc in first lp, ch 5, sc in next lp 23 times, ch 2, dc in last sc. Drop A at Edge Y. (24 sc, 23 lps, 2 ch-2 half lps, 2 edge dc)
Each new lp is centered over a sc from the row below, so the next fans move over by half a repeat.
Band Type 2 (Offset Fans)
Fan Row 2 (Color B): Turn. Standing dc in edge dc, 4 dc in same st (half fan made), sc in next full lp, ch 1, sc in next lp, fan in next lp, sc in next lp, ch 1 7 times, sc in last full lp, 5 dc in 3rd ch of turning ch-5. Fasten off B. (7 fans, 2 half fans, 16 sc, 8 ch-1 bridges)
This row uses 1 + (7 x 3) + 1 = 23 full lps, and the half fans cover the ch-2 half lps.
Net Row B (Color A, don’t turn): Pick up A at Edge Y. Ch 1, sc in first dc of half fan, ch 1, sc in 3rd dc of half fan, ch 5, sc in next bridge, ch 5, sc in 3rd dc of next fan, ch 5, sc in 7th dc of same fan, ch 5, sc in next bridge 7 times, ch 5, sc in 3rd dc of last half fan, ch 1, sc in last dc. Turn. (26 sc, 23 lps, 2 ch-1 sps)
Count: 2 edge sc + 2 half-fan sc + 8 bridges + 14 fan sc = 26.
Shift Row B: Ch 1, sc in first sc, ch 5, sk ch-1 sp, sc in next lp, ch 5, sc in next lp 22 times, ch 5, sk ch-1 sp, sc in last sc. Drop A at Edge Y. (25 sc, 24 lps)
This row brings you back to the Row 1 count, ready for another Type 1 band.
Band Order
- Rows 2–4: Band Type 1
- Rows 5–7: Band Type 2
- Rows 8–10: Band Type 1
- Rows 11–13: Band Type 2
- Rows 14–16: Band Type 1
- Rows 17–19: Band Type 2
- Rows 20–21: Fan Row 1 and Net Row A only (skip Shift Row A)
You now have 7 rows of fans and 25 sc with 24 lps. The body should measure 28 in x 20.25 in (71.1 x 51.4 cm).
Filet Header
Row 22 (conversion): Ch 3 (counts as dc), 3 dc in next lp, dc in next sc 24 times. (97 dc = 25 dc worked 1 per sc + 72 dc worked 3 per lp)
Row 23 (mesh): Turn. Ch 4 (counts as dc and ch 1), sk next dc, dc in next dc, ch 1, sk next dc, dc in next dc across; work the last dc in the top of the turning ch. (49 dc, 48 ch-1 sps)
Rows 24–27: Turn. Ch 4 (counts as dc and ch 1), dc in next dc, ch 1 across to the last st, dc in 3rd ch of turning ch-4. (49 dc, 48 ch-1 sps)
Row 28: Turn. Ch 3 (counts as dc), dc in next ch-1 sp, dc in next dc across; work the last dc in 3rd ch of turning ch-4. (97 dc = 49 dc + 48 dc in sps)
Checkpoint: 23.75 in (60.3 cm) tall and 28 in (71.1 cm) wide.
Row 29 (tab row, conversion): Turn. Ch 1, (sc, ch 16, sc) in first dc, sc in next 11 dc, (sc, ch 16, sc) in next dc 8 times. Fasten off. (106 sc = 97 sc worked 1 per st + 9 extra sc at the tab bases; 9 ch-16 tabs)
The tabs are spaced every 12 sts, with one at each corner.
Border
Border gauge: 4 sc = 1 in (2.5 cm). The border is a sc edging up each side plus an arch-and-drop row along the underside of the foundation chain.
Side Edging
Right side: With the RS facing, join Color A at the bottom corner and work up the row ends:
- Row 1: 2 sc
- Each full band (6 bands): 2 sc in the fan row end, 5 sc in the net row end and 5 sc in the shift row end = 12 sc per band, 72 sc total
- Rows 20–21: 2 sc + 5 sc = 7 sc
- Rows 22–28: 2 sc in each dc row end = 14 sc
- Row 29: 1 sc
Fasten off. (96 sc)
Left side: With the RS facing, join at the top corner and work the same counts in reverse order down to the bottom corner. (96 sc)
Why the math works: 96 sc at 4 sc per inch = 24 in (61.0 cm), which is exactly the panel height. The net and shift rows are each about 1.2 in (3.0 cm) tall and take 5 sc. The fan and dc rows are each about 0.5 in (1.3 cm) tall and take 2 sc. That keeps the edge flat.
Bottom Arches and Drops
Drop: Ch 12, sl st in 2nd ch from hook and in each ch back up the chain. (11 sl sts)
Bottom Row: With the RS facing and the foundation chain on top, join Color A with sc in the first ch at the corner. Drop, sc in same ch, [ch 5, sk 3 ch, sc in next ch] 3 times; repeat from * 7 more times, drop, sc in same ch. Fasten off. (25 sc worked into ch + 9 extra sc beside the drops = 34 sc; 24 ch-5 arches; 9 drops)
Berries: Work 1 berry cluster in the tip of each drop. (9 berries)
Why the math works: Each sc goes into the same ch as a Row 1 sc (every 4th ch), so every arch lines up under a net loop. The drops fall on every 12th ch, which gives 8 + 1 = 9 drops: one at each corner and one under each bridge between the bottom fans. Each drop is 2.25 in (5.7 cm) and each berry adds 0.75 in (1.9 cm), for 3 in (7.6 cm) in total.
Final Blocking
- Weave in all ends along the side edges or inside the fans, never across open mesh.
- Soak the curtain in cool water for 10 minutes. Roll it in a towel and press out the water without wringing.
- Pin it flat to 28.5 in (72.4 cm) wide and 24 in (61.0 cm) tall, keeping the sides straight.
- Pin the bottom arches evenly and pin each drop straight down to 3 in (7.6 cm).
- Open each fan into an even half circle and pin the lp points so the mesh openings match in size.
- Shape the tabs into loops about 1.75 in (4.4 cm) tall.
- Let it dry completely before unpinning.
Final Quality-Control Checklist
- Panel measures 28.5 in x 24 in (72.4 x 61.0 cm).
- There are 7 fan rows: 4 rows of 8 full fans and 3 rows of 7 fans plus 2 half fans.
- Each fan sits centered between two fans in the row below.
- The header has 5 mesh rows between 2 solid dc rows.
- There are 9 evenly spaced tabs, with one at each corner.
- Each side has 96 sc and no ripples.
- All 9 drops are the same length, and each ends in a 3-bobble berry.
- No ends show in the mesh.
Troubleshooting
- Fans don’t alternate: You skipped a shift row. Each band must end with 24 lps (Shift Row B) or 23 full lps (Shift Row A).
- Lp count is off: Count the sc after every blue row: 25, 24 or 26, as noted above.
- Fans cup: Your dc are too tight. Loosen them, or use a 5.5 mm hook for the fan rows only.
- Header pulls in: Work Row 22 more loosely or with a hook half a size larger.
- Sides wave: Rework the edging with 4 sc instead of 5 in each net and shift row end.
- Drops twist: Re-wet them and pin them straight to dry.
Care
Hand wash or machine wash on a cool, gentle cycle in a mesh bag. Reshape and dry flat, then hang the curtain while it is still slightly damp so the drops hang straight.
Final Notes
All the sizes build on each other. Each 12-ch repeat is 3.5 in (8.9 cm), so 8 repeats make a 28 in (71.1 cm) body. Row 1 and seven fan bands bring the height to 20.25 in (51.4 cm). The header and tab row add 3.75 in (9.5 cm), for a 24 in (61.0 cm) panel. The side edging adds 0.25 in (0.6 cm) on each side for a width of 28.5 in (72.4 cm), and the drops hang 3 in (7.6 cm) below. If you match the swatch and count your sc after every blue row, the fans will line up all the way to the top.
Happy crocheting!