

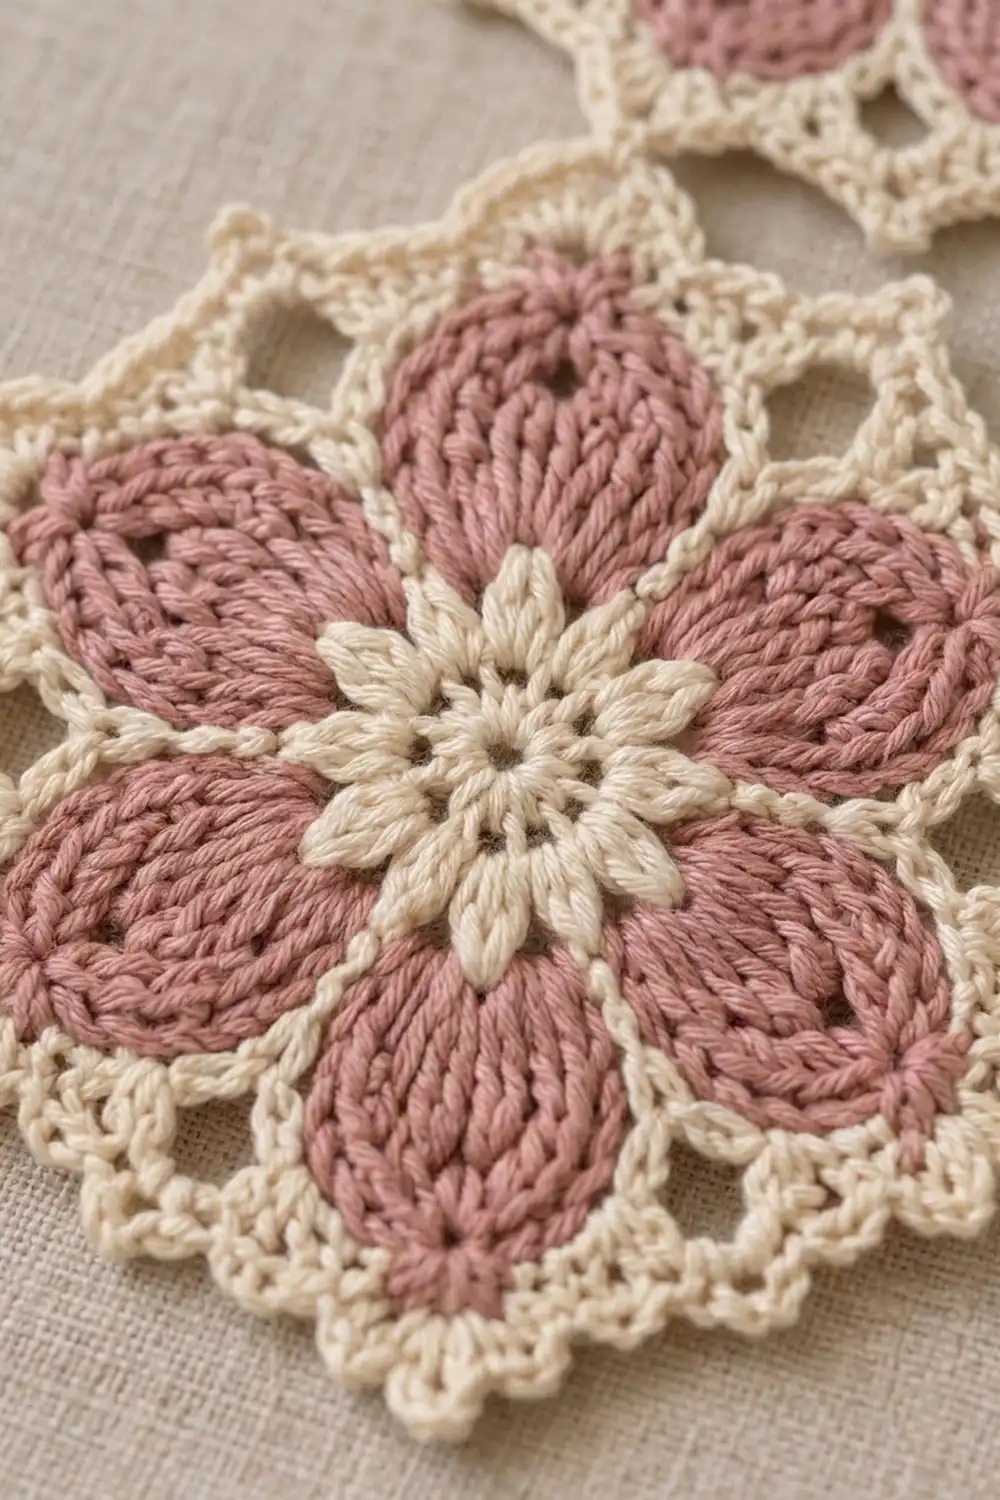
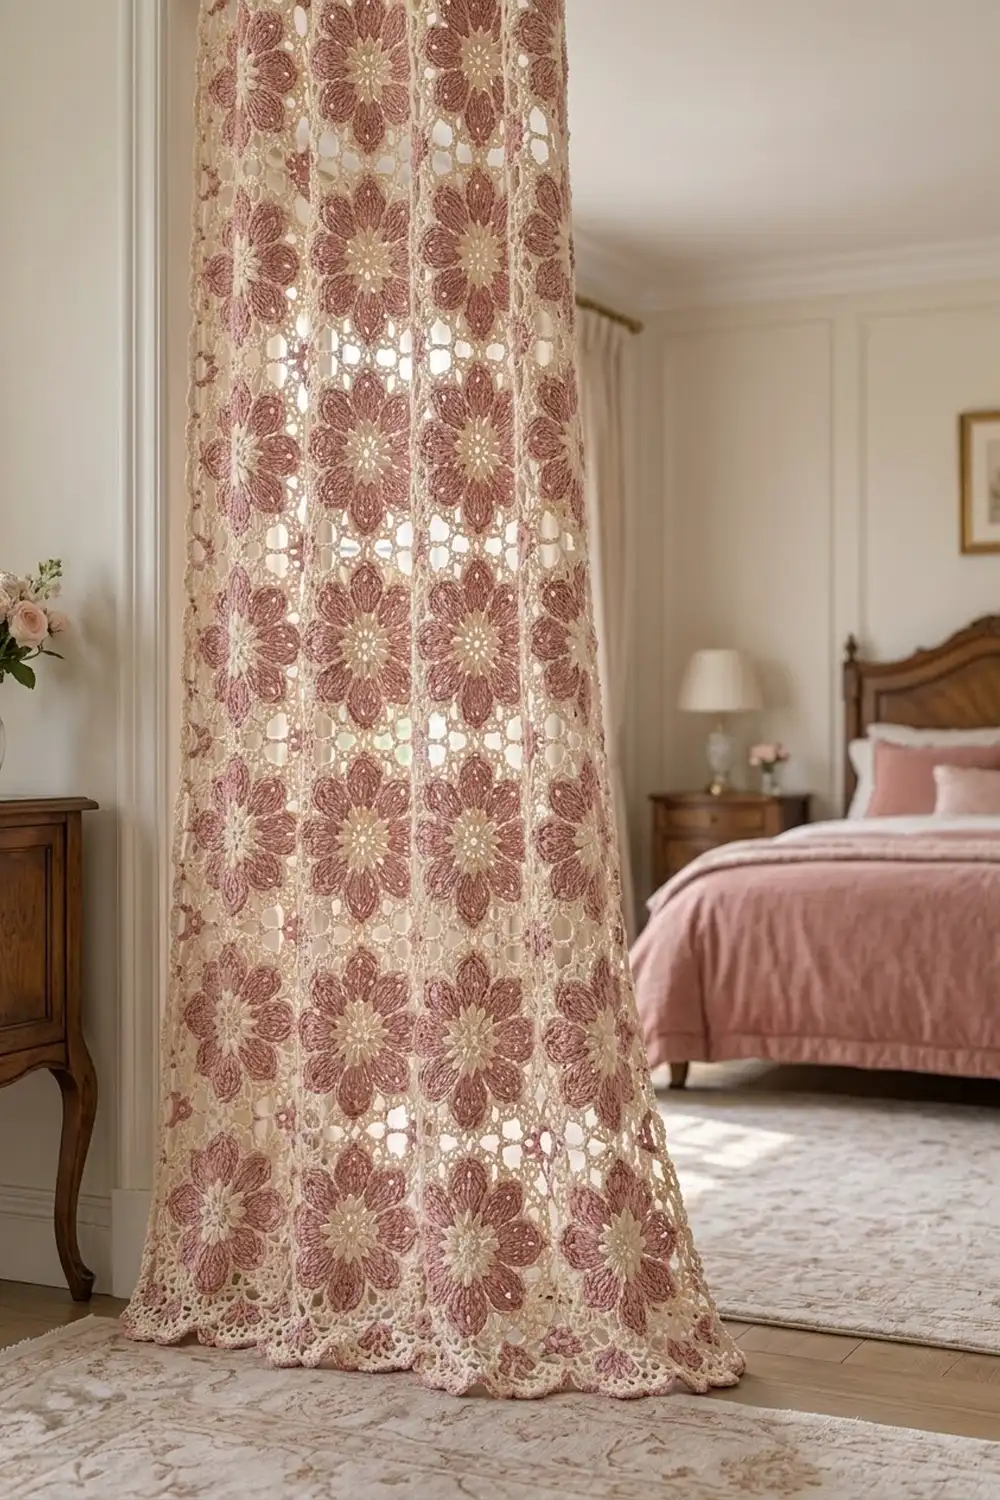
This curtain panel is made of soft flower motifs in dusty rose and cream, joined into a light lace grid. Each motif has a small cream star center, six solid rose petals with a tiny eyelet near the base, and a cream lace frame with a picot scallop edge. When the panel hangs at a window, light comes through the open diamonds between the flowers.
The look is romantic and vintage, but the construction is simple and repetitive. You make one motif, check its size, and then repeat it. Joining happens on the last round of each motif, so there is very little sewing at the end.
The pattern uses US crochet terms. The finished panel measures 44 in (111.8 cm) wide by 78 in (198.1 cm) long. The bottom edge is left as a row of motif scallops, and the sides and top get a neat four-row border.
Construction overview: work 66 motifs in rounds and join them as you go in a grid of 6 across by 11 down. Then work the border in rows up one side, across the top, and down the other side. Finish with blocking.
Finished Size and Construction
- Finished size: 44 in (111.8 cm) wide x 78 in (198.1 cm) long
- Skill level: Intermediate
- Terminology: US crochet terms
- Yarn weight: DK (#3) cotton or cotton blend
- Hook: 4.0 mm (G-6)
- Number of pieces: 66 motifs
- Layout: 6 motifs across x 11 motifs down
- Motif size: 7 in (17.8 cm) across the flats, side picot to opposite side picot
- Size before border: 42 in (106.7 cm) x 77 in (195.6 cm)
- Border depth: 1 in (2.5 cm) on the sides and top; no border on the bottom edge
Materials
Choose a smooth, mercerized or matte DK cotton. Cotton holds the lace open and keeps its shape on a window. Avoid fuzzy yarns, because they blur the petal stitches and fill in the open diamonds.
- Color A, Cream: 500 g (about 1,150 m)
- Color B, Dusty Rose: 400 g (about 920 m)
Each motif uses about 6 g (13.8 m) of Cream and 5 g (11.5 m) of Dusty Rose. These quantities include a margin for a test motif, gauge swatching, and weaving in ends.
Tools:
- 4.0 mm (G-6) crochet hook
- Tapestry needle
- Stitch markers
- Scissors
- Measuring tape
- Blocking mats, rustproof pins, and a spray bottle
- 7 curtain clip rings for hanging (optional)
Abbreviations (US Terms)
- ch – chain
- sl st – slip stitch
- sc – single crochet
- hdc – half double crochet
- dc – double crochet
- tr – treble crochet
- sk – skip
- sp – space
- st(s) – stitch(es)
Special stitch – Join-picot: ch 1, sl st into the matching picot (or corner loop) of the neighbor motif, ch 1. This replaces a ch-3 picot or part of a corner loop when joining.
Gauge and Checkpoints
Make one complete motif before you start the panel. Block it lightly and measure it. Every later measurement depends on this one piece.
Motif checkpoints:
- After Round 1: 1.25 in (3.2 cm) across
- After Round 3: 2.25 in (5.7 cm) across the points
- After Round 7: 5 in (12.7 cm) across the petal tips
- After Round 9: 6.25 in (15.9 cm) across
- After Round 10: 7 in (17.8 cm) across the flats; about 9.9 in (25.1 cm) corner loop to opposite corner loop when pinned square
Border gauge: 31 sc = 7 in (17.8 cm).
If your motif is more than 0.25 in (0.6 cm) too big, go down a hook size. If it is more than 0.25 in (0.6 cm) too small, go up a hook size. A difference of 0.25 in per motif adds up to 1.5 in (3.8 cm) across the width and 2.75 in (7.0 cm) down the length, so this check matters.
Motif
Work in rounds with the right side facing. Do not turn.
Round 1 (Color A): Make a magic ring. Ch 3 (counts as dc), 11 dc in ring. Sl st to top of ch-3. Pull the ring closed. (12 dc)
Round 2: Ch 3 (counts as dc), dc in same st, 2 dc in each st around. Sl st to top of ch-3. (24 dc)
Round 3: (Hdc, dc, hdc) in next st, sl st in next st; repeat from * around. (12 points and 12 sl sts; 48 sts)* Fasten off Color A.
This round makes the cream star center.
Round 4 (Color B): Join Color B with a sl st in any sl st of Round 3. Ch 1, sc in same st. Ch 6, sk next point, next sl st, and next point, sc in next sl st; repeat from * 4 more times. Ch 6, sl st to first sc. (6 sc and 6 ch-6 loops)*
Let each ch-6 sit behind the two cream points it spans. Each loop is the base of one petal.
Round 5: Sc in next sc, (hdc, 2 dc, ch 2, 2 dc, hdc) in next ch-6 loop; repeat from * around. Sl st to first sc. (42 sts and 6 ch-2 sps)*
The ch-2 is the eyelet near the base of each petal.
Round 6: Sl st in next sc, sk next hdc, dc in next dc, 2 dc in next dc, 5 tr in ch-2 sp, 2 dc in next dc, dc in next dc, sk next hdc; repeat from * around. (11 sts per petal and 6 sl sts; 72 sts)*
Round 7: Sl st in next sl st, hdc in next 2 sts, dc in next 2 sts, 2 dc in next st, 3 dc in next st, 2 dc in next st, dc in next 2 sts, hdc in next 2 sts; repeat from * around. (15 sts per petal and 6 sl sts; 96 sts)* Fasten off Color B.
The petals are now full and rounded, and the fanned tall stitches give them their ridged texture.
Round 8 (Color A): Join Color A with a sl st in any sl st between petals. Ch 1, sc in same st. (Ch 5, sk 3 sts, sc in next st) 3 times, ch 5, sk 3 sts, sc in next sl st; repeat from * around, ending last repeat with sl st to first sc instead of sc. (24 sc and 24 ch-5 loops)*
On each petal, the sc land in stitch 4, stitch 8 (the center of the 3-dc tip), and stitch 12.
Round 9: Sl st in next 2 ch, ch 1, sc in same loop. Ch 6, sc in next loop; repeat from * around, but work ch 8 instead of ch 6 at loops 1, 7, 13, and 19. End with ch 6, sl st to first sc. (24 sc; 20 ch-6 loops and 4 ch-8 corner loops)*
Count from the first loop you make. Place a marker in each ch-8 corner loop.
Round 10: Sl st into first loop. In each ch-6 side loop: (3 sc, ch 3, 3 sc). In each ch-8 corner loop: (4 sc, ch 9, 4 sc). Continue around and sl st to first sc. (152 sc; 20 ch-3 picots and 4 ch-9 corner loops) Fasten off and weave in ends.
Each side of the motif now has 1 corner loop, then 5 side picots, then the next corner loop.
Make All Pieces
Make 66 motifs in total. Make Motif 1 complete, then join each later motif to its finished neighbors on Round 10.
- Color A (Cream): Rounds 1–3 and 8–10 of all 66 motifs
- Color B (Dusty Rose): Rounds 4–7 of all 66 motifs
Layout grid (6 across x 11 down, numbered in joining order):
Row 1:   1   2   3   4   5   6
Row 2:   7   8   9  10  11  12
Row 3:  13  14  15  16  17  18
Row 4:  19  20  21  22  23  24
Row 5:  25  26  27  28  29  30
Row 6:  31  32  33  34  35  36
Row 7:  37  38  39  40  41  42
Row 8:  43  44  45  46  47  48
Row 9:  49  50  51  52  53  54
Row 10: 55  56  57  58  59  60
Row 11: 61  62  63  64  65  66
Row 1 is the top of the curtain. Row 11 is the bottom, and its lower edges become the scallops.
Joining
Use join-as-you-go on Round 10. Work Round 10 as usual until you reach a side that touches a finished motif.
Side joins: On a shared side, work picots 1 and 5 as normal ch-3 picots. Replace picots 2, 3, and 4 with join-picots into picots 2, 3, and 4 of the neighbor (counting toward each other). Joining stitch to stitch like this keeps the sides even. The free picots 1 and 5 make the small diamond openings.
Corner joins: Work the corner loop as 4 sc, ch 4, sl st into the corner point, ch 4, 4 sc. The first corner loop made at a junction is the anchor. Every later motif at that junction joins into the same sl st, so up to 4 motifs meet at one point.
Tension: Keep the join-picot chains the same size as your normal picots. Tight joins pucker the lace. Loose joins let the motifs sag apart when the curtain hangs.
Size checkpoint: After Row 1, the strip should measure 42 in (106.7 cm) across (6 x 7 in). After all 11 rows, the panel should measure 42 in (106.7 cm) x 77 in (195.6 cm), measured between the corner points.
Border
The border goes up the left side, across the top, and down the right side. The bottom stays as motif scallops. Work in rows with Color A.
Border gauge: 31 sc = 7 in (17.8 cm), so each motif side gets exactly 31 stitches.
Row 1 (right side): Join Color A in the free bottom corner loop of Motif 61 (bottom left). Ch 4 (counts as tr). Working up each motif side: ch 5, dc in side picot 1, ch 4, hdc in picot 2, ch 3, sc in picot 3, ch 3, hdc in picot 4, ch 4, dc in picot 5, ch 5, tr in the corner point. At each junction between two motifs, work 2 tr in the same point: one ends the motif you are on, one starts the next. At the two top corners of the panel, work (tr, ch 2, tr) in the corner loop.
Each motif side counts as: 7 sts (tr, dc, hdc, sc, hdc, dc, tr) + 24 ch = 31. The 2 tr at a junction belong one to each motif, so nothing is added per seam.
- Left side: 11 x 31 = 341
- Top: 6 x 31 = 186
- Right side: 11 x 31 = 341
- Plus 1 ch-2 sp at each top corner
Row 2: Ch 1, turn. Sc in each st and each ch along the side, and work 3 sc in each top corner ch-2 sp. (Right side 341, corner 3, top 186, corner 3, left side 341; 874 sc)
Row 3: Ch 3 (counts as dc), turn. Dc in each sc, and work 3 dc in the center sc of each corner group. (Sides 342 each, top 188, corners 3 each; 878 dc)
Row 4: Ch 1, turn. Sc in each dc, and work 3 sc in the center dc of each corner group. (Sides 343 each, top 190, corners 3 each; 882 sc) Fasten off.
Why the math works: Row 1 turns each curved motif side into a straight line of 31 stitches. That matches the border gauge of 31 sc per 7 in (17.8 cm), so the edge lies flat without ruffling or cupping. In each later row, the corner groups add just 1 stitch to each side, enough to turn the corner smoothly. Rows 2–4 add 1 in (2.5 cm) of depth, giving 44 in (111.8 cm) of width and 78 in (198.1 cm) of length.
Final Blocking
- Weave in all ends along stitches of the same color, never across open lace.
- Wet the panel fully in cool water, then gently press out the water. Don’t wring it.
- Roll the panel in towels to remove more water.
- Lay it flat. Pin the top border straight to 44 in (111.8 cm).
- Pin both side borders straight to 78 in (198.1 cm).
- Pin each bottom motif into a rounded scallop, with one pin in every picot.
- Open the diamonds by pinning the free picots where needed.
- Let it dry completely before unpinning. If your space is small, block in sections.
Final Quality-Control Checklist
- All 66 motifs measure 7 in (17.8 cm) across the flats.
- Every motif has 12 cream points, 6 rose petals, and 6 eyelets.
- Each shared side uses picots 2–4 only, and picots 1 and 5 are free.
- Every corner junction meets at a single sl st.
- Border Row 1 has 31 sts on each motif side.
- Border Row 4 counts 343 / 190 / 343 plus the corners.
- The panel is 44 in (111.8 cm) x 78 in (198.1 cm).
- The bottom scallops are even and all ends are hidden.
Troubleshooting
Petals cup forward: Round 6 is tight. Relax your tension on the tr, or go up a hook size for Rounds 6–7 only.
Lace frame ruffles: The chains in Rounds 8–9 are too loose. Make the chains firmer, or go down a hook size for those rounds.
Motifs don’t line up in the grid: Check that the corner loops sit at loops 1, 7, 13, and 19 of Round 9, and that every motif is oriented the same way.
Border waves: You have too many stitches, or your sc are tighter than the gauge. Recount to 31 per motif side and match the border gauge.
Border pulls in: Your sc are too tight. Work Rows 2–4 with a 4.5 mm hook.
Gaps at junctions: A motif skipped the corner sl st. Sew the junction closed with a short tail of Color A.
Care
Hand wash in cool water with mild detergent, then lay flat or re-pin to dry. Avoid hanging the panel wet, because the weight will stretch the lace.
Final Notes
The measurement chain is simple. Each motif is 7 in (17.8 cm). Six motifs across make 42 in (106.7 cm), and 11 motifs down make 77 in (195.6 cm). Border Row 1 sets each motif side to 31 stitches to match the border gauge. Rows 2–4 add 1 in (2.5 cm) on the sides and top, for a finished panel of 44 in (111.8 cm) x 78 in (198.1 cm). If your first motif measures correctly, the rest of the panel will too. Clip the rings evenly along the top border and enjoy the light through your roses.
Happy crocheting!