

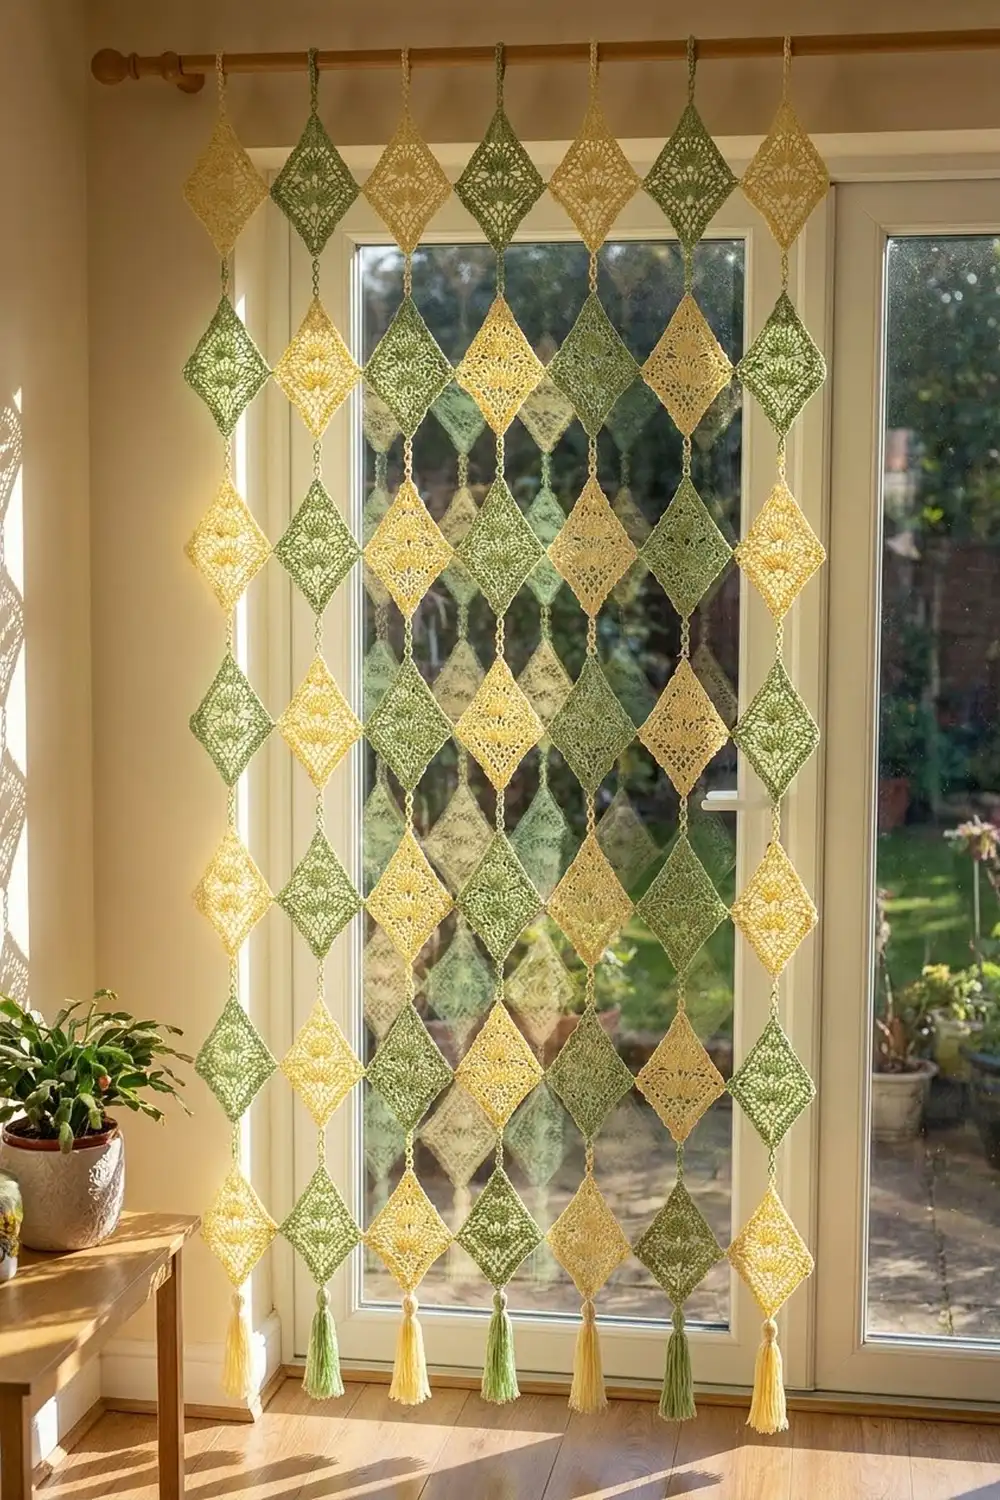
This curtain is made of lace diamonds hung in long strands, and it lets daylight through. Each diamond has a center line of V-stitches with columns of small fans on both sides, finished with a neat chain-textured edge. The strands sway a little when the window is open, and the light through the lace makes soft patterns on the floor.
The palette is two fresh colors: pale butter yellow and soft leaf green. Each strand is a single color, and the strands alternate across the rod. Matching tassels at the bottom add some weight and help each strand hang straight.
The pattern uses US crochet terms. The finished curtain is 49 in (124.5 cm) wide. It hangs 68.25 in (173.4 cm) from the rod to the tassel tips.
Here is how it’s built. You work each diamond in rows from the bottom tip to the top tip, then add a two-round edging. In the second edging round, you join each diamond to the one above it, so every strand grows from the top down. At the end you add hanging loops and tassels.
Finished Size and Construction
- Finished curtain: 49 in (124.5 cm) wide × 68.25 in (173.4 cm) drop
- Skill level: Intermediate
- Terminology: US
- Yarn weight: DK (#3) cotton or cotton blend
- Hook: 4 mm (G-6)
- Number of pieces: 72 diamonds (40 yellow, 32 green)
- Layout: 9 strands × 8 diamonds
- Diamond size (finished): 5 in (12.7 cm) × 7 in (17.8 cm)
- Diamond size before border: 4.5 in (11.4 cm) × 6.5 in (16.5 cm)
- Border depth: 0.25 in (0.6 cm) per side
- Link between diamonds: 0.75 in (1.9 cm)
- Strand length (crochet only): 61.25 in (155.6 cm)
Materials
Pick a smooth mercerized cotton or a cotton-bamboo blend in DK weight. Smooth cotton shows the fans clearly, and it holds its shape when it hangs in sunlight. This pattern assumes 50 g balls with about 120 m each.
- Pale yellow: 5 balls, 250 g / 600 m (about 420 m needed)
- Leaf green: 4 balls, 200 g / 480 m (about 335 m needed)
Each diamond uses about 9 m (4 g). Each tassel uses about 11 m (5 g).
Tools:
– 4 mm (G-6) hook
– Tapestry needle
– Scissors
– Stiff card 5.5 in (14.0 cm) tall for the tassels
– Rust-proof pins and a blocking mat
– Measuring tape
– Wooden curtain rod, 1 in (2.5 cm) diameter or less
The quantities include a margin of about 40% for gauge differences and swatching.
Abbreviations (US Terms)
- ch: chain
- sl st: slip stitch
- sc: single crochet
- dc: double crochet
- sp: space
- st(s): stitch(es)
- tch: turning chain
Special stitches:
– Fan: 3 dc in the same stitch.
– V-st: (dc, ch 1, dc) in the same space. The ch-1 in the middle is the “V-sp.”
– dc4tog: Yarn over, insert hook in the next indicated place, pull up a loop, yarn over, pull through 2 loops. Repeat from * to * 3 more times in the next 3 indicated places, then yarn over and pull through all 5 loops on the hook.
Counting notes:
– The ch-4 at the start of a row counts as 1 dc plus 1 ch-1 sp.
– For a row with k fans on each side, the count is (6k + 4) dc and (2k + 3) ch-1 sps.
Gauge and Checkpoints
Make one complete diamond, including both border rounds, before you start the rest.
Gauge:
– 4 dc rows = 2 in (5.1 cm)
– One fan plus its ch 1 = 0.6 in (1.5 cm) wide
– The edge dc plus ch 1 at each end of a row = 0.3 in (0.8 cm)
– The center V-st = 0.3 in (0.8 cm)
Checkpoints (measure lightly stretched, not pulled):
– After Row 3: 2.1 in (5.3 cm) wide
– After Row 5: 3.3 in (8.4 cm) wide
– After Row 7: 4.5 in (11.4 cm) wide, and 3.5 in (8.9 cm) tall from the bottom tip
– After Row 13: 6.5 in (16.5 cm) tall from tip to tip
– After the border: 5 in (12.7 cm) × 7 in (17.8 cm)
If your diamond is too big, go down 0.5 mm in hook size. If it’s too small, go up 0.5 mm. If the width matches but the height is off, check your dc height. Pull each loop up to the full height of the hook shaft instead of changing hooks.
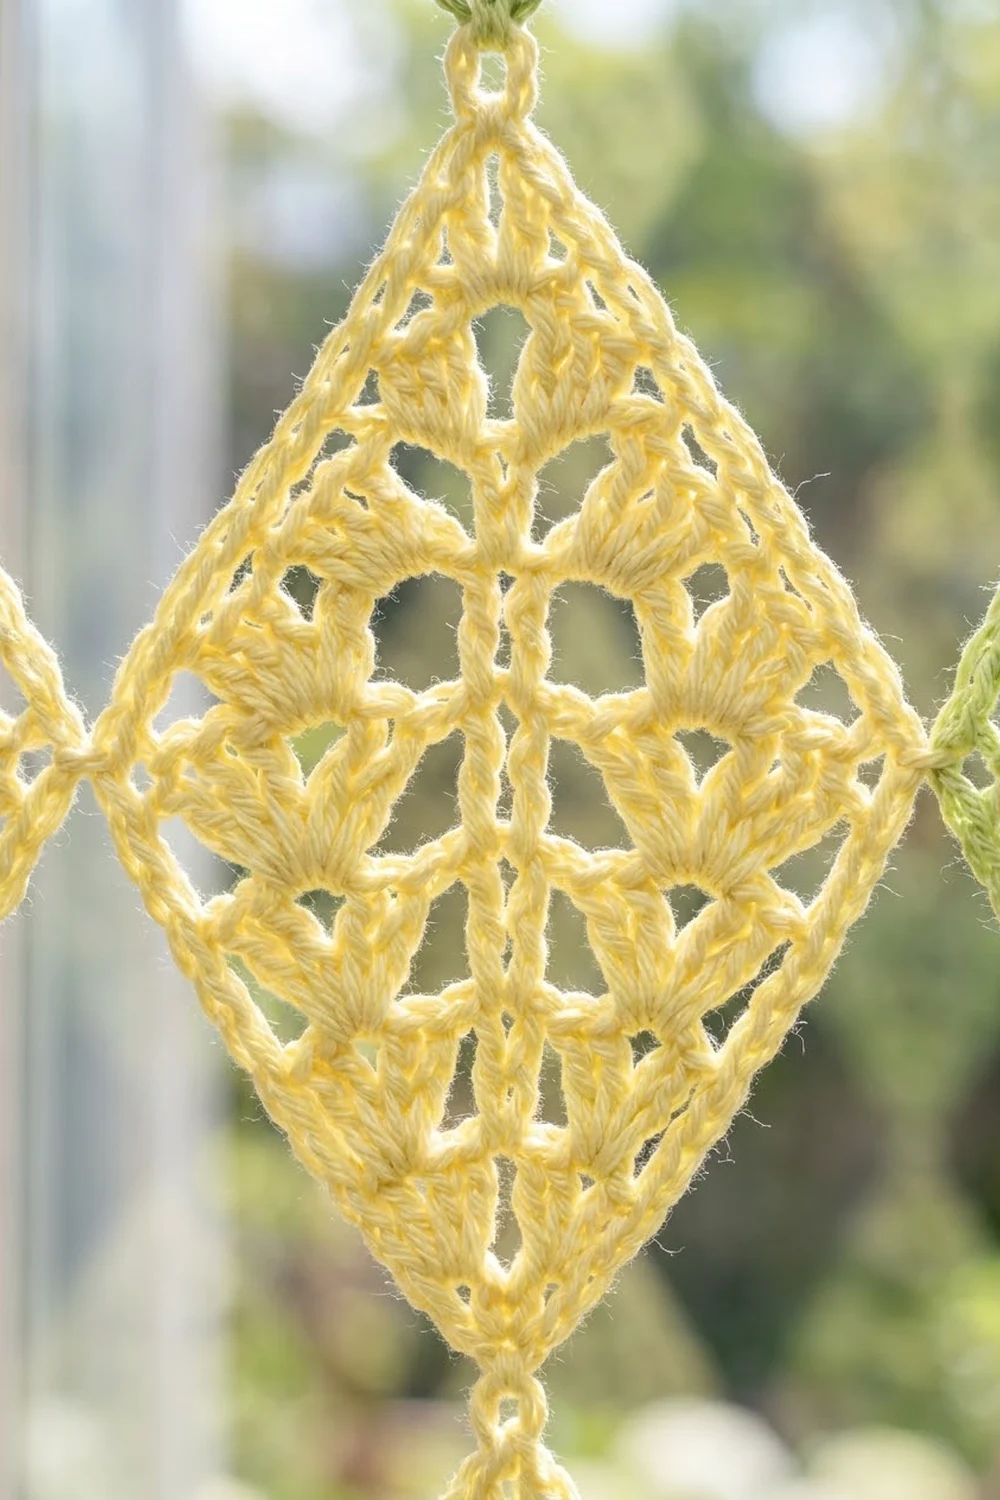
Diamond Motif
Make 72 in total. Work in rows, turning at the end of each row.
Foundation: Ch 4, then sl st in the first ch to form a ring.
Row 1 (RS): Ch 4 (counts as dc + ch 1). In the ring, work a V-st, then ch 1 and dc. Turn.
(4 dc, 3 ch-1 sps; k = 0)
Row 2 (increase): Ch 4. In the next ch-1 sp, make a fan. Ch 1. V-st in the V-sp. Ch 1. Fan in the next ch-1 sp. Ch 1, then dc in the 3rd ch of the tch. Turn.
(10 dc, 5 ch-1 sps; k = 1)
Row 3 (plain): Ch 4. Fan in the center dc of the next fan, then ch 1. V-st in the V-sp. Ch 1, then fan in the center dc of the next fan. Ch 1, then dc in the 3rd ch of the tch. Turn.
(10 dc, 5 ch-1 sps)
Row 4 (increase): Ch 4. Fan in the next ch-1 sp, then ch 1. Fan in the center dc of the next fan, then ch 1. V-st in the V-sp. Ch 1, fan in the center dc of the next fan. Ch 1, fan in the next ch-1 sp. Ch 1, then dc in the 3rd ch of the tch. Turn.
(16 dc, 7 ch-1 sps; k = 2)
On increase rows, you make a new fan at each edge in the ch-1 sp just inside the edge dc. That starts a new column on each side, and the diamond grows outward. Inner fans always sit in the center dc of the fan below, which stacks them into straight columns.
Row 5 (plain): Ch 4. Fan in the center dc of the next fan, ch 1. Repeat from * to * once more. V-st in the V-sp. Ch 1, fan in the center dc of the next fan. Repeat from ** to ** once more. Ch 1, then dc in the 3rd ch of the tch. Turn.
(16 dc, 7 ch-1 sps)
Row 6 (increase): Ch 4. Fan in the next ch-1 sp, then ch 1. Fan in the center dc of the next fan, ch 1. Repeat from * to * once more. V-st in the V-sp. Ch 1, fan in the center dc of the next fan. Repeat from ** to ** once more. Ch 1, fan in the next ch-1 sp. Ch 1, then dc in the 3rd ch of the tch. Turn.
(22 dc, 9 ch-1 sps; k = 3)
Row 7 (plain, widest row): Work the same as Row 5, but with 3 fans on each side.
(22 dc, 9 ch-1 sps)
Check that the piece is 4.5 in (11.4 cm) wide.
Row 8 (decrease): Sl st in the first ch-1 sp, then sl st in the next 2 dc. You are now in the center dc of the outer fan. Ch 4 (counts as dc + ch 1). Fan in the center dc of the next fan, ch 1. Repeat from * to * once more. V-st in the V-sp. Ch 1, fan in the center dc of the next fan. Repeat from ** to ** once more. Ch 1, then dc in the center dc of the last fan. Leave the remaining sts unworked. Turn.
(16 dc, 7 ch-1 sps; k = 2)
On a decrease row, the outer fan column ends at each edge. Its center dc becomes the new edge stitch, which steps the edge inward.
Row 9 (plain): Work the same as Row 5.
(16 dc, 7 ch-1 sps)
Row 10 (decrease): Sl st in the first ch-1 sp and the next 2 dc. Ch 4. Fan in the center dc of the next fan, then ch 1. V-st in the V-sp. Ch 1, fan in the center dc of the next fan. Ch 1, then dc in the center dc of the last fan. Turn.
(10 dc, 5 ch-1 sps; k = 1)
Row 11 (plain): Work the same as Row 3.
(10 dc, 5 ch-1 sps)
Row 12 (decrease): Sl st in the first ch-1 sp and the next 2 dc. Ch 4. V-st in the V-sp. Ch 1, then dc in the center dc of the last fan. Turn.
(4 dc, 3 ch-1 sps; k = 0)
Row 13 (tip): Ch 2. Work dc4tog over these 4 places: the next ch-1 sp, the V-sp, the next ch-1 sp, and the 3rd ch of the tch.
(1 cluster)
Don’t fasten off. Go straight on to Border Round 1, which is part of every diamond.
The finished shape is symmetric. There are 6 rows below Row 7 and 6 rows above it, so the side points sit exactly halfway up the diamond.
Make All Pieces
Work Rows 1–13 and Border Round 1 on every diamond. Leave Border Round 2 until you assemble, because the join happens in that round.
- Pale yellow: 40 diamonds (5 strands × 8)
- Leaf green: 32 diamonds (4 strands × 8)
Layout (columns are strands, read from left to right; rows are diamond positions, from top to bottom):
      S1 S2 S3 S4 S5 S6 S7 S8 S9
D1    Y  G  Y  G  Y  G  Y  G  Y
D2    Y  G  Y  G  Y  G  Y  G  Y
D3    Y  G  Y  G  Y  G  Y  G  Y
D4    Y  G  Y  G  Y  G  Y  G  Y
D5    Y  G  Y  G  Y  G  Y  G  Y
D6    Y  G  Y  G  Y  G  Y  G  Y
D7    Y  G  Y  G  Y  G  Y  G  Y
D8    Y  G  Y  G  Y  G  Y  G  Y
Y = pale yellow, G = leaf green.
Joining
Each strand is joined as you go, from the top down. The strands themselves are never joined to each other. They hang separately, and the spacing on the rod keeps them apart.
Method:
1. Work Border Round 2 on Diamond 1, using the hanging-loop version of the top tip. This diamond now has a free ch-4 loop at its bottom tip.
2. Work Border Round 2 on Diamond 2, using the joining version of the top tip: ch 2, sl st through the bottom-tip ch-4 loop of Diamond 1, ch 2.
3. Join Diamonds 3 through 8 in the same way, each one to the bottom loop of the diamond above it.
Stitch logic: Each join connects one point to one point: a single sl st through a single loop. No extra stitches go along the sides, so the diamonds keep their pointed outline. The link from tip to tip is the bottom ch-4 loop plus the ch 2, which comes to about 0.75 in (1.9 cm).
Tension: Keep the link chains the same size as your normal chains. Tight links make the strand twist. Loose links make it sag, and the gaps look uneven.
Size checkpoint: A finished strand should measure 8 × 7 in + 7 × 0.75 in = 61.25 in (155.6 cm), not counting the hanging loop or tassel.
Border
Border gauge: 7 sc = 2 in (5.1 cm) along a diagonal edge. Each diagonal side of the diamond is about 4 in (10.2 cm) long.
Round 1 (sc): Ch 1. In the top of the cluster, work (sc, ch 3, sc); this is the top tip. Working down the first side, make 2 sc in each row-end of Rows 13 down to 8 (12 sc). In the Row 7 row-end, work (sc, ch 2, sc); this is a side point. Make 2 sc in each row-end of Rows 6 down to 1 (12 sc). In the foundation ring, work (sc, ch 3, sc); this is the bottom tip. Make 2 sc in each row-end of Rows 1 to 6 (12 sc). In the Row 7 row-end, work (sc, ch 2, sc). Make 2 sc in each row-end of Rows 8 to 13 (12 sc). Sl st in the first sc to close the round.
Count: 56 sc, 2 ch-3 tip sps, and 2 ch-2 side sps. Each side has 14 sc: 12 along the side, plus 1 corner sc at each end. 4 sides × 14 = 56. Each corner group (sc, ch, sc) gives one sc to each of the two sides it joins, so no corner sc is counted twice.
Round 2 (sl st, with joins): Sl st into the top-tip ch-3 sp. Finish the top tip with one of these three versions:
– Hanging loop (Diamond 1 only): ch 20, sl st in the same sp.
– Join (Diamonds 2–8): ch 2, sl st through the bottom ch-4 loop of the diamond above, ch 2, sl st in the same sp.
– Plain: ch 4, sl st in the same sp.
Then:
– Sl st in each of the next 14 sc.
– In the ch-2 side sp, work (sl st, ch 1, sl st).
– Sl st in each of the next 14 sc.
– In the bottom-tip ch-3 sp, work (sl st, ch 4, sl st). The ch-4 loop is the connection point for the next diamond, or for the tassel on Diamond 8.
– Sl st in each of the next 14 sc.
– In the ch-2 side sp, work (sl st, ch 1, sl st).
– Sl st in each of the last 14 sc. The last of these is the sc where Round 1 was closed.
– Join to the first sl st and fasten off.
Count: 64 sl sts: 14 per side × 4 sides = 56, plus 2 in each of the 4 corner sps = 8.
Why the math works: A DK dc row-end is about 0.5 in (1.3 cm) tall, and 2 sc fill that height without ruffling or pulling. Each side covers 6 row-ends, so 12 sc go along it. The sl st round adds texture and firmness but no extra width. Each round adds about 0.125 in (0.3 cm) to every edge, for a total border depth of 0.25 in (0.6 cm). That takes the diamond from 4.5 in × 6.5 in (11.4 cm × 16.5 cm) to 5 in × 7 in (12.7 cm × 17.8 cm).
Tassels and Hanging
Tassels (make 9; 5 yellow, 4 green):
1. Wrap the yarn 40 times around a 5.5 in (14.0 cm) card.
2. Thread a 12 in (30.5 cm) tie strand under the wraps at the top, knot it tightly, and cut the wraps along the bottom.
3. Wrap a second strand 6 times around the bundle, 0.75 in (1.9 cm) below the top, then knot it and bury the ends.
4. Trim the tassel to 5 in (12.7 cm).
5. Use the top tie strand to fasten the tassel through the bottom-tip ch-4 loop of Diamond 8, then weave the ends in.
Hanging: Slide each ch-20 loop onto the rod. Space the loops 5.5 in (14.0 cm) apart from center to center. That leaves 0.5 in (1.3 cm) between neighboring strands at their side points, for a total width of 9 × 5 in + 8 × 0.5 in = 49 in (124.5 cm). Each loop drops about 2 in (5.1 cm) below the rod, so the total drop is 2 + 61.25 + 5 = 68.25 in (173.4 cm).
Final Blocking
- Weave in all the ends before blocking, working each one along the edges or spine of its own diamond.
- Soak each strand in cool water for 10 minutes, then press out the water. Don’t wring it.
- Roll the strand in a towel to take out more moisture.
- Lay it flat and pin each diamond to 5 in × 7 in (12.7 cm × 17.8 cm). Put one pin at each tip and each side point.
- Straighten the center spine of each diamond and open out every fan.
- Check that each link measures 0.75 in (1.9 cm).
- Leave it to dry completely. Brush out the tassels, then hang the strand on the rod and let it settle for a day.
Final Quality-Control Checklist
- [ ] There are 72 diamonds: 40 yellow and 32 green.
- [ ] Every diamond has 13 rows, and Row 7 has 22 dc and 9 ch-1 sps.
- [ ] Border Round 1 has 56 sc, with 14 per side.
- [ ] Border Round 2 has 64 sl sts.
- [ ] Each diamond measures 5 in × 7 in (12.7 cm × 17.8 cm).
- [ ] Each strand measures 61.25 in (155.6 cm) without its loop and tassel.
- [ ] Every join is a single sl st through one ch-4 loop.
- [ ] Each tassel is 5 in (12.7 cm) long and matches its strand.
- [ ] The strands follow the order Y G Y G Y G Y G Y.
- [ ] All the ends are woven in and secure.
Troubleshooting
- The diamond leans to one side. You probably missed an edge stitch or used the wrong point for a decrease. Recount against the row totals; each side should mirror the other.
- The fans don’t stack in columns. Each inner fan goes into the center dc of the fan below it, not into a ch-1 sp. Only the new edge fan on an increase row goes into a ch-1 sp.
- The diamond is too wide or too short. Your dc is too short for the fan width. Lengthen the dc loops, or go up a hook size and recheck the Row 7 checkpoint.
- The edges ruffle. You’ve made more than 2 sc in a row-end. Rework Border Round 1 with exactly 12 sc along each side.
- The edges pull in or cup. Your border is too tight. Work Round 2 with a looser sl st, or use a hook one size larger for that round only.
- A strand twists when hanging. The link chains don’t match each other. Redo the tight ones and steam-block the strand while it hangs.
- The tips look blunt. Work the tip groups exactly as written, and pin the tips out sharp during blocking.
Care
Hand wash in cool water with a mild detergent, then dry flat. Every few months, take the curtain down and give it a short soak to remove dust. Re-pin the diamonds if they’ve stretched.
Final Notes
Here is the full measurement chain for this curtain:
– The fans and dc rows give a diamond 4.5 in × 6.5 in (11.4 cm × 16.5 cm) at Row 13.
– The border takes it to 5 in × 7 in (12.7 cm × 17.8 cm).
– Eight diamonds and seven 0.75 in (1.9 cm) links make a strand 61.25 in (155.6 cm) long.
– Loops and tassels bring the drop to 68.25 in (173.4 cm).
– Nine strands spaced on the rod give a width of 49 in (124.5 cm).
Check each stage before you move on, and the finished curtain will hang evenly.
Happy crocheting!