

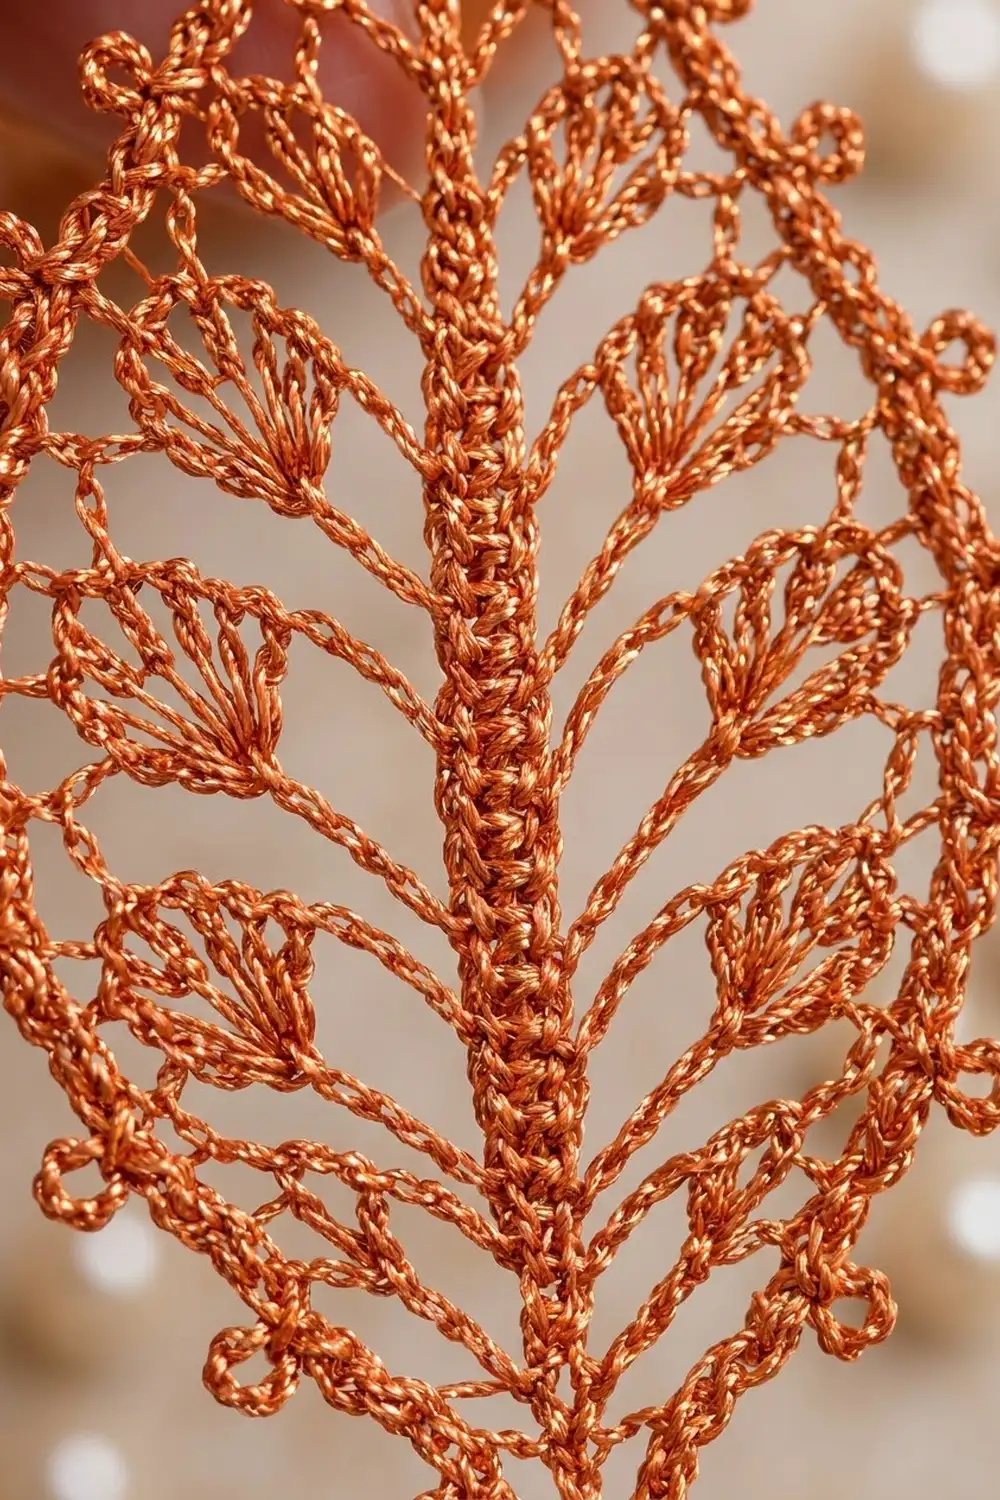
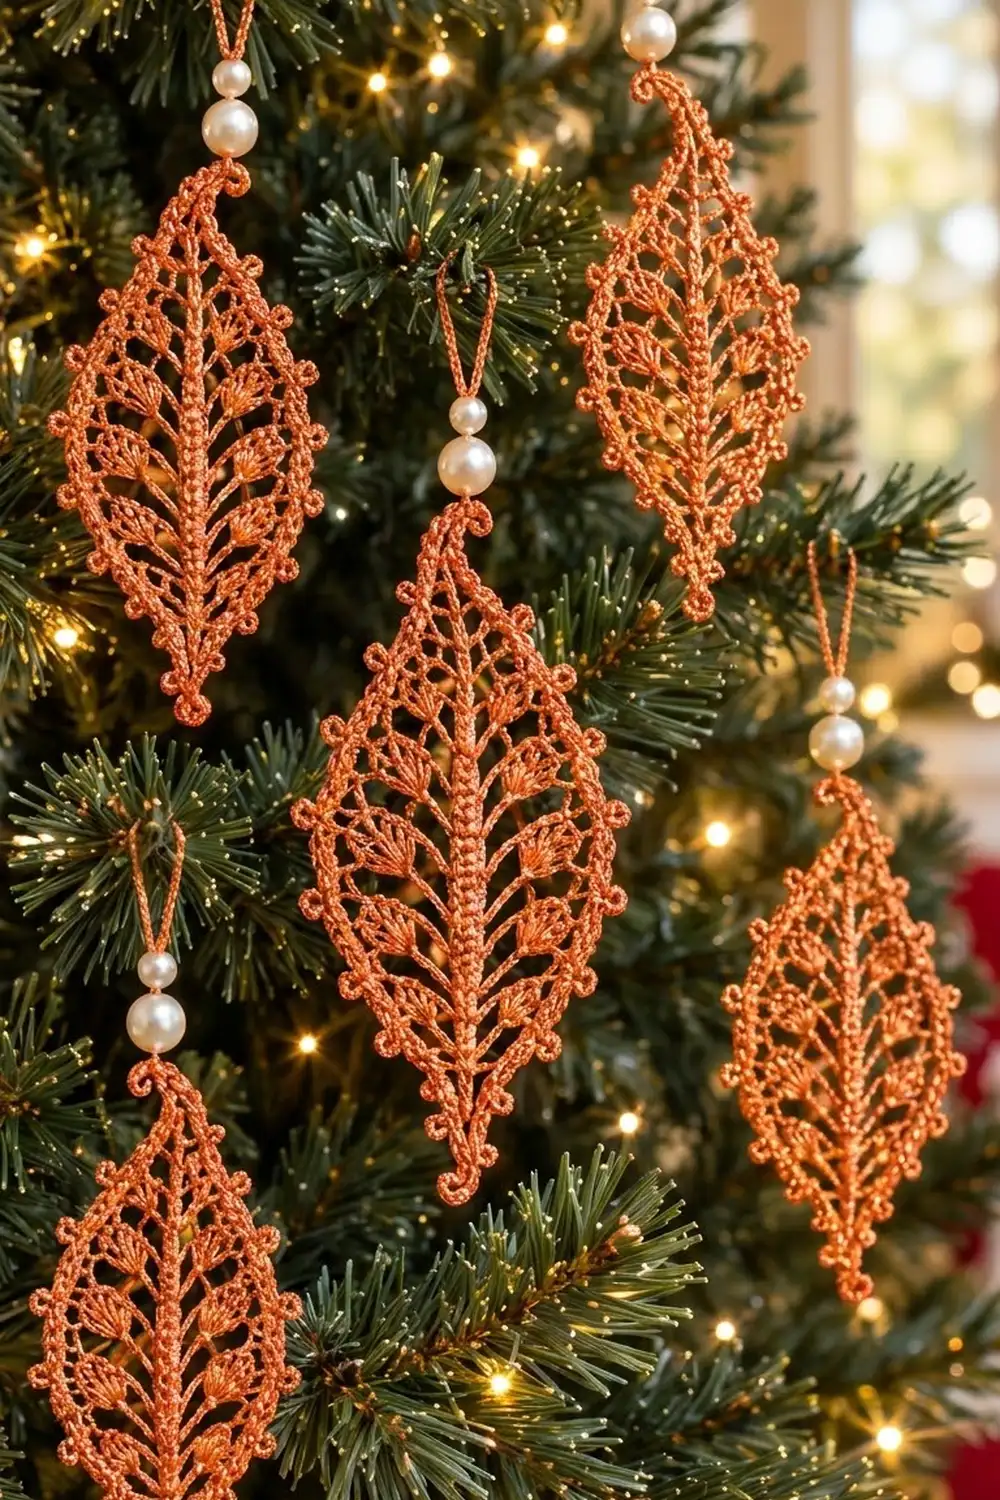
This little leaf is a bit of thread lace made to hang on the tree. It has a solid ridged spine, six small dc fans on each side, an open chain frame, and a neat picot edge. Copper metallic thread makes it catch the light, and two cream pearls on the hanger finish it off.
The style borrows from Irish crochet and filigree lace, but you won’t need any freeform motifs. The whole ornament is worked in joined rounds around one foundation chain, so it is one single piece with only two ends to weave in.
The pattern uses US crochet terms. After blocking, the leaf body measures 2 in (5.1 cm) wide by 4.25 in (10.8 cm) long. With the bottom curl it is 4.75 in (12.1 cm) long, and the hanger adds a 2.5 in (6.4 cm) loop above the pearls.
Here’s how it’s built. Round 1 works sc around both sides of a chain to make the spine. Round 2 adds the vein fans and the bottom curl. Round 3 builds the chain frame, and Round 4 adds the picot edge. Starch and pin the leaf, then thread on the pearl hanger.
Finished Size and Construction
- Finished size: 2 in (5.1 cm) wide x 4.25 in (10.8 cm) long without the curl; 4.75 in (12.1 cm) long with the curl
- Skill level: Intermediate (thread work, counting around a spine)
- Terminology: US crochet terms
- Yarn weight: Size 10 crochet thread (lace weight, category 0)
- Hook: 1.5 mm steel hook (US 8 steel)
- Number of pieces: 1
- Layout: Single motif, hung vertically with the tip at the top
- Piece size: 2 in x 4.25 in (5.1 cm x 10.8 cm)
- Size before border (after Round 2): 1.5 in (3.8 cm) wide x 3.75 in (9.5 cm) long
- Border depth (Rounds 3–4): about 0.25 in (0.6 cm) per side, plus the tip and base extensions
Materials
Thread: Pick a size 10 metallic or metallic-blend crochet thread with a firm twist. Very soft metallic threads split on a steel hook and won’t hold the fans crisply. Mercerized cotton in a copper or rust shade also works well if you want less shine.
- Copper metallic thread: 5 g, about 25 m (27 yd) per ornament
The quantity includes a margin for your gauge swatch and the 14 in (35.6 cm) hanger tail. One leaf actually uses about 18 m (20 yd).
Tools and notions:
– 1.5 mm (US 8) steel crochet hook
– 1 cream pearl bead, 8 mm, with a hole of at least 1 mm
– 1 cream pearl bead, 6 mm, with a hole of at least 1 mm
– Fine beading needle or big-eye needle
– Tapestry needle for weaving in
– Fabric stiffener or heavy spray starch
– Blocking foam and rustproof pins
– Toothpick or thin skewer (for shaping the curl)
– Scissors and a ruler
Abbreviations (US Terms)
- ch – chain
- sl st – slip stitch
- sc – single crochet
- dc – double crochet
- sp – space
- st(s) – stitch(es)
- rep – repeat
Special stitches
- Vein Fan (VF): Ch 7, sl st in 4th ch from hook to form a small ring, work 7 dc in the ring, then sl st in each of the next 3 ch of the stalk. You end back at the base of the stalk. Each VF is a 3-ch stalk topped by a half-round fan of 7 dc. The center dc is the 4th dc.
- Curl: Ch 9, 2 sc in 2nd ch from hook and in each remaining ch across (16 sc). The extra stitches twist the strip into a corkscrew.
- Picot: Ch 3, sl st in 3rd ch from hook.
Gauge and Checkpoints
Gauge: 10 sc = 1 in (2.5 cm) and 10 ch = 1 in (2.5 cm) in size 10 thread with a 1.5 mm hook.
Since this is a one-piece project, your first leaf is your test piece. Work Rounds 1 and 2, then measure before you go on.
Checkpoints:
– After Round 1: The spine is 3.75 in (9.5 cm) long and about 0.25 in (0.6 cm) wide.
– After Round 2: Pin the fans out flat. From the tip of one fan to the tip of the fan opposite, the leaf measures about 1.5 in (3.8 cm). Each fan sticks out about 0.6 in (1.5 cm) from the spine.
– After Round 3: The frame measures 1.75 in (4.4 cm) wide x 4 in (10.2 cm) long.
– After Round 4 and blocking: 2 in (5.1 cm) x 4.25 in (10.8 cm), without the curl.
Spine too long? Your tension is loose. Try a 1.4 mm hook. Spine too short? Go up to a 1.65 mm hook. Don’t change the stitch counts. The frame loops are sized to fit the 5-stitch spacing between fans, so changing counts will distort the leaf.
Pattern
Round 1: Spine
Ch 37.
Round 1: Sc in 2nd ch from hook and in each of the next 34 ch (35 sc). Work 3 sc in the last ch. Rotate and work along the free loops of the foundation chain: sc in each of the next 34 ch. Work 2 sc in the same ch as the first sc. Join with sl st to the first sc. (74 sc)
How the stitches sit:
– Top end: 3 sc (the first sc plus the last 2 sc)
– Side A: 34 sc
– Base end: 3 sc
– Side B: 34 sc
That’s 3 + 34 + 3 + 34 = 74. You get the ridged, double-column spine by working sc into both sides of the chain.
Round 2: Vein Fans and Curl
Round 2: Ch 1, (sc, ch 3, sc) in the same st as the join. This top ch-3 sp is the anchor for the frame and the hanger.
Side A: Sc in next 4 sts, *VF, sc in next 5 sts; rep from * 5 more times. (34 sc and 6 VF)
Base: Sc in next st, (sc, Curl, sc) in next st, sc in next st. (4 sc and 1 Curl)
Side B: Sc in next 5 sts, *VF, sc in next 5 sts; rep from * 4 more times, VF, sc in next 4 sts. (34 sc and 6 VF)
Top: Sc in each of the last 2 sts. Join with sl st to the first sc.
Round 2 count: 76 sc, 12 VF (6 per side), 1 Curl, 1 top ch-3 sp.
Here’s the arithmetic: 2 + 34 + 4 + 34 + 2 = 76 sc. Side A is 4 + (6 x 5) = 34 sc. Side B is 5 + (5 x 5) + 4 = 34 sc. Because of this, the fans on each side line up as mirror-image pairs, 5 spine sts (0.5 in / 1.3 cm) apart. The top pair starts 4 sts below the tip, and the lowest pair sits 5 sts above the base.
As you work, push each fan so it points outward and slightly up toward the tip. Blocking will set the angle.
Border
The border has two rounds. Round 3 is the open frame of chain loops, and Round 4 is the picot edge. Together they form the outline of the leaf.
Border gauge: One ch-6 loop spans the 0.5 in (1.3 cm) between neighboring fans. The extra 0.1 in (0.3 cm) gives the slack needed to follow the outward curve. The ch-9 loops at the tip and the ch-7 loops at the base cover the longer diagonal distances to the points.
Round 3: Chain Frame
Round 3: Sl st into the top ch-3 sp, ch 1, sc in the same sp (top anchor).
Side A: Ch 9, sc in the 4th dc of the first VF. (Ch 6, sc in the 4th dc of the next VF) 5 times. Ch 7, sc in the sc just before the Curl (base anchor). Leave the Curl free.
Side B: Ch 7, sc in the 4th dc of the first VF on Side B. (Ch 6, sc in the 4th dc of the next VF) 5 times. Ch 9, join with sl st to the first sc.
Round 3 count: 14 anchor sc and 14 ch-loops.
– Per side: 1 ch-9 loop, 5 ch-6 loops, 1 ch-7 loop = 9 + 30 + 7 = 46 ch
– Total: 92 ch
Round 4: Picot Edge
Round 4: Sl st in the first ch-9 sp, ch 1.
Side A: (3 sc, picot, 3 sc, picot, 3 sc) in the ch-9 sp. *Sl st in next anchor sc, (3 sc, picot, 3 sc) in next ch-6 sp; rep from * 4 more times. Sl st in next anchor sc, (4 sc, picot, 3 sc) in the ch-7 sp.
Base: Sl st in the base anchor sc.
Side B: (3 sc, picot, 4 sc) in the next ch-7 sp. *Sl st in next anchor sc, (3 sc, picot, 3 sc) in next ch-6 sp; rep from * 4 more times. Sl st in next anchor sc, (3 sc, picot, 3 sc, picot, 3 sc) in the last ch-9 sp. Join with sl st to the top anchor sc.
Round 4 count per side: 46 sc and 8 picots.
– ch-9 loop: 9 sc + 2 picots
– 5 ch-6 loops: 30 sc + 5 picots
– ch-7 loop: 7 sc + 1 picot
Round 4 total: 92 sc, 16 picots, 14 sl sts (13 worked into anchors, plus the closing join into the top anchor).
Why the math works: Each loop gets exactly as many sc as it has chains: 9 in 9, 6 in 6, 7 in 7. One sc per chain covers the loop completely without stretching it (which would cup the edge) or crowding it (which would ruffle it). The side totals match the frame exactly (46 ch to 46 sc), and the two sides are mirror images. The picots fall about every 0.3 in (0.8 cm) along each side, with two closer together near the tip so the point looks sharper.
Hanger
Cut the thread, leaving a 14 in (35.6 cm) tail, and pull it through the last loop. Thread the tail onto a beading needle. Pick up the 8 mm pearl, then the 6 mm pearl, and slide both down until they rest against the tip.
Make a 2.5 in (6.4 cm) loop above the pearls. Then pass the needle back down through the 6 mm pearl, the 8 mm pearl, and the top ch-3 sp from Round 2. Snug the loop so the two strands lie side by side, and knot securely at the base of the tip. Weave the tail down into the spine.
Final Blocking
- Weave in the starting tail along the spine before blocking.
- Soak the leaf in fabric stiffener, or wet it and spray it heavily with starch. Blot it in a towel until it’s damp, not dripping.
- Lay it on blocking foam. Pin the spine dead straight, 3.75 in (9.5 cm) long.
- Pin the top point and the base anchor so the body is 4.25 in (10.8 cm) long.
- Pin each fan open at its center dc, angled up toward the tip. Mirror each pair across the spine.
- Pin out each picot, pulling the edge to 2 in (5.1 cm) at the widest point, about one-third of the way up from the base.
- Wrap the damp Curl around a toothpick, slide it off, and let it hang free.
- Let it dry completely, at least 12 hours, before you unpin it.
Final Quality-Control Checklist
- Spine is straight, with 34 sc on each side.
- 6 fans on each side, in mirrored pairs, each with 7 dc.
- Every frame loop is anchored to the 4th (center) dc of its fan.
- 8 picots per side, 16 in total.
- Measures 2 in x 4.25 in (5.1 cm x 10.8 cm), or 4.75 in (12.1 cm) long with the Curl.
- The Curl twists in a tight corkscrew.
- Both pearls sit snugly at the tip and the hanger loop is 2.5 in (6.4 cm).
- All ends are hidden inside the spine.
Troubleshooting
Fans flop or cup. The ring may be too large. Pull the starting sl st of each VF ring tight. Stiffen generously.
Fans aren’t aligned in pairs. Recount Round 2. Side A starts with 4 sc and Side B ends with 4 sc.
Edge ruffles. You worked extra sc in a loop. Work exactly one sc per chain.
Edge cups or pulls the fans inward. Your chains are too tight. Go up a hook size for Round 3 only.
Leaf leans to one side. One side’s frame loops differ from the other’s. Compare the two sides loop by loop: 9, 6, 6, 6, 6, 6, 7.
Curl won’t twist. Make sure you worked 2 sc in every chain, 16 sc in total.
Pearls won’t pass over doubled thread. Use beads with a 1 mm hole or larger, or use a single strand and tie off above the beads.
Care
Store flat or hanging, away from moisture and direct sun. If the leaf gets crushed, dampen it, re-pin it, and starch it again.
Final Notes
The measurement chain is simple:
1. The 36 working ch set a 3.75 in (9.5 cm) spine.
2. Fans every 5 sts space the veins 0.5 in (1.3 cm) apart and widen the leaf to 1.5 in (3.8 cm).
3. Frame loops of 9, 6, and 7 ch take it to 1.75 in (4.4 cm).
4. One sc per chain plus picots finishes it at 2 in x 4.25 in (5.1 cm x 10.8 cm).
Once the first leaf matches every checkpoint, the rest will come out the same size, ready for a whole branch of copper leaves.
Happy crocheting!