

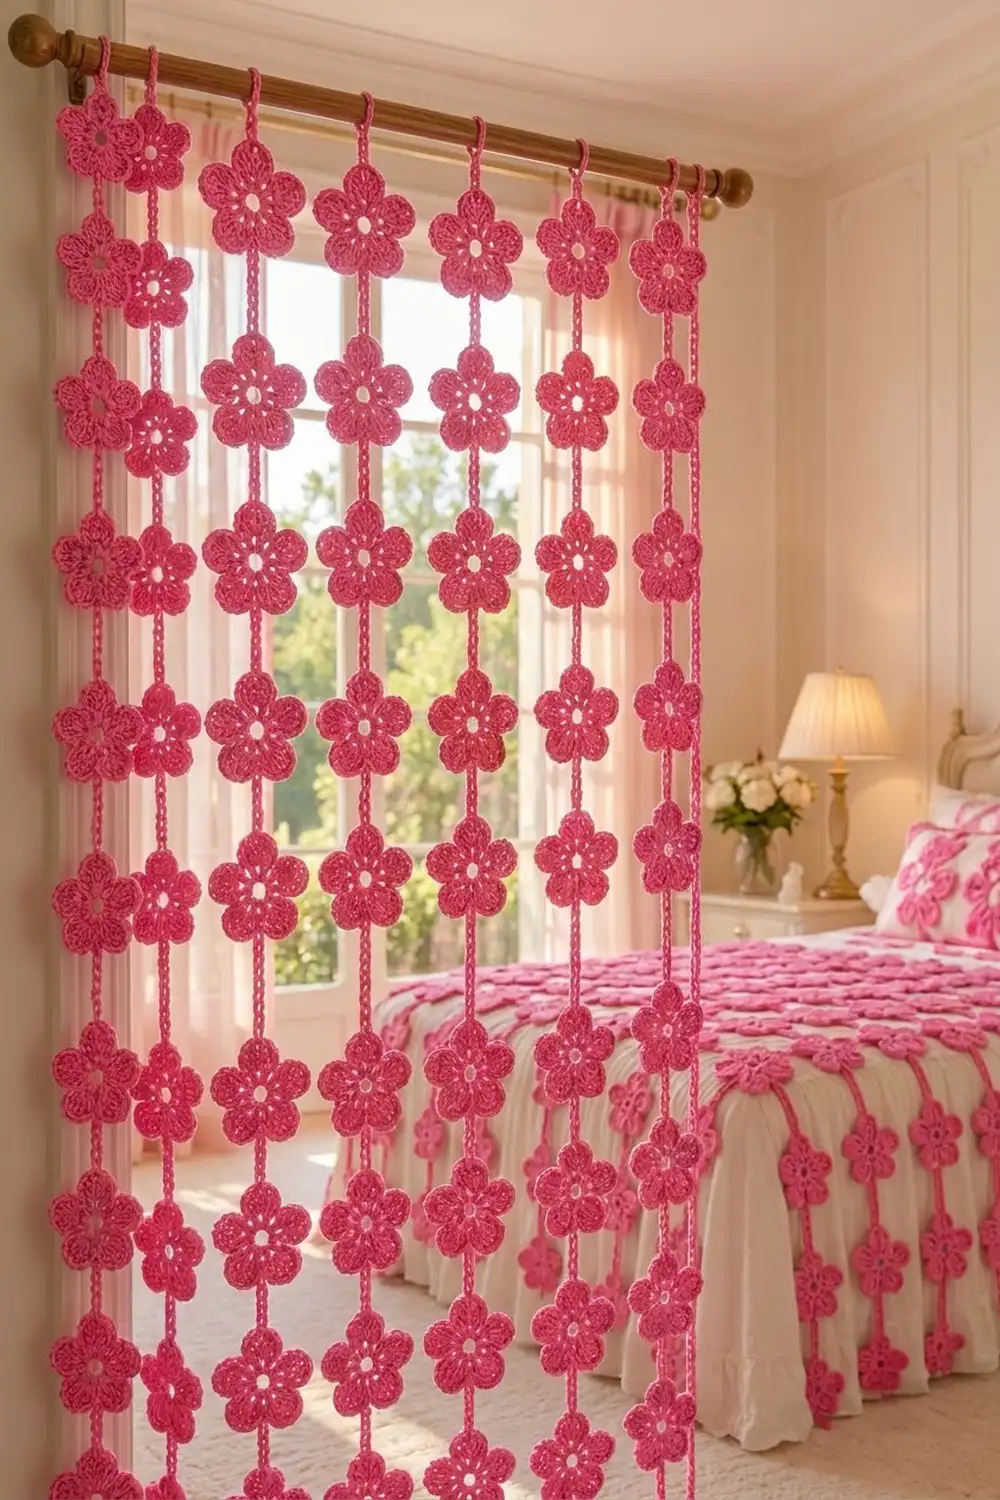
This curtain is made from strands of bright pink five-petal flowers joined by slim chain cords. It hangs from a rod and lets light through the open centers and the gaps between strands. It works well in a bedroom window, a doorway, or anywhere a soft, airy divider would help.
Each flower has an open center, a ring of small eyelets, and five solid rounded petals edged with single crochet. The whole curtain uses one color, so it looks bold but stays simple. All terms are US crochet terms.
The finished panel shown here has 10 strands of 10 flowers. It is about 49 in (124.5 cm) wide and has a 77 in (195.6 cm) drop measured from the top of the rod. Each flower is 3.5 in (8.9 cm) tall and about 4 in (10.2 cm) wide.
Construction is easy to follow. You make every flower separately in 4 rounds. Then you join flowers into strands with chain-and-slip-stitch connector cords and finish the top of each strand with a cord and hanging loop.
Finished Size and Construction
- Finished panel size: 49 in (124.5 cm) wide x 77 in (195.6 cm) drop
- Skill level: Easy / advanced beginner
- Terminology: US crochet terms
- Yarn weight: Worsted (#4)
- Hook: 5 mm (H-8)
- Number of pieces: 100 flowers, 90 connector cords, 10 top cords with loops
- Layout: 10 strands x 10 flowers, strands spaced 5 in (12.7 cm) apart center to center
- Piece size: 3.5 in (8.9 cm) tall (top petal tip to bottom valley) x 4 in (10.2 cm) wide
- Size before border: 3 in (7.6 cm) tall after Round 3
- Border depth: Round 4 adds 0.25 in (0.6 cm) around each petal; the top finish adds a 4 in (10.2 cm) cord and a 2 in (5.1 cm) hanging loop
Materials
Yarn: Use a worsted-weight cotton or cotton blend. Cotton holds its shape on a long drop and won’t stretch as much as acrylic. A smooth, tightly plied yarn gives crisp petals and clean eyelets.
- Bubblegum pink: 600 g, about 1,020 m (based on 170 m per 100 g)
Each flower takes about 4 g (7 m), each connector about 0.7 g (1.2 m), and each top cord about 1.2 g (2 m). That adds up to roughly 475 g (808 m). The amount listed includes a margin of about 25% for gauge differences, test pieces, and tails.
Tools:
- 5 mm (H-8) crochet hook
- Tapestry needle
- Scissors
- Locking stitch markers
- Tape measure
- Blocking mat, rustproof pins, and a spray bottle
- Curtain rod up to 1 in (2.5 cm) in diameter
Abbreviations (US Terms)
- ch – chain
- sl st – slip stitch
- sc – single crochet
- hdc – half double crochet
- dc – double crochet
- tr – treble crochet
- sp – space
- st(s) – stitch(es)
Special stitch – back bump slip stitch: Turn the chain over so you can see the row of little bumps on the back. Insert your hook into the bump of the next chain, yarn over, and pull through the bump and the loop on your hook. Working back along the chain this way adds a second line of stitches on top of it. That gives the cord its slightly doubled look and keeps it from stretching.
Tip stitch: On each petal, Round 4 places 2 sc in the center tr. The first of these 2 sc is the tip stitch. Connectors and top cords are joined here.
Bottom valley: The sl st where Round 4 starts and ends. It sits between Petal 5 and Petal 1, directly opposite the tip of Petal 3.
Gauge and Checkpoints
Make one complete flower and one test cord before you start the full set. Gauge matters more for flowers than for most motifs, because you will repeat any size error 100 times.
- After Round 1: 1.5 in (3.8 cm) across
- After Round 2: 2.25 in (5.7 cm) across the chain loops
- After Round 3: 3 in (7.6 cm) from the top petal tip to the bottom valley
- After Round 4: 3.5 in (8.9 cm) tall, 4 in (10.2 cm) wide
- Cord gauge: 16 ch, slip-stitched back = 4 in (10.2 cm), or 4 ch = 1 in (2.5 cm)
If your flower is too big: go down a hook size to 4.5 mm (7) and pull Round 1 a little firmer. If it’s too small: go up to 5.5 mm (I-9). If only the cord is off, change the hook for cords alone instead of changing the stitch count. That way the flowers stay the same.
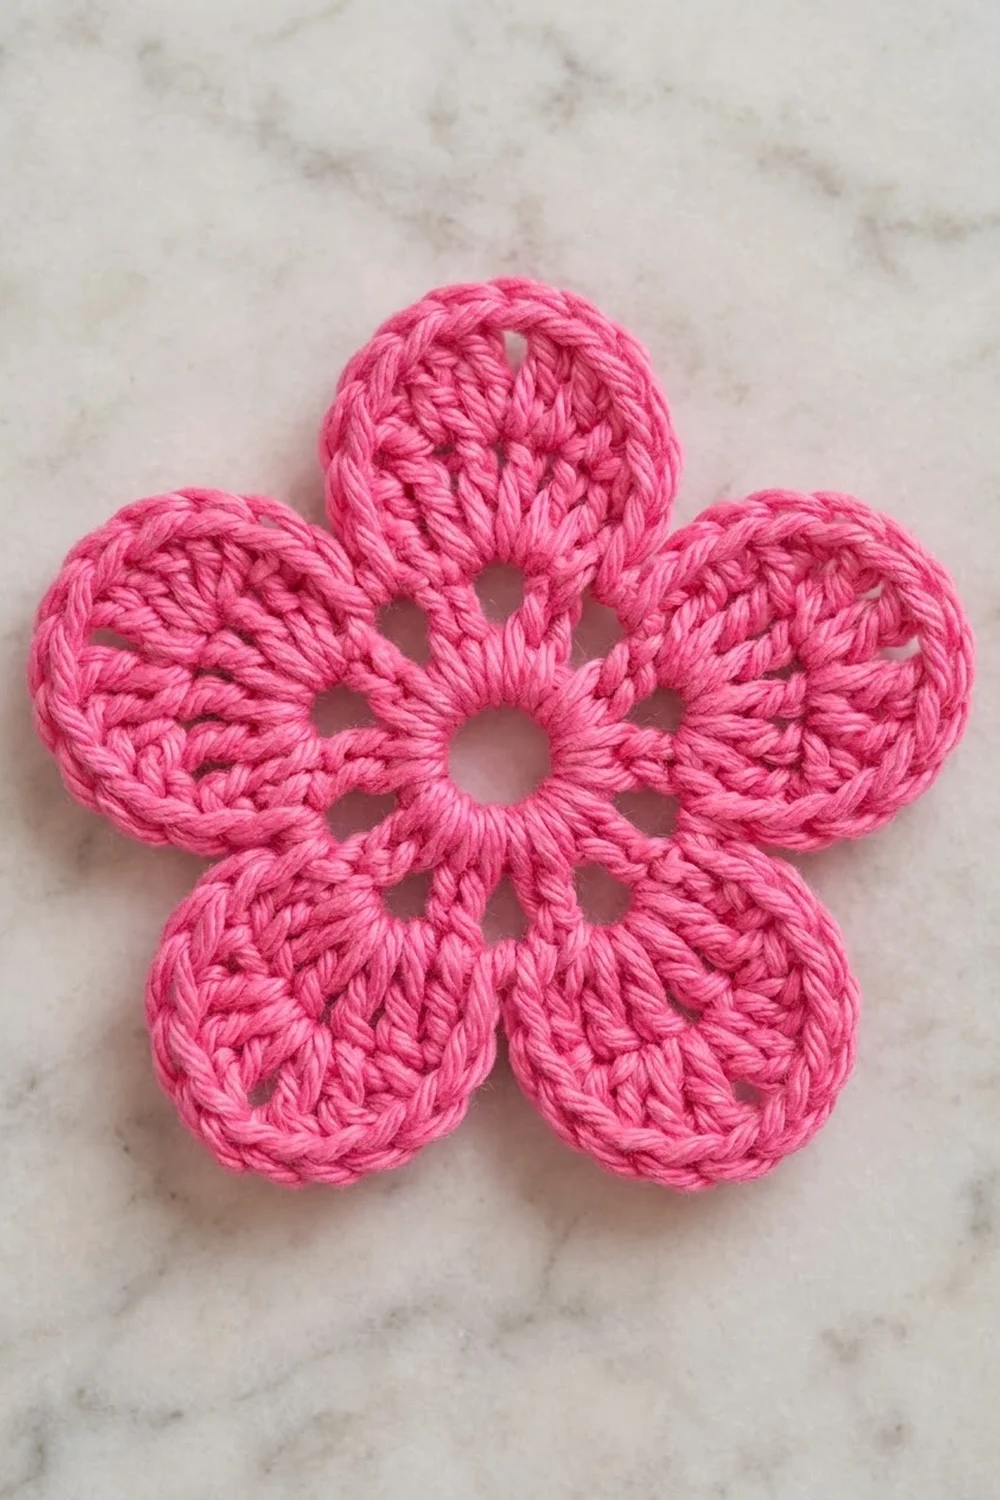
Flower Motif (Make 100)
Ring: Ch 5, sl st in the first ch to form a ring. The ring leaves the open hole in the center.
Round 1: Ch 4 (counts as dc and ch 1). Work [dc, ch 1] 9 times into the ring. Sl st in the 3rd ch of the beginning ch-4. (10 dc, 10 ch-1 sps)
The ten ch-1 spaces form the ring of small eyelets around the center.
Round 2: Ch 1, sc in the same st as the joining. Ch 5, skip (ch-1 sp, dc, ch-1 sp), sc in next dc. Repeat from * 3 more times. Ch 5, skip (ch-1 sp, dc, ch-1 sp), sl st in the first sc. (5 sc, 5 ch-5 loops)
Each ch-5 loop arches over 2 eyelets and 1 dc. These loops are the bases of the petals.
Round 3 (petals): In the next ch-5 loop, work (sc, hdc, 2 dc, 3 tr, 2 dc, hdc, sc). Sl st in the next sc. Repeat from * 4 more times. The last sl st lands in the first sc of Round 2. (55 petal sts in 5 petals of 11 sts each, plus 5 sl sts; 60 sts total)
Number the petals 1 to 5 in the order you made them. Petal 3 is the top petal. Check that the flower measures 3 in (7.6 cm) from the tip of Petal 3 to the valley where you just finished.
Round 4 (petal edging): Ch 1 (doesn’t count as a stitch). Sc in the sc, sc in the hdc, sc in each of the 2 dc, 2 sc in each of the 3 tr, sc in each of the 2 dc, sc in the hdc, sc in the sc. Sl st in the next sl st between petals. Repeat from * 4 more times. The last sl st is worked into the starting valley and becomes the bottom valley. (14 sc per petal, 70 sc plus 5 sl sts; 75 sts total)
Each petal count works out as 1 + 1 + 2 + 6 + 2 + 1 + 1 = 14 sc. The 6 sc across the 3 tr round out the petal tip, and the plain sc along the sides keep the petal flat.
Fasten off, leaving a 6 in (15.2 cm) tail. Weave in both tails on the back, through the Round 1 dc posts, so they stay hidden behind the eyelets.
Make All Pieces
All pieces are bubblegum pink:
- Flowers: 100 (10 per strand)
- Connector cords: 90 (9 per strand, worked directly between flowers during joining)
- Top cords with hanging loops: 10 (1 per strand)
Strand layout, front view (each F is one flower, each | is one connector):
Loop  Loop  Loop  Loop  Loop  Loop  Loop  Loop  Loop  Loop
 |     |     |     |     |     |     |     |     |     |
 F     F     F     F     F     F     F     F     F     F
 |     |     |     |     |     |     |     |     |     |
 F     F     F     F     F     F     F     F     F     F
 ...  (10 flowers and 9 connectors in every strand)  ...
 F     F     F     F     F     F     F     F     F     F
Before joining, sort the flowers into stacks of 10. Lay each stack out in a line with Petal 3 at the top and the bottom valley at the bottom.
Joining
Connectors link the bottom valley of one flower to the tip stitch of the flower below it. The cord is a ch-16 with a back bump slip stitch layer worked back up the chain.
Connector (make 9 per strand):
- With the right side facing, join yarn with a sl st in the bottom valley of Flower 1.
- Ch 16.
- Sl st in the tip stitch of Petal 3 on Flower 2. Make sure Flower 2 is right side up and not twisted.
- Turn the chain and work a back bump sl st into each of the 16 ch, working back up toward Flower 1. (16 ch + 16 sl sts = 32 sts per connector)
- Sl st in the bottom valley of Flower 1 again. Fasten off.
Both tails end at the same valley. Weave them into the back of the flower’s lower petals.
Stitch-to-stitch logic: Each connector joins exactly 1 stitch at each end: the bottom valley sl st above and the tip stitch below. The joins don’t add any stitches to the flowers, so every flower stays at 75 sts. Because the cord enters at the top tip and leaves from the opposite valley, the flowers hang straight on one vertical line.
Tension: Keep the chains relaxed and even. Work the back bump slip stitches at the same tension as the chain. If you pull them tight, the cord shortens and puckers. If they’re loose, the cord will stretch once the curtain hangs.
Size checkpoint: Hold a joined pair of flowers up by the top flower. The space between flowers should be 4 in (10.2 cm). Each finished strand of 10 flowers should measure 71 in (180.3 cm) from the top tip of Flower 1 to the bottom valley of Flower 10: that’s 10 x 3.5 in plus 9 x 4 in.
Border: Top Cord and Hanging Loop
On this curtain, the “border” is the finish at the top of each strand: a cord and loop that hang it from the rod. Use the same 4 ch per 1 in (2.5 cm) gauge as the connectors.
Top cord and loop (make 1 per strand):
- Join yarn with a sl st in the tip stitch of Petal 3 on Flower 1.
- Ch 16 for the cord.
- Ch 16 more for the loop. Sl st into the 16th chain made (the last cord chain) to close the loop. (loop = 16 ch)
- Work a back bump sl st into each of the 16 cord chains, back down toward the flower. (16 sl sts)
- Sl st in the tip stitch again. Fasten off and weave in the ends.
Count per strand: 16 cord ch + 16 loop ch + 16 sl sts = 48 sts.
Why the math works: At 4 ch per 1 in (2.5 cm), the 16-ch loop measures 4 in (10.2 cm) around. That’s enough to slide over a rod up to 1 in (2.5 cm) thick, which is about 3.1 in (8.0 cm) around. Folded over the rod, the loop adds a 2 in (5.1 cm) drop. The cord adds 4 in (10.2 cm), which matches the connector spacing. So the drop is 2 in + 4 in + 71 in = 77 in (195.6 cm).
For the width, the 10 strands are spaced 5 in (12.7 cm) apart center to center. Nine gaps of 5 in plus one 4 in (10.2 cm) flower width gives 49 in (124.5 cm). That leaves 1 in (2.5 cm) of air between neighboring flowers, which keeps them from tangling.
Final Blocking
- Lay each flower face down on the blocking mat.
- Mist it with water until it’s damp but not dripping.
- Pin the 5 petal tips so the flower is 4 in (10.2 cm) wide and 3.5 in (8.9 cm) from the Petal 3 tip to the bottom valley.
- Push a pin into the center hole to keep it round and open.
- Use the tip of a pin to open up the 10 eyelets in Round 1.
- Mist each connector and top cord, then pin it straight. Don’t stretch it: 16 ch should stay 4 in (10.2 cm).
- Let everything dry completely, then unpin.
- Hang each strand from the rod for 24 hours so the cords settle into their final length.
Final Quality-Control Checklist
- Every flower has 10 dc in Round 1, 5 ch-5 loops in Round 2, 60 sts in Round 3, and 75 sts in Round 4.
- Every flower is 3.5 in (8.9 cm) tall and 4 in (10.2 cm) wide.
- Petal 3 points up and the bottom valley points down on every flower.
- Every connector has 16 ch + 16 sl sts and measures 4 in (10.2 cm).
- Every strand is 71 in (180.3 cm) from Flower 1 tip to Flower 10 valley.
- Every top loop has 16 ch and slides easily over the rod.
- No twisted flowers: all right sides face the room.
- All tails are woven in on the back and trimmed.
Troubleshooting
- Petals cup: Round 4 is too tight. Go up a hook size for Round 4 only.
- Petals ruffle: Round 3 tr are too loose, or you added extra sts. Recount: 11 per petal.
- Center hole closed up: You worked Round 1 into a magic ring instead of a ch-5 ring. Use a chain ring.
- Strand hangs crooked: A connector is joined to the wrong petal. Check that it enters at the Petal 3 tip stitch and leaves from the bottom valley.
- Strands are different lengths: Measure every connector against your 4 in (10.2 cm) test cord and redo any that are off.
- Cords stretch over time: Work the back bump sl sts slightly firmer, or switch to a less stretchy cotton.
Care
Hand wash in cool water with mild soap and gently squeeze out the water without wringing. Lay the strands flat to dry, then rehang them.
Final Notes
The measurement chain is simple. Round 1 is 1.5 in (3.8 cm) across. The flower grows to 3 in (7.6 cm) after Round 3 and finishes at 3.5 in (8.9 cm) by 4 in (10.2 cm). Each 4 in (10.2 cm) connector builds a 71 in (180.3 cm) strand. The top cord and loop bring the drop to 77 in (195.6 cm), and 10 strands spaced 5 in (12.7 cm) apart give a 49 in (124.5 cm) wide panel. If you check your gauge on the first flower and the first cord, the rest of the curtain will come out right.
Happy crocheting!