

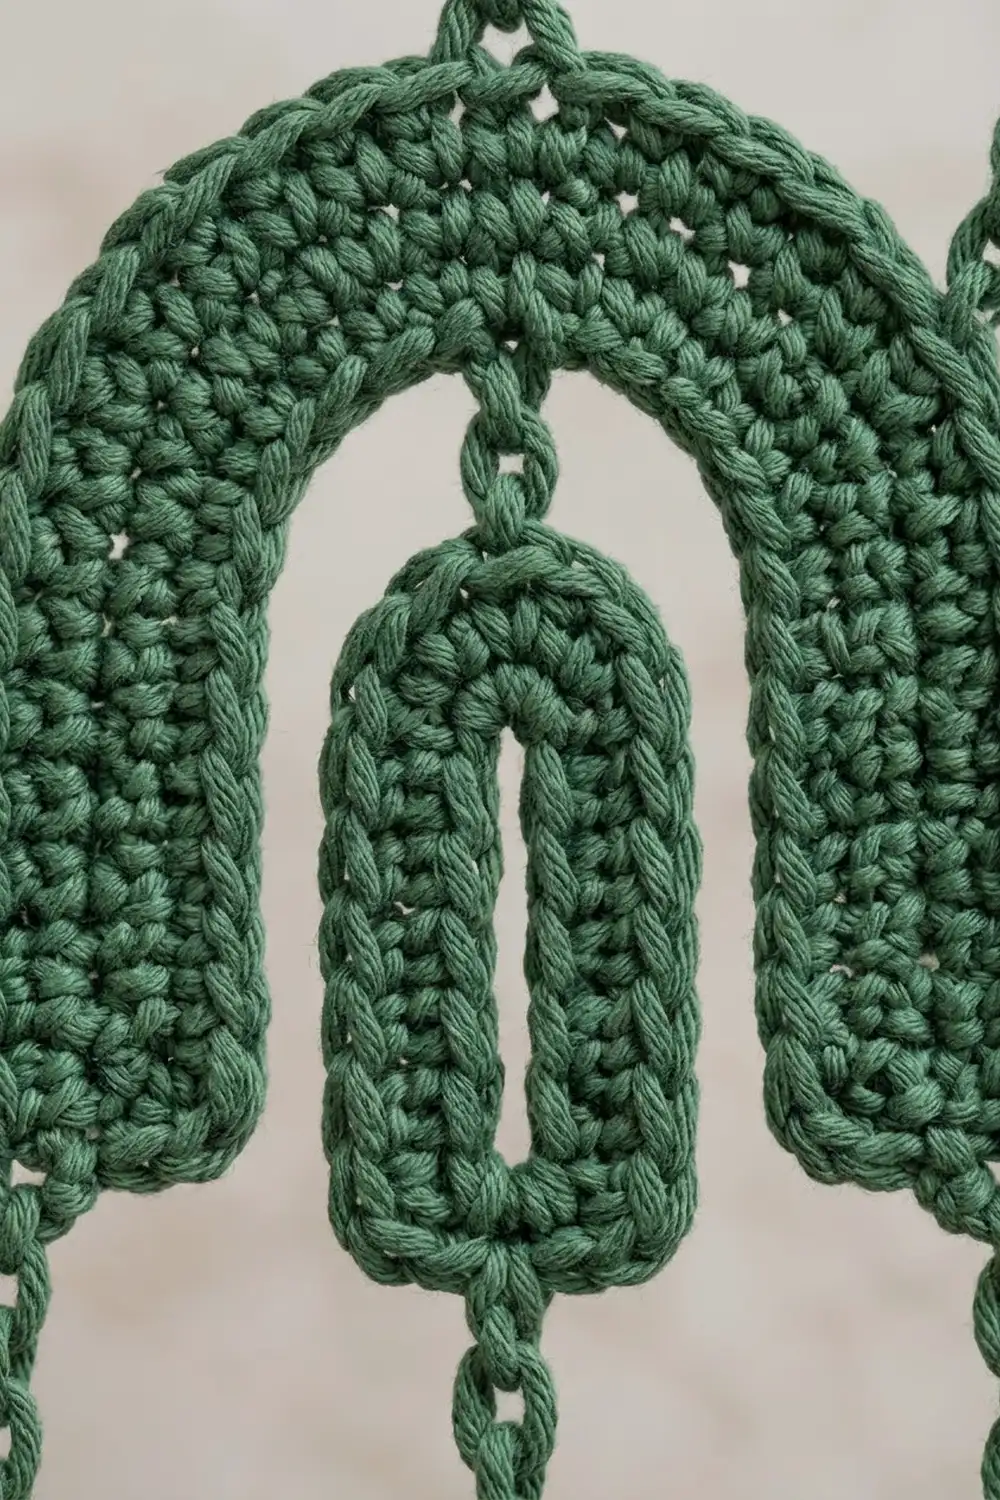
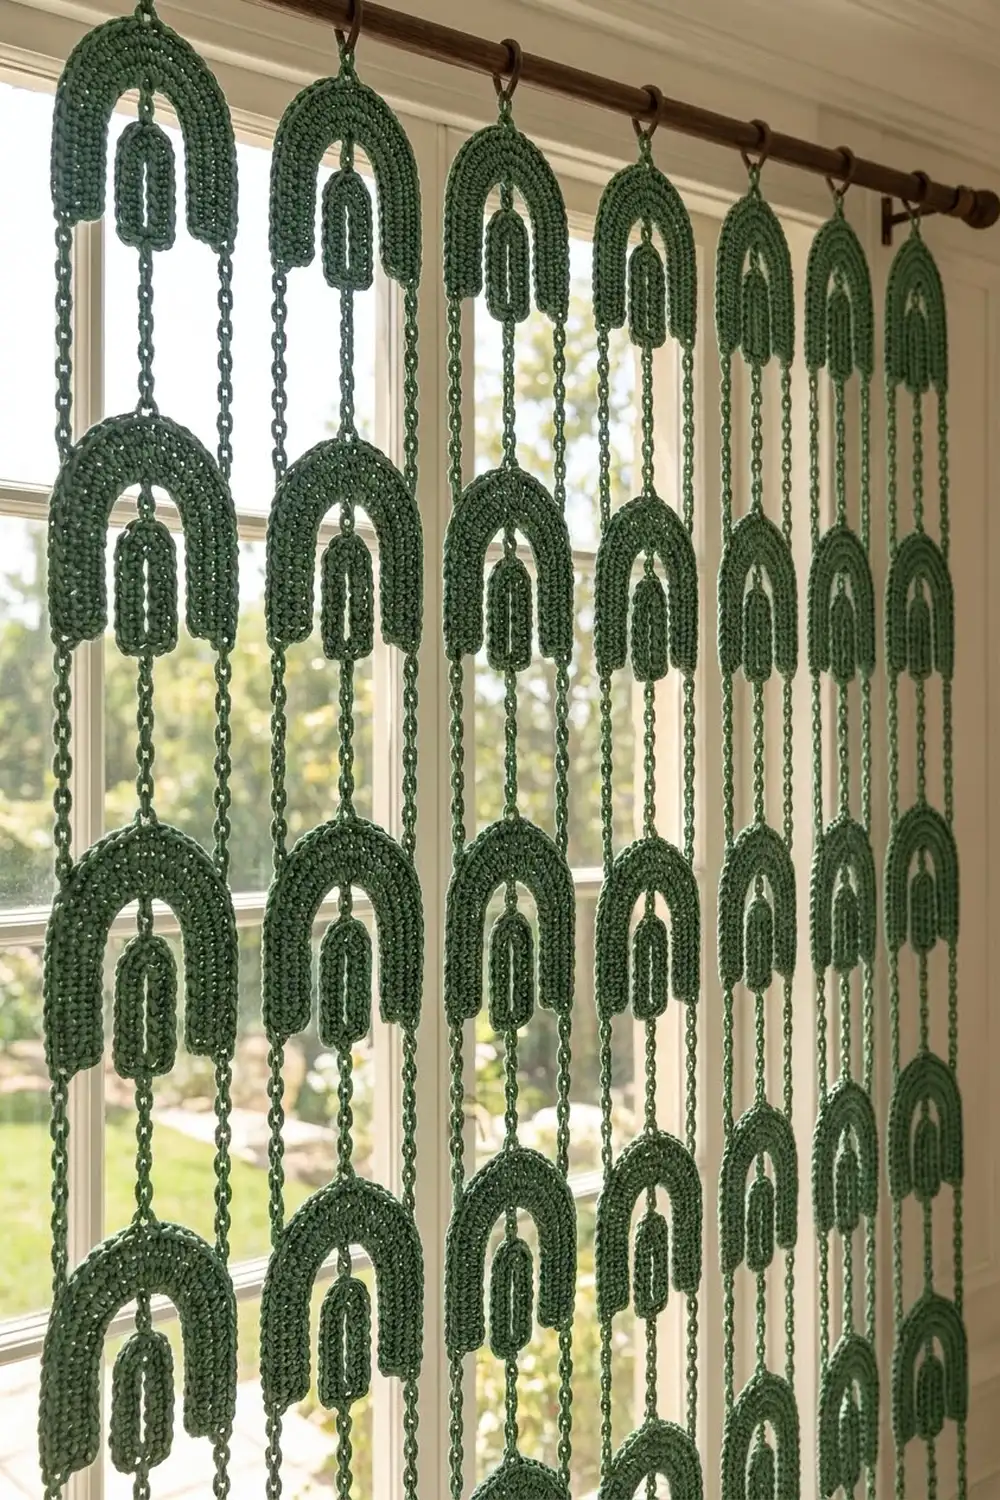
This curtain panel is made of tall strands of arch motifs. Each motif has two separate pieces: a thick outer arch, and a narrow inner arch with an open slot that hangs inside it. Ten strands hang from a solid header, and light comes through the gaps between them, so the panel feels airy even though each motif is dense.
The sample uses one color, a muted forest green in smooth cotton, which lets the single crochet texture and the shapes of the arches stand out. The style is modern and graphic with a mid-century feel. It works in a window, in a doorway, or as a wall hanging.
The pattern uses US crochet terms. The finished panel measures about 50 in (127.0 cm) wide by 77.25 in (196.2 cm) long, from the top fold of the header to the end of the last cord.
Construction is simple and repetitive. First you make 120 outer arches and 120 inner arches flat, in rows. Next you crochet the header. Then you build each strand from the header down with a chain cord that slip stitches through the center of every arch. The cord does all the joining, so you don’t sew any motifs together.
Finished Size and Construction
- Finished size: about 50 in (127.0 cm) x 77.25 in (196.2 cm)
- Skill level: Intermediate
- Terminology: US
- Yarn weight: Worsted (#4) cotton or cotton blend
- Hook: 5.0 mm (H-8)
- Number of pieces: 240 (120 outer arches, 120 inner arches), plus 1 header
- Layout: 10 strands x 12 motifs
- Piece size:
- Outer arch: 4.6 in (11.7 cm) wide x 3.8 in (9.7 cm) tall
- Inner arch: 1.8 in (4.6 cm) wide x 2.4 in (6.1 cm) tall
- Motif pitch (top of one outer arch to top of the next): 6.25 in (15.9 cm)
- Size before border: the strands cover 50 in (127.0 cm) x 75.5 in (191.8 cm)
- Border (header) depth: 3.5 in (8.9 cm) flat, about 1.75 in (4.4 cm) folded
Materials
Choose a smooth, firm worsted cotton or cotton blend. Cotton holds the curves crisply and stretches very little when it hangs. Fuzzy or very drapey yarns will let the cords grow longer and will blur the outlines of the arches.
- Forest green: 1,300 g, about 2,470 m (13 balls of 100 g / 190 m)
- Outer arches: about 6 g (11.6 m) each
- Inner arches: about 2 g (3.8 m) each
- Header and cords: about 160 g (300 m) in total
These quantities include a margin of about 15%. Buy all the yarn from one dye lot, because light behind the panel makes any color shift easy to see.
Tools:
– 5.0 mm (H-8) crochet hook
– Tapestry needle
– Stitch markers
– Rust-proof pins and a blocking mat
– Tape measure
– Spray bottle
– Curtain rod up to 1.25 in (3.2 cm) in diameter
Abbreviations (US Terms)
- ch: chain
- sc: single crochet
- sl st: slip stitch
- st(s): stitch(es)
- inc: 2 sc in the same st
- FSC: foundation single crochet
- RS / WS: right side / wrong side
Special stitch, FSC:
1. Ch 2. Insert the hook in the 2nd ch from the hook and pull up a loop.
2. Yarn over and pull through 1 loop. This makes the “chain” part of the stitch.
3. Yarn over and pull through 2 loops. This makes the “sc” part of the stitch.
4. For each new FSC, insert the hook into the “chain” part of the previous stitch and repeat steps 2 and 3.
Gauge and Checkpoints
Gauge: 16 sc and 18 rows = 4 in (10.2 cm). Chain gauge: 4 ch = 1 in (2.5 cm).
Make one outer arch and one inner arch before anything else. Every length in this pattern depends on these two pieces.
Checkpoints:
– Outer arch after Row 1: the strip is about 6.75 in (17.1 cm) long before it curves.
– Outer arch after Row 5: 4.6 in (11.7 cm) wide x 3.8 in (9.7 cm) tall, with an opening about 2.4 in (6.1 cm) wide.
– Inner arch after Row 3: 1.8 in (4.6 cm) wide x 2.4 in (6.1 cm) tall.
– Inner arch placed inside the outer arch: about 0.3 in (0.8 cm) of space on each side.
If your pieces are too big, go down to a 4.5 mm hook. If they are too small, go up to a 5.5 mm hook. Check your chain gauge as well, because the cords make up most of the panel’s length.
Outer Arch (make 120)
You work this piece in rows, starting at the inner edge and building outward. Each leg stays straight at 6 sts. All the increases go in the curved center section, which bends the strip into a U.
Ch 28.
Row 1 (RS): Sc in the 2nd ch from the hook and in each ch across. Ch 1, turn. (27 sts: 6 leg + 15 curve + 6 leg)
Row 2: Sc in the next 6 sts, [sc in next 2, inc, sc in next 4, inc, sc in next 4, inc, sc in next 2], sc in the last 6 sts. Ch 1, turn. (30 sts: 6 + 18 + 6)
Row 3: Sc in the next 6 sts, [sc in next 2, inc, sc in next 5, inc, sc in next 5, inc, sc in next 3], sc in the last 6 sts. Ch 1, turn. (33 sts: 6 + 21 + 6)
Row 4: Sc in the next 6 sts, [sc in next 3, inc, sc in next 6, inc, sc in next 6, inc, sc in next 3], sc in the last 6 sts. Ch 1, turn. (36 sts: 6 + 24 + 6)
Row 5: Sc in the next 6 sts, [sc in next 3, inc, sc in next 7, inc, sc in next 7, inc, sc in next 4], sc in the last 6 sts. (39 sts: 6 + 27 + 6)
Fasten off and weave in the ends.
Why 3 increases per row: Each row is about 0.22 in (0.6 cm) tall. That means the outer edge of the curve has to be about 0.7 in (1.8 cm) longer than the row before it, which is 3 sts at this gauge. With 3 increases per row, the curve lies flat. Each leg is 6 sts, or 1.5 in (3.8 cm). The flat leg ends are made by the row ends, 5 rows across.
Markers: Place one marker in st 14 of Row 1 (the center of the inner edge). Place another in st 20 of Row 5 (the center of the outer edge).
Inner Arch (make 120)
This piece uses the same method on a smaller scale. The 3-st curve in Row 1 leaves a narrow open slot down the center, and each leg ends flat.
Ch 16.
Row 1 (RS): Sc in the 2nd ch from the hook and in each ch across. Ch 1, turn. (15 sts: 6 + 3 + 6)
Row 2: Sc in the next 6 sts, inc in each of the next 3 sts, sc in the last 6 sts. Ch 1, turn. (18 sts: 6 + 6 + 6)
Row 3: Sc in the next 6 sts, (sc in next st, inc) 3 times, sc in the last 6 sts. (21 sts: 6 + 9 + 6)
Fasten off and weave in the ends. Set the legs parallel to each other with a slot about 0.5 in (1.3 cm) wide between them.
Markers: Place one marker in st 8 of Row 1 and another in st 11 of Row 3.
Make All Pieces
Every piece is forest green.
- Outer arches: 120 (about 720 g)
- Inner arches: 120 (about 240 g)
- Header: 1 (see Border)
Pair each inner arch with an outer arch. Each pair makes one motif. Before joining, mist the pieces and pin them flat in batches of 20 so the curves set.
Layout (O = one motif, outer + inner arch):
Header (200 sts)
S1 S2 S3 S4 S5 S6 S7 S8 S9 S10
O  O  O  O  O  O  O  O  O  O    motif 1
O  O  O  O  O  O  O  O  O  O    motif 2
...  (repeat)  ...
O  O  O  O  O  O  O  O  O  O    motif 12
The panel has 10 strands (S1–S10) with 12 motifs in each strand.
Joining
Crochet the header first (see Border below). Then build each strand from the top down. The chain cord is the only thing holding the motifs together.
To make one strand:
- Join the yarn with a sl st in this strand’s attachment st on the header foundation edge (listed in the Border section). Ch 10 to make the top lead, 2.5 in (6.4 cm).
- Hold an outer arch with the RS facing you. Insert the hook from front to back through the marked st 20 of Row 5, then sl st.
- Ch 4, laying the chain down the front of the arch. Sl st through the marked st 14 of Row 1.
- Ch 2 to make the drop, 0.5 in (1.3 cm). Sl st through the marked st 11 of Row 3 of an inner arch.
- Ch 3, laying the chain down the front of the inner arch. Sl st through the marked st 8 of Row 1 at the top of the slot.
- Ch 16, 4 in (10.2 cm), letting the chain run down between the legs and past the bottom of the arch. Sl st into the next outer arch, as in step 2.
Repeat steps 2–6 for motifs 1 through 11. For motif 12, work steps 2–5, then ch 8, 2 in (5.1 cm). Fasten off and weave the tail back into the chain.
Stitch logic: 4 + 2 + 3 + 16 = 25 ch per motif. At 4 ch per inch, that makes a pitch of 6.25 in (15.9 cm).
Tension: Keep your chain even and slightly firm. A loose chain will stretch under the weight of 12 motifs. The ch 4 across the outer arch, which is 1.1 in (2.8 cm) deep, should lie snug so the arch stays flat against the cord.
Size checkpoint: Hang the first strand for 24 hours, then measure it below the header. It should be 75.5 in (191.8 cm): a 2.5 in (6.4 cm) lead, plus 11 x 6.25 in (15.9 cm), plus 4.25 in (10.8 cm) for motif 12. If it is more than 1 in (2.5 cm) too long, use ch 15 in step 6 for the remaining strands.
Border: Rod-Pocket Header
The header is the panel’s only border. It is a solid sc band folded into a rod pocket.
Border gauge: 16 sc = 4 in (10.2 cm), the same as the motifs.
Row 1: FSC 200. Ch 1, turn. (200 sts)
Rows 2–16: Sc in each st across. Ch 1, turn. (200 sts in each row)
After Row 16, fasten off and leave a 60 in (152.4 cm) tail. Each short end is 16 rows, about 3.5 in (8.9 cm).
Fold:
1. Fold Rows 9–16 to the WS so that Row 16 lines up with the back of the line between Rows 8 and 9.
2. Use the tail to whipstitch along all 200 sts.
3. Leave both short ends open for the rod.
The folded header is about 1.75 in (4.4 cm) deep.
Attachment sts: Join the strands to foundation sts 10, 30, 50, 70, 90, 110, 130, 150, 170, and 190.
Why the math works:
– The header is 10 strands x 20 sts = 200 sts, with no extra sts between strands.
– 20 sts at 4 sts per inch = 5 in (12.7 cm) per strand, so 10 strands = 50 in (127.0 cm).
– Each strand hangs near the middle of its own 20-st section, which puts the outer strands about 2.5 in (6.4 cm) from each edge.
– A 4.6 in (11.7 cm) motif in a 5 in (12.7 cm) section leaves a 0.4 in (1.0 cm) gap between strands, so the arches hang freely without catching on each other.
Final Blocking
- Lay the panel flat with the header at the top.
- Space the strands 5 in (12.7 cm) apart, center to center.
- Pin the header to 50 in (127.0 cm) wide.
- Center each inner arch inside its outer arch, with the cord running straight through the slot.
- Mist lightly. Don’t soak the panel, because wet cotton is heavy and will stretch the cords.
- Let it dry completely, for at least 12 hours.
- Hang the panel and let it settle for a day before you adjust anything.
Final Quality-Control Checklist
- Every outer arch measures 4.6 in (11.7 cm) x 3.8 in (9.7 cm), within 0.25 in (0.6 cm).
- Every outer arch has 39 sts in Row 5, and every inner arch has 21 sts in Row 3.
- Every inner arch has an open slot and two even legs.
- On every motif, the cord passes through all 4 marked points.
- Every strand measures 75.5 in (191.8 cm), within 1 in (2.5 cm).
- The header is 200 sts wide, and the pocket is whipstitched closed along its full length.
- No ends show on the RS.
Troubleshooting
Arch cups: Your increases are too tight. Go up a hook size.
Arch ruffles: Your rows are shorter than the gauge. Go down a hook size.
Legs are uneven: Count the 6 leg sts at both ends of every row.
Inner arch doesn’t fit: Check that Row 1 of the outer arch has 27 sts.
Strands are different lengths: Your chain tension is changing. Adjust the ch 16 to match the first strand.
Motifs twist: Make every sl st from front to back with the RS facing you.
Care
Hand wash in cool water. Dry flat, supporting the full length so the cords don’t stretch.
Final Notes
All the measurements in this pattern build on each other:
– A gauge of 16 sc = 4 in (10.2 cm) gives a 4.6 in (11.7 cm) outer arch and a 1.8 in (4.6 cm) inner arch.
– A chain gauge of 4 ch = 1 in (2.5 cm) gives a 6.25 in (15.9 cm) pitch, so each 12-motif strand is 75.5 in (191.8 cm).
– Ten 20-st sections make a 200-st header, 50 in (127.0 cm) wide.
If your test pieces match these sizes, the full panel will come out right too.
Happy crocheting!