

The Crimson Tulip Lace Curtain Panel is a tall, airy curtain worked in one rich cranberry red. Narrow solid ribs run from top to bottom. Between them sit open lace columns. Each column has a center stem and pairs of plump, teardrop-shaped leaves that fan up and out, stacked like a row of tulips.
The style is classic and festive. In winter light the red glows, and the open lace keeps the room bright. The same stitch works all year in a neutral color, but deep red is ideal for holiday decorating.
This pattern uses US crochet terms. One finished panel measures 41.75 in (106.0 cm) wide and 84.5 in (214.6 cm) long after blocking, including the border.
The panel is one piece worked in rows from the bottom up. You start with a foundation row of double crochet, then repeat a 2-row lace pattern. A solid row of double crochet squares off the top. Two rounds of single crochet go around the whole panel to finish it. For a pair of curtains, make two identical panels. Each panel hangs on its own, and the two are never joined.
Finished Size and Construction
- Finished size: 41.75 in x 84.5 in (106.0 cm x 214.6 cm)
- Skill level: Easy intermediate
- Terminology: US crochet terms
- Yarn weight: DK (#3), cotton or cotton blend
- Hook: 5.0 mm (H-8)
- Number of pieces: 1 panel (make 2 for a pair, hung separately)
- Layout: 10 lace columns between 11 vertical ribs
- Piece size before border: 40.75 in x 83.5 in (103.5 cm x 212.1 cm)
- Border depth: 0.5 in (1.3 cm) on each edge, 2 rounds of single crochet
Materials
Yarn: Choose a smooth DK cotton or cotton blend with good stitch definition. Mercerized or combed cotton shows the leaf clusters best. Avoid fuzzy or very stretchy yarns. A long curtain gets heavier as it hangs, and loose fibers blur the lace.
- Cranberry Red: 900 g / about 2,070 m per panel (approx. 18 balls of 50 g / 115 m). For a pair, you need 1,800 g / about 4,140 m.
These quantities include a margin of about 15% for your gauge swatch, differences in tension, and weaving in ends.
Tools:
- 5.0 mm (H-8) crochet hook
- Tapestry needle
- 4 to 6 locking stitch markers
- Measuring tape
- Blocking mats and rust-proof pins, or a clean sheet on a large floor area
- Spray bottle
- 8 to 10 curtain clip rings and a rod for hanging
Abbreviations (US Terms)
- ch – chain
- sc – single crochet
- dc – double crochet
- sk – skip
- sp(s) – space(s)
- st(s) – stitch(es)
- yo – yarn over
- RS / WS – right side / wrong side
- rep – repeat
Special stitch – Leaf Cluster (Cl): *Yo, insert hook in the stitch or space given, yo and pull up a loop, yo and draw through 2 loops; rep from * 3 more times in the same place (5 loops on hook), yo and draw through all 5 loops. This is a 4-dc cluster, and it forms one plump, teardrop-shaped leaf.
Turning chain: The ch 3 at the start of a dc row counts as 1 dc throughout.
Gauge and Checkpoints
Gauge: 16 dc and 8 rows = 4 in (10.2 cm) in pattern, after blocking. One 16-stitch pattern repeat = 4 in (10.2 cm) wide. Each row is about 0.5 in (1.3 cm) tall.
Test one piece first. Make a gauge swatch that is a small version of the panel. Its two lace columns between three ribs show you the true fabric.
- Ch 37.
- Work Rows 1 through 10 of the panel pattern below. This gives 2 repeats instead of 10.
- Work the Final Row as Row 11. You should have 35 dc.
- Block the swatch.
Swatch checkpoint: 35 sts = 8.75 in (22.2 cm) wide. 11 rows = 5.5 in (14.0 cm) tall. Each lace column has 5 tiers of leaves.
If the swatch is too big, go down to a 4.5 mm hook. If it is too small, go up to a 5.5 mm hook. Width matters most, so fix it first, then check the height.
Checkpoints on the panel:
- After Row 1: 163 dc, 40.75 in (103.5 cm) wide.
- After Row 20: 10 in (25.4 cm) tall.
- After Row 84: 42 in (106.7 cm) tall.
- After the Final Row (Row 167): 163 dc, 83.5 in (212.1 cm) tall.
Measure flat, without stretching. Lace relaxes downward when it hangs. If your fabric runs longer than the checkpoints, you can stop early. Always end on an even-numbered leaf row before the Final Row.
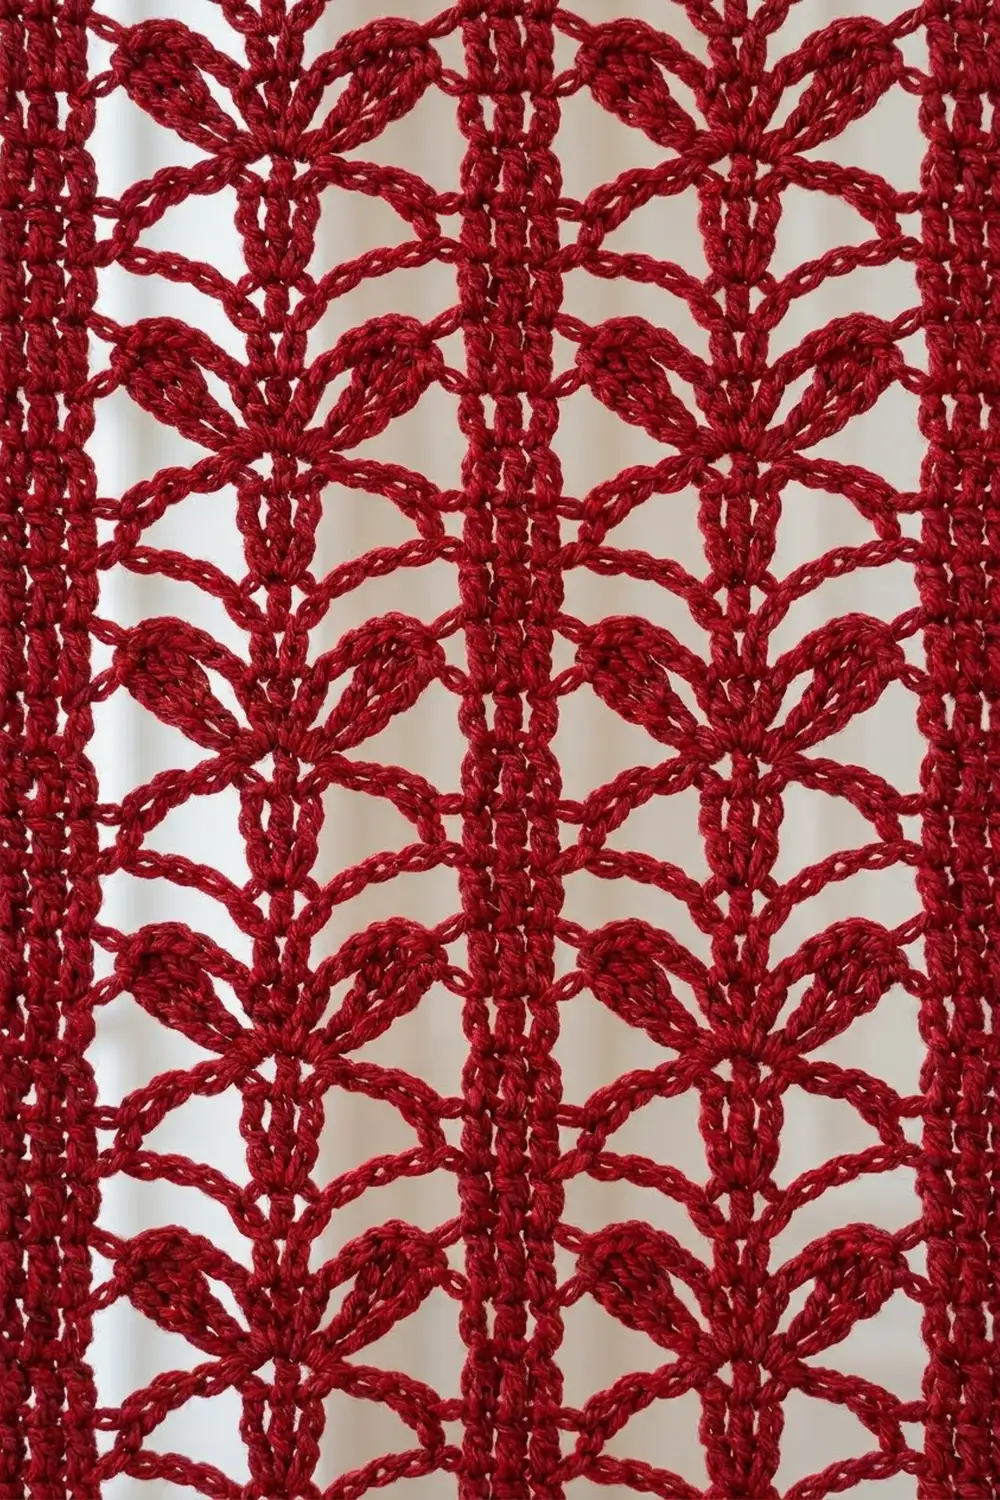
Panel Pattern
The stitch count is a multiple of 16 + 3. Each 16-st repeat holds one 13-st lace column and one 3-st rib. The extra 3 sts make the last rib.
Tip: Place a stitch marker in the first rib stitch of every second or third repeat on Row 2. This makes it easy to spot a missed repeat early.
Foundation: Ch 165.
Row 1 (WS): Dc in 4th ch from hook (the 3 skipped ch count as 1 dc), dc in each ch across. Turn. (163 dc)
Row 2 (RS, leaf row): Ch 3, dc in next 2 sts; *ch 5, sk next 6 sts, (Cl, ch 3, Cl) in next st, ch 5, sk next 6 sts, dc in next 3 sts; rep from * across. Turn.
Each repeat uses 6 + 1 + 6 + 3 = 16 sts of Row 1. The two clusters lean apart to make the first V-shaped pair of leaves.
Row 2 count: 33 dc, 20 Cl, 10 ch-3 sps, 20 ch-5 sps.
Row 3 (WS, stem row): Ch 3, dc in next 2 dc; *ch 5, sk next ch-5 sp and Cl, sc in next ch-3 sp, ch 5, sk next Cl and ch-5 sp, dc in next 3 dc; rep from * across, working the last dc in the top of the turning ch. Turn.
The sc pulls the base of the next leaf pair to the center. This builds the center stem.
Row 3 count: 33 dc, 10 sc, 20 ch-5 sps.
Row 4 (RS, leaf row): Ch 3, dc in next 2 dc; *ch 5, (Cl, ch 3, Cl) in next sc, ch 5, dc in next 3 dc; rep from * across, working the last dc in the top of the turning ch. Turn.
Row 4 count: 33 dc, 20 Cl, 10 ch-3 sps, 20 ch-5 sps.
Rows 5–166: Rep Rows 3 and 4 another 81 times. Row 166 is a leaf row.
The ribs always get 3 dc worked into 3 dc, so they build solid columns. Each new leaf pair grows from the sc directly above the last pair, so the leaves stack along a straight stem. Each lace column ends up with 83 leaf tiers.
Row 167 (WS, Final Row): Ch 3, dc in next 2 dc; 5 dc in next ch-5 sp, dc in top of next Cl, dc in next ch-3 sp, dc in top of next Cl, 5 dc in next ch-5 sp, dc in next 3 dc; rep from * across, working the last dc in the top of the turning ch. Do not fasten off. (163 dc)*
Each repeat is 5 + 1 + 1 + 1 + 5 + 3 = 16 dc, so the top edge has the same 163 sts as Row 1. This gives you straight, even top and bottom edges for the border.
Checkpoint: 40.75 in x 83.5 in (103.5 cm x 212.1 cm).
Border
Border gauge: 4 sc = 1 in (2.5 cm), the same width as the dc fabric. On the side edges, work 2 sc in each row end. Each row is 0.5 in (1.3 cm) tall, so 2 sc lie flat along it.
Corner ch-2 spaces are not counted as stitches.
Round 1 (RS): Ch 1, turn so the RS faces you, and work along the top edge: sc in each st across. (163 sc) Ch 2 for the corner.
Rotate and work down the first side: 2 sc in each row end. (167 rows x 2 = 334 sc) Ch 2 for the corner.
Rotate and work along the bottom edge into the free loops of the foundation chain: sc in each ch. (163 sc) Ch 2 for the corner.
Work up the second side: 2 sc in each row end. (334 sc) Ch 2 for the corner, then sl st to the first sc to join.
Round 1 total: 994 sc and 4 corner ch-2 sps.
Round 2: Ch 1, sc in each sc around, working (sc, ch 2, sc) in each corner ch-2 sp. Sl st to first sc to join. Fasten off.
Round 2 counts per side, including that side’s 2 corner sc:
- Top: 163 + 2 = 165 sc
- Each side: 334 + 2 = 336 sc
- Bottom: 163 + 2 = 165 sc
Round 2 total: 1,002 sc and 4 corner ch-2 sps.
Why the math works: Along the body of the panel, the border has 1 sc for every stitch at the top and bottom and 2 sc for every row on the sides. That matches the gauge exactly, so the edges don’t ruffle or cup. The only extra stitches are the 2 corner sc per side in Round 2, and they sit in the corners, outside the main fabric. The two rounds add 0.5 in (1.3 cm) on every edge. Width is 40.75 + 1 = 41.75 in (106.0 cm), and length is 83.5 + 1 = 84.5 in (214.6 cm).
Final Blocking
- Weave in all ends along the ribs or inside the border, where they hide best. Leave the tails a little long for now.
- Soak the panel in cool water with a little wool wash for 15 minutes. Press out the water gently. Don’t wring it.
- Roll the panel in a large towel to remove more water.
- Lay it flat on a clean sheet or blocking mats in a large space.
- Pin the corners first, to 41.75 in x 84.5 in (106.0 cm x 214.6 cm).
- Pin along the ribs so they are straight and parallel.
- Open each pair of leaves with your fingers. Shape the clusters into round teardrops and pull the center stems straight.
- Pin the border edges every 3 to 4 in (7.6 to 10.2 cm).
- Let the panel dry completely, then trim the woven-in tails.
If you don’t have enough floor space, hang the damp panel from its rod and gently ease the ribs straight. It will lengthen a little under its own weight, so check the length once it is dry.
Final Quality-Control Checklist
- Every row has 33 dc in the ribs, with 3 dc per rib.
- Rows 1 and 167 both have 163 dc.
- All 10 lace columns have the same number of leaf tiers (83 each).
- The leaves stack straight above each other along the center stems.
- The 11 ribs run straight and parallel from top to bottom.
- Border Round 2 has 165 sc on the top and bottom and 336 sc on each side.
- The panel lies flat at 41.75 in x 84.5 in (106.0 cm x 214.6 cm).
- The corners are square and the border lies flat.
- For a pair, both panels match in length within 0.5 in (1.3 cm).
Troubleshooting
The ribs lean or wander. You probably skipped the turning chain or worked into the wrong stitch. Count 3 dc at the start and end of every row.
The leaves twist or tilt to one side. The (Cl, ch 3, Cl) group must go into the center sc, not into a ch-5 sp. Check that each stem-row sc sits in the ch-3 sp.
The clusters look flat or skinny. Pull up each loop to full dc height before you close the cluster. Make sure the final yo goes through all 5 loops.
The chain arcs droop. Your chains are looser than your dc. Work the ch-5s a little tighter. If they still droop, change to ch 4 and redo your swatch to confirm gauge.
The top edge pulls in. Work all 5 dc into each ch-5 sp in the Final Row. Skimping here narrows the top.
The side border ruffles. You are working more than 2 sc per row end, or your sc are tight. Keep to 2 sc per row and relax your tension.
The panel is too long after hanging. Lace stretches. If you are still working, leave out a few pairs of rows before the Final Row. If it is finished, block it again and let it dry flat.
Care
Hand wash in cool water, or machine wash on a gentle cycle in a mesh bag, then dry flat and reshape. Don’t tumble dry. Avoid long periods of strong direct sun so the red doesn’t fade.

Final Notes
The whole panel depends on one simple measurement chain. Your swatch shows 16 sts = 4 in (10.2 cm) and 8 rows = 4 in (10.2 cm). That gives 163 sts = 40.75 in (103.5 cm) across and 167 rows = 83.5 in (212.1 cm) tall. The Final Row brings the top back to 163 sts. The border adds 0.5 in (1.3 cm) on every edge, for a finished panel of 41.75 in x 84.5 in (106.0 cm x 214.6 cm).
Check your gauge, count your 3-dc ribs, and keep each leaf pair centered on its stem. After that, it’s a steady rhythm of two rows.
Happy crocheting!