

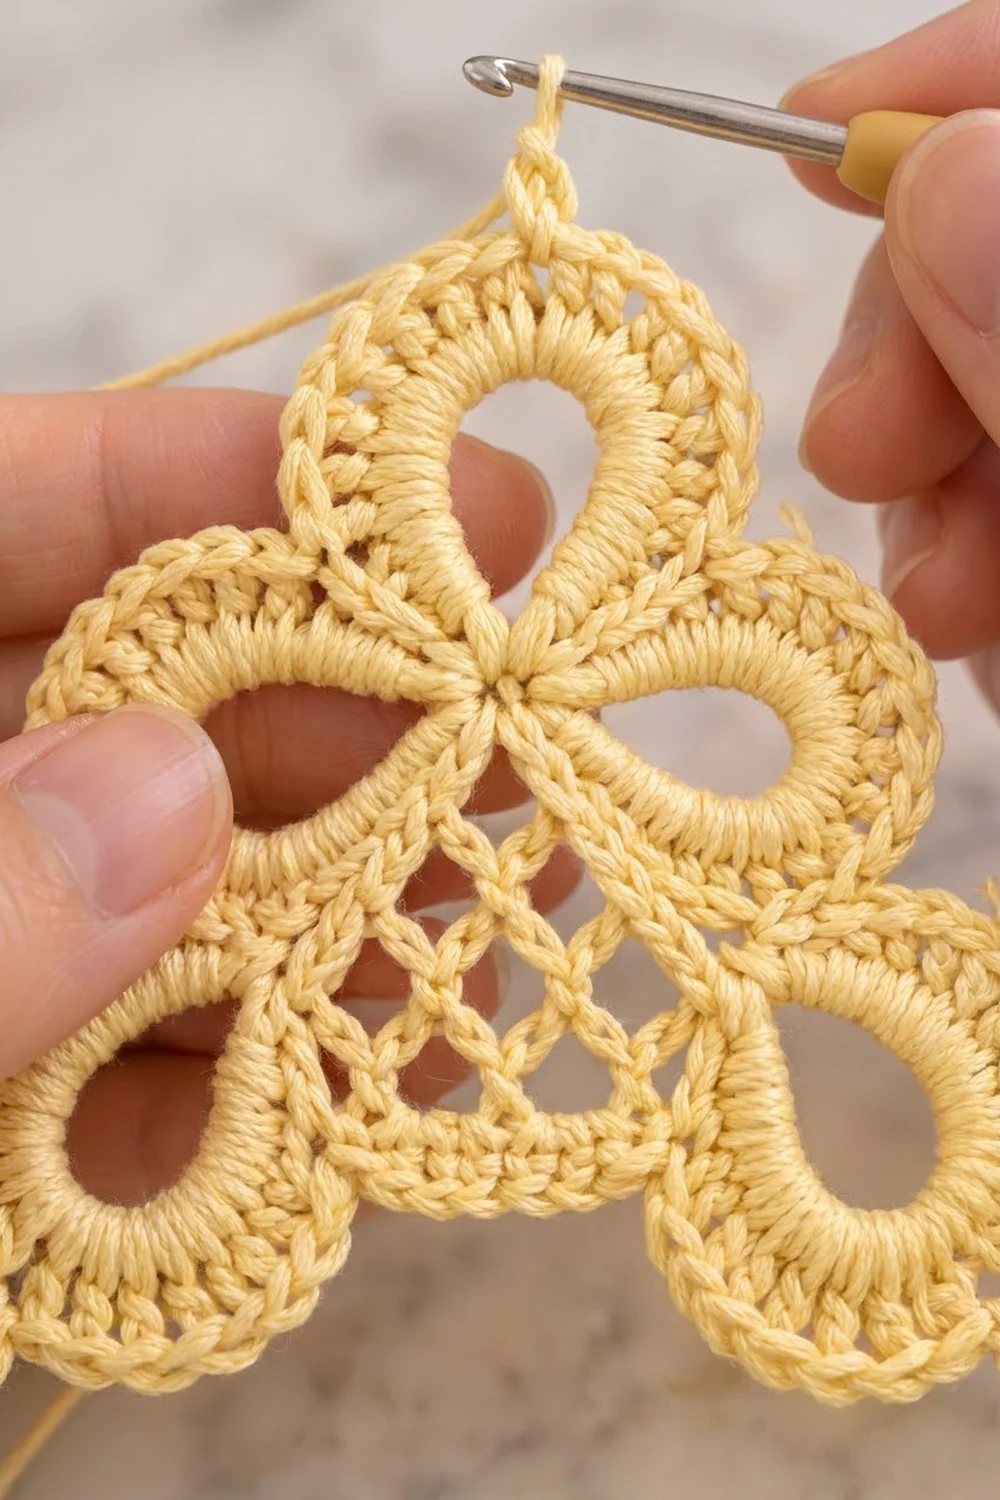
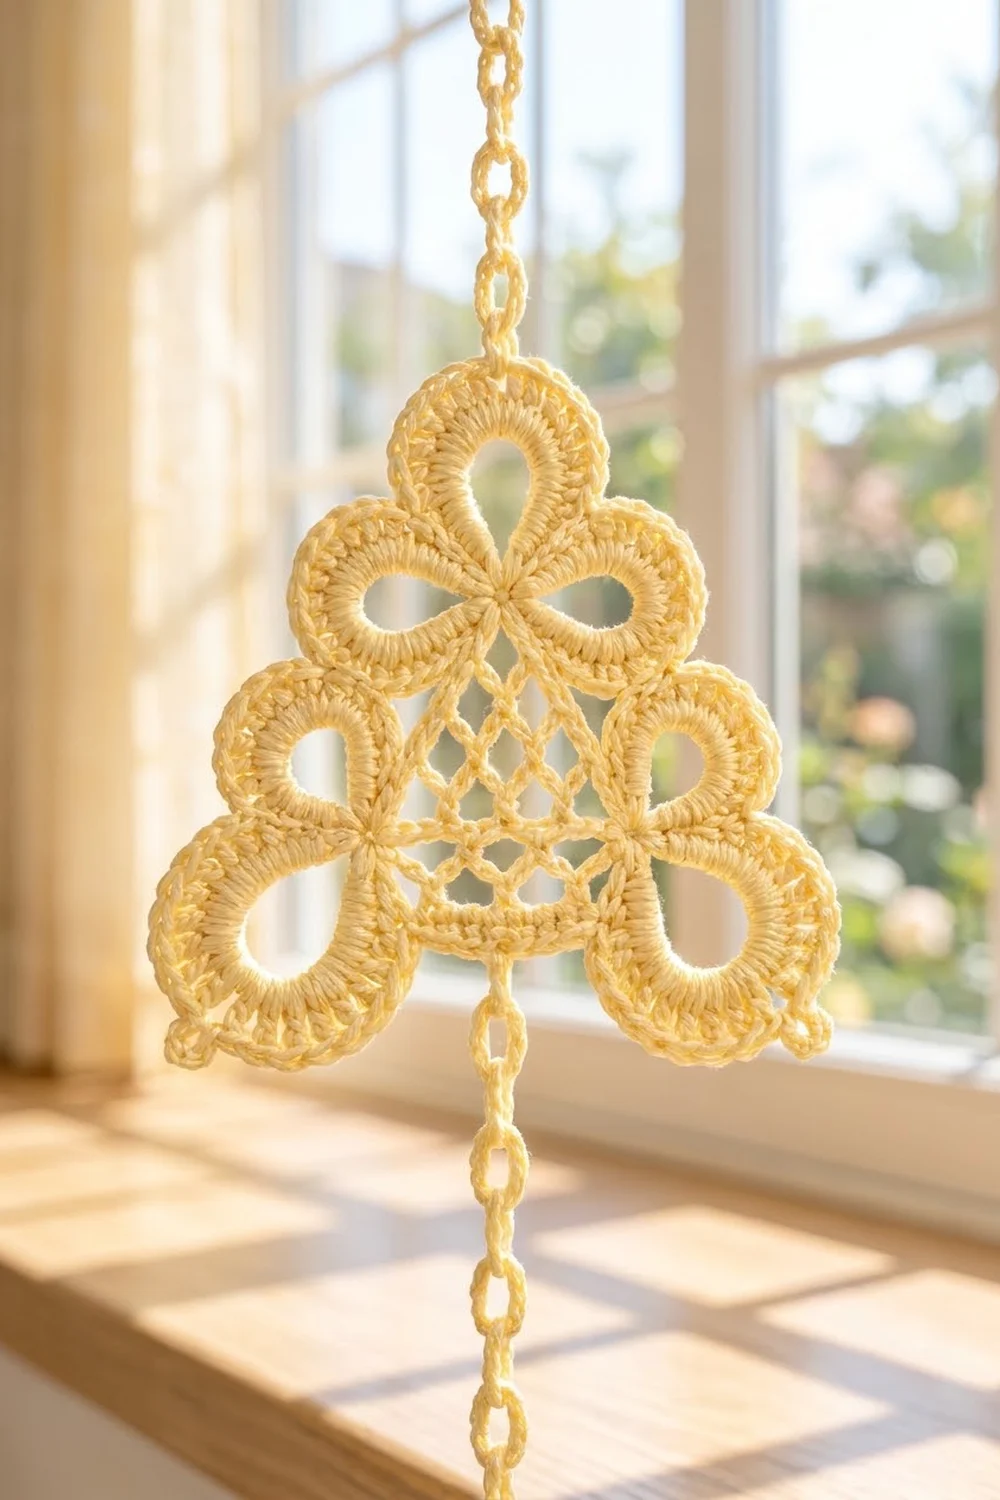
The Buttercup Trefoil Triangle is a lacy, point-up triangle motif in soft butter yellow. Each corner has a trefoil of three teardrop petals, the center is filled with a diamond chain lattice, and a fine picot edge runs all the way around. The result looks like vintage Irish-style lace, but you only need basic stitches to make it.
This pattern makes one single motif in one color. It is written in US crochet terms. The finished triangle measures 6 in (15.2 cm) per side and 5.25 in (13.3 cm) tall after blocking.
You work the motif in the round as one continuous piece. First you crochet a small triangle of chain mesh. Then you work a trefoil round, building three petals at each mesh corner and joining neighboring petal tips as you go. Two border rounds finish it: a round of single crochet, then a round of picots.
One motif works well as an ornament, a bookmark-style appliqué, or a tester before a bigger lace project. The photos also show repeats strung into curtain strands, but these instructions cover one motif only.
Finished Size and Construction
- Finished size: 6 in (15.2 cm) per side, 5.25 in (13.3 cm) tall
- Skill level: Intermediate
- Terminology: US crochet terms
- Yarn weight: Sport weight (2 – Fine) mercerized cotton
- Hook: 2.75 mm (US C-2)
- Number of pieces: 1
- Layout: One equilateral triangle, worked point up
- Piece size: 6 in (15.2 cm) per side
- Size before border: 5.25 in (13.3 cm) per side, 4.5 in (11.4 cm) tall
- Border depth: 0.25 in (0.6 cm), 2 rounds
Materials
Use a smooth mercerized cotton or a cotton blend. Mercerized cotton gives clean stitch definition and crisp petals, and the picots keep their shape. Avoid fuzzy or very stretchy yarns, because the lattice and petal holes lose their outline.
Yarn
- Butter yellow: 15 g, about 50 m (55 yd)
These quantities include a margin for your gauge swatch and weaving in ends.
Tools
- 2.75 mm (US C-2) crochet hook
- Tapestry needle
- Scissors
- 3 stitch markers
- Rust-proof pins
- Blocking mat or folded towel
- Spray bottle with water
- Ruler or measuring tape
Abbreviations (US Terms)
- ch – chain
- sl st – slip stitch
- sc – single crochet
- hdc – half double crochet
- dc – double crochet
- sp(s) – space(s)
- st(s) – stitch(es)
- rnd – round
- rep – repeat
Special stitches
- Picot: Ch 3, sl st in 3rd ch from hook.
- Petal: Ch 18, sl st in the same corner ch-2 sp to make a ring. Into the ring, work (2 sc, 3 hdc, 7 dc, ch 3, 7 dc, 3 hdc, 2 sc), then sl st in the same corner ch-2 sp. That is 24 sts plus 1 tip ch-3 sp. Each half of the petal (hub to tip) has 12 sts.
- Joined petal: Work it like a Petal, but replace the tip “ch 3” with: ch 1, sl st in the tip ch-3 sp of the named petal, ch 1.
Gauge and Checkpoints
Gauge: 24 sc = 4 in (10.2 cm), or 6 sc per 1 in (2.5 cm).
Since this is a single motif, the best gauge test is to work the mesh (Rnds 1–4) and measure it before you go on. If it is right, keep going. If not, change your hook size now, while you’ve only made a little.
Checkpoints:
- After Rnd 1: The ring opening is about 0.75 in (1.9 cm) across.
- After Rnd 3: The mesh triangle measures about 2.5 in (6.4 cm) per side.
- After Rnd 4: The solid-edged triangle measures 2.75 in (7.0 cm) per side, from corner space to corner space.
- One petal: About 1.5 in (3.8 cm) long and 1 in (2.5 cm) wide.
- After Rnd 5: 5.25 in (13.3 cm) per side and 4.5 in (11.4 cm) tall.
- After Rnd 7 and blocking: 6 in (15.2 cm) per side and 5.25 in (13.3 cm) tall.
Too big? Go down 0.25 mm in hook size, and check that your chains aren’t loose. Loose ch-5 loops make the mesh grow fastest.
Too small? Go up 0.25 mm. If the petals cup or curl, the 18-chain rings are probably too tight. Chain a little more loosely, but keep the same count.
Pattern
Part 1: Center Mesh Triangle
Rnd 1: Ch 6, sl st in first ch to form a ring. Ch 1, sc in ring, (ch 5, sc in ring) 5 times, ch 2, dc in first sc. The ch-2 plus dc counts as the 6th ch-5 loop and leaves your hook at its center. (6 sc, 6 loops)
In the next round, loops 1, 3, and 5 (counted after the closing loop) become corners. The others are side loops.
Rnd 2: Ch 1, sc around the post of the dc. *Ch 5, (sc, ch 5, sc) in next loop for a corner, ch 5, sc in next loop; rep from * once. Ch 5, (sc, ch 5, sc) in next loop for the last corner, ch 2, dc in first sc. (9 sc, 9 loops: 3 corner loops and 2 side loops per side)
Rnd 3: Ch 1, sc around the post of the dc, ch 5, sc in next loop. *Ch 5, (sc, ch 5, sc) in next corner loop, (ch 5, sc in next loop) twice; rep from * once. Ch 5, (sc, ch 5, sc) in last corner loop, ch 5, sl st in first sc. (12 sc, 12 loops: 3 corner loops and 3 side loops per side)
You should now see clear diamond-shaped openings. These diamonds are the lattice in the center of the finished motif.
Rnd 4 (conversion round): Ch 1, 4 sc in each of next 2 loops. *(2 sc, ch 2, 2 sc) in next corner loop, 4 sc in each of next 3 loops; rep from * once. (2 sc, ch 2, 2 sc) in last corner loop, 4 sc in last loop, sl st in first sc.
Count: 9 side loops × 4 sc = 36 sc, plus 3 corners × 4 sc = 12 sc. (48 sc and 3 corner ch-2 sps)
Per side: 16 sc between corner ch-2 sps (2 + 4 + 4 + 4 + 2). In this pattern, the corner is the ch-2 sp, and it is not counted in the 16.
Place a marker in each corner ch-2 sp. These spaces are the hubs for the trefoils.
Part 2: Trefoil Round
The first sc of Rnd 4 sits at position 7 of its 16-st side. To reach the first corner, sl st in each of next 9 sc, then sl st in the corner ch-2 sp. This is Corner A.
Rnd 5:
Corner A:
– Petal 1 (trailing side petal; it lies along the side you just came from)
– Petal 2 (corner petal; it points straight out from the corner)
– Petal 3 (leading side petal; it lies along the side you’re about to travel)
Sl st in each of next 16 sc, then sl st in next corner ch-2 sp (Corner B).
Corner B:
– Joined Petal 1, joined to Petal 3 of Corner A
– Petal 2
– Petal 3
Sl st in each of next 16 sc, then sl st in next corner ch-2 sp (Corner C).
Corner C:
– Joined Petal 1, joined to Petal 3 of Corner B
– Petal 2
– Joined Petal 3, joined to Petal 1 of Corner A
Sl st in each of next 16 sc, then sl st in Corner A ch-2 sp. Fasten off.
Count: 9 petals × 24 sts = 216 sts. There are 3 free corner-tip ch-3 sps and 3 joined side tips (one at the middle of each side). The round also has 48 travel sl sts.
All three petals of a trefoil come from the same ch-2 sp, so their bases pinch together into one hub. That pinch is what makes them teardrop-shaped. The side petals from neighboring corners meet tip to tip near the middle of each side, and the corner petal sticks out past the corner of the mesh.
Part 3: Border
Border gauge: Work the border at the same 6 sc per 1 in (2.5 cm). Each of the 2 border rounds adds about 0.125 in (0.3 cm), for a total depth of 0.25 in (0.6 cm).
On each side, only the outer flank of each petal gets border stitches. The inner flanks of the 6 side petals (12 sts each, 72 sts total) face the mesh and are left unworked.
Rnd 6: Join yarn with a sl st in the tip ch-3 sp of Corner A’s Petal 2. Ch 1, 2 sc in same sp.
Side:
– sc in each of 12 sts down the second half of the corner petal (tip to hub)
– sc in each of 12 sts on the outer flank of the side petal (hub to tip)
– 1 sc in the joined tip, working under both ch-1s together
– sc in each of 12 sts on the outer flank of the next side petal (tip to hub)
– sc in each of 12 sts up the first half of the next corner petal (hub to tip)
That is 49 sc. Work (2 sc, ch 3, 2 sc) in the corner tip ch-3 sp.
Rep the side and corner once. Then work the third side, 2 sc in the first sp, ch 1, and hdc in first sc. The ch 1 plus hdc forms the last corner sp and leaves your hook at its center.
Per side: 2 + 49 + 2 = 53 sc between corner sps.
Total: 3 × 53 = 159 sc and 3 corner sps.
Rnd 7 (picot round): Ch 1, (sc, picot, sc) around the hdc post.
Side: sc in next 2 sc, *picot, sc in next 4 sc; rep from * 11 more times, picot, sc in next 3 sc. Work (sc, picot, sc) in the next corner sp. Rep the side and corner once, then work the last side and sl st in first sc. Fasten off.
Per side: 53 sc and 13 picots (2 + 12 × 4 + 3 = 53).
Total: 159 sc worked one in each existing st, plus 6 sc added at the corners = 165 sc. Picots: 3 × 13 side picots + 3 corner picots = 42 picots.
Why the math works: Every petal half has exactly 12 sts. On each side, the border passes over four petal halves (4 × 12 = 48) and one joined tip (1), which gives 49. The 2 corner-group sc at each end bring it to 53. Rnd 7 keeps those same 53 sts, and 53 = 2 + (12 × 4) + 3, so the picots land evenly with none left over. The corners only add sc inside the corner sp, so each corner stays sharp without bunching the sides.
Final Blocking
- Weave in all ends along the back of the sc stitches, splitting the yarn so the ends stay put.
- Soak the motif in cool water for 10 minutes, then gently press out the water in a towel. Don’t wring it.
- Lay it face up on the blocking mat with one point at the top.
- Pin the three corner-petal tips first, making an equilateral triangle 6 in (15.2 cm) per side.
- Pin each joined side tip at the midpoint of its side.
- Open each petal’s teardrop hole with a pin through its center.
- Stretch the center lattice gently so the diamonds look even. Pin the three mesh corners.
- Pin out every picot on the outer edge.
- Let it dry completely, at least 12 hours. Measure: 6 in (15.2 cm) per side and 5.25 in (13.3 cm) tall.
Final Quality-Control Checklist
- Rnd 4 has 48 sc, 16 per side, plus 3 corner ch-2 sps.
- Every petal has 24 sts and a tip space or tip join.
- All 9 petals come from the correct corner hub (3 per corner).
- Three side tips are joined, one per side, with none twisted.
- Rnd 6 has 53 sc per side, 159 in total.
- Rnd 7 has 13 picots per side plus 1 picot at each corner (42 total).
- Petal holes stay open and teardrop-shaped.
- The finished size is 6 in (15.2 cm) per side and 5.25 in (13.3 cm) tall.
- All ends are woven in securely.
Troubleshooting
The mesh puckers or ruffles. Your chain tension doesn’t match your sc tension. If it puckers, loosen the ch-5 loops. If it ruffles, tighten them.
The petals overlap or flip. Before you join, lay each new petal flat beside its neighbor so the ring isn’t twisted. Petal 1 should lie on the trailing side, and Petal 3 on the leading side.
The petal holes close up. Your 18-chain rings are too tight, or you packed in extra stitches. Recount to 24 sts per petal.
The side tips don’t meet. Your mesh is too large or your petals are too short. Recheck the 2.75 in (7.0 cm) checkpoint after Rnd 4.
A side doesn’t count to 53. Count each petal half on its own (12 sts each). Usually a stitch was skipped at the hub V between two petals.
The edge waves after blocking. Your picots are too tight compared with the sc. Chain them a little more loosely and pin each one out.
Care
Hand wash in cool water with a mild detergent and dry flat. Re-pin the tips and picots while it’s damp to keep the crisp triangle shape.
Final Notes
The measurement chain is short and easy to check. Rnd 4 gives a 2.75 in (7.0 cm) mesh triangle with 16 sc per side. Rnd 5 adds three 1.5 in (3.8 cm) petals at each corner, which brings the motif to 5.25 in (13.3 cm) per side. The two border rounds, 53 sc and 13 picots per side, add 0.25 in (0.6 cm) of depth. After blocking, the finished motif is 6 in (15.2 cm) per side and 5.25 in (13.3 cm) tall.
The border makes each side grow by about 0.75 in (1.9 cm) and not just 0.25 in (0.6 cm) because a triangle’s corners move outward along the corner angles. Check each stage against these numbers and your motif will come out right.
Happy crocheting!