

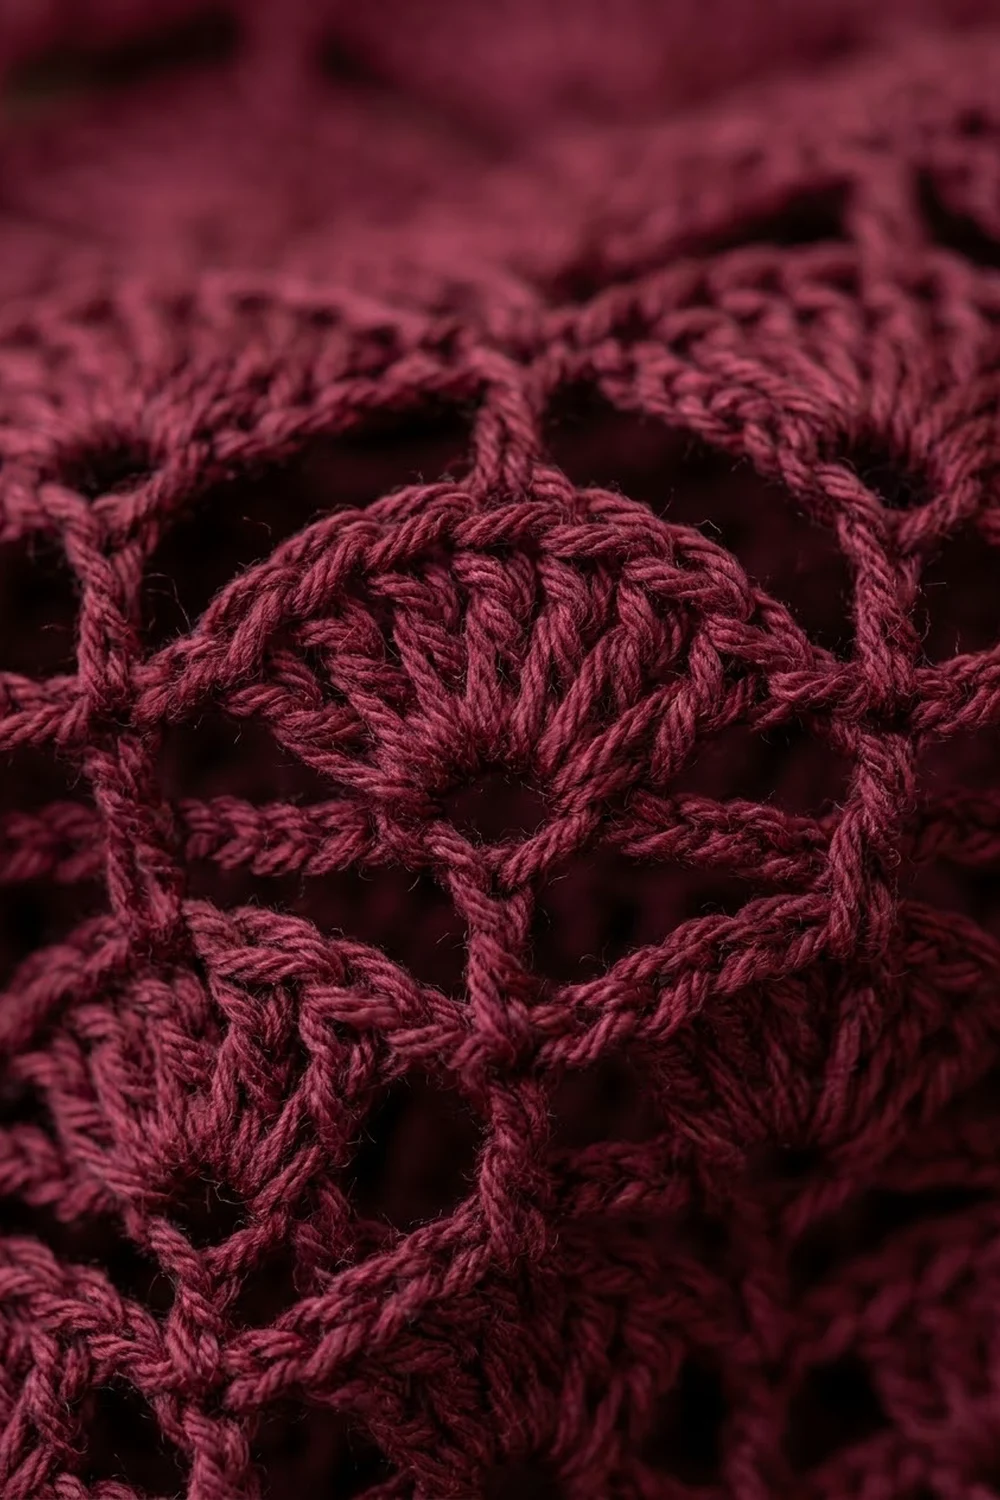
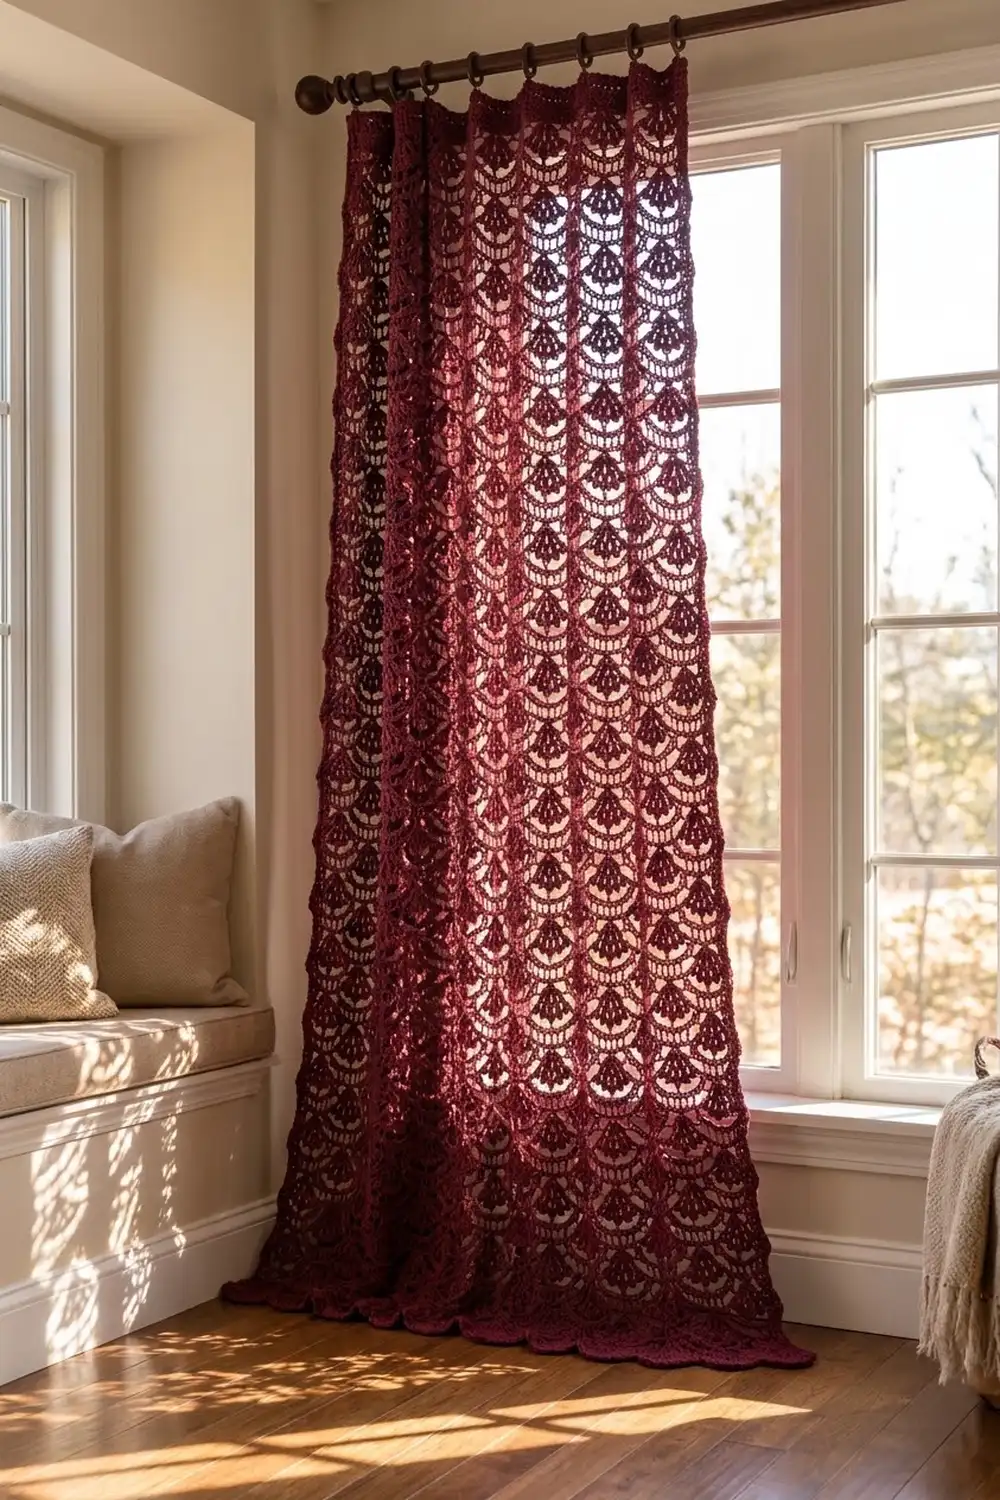
This curtain panel is a single sheet of open fan lace in one deep burgundy color. Small solid fans hang from slim vertical posts, curved chain arcs link them, and each tier is offset by half a repeat from the one above, so the fans stack in a brick pattern. Light comes through the arcs and the fans stay solid, which gives a warm, vintage look in a sunny window.
The panel is worked from the top down in US crochet terms. A solid single crochet header forms the rod pocket, the lace hangs below it, and the last row is a row of full fans, so the hem is scalloped with no extra edging. A narrow single crochet border along both long sides keeps the edges straight.
The finished panel measures 49 in (124.5 cm) wide and 62.8 in (159.5 cm) long, with the rod pocket folded and sewn. The photo shows a pair of panels. Each panel is one separate piece, so make two if you want a pair.
Construction is simple. First you crochet a header band. Then you repeat a 4-row lace sequence (2 tiers of fans) down to the length you want, finish with a full-fan hem row, and add the side borders. Last, you fold the header, sew it and block the panel.
Finished Size and Construction
- Finished size: 49 in (124.5 cm) wide x 62.8 in (159.5 cm) long, after blocking, header folded
- Skill level: Intermediate
- Terminology: US crochet terms
- Yarn weight: DK (light #3) cotton or cotton blend
- Hook: 4.0 mm (G-6)
- Number of pieces: 1 (one panel, worked in one piece)
- Layout: Header band at the top, 38 lace tiers below it, scalloped fan hem
- Lace width: 20 pattern repeats = 48 in (121.9 cm)
- Size before border: 48 in (121.9 cm) wide x 64.8 in (164.6 cm) long, header unfolded
- Border depth: about 1/2 in (1.3 cm) on each long side, 3 rows of sc
- Rod pocket: 4 in (10.2 cm) header folded to 2 in (5.1 cm)
Materials
Pick a smooth, mercerized or combed DK cotton. Cotton keeps the fans crisp, holds its shape on a curtain rod and blocks well. Fuzzy acrylic or mohair blends will blur the fans and the lace will sag over time.
- Burgundy / wine: 1,100 g, about 2,530 m (2,767 yd), which is about 22 balls of 50 g / 115 m (126 yd)
The quantity includes a margin of about 15 percent for your gauge swatch, tension differences and a little extra length. Buy all the yarn from one dye lot. A color shift is easy to see on a large flat panel with light behind it.
Tools:
– 4.0 mm (G-6) crochet hook
– Tapestry needle
– Stitch markers (at least 10)
– Rust-proof pins and blocking mats or a clean carpet with a sheet over it
– Measuring tape
– Spray bottle
Abbreviations (US Terms)
- ch – chain
- sc – single crochet
- dc – double crochet
- tr – treble crochet (yarn over twice)
- st(s) – stitch(es)
- ch-5 loop – the space under 5 chains
- RS / WS – right side / wrong side
Special stitch:
– Fan: 7 dc in the same stitch. The fan is narrow where it is anchored and opens out away from the anchor. The panel is worked top-down, so each fan hangs from its post and opens toward the hem.
– Half fan: 4 dc in the same stitch (or ch 3 plus 3 dc at the start of a row). It finishes the side edges on offset rows.
– Center dc: the 4th dc of a 7-dc fan.
Gauge and Checkpoints
Header gauge: 20 sc and 22 rows = 4 in (10.2 cm).
Lace gauge (blocked): 1 repeat (12 header sts) = 2.4 in (6.1 cm) wide, and 2 tiers (4 lace rows) = 3.2 in (8.1 cm) tall. An arc row is about 1 in (2.5 cm) tall and a fan row is about 0.6 in (1.5 cm), so each tier is 1.6 in (4.1 cm).
Make one test swatch first. It is the small three-fan piece shown in the photo.
- Ch 38. Sc in 2nd ch from hook and in each ch across: 37 sc.
- Work 3 more rows of sc (4 header rows total).
- Work Lace Rows 1–6, then Rows 3–4 once more, following the main pattern below. This gives 4 tiers.
- Block the swatch, let it dry and then measure it.
Swatch checkpoints:
– After Row 2: 2 full fans + 2 half fans + 3 sc = 25 sts.
– After Row 4: 3 full fans + 4 sc = 25 sts.
– After Row 6: lace measures 4.8 in (12.2 cm) tall (3 tiers).
– Finished swatch lace: 7.2 in (18.3 cm) wide x 6.4 in (16.3 cm) tall (4 tiers).
If your swatch is too big, go down one hook size (3.75 mm). If it is too small, go up one size (4.5 mm). If your width is right but your tiers are short, make the tr a little taller and do not pull the ch-5 loops tight. Width matters most, because it controls the stitch count of the whole panel.
Header Band
The header is a solid sc band. It is folded in half later to make the rod pocket.
Header Row 1: Ch 242. Sc in 2nd ch from hook and in each ch across. Turn. (241 sc)
Header Rows 2–22: Ch 1 (does not count as a st), sc in each sc across. Turn. (241 sc)
Checkpoint: The header measures 4 in (10.2 cm) tall and 48.2 in (122.4 cm) wide. 241 = 20 repeats of 12 + 1, which sets up 20 lace repeats.
Place a marker every 12 sts. It makes Row 1 much easier to check.
Lace Body
The lace has a 2-row set-up tier, a 4-row repeat (2 tiers) and a 2-row hem tier. In an arc row, tall tr posts and sc anchors alternate, with ch-5 loops between them. In a fan row, you work a fan into each tr and an sc into each sc, and skip the loops so they hang as curved arcs.
Each arc row moves the posts to sit between the fans of the row above it. That is what offsets the tiers.
Row 1 (set-up arc row, RS): Ch 4 (counts as tr), ch 5, skip 5 sts, sc in next st, ch 5, skip 5 sts, tr in next st; repeat from * across, ending with tr in last sc. Turn.
(21 tr, 20 sc, 40 ch-5 loops)*
Row 2 (fan row): Ch 3 (counts as dc), 3 dc in first tr (half fan made), skip ch-5 loop, sc in next sc, skip ch-5 loop, fan (7 dc) in next tr; repeat from * 18 more times, skip ch-5 loop, sc in next sc, skip ch-5 loop, 4 dc in top of turning ch-4 (half fan made). Turn.
(19 fans + 2 half fans + 20 sc = 133 + 8 + 20 = 161 sts)*
Row 3 (offset arc row): Ch 1, sc in first dc, ch 5, tr in next sc, ch 5, sc in center dc of next fan; repeat from * 18 more times, ch 5, tr in last sc, ch 5, sc in top of turning ch-3. Turn.
(21 sc, 20 tr, 40 ch-5 loops)*
The first and last sc sit at the outer edge of each half fan, which counts as that half fan’s center.
Row 4 (full fan row): Ch 1, sc in first sc, skip ch-5 loop, fan in next tr, skip ch-5 loop, sc in next sc; repeat from * across. Turn.
(20 fans + 21 sc = 140 + 21 = 161 sts)*
Row 5 (arc row): Ch 4 (counts as tr), ch 5, sc in center dc of next fan, ch 5, tr in next sc; repeat from * across, ending with tr in last sc. Turn.
(21 tr, 20 sc, 40 ch-5 loops)*, the same as Row 1.
Row 6: Work as Row 2. (161 sts)
Rows 7–74: Repeat Rows 3–6 another 17 times. Rows 3–6 are now worked 18 times in total.
Rows 75–76 (hem tier): Work Rows 3 and 4 once more. Do not turn. Fasten off.
The hem is Row 76, a full fan row with 20 complete fans. Those fans form the scalloped lower edge.
Lace row totals: 76 rows = 38 arc rows + 38 fan rows = 38 tiers.
Length checkpoints (lace only, measured lightly stretched on a flat surface):
– After Row 6: 4.8 in (12.2 cm)
– After Row 42 (Rows 3–6 worked 10 times): 22 tiers = 35.2 in (89.4 cm)
– After Row 76: 38 tiers = 60.8 in (154.4 cm)
The stitch count goes back and forth between two states, and it never drifts. Every arc row has 40 ch-5 loops, and every fan row has 161 sts. If you count 160 or 162 at the end of a fan row, check the half fans at the edges first.
Border
The border is worked along the two long side edges of the lace only. It starts at Row 1 and ends at the hem. The header sides are left open, so you can slide the rod in after folding.
Border gauge: 5 sc = 1 in (2.5 cm) along the edge. This is the same as the header stitch gauge.
Border Row 1: With RS facing, join yarn at the hem corner of one side edge. Ch 1, work 3 sc around the end of each fan row and 5 sc around the end of each arc row (around the tr or ch-4 post, or around the edge sc and its ch-5 loop). Work up to Row 1, ending at the base of the header. Turn.
(38 fan rows x 3 + 38 arc rows x 5 = 114 + 190 = 304 sc)
Border Rows 2–3: Ch 1, sc in each sc across. Turn. (304 sc) Fasten off after Row 3.
Repeat on the other long side, starting at the top of the lace and working down toward the hem: 304 sc in each of 3 rows.
Why the math works: Each tier is 1.6 in (4.1 cm) tall and gets 3 + 5 = 8 sc. At 5 sc per inch, 8 sc is exactly 1.6 in. Over 38 tiers, 304 sc ÷ 5 = 60.8 in (154.4 cm), which matches the lace length. The border will not ruffle or pull the lace in. The 3 rows of sc add about 1/2 in (1.3 cm) to each side, so the finished width is 48 + 0.5 + 0.5 = 49 in (124.5 cm).
The hem needs no border. Row 76 already gives a finished scalloped edge.
Rod Pocket
Fold the 4 in (10.2 cm) header in half toward the WS. Header Row 22 should meet the base of Header Row 1. Whipstitch the last header row to the WS along the top of Lace Row 1, one stitch at a time, using the same yarn. This makes a 2 in (5.1 cm) pocket, open at both ends, that fits most rods up to 1.25 in (3.2 cm) across.
Final Blocking
- Weave in all ends, working each one through the solid dc of a fan so it does not show in the open arcs.
- Soak the panel in lukewarm water with a little wool or cotton wash for 15 minutes.
- Press out the water. Do not wring. Roll the panel in towels to remove more.
- Lay it flat on mats or on a sheet over carpet, RS up.
- Pin the top edge straight to 48.2 in (122.4 cm). Then pin the side borders straight down to a total length of 62.8 in (159.5 cm) with the header folded, or 64.8 in (164.6 cm) unfolded.
- Pin the bottom of each of the 20 hem fans so every fan opens out into an even scallop.
- Check that the lace is 48 in (121.9 cm) wide between the borders. Smooth each ch-5 loop into a gentle curve.
- Mist any dry areas and leave the panel to dry completely, about 24 hours, before you unpin it.
Final Quality-Control Checklist
- Header is 241 sc wide and 22 rows tall
- Every fan row has 161 sts, and every arc row has 40 ch-5 loops
- Fans in each tier sit halfway between the fans of the tier above
- 38 tiers total, and the hem row has 20 full fans
- Each side border has 304 sc in each of 3 rows
- Panel lies flat, with no ruffling along the sides
- Blocked size is 49 in (124.5 cm) x 62.8 in (159.5 cm) with the pocket folded
- Rod pocket is sewn evenly and open at both ends
- All ends are hidden in solid stitches
Troubleshooting
Fans are stacked straight down instead of offset. You worked a fan into a sc anchor instead of a tr. Fans always go into tr posts, and the posts always go into the sc between fans.
The sides wave or ruffle. Your arc rows are shorter than 1 in (2.5 cm). Work 4 sc instead of 5 around each arc row end on both sides, and recount so the two sides match.
The sides pull in. Your tiers are taller than 1.6 in (4.1 cm). Add 1 sc around every fourth fan row end. Add the same number on both sides.
Half fans look lopsided. On Rows 2 and 6, the ch 3 counts as the first dc. Work only 3 more dc into the first tr, and work the closing half fan into the top of the ch-4, not into the ch-5 loop.
Arcs look tight and flat. Chain loosely, or go up a hook size for the ch-5 loops only.
Panel is too narrow. Remeasure your swatch. Each repeat should be 2.4 in (6.1 cm). To change the width, add or remove repeats in steps of 12 header sts.
Care
Hand wash or machine wash cold on a gentle cycle inside a mesh bag. Lay flat to dry and re-pin the hem fans if needed. Avoid hanging the panel wet, because the weight will stretch the lace.
Final Notes
The measurement chain is short and easy to follow. A 12-st repeat measures 2.4 in (6.1 cm), so 20 repeats on 241 header sts give 48 in (121.9 cm) of lace. Each tier is 1.6 in (4.1 cm), so 38 tiers give 60.8 in (154.4 cm) of lace. A 304-sc border on each side matches that length exactly and adds 1/2 in (1.3 cm) per side, for a 49 in (124.5 cm) wide panel. A 2 in (5.1 cm) rod pocket brings the finished length to 62.8 in (159.5 cm).
Check your swatch, count your fans, and let the blocking finish the work. Happy crocheting!