

This runner is made from small fan-shaped lace motifs. Each one starts at a little ring, opens into nine spokes and a row of arches, then squares off into a diamond with a chain-loop edge. Joined point to point, the diamonds leave open diamond-shaped windows between them, which gives the runner its lattice look.
The sample uses one soft butter-yellow cotton. It works for the holidays, especially on pale stone or wood, and still looks right for spring and summer. A plump tassel hangs from each of the three points at both ends.
The pattern uses US crochet terms. The blocked runner measures 15.5 in (39.4 cm) wide and 50.5 in (128.3 cm) long, including the border. The tassels add 3 in (7.6 cm) at each end, so the total length is 56.5 in (143.5 cm).
Construction is simple. You crochet 30 identical motifs, joining them as you go with a single slip stitch at each shared corner. Then you work one round of border around the outside edge and add six tassels.
Finished Size and Construction
- Finished size: 15.5 x 50.5 in (39.4 x 128.3 cm), plus 3 in (7.6 cm) tassels at each end
- Skill level: Intermediate
- Terminology: US
- Yarn weight: DK / light (#3) cotton
- Hook: 4 mm (G-6)
- Number of pieces: 30 motifs
- Layout: 3 motifs wide x 10 motifs long, set on point
- Motif size: 3.5 in (8.9 cm) per side; 5 in (12.7 cm) from tip to opposite tip
- Size before border: 15 x 50 in (38.1 x 127 cm)
- Border depth: 0.25 in (0.6 cm)
Materials
Yarn: Use a smooth DK-weight mercerized cotton or cotton blend. Mercerized cotton shows the spokes clearly and holds the points well after blocking. Avoid fuzzy yarns, which blur the open holes.
- Pale Butter Yellow: 250 g / 625 m (683 yd), which is five 50 g balls of about 125 m each
The amount above already includes a margin of about 20% for gauge differences and a test motif.
Tools:
– 4 mm (G-6) crochet hook
– Tapestry needle
– Scissors
– Stiff card, 3.5 in (8.9 cm) tall, for tassels
– Stitch markers
– Blocking mats, rustproof pins and a spray bottle
– Measuring tape
Abbreviations (US Terms)
- ch – chain
- sl st – slip stitch
- sc – single crochet
- hdc – half double crochet
- dc – double crochet
- tr – treble crochet
- sp(s) – space(s)
- st(s) – stitch(es)
- tch – turning chain
- RS / WS – right side / wrong side
Corner loop: (sc, ch 5, sc) worked into the same corner space.
Joining corner: (sc, ch 2, sl st into the matching ch-5 corner loop of the neighboring motif, ch 2, sc) worked into the same corner space. This replaces a corner loop and comes out the same length.
Gauge and Checkpoints
Gauge is measured per motif. Make one test motif, block it, and check it before starting the runner.
- After Row 1: the fan measures 1 in (2.5 cm) from the center of the ring to the top of a dc.
- After Row 2: the fan measures 2 in (5.1 cm) from the ring center to the top of a tr.
- After Row 3: the fan measures 2.5 in (6.4 cm) from the ring center to the top of the center arch.
- After Round 5: each side measures 3 in (7.6 cm), with 15 sc on each side (5 sc per inch).
- After Round 6 (blocked): each side measures 3.5 in (8.9 cm), and the motif measures 5 in (12.7 cm) from tip to opposite tip.
If your motif is too big: go down one hook size, or check that your chain loops aren’t loose. If it’s too small: go up one hook size. Even 0.25 in (0.6 cm) per motif adds up to 2.5 in (6.4 cm) over the length of the runner, so fix gauge now.
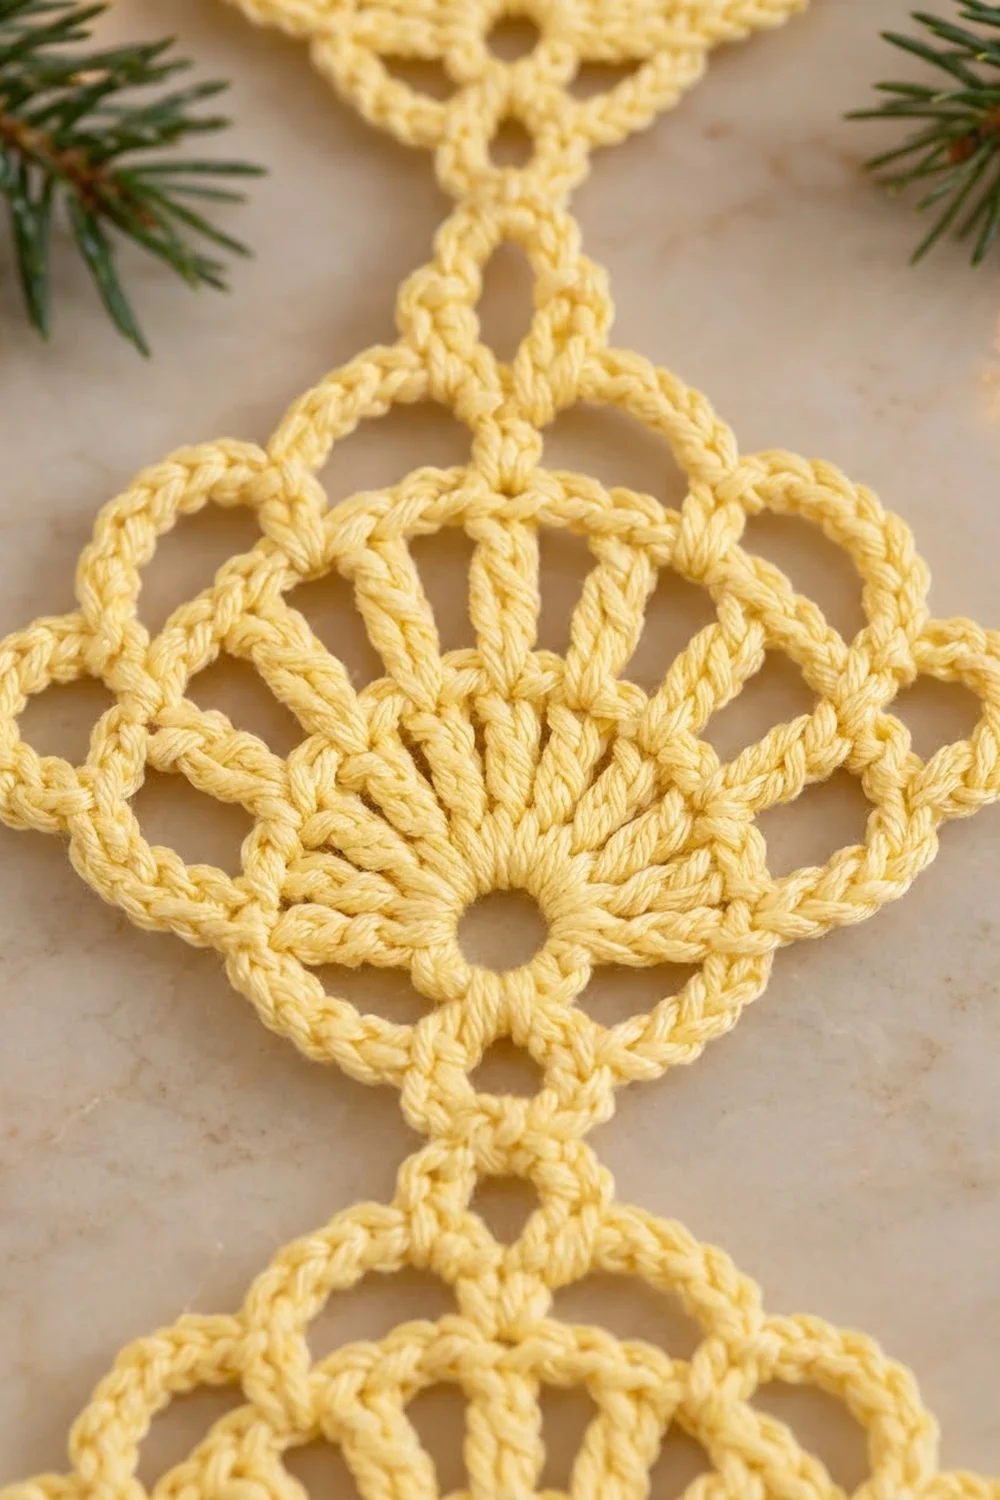
Fan Diamond Motif
Hold the motif with the ring at the bottom. The motif looks the same on both sides, so either side can face up when you join.
Ring: Ch 8, sl st in the first ch to form a ring.
Row 1 (RS): Ch 3 (counts as dc), 8 dc into the ring, turn. (9 dc)
The dc sit in the top half of the ring and fan upward. Leave the bottom half of the ring empty for now.
Row 2 (WS): Ch 7 (counts as tr + ch 3), [tr in next dc, ch 3] 7 times, tr in top of tch, turn. (9 tr, 8 ch-3 sps)
These are the nine spokes.
Row 3 (RS): Ch 1, sc in first tr, [ch 5, sc in next tr] 8 times, working the last sc in the 4th ch of the tch, turn. (9 sc, 8 ch-5 arches)
Mark the 5th sc. It is the center spoke and will become the top point.
Row 4 (WS, graduated row): Ch 1, sc in first sc. Then work:
– 3 sc in the next arch
– 3 hdc in the next arch
– 3 dc in the next arch
– 3 tr in the next arch
– (tr, ch 3, tr) in the marked center sc
– 3 tr in the next arch
– 3 dc in the next arch
– 3 hdc in the next arch
– 3 sc in the next arch
Finish with sc in the last sc. Do not turn. (28 sts: 1 + 12 + 2 + 12 + 1, plus 1 ch-3 sp)
The stitches get taller toward the center, which lifts the middle into the top point of the diamond.
Round 5 (squaring round): In this round, corners are ch-2 spaces. Each side’s count of 15 includes the sc worked on each side of its two corners. Ch 1 and work:
– Side corner: (sc, ch 2, sc) in the last sc of Row 4.
– Lower side: 2 sc around the end of Row 3, 5 sc around the end of Row 2, 4 sc around the end of Row 1, and 2 sc in the bottom half of the ring.
– Bottom corner: (sc, ch 2, sc) in the ring.
– Second lower side: 2 sc in the ring, 4 sc around the end of Row 1, 5 sc around the end of Row 2, and 2 sc around the end of Row 3.
– Side corner: (sc, ch 2, sc) in the first sc of Row 4.
– Upper side: sc in each of the next 12 sts and sc in the next tr.
– Top corner: (sc, ch 2, sc) in the ch-3 sp.
– Second upper side: sc in the next tr and sc in each of the next 12 sts.
Join with a sl st to the first sc. (60 sc, which is 15 per side; 4 ch-2 corner sps)
Check the lower sides: corner sc 1 + 2 + 5 + 4 + 2 + corner sc 1 = 15. Check the upper sides: corner sc 1 + 12 + 1 + corner sc 1 = 15.
Round 6 (lace edge): Sl st into the next ch-2 corner sp and ch 1. Work a corner loop in that sp. Then work each side as follows, counting the 15 sc of the side as stitches 1–15:
ch 3, skip 2 sc, sc in next sc; ch 3, skip 2 sc, sc in next sc; ch 3, skip 3 sc, sc in next sc; ch 3, skip 2 sc, sc in next sc; ch 3, skip 2 sc.
That uses 2+1+2+1+3+1+2+1+2 = 15 sts. Work a corner loop in the next corner sp and repeat around. Leave out the last corner loop, which you already made at the start, and join with a sl st to the first sc. (24 sc; 20 ch-3 loops, which is 5 per side; 4 ch-5 corner loops)
Fasten off and weave in the ends.
Make All Pieces
Make 30 motifs in Pale Butter Yellow. Make the first one complete, then join the other 29 to their neighbors during Round 6.
Layout (each ◇ is one motif on point, with the ring at the bottom; motifs touch only at corners):
       A    B    C
R1     ◇    ◇    ◇    ← tassel end
R2     ◇    ◇    ◇
R3     ◇    ◇    ◇
R4     ◇    ◇    ◇
R5     ◇    ◇    ◇
R6     ◇    ◇    ◇
R7     ◇    ◇    ◇
R8     ◇    ◇    ◇
R9     ◇    ◇    ◇
R10    ◇    ◇    ◇    ← tassel end
Joining
Method: Join as you go, at the corners only. In Round 6 of each new motif, use a joining corner instead of a corner loop at every corner that touches a finished motif.
Stitch-to-stitch logic:
– A side corner joins to the facing side corner of the motif beside it (for example, B1 to A1).
– A top corner joins to the bottom corner of the motif above it (for example, A2 to A1).
– Each meeting point joins exactly two motifs. Sides never join, so the open diamond holes stay open.
– A1 has no joins. B1 and C1 have one each. Column A from row 2 down has one join (top), and columns B and C from row 2 down have two (top and side).
– Keep every ring pointing toward the same end so all the fans face the same way.
Tension: Work the ch-2 on each side of the sl st at the same tension as your ch-5 loops. If the joins are tight, the points pucker. If they’re loose, the lattice sags.
Size checkpoints:
– Row 1 of motifs measures 15 in (38.1 cm) from the outer side tip of A1 to the outer side tip of C1.
– After 4 rows, the piece measures 20 in (50.8 cm) from top tip to bottom tip.
– After 10 rows, it measures 50 in (127 cm).
Border
Border gauge: 15 sc along one motif side of 3.5 in (8.9 cm), which is 3 sc in each of its 5 ch-3 loops.
Work only around the outer edge. Leave the inside holes unworked.
Border Round: With RS facing, join the yarn in any outer ch-3 loop. Ch 1 and work:
– Every outer motif side: 3 sc in each of the 5 ch-3 loops (15 sc).
– Every outer tip: (2 sc, ch 3, 2 sc) in the ch-5 corner loop.
– Every valley, where two edge motifs meet: 1 sc around the joining sl st.
Join with a sl st to the first sc and fasten off.
Counts per side:
– Each long side: 10 motifs x 2 exposed sides x 15 sc = 300 sc. Add 10 side tips x 4 sc = 40 sc and 9 valleys x 1 sc = 9 sc, for a total of 349 sc and 10 ch-3 tip sps.
– Each short end: 4 exposed sides x 15 sc = 60 sc (1 side each from A and C, 2 from B). Add 3 tips x 4 sc = 12 sc and 2 valleys x 1 sc = 2 sc, for a total of 74 sc and 3 ch-3 tip sps.
– Whole round: 2 x 349 + 2 x 74 = 846 sc and 26 ch-3 tip sps.
Why the math works: Each motif side contributes the same 15 sc, so the long sides and ends stay in proportion, and nothing is added at the seams. The ch-3 at each tip lets the point turn sharply without pulling. A single sc in each valley holds the inward angle without bunching. The border adds 0.25 in (0.6 cm) all around, so the runner goes from 15 x 50 in (38.1 x 127 cm) to 15.5 x 50.5 in (39.4 x 128.3 cm).
Tassels (make 6):
1. Wrap the yarn 30 times around the 3.5 in (8.9 cm) card.
2. Slide a 10 in (25.4 cm) tie under the top wraps and knot it tightly.
3. Cut the wraps open along the bottom.
4. Wrap a second strand around the bundle 0.5 in (1.3 cm) below the top, 6 times, and knot it.
5. Trim the tassel to 3 in (7.6 cm).
6. Thread both tails of the top tie through the ch-3 tip space at one of the three points on a short end, knot them on the WS and weave them in.
Repeat for the other end.
Final Blocking
- Soak the runner in cool water for 15 minutes, then press out the water. Don’t wring it.
- Roll it in a towel to remove more moisture.
- Lay it flat on blocking mats and pin it to 15.5 x 50.5 in (39.4 x 128.3 cm).
- Pin every outer tip first, then each valley, keeping the edges in straight zigzags.
- Pin each inside hole open so it forms a diamond with 3.5 in (8.9 cm) sides.
- Lightly mist the fans and press each spoke straight with your fingers.
- Leave it to dry completely, usually 24 hours, before unpinning.
- Comb the tassels straight and trim them evenly.
Final Quality-Control Checklist
- All 30 motifs have 9 spokes and 8 arches.
- Every motif side has 5 ch-3 loops.
- All the rings point toward the same end.
- Each corner join connects exactly two motifs.
- No side-to-side joins have been made by mistake.
- The border has 349 sc on each long side and 74 sc on each end.
- The runner measures 15.5 x 50.5 in (39.4 x 128.3 cm).
- All six tassels are 3 in (7.6 cm) long and firmly knotted.
- All ends are woven in and invisible from both sides.
Troubleshooting
- Fan cups instead of lying flat: Your ch-3 spaces in Row 2 are too tight. Chain more loosely, or go up a hook size for Row 2 only.
- Top point looks rounded: Make sure you worked tr in Row 4’s center arches and (tr, ch 3, tr) in the marked center sc.
- Lower sides ripple: You worked too many sc around the row ends. Count them again: 2, 5, 4, 2.
- Motifs are different sizes: Check that each one has 60 sc in Round 5. Re-pin while blocking to even out small differences.
- Holes are skewed: A joining corner went into the wrong loop. Undo it back to that corner and rejoin.
- Border ruffles or pulls: Keep exactly 3 sc per loop and 1 sc per valley.
Care
Hand wash in cool water with mild soap and dry flat, pinning the points again if needed. Steam the tassels lightly to refresh them. Don’t iron directly on the lace.
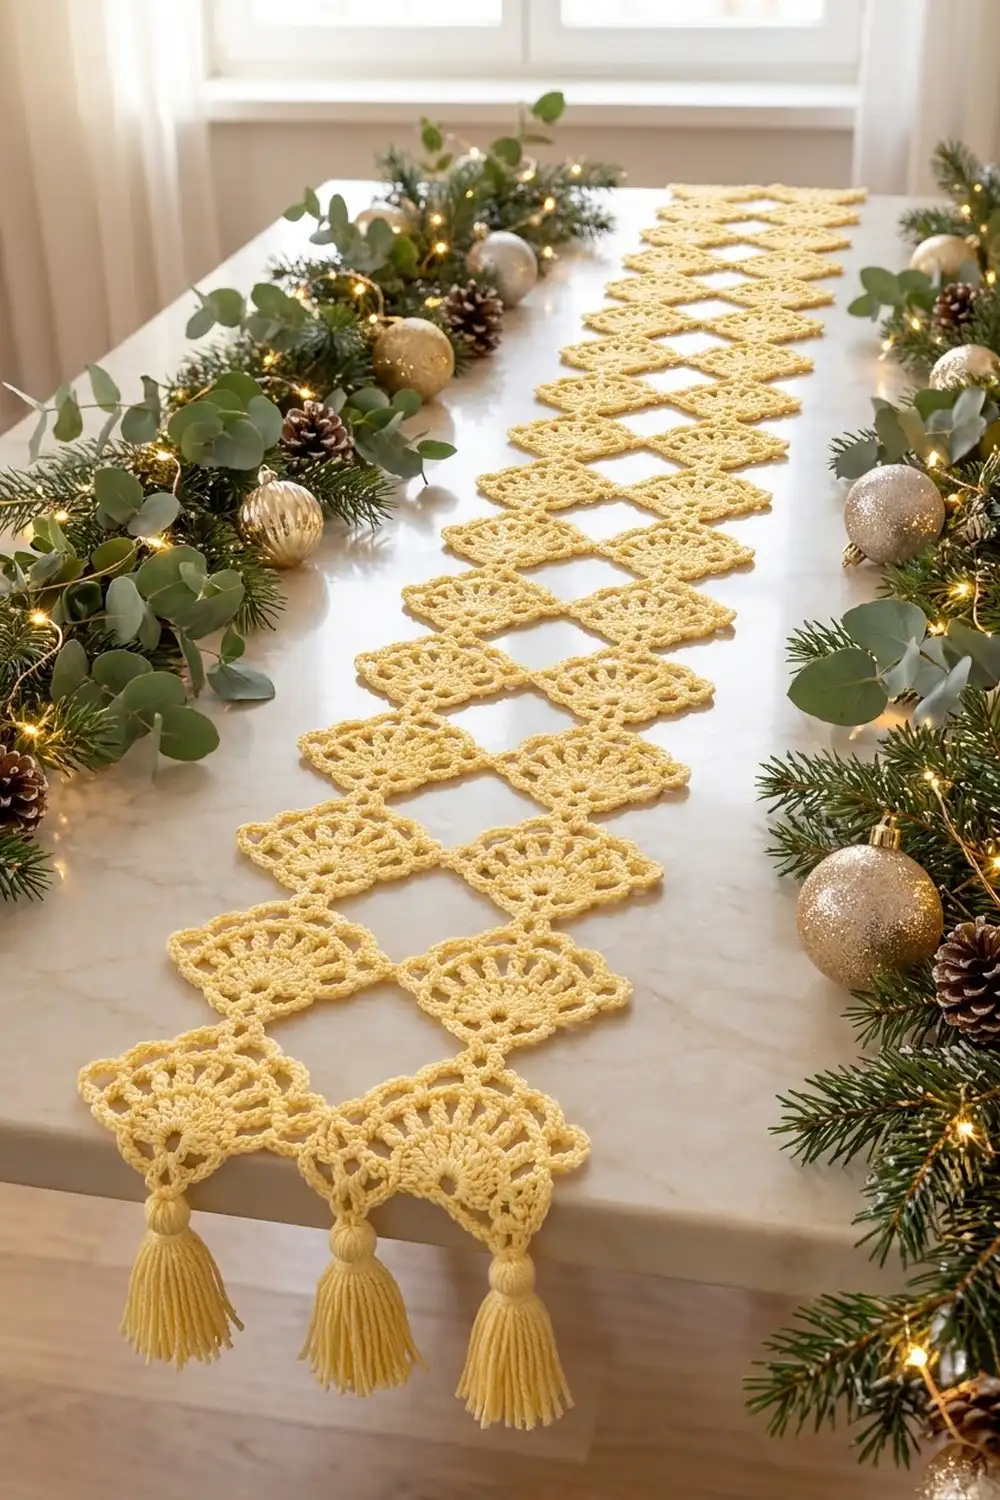
Final Notes
Measure at each stage:
– Row 1 fan: 1 in (2.5 cm) from the ring center
– Row 2: 2 in (5.1 cm)
– Row 3: 2.5 in (6.4 cm)
– Round 5: 3 in (7.6 cm) per side
– Round 6: 3.5 in (8.9 cm) per side, 5 in (12.7 cm) tip to tip
– Joined: 15 x 50 in (38.1 x 127 cm)
– Bordered: 15.5 x 50.5 in (39.4 x 128.3 cm)
If each stage matches, the finished runner will lie flat and come out at the right size.
Happy crocheting!