

The Daisy Meadow Garland is a long, airy strand of cream daisies and sage green leaf pairs. The flowers are dense and dimensional, with twelve rounded petals around a darker green center. The leaves are open and lacy, with small holes that read as veins. Each leaf pair sits between two flowers.
The palette is soft and botanical: cream petals, a deep green center, and sage leaves. It looks lovely hanging in a window, where light shows through the leaf filigree and catches the texture of the petals.
This pattern uses US crochet terms. The finished garland measures about 23 in (58.4 cm) long including the hanging ring. The strand is about 3 in (7.6 cm) wide at the flowers.
You will make 4 flower motifs and 4 leaf-pair motifs separately. Then you join them in a single vertical line using short sage chain connectors. Finally, you add a hanging ring at the top.
Finished Size and Construction
- Finished size: 23 in (58.4 cm) long × 3 in (7.6 cm) wide
- Skill level: Intermediate
- Terminology: US crochet terms
- Yarn weight: DK (weight 3) cotton or cotton blend
- Hook: 3.5 mm (E-4)
- Number of pieces: 8 motifs (4 flowers, 4 leaf pairs) plus 1 hanging ring
- Layout: 1 column, alternating leaf pair and flower, with a leaf pair at the top
- Flower size: 3 in (7.6 cm) across
- Leaf section size: 2.5 in (6.4 cm) tall between flowers, once joined
- Size before border: 22 in (55.9 cm) long
- Border depth: 1 in (2.5 cm), from the hanging ring at the top
Materials
Yarn: Choose a smooth, mercerized or combed DK cotton. Cotton gives crisp stitch definition, holds the petal shape, and keeps the leaf holes open. Avoid fuzzy or very stretchy yarns, because they blur the filigree.
- Cream (petals): 25 g, about 58 m
- Dark green (flower centers): 10 g, about 23 m
- Sage green (leaves, connectors, ring): 30 g, about 69 m
The meterage assumes about 2.3 m per gram, which is typical for DK cotton. These quantities include a margin of roughly 40% over what the garland actually uses. That margin covers your gauge swatch and any re-work.
Tools:
- 3.5 mm (E-4) crochet hook
- Tapestry needle
- 4 locking stitch markers
- Scissors
- Rust-proof pins and a blocking mat
- Spray bottle
- Ruler or tape measure
Abbreviations (US Terms)
- ch – chain
- sl st – slip stitch
- sc – single crochet
- hdc – half double crochet
- dc – double crochet
- tr – treble crochet
- sk – skip
- sp – space
- st(s) – stitch(es)
- MR – magic ring
Special terms:
- Petal (worked in one ch-2 sp): (sc, hdc, 3 dc, hdc, sc).
- Petal tip: the center dc of a petal’s 3 dc. This is the 4th stitch of the 7.
- Leaf base / leaf tip: On each leaf, the base is the end nearest the hook when you start. The tip is the end at the slip knot.
Gauge and Checkpoints
Gauge: 20 sc = 4 in (10.2 cm). That works out to 5 sc and 5 ch per 1 in (2.5 cm).
Make one complete flower and one complete leaf pair before anything else. Measure both against the checkpoints below.
Flower checkpoints:
- After Rnd 3 (green center): 1.25 in (3.2 cm) across
- After Rnd 4: 1.75 in (4.4 cm) across
- After Rnd 5: 3 in (7.6 cm) across, measured petal tip to petal tip
Leaf checkpoints:
- Foundation ch 14: about 2.75 in (7.0 cm) long, unstretched
- Each finished leaf: 2.75 in (7.0 cm) long × 1.25 in (3.2 cm) wide
If your pieces are too big, go down one hook size to 3.25 mm. If they are too small, go up to 3.75 mm.
Small differences of about 0.25 in (0.6 cm) per flower are fine. The garland will simply be slightly longer or shorter. Petal tips that curl usually mean your tension is too tight, so loosen up rather than changing the stitches.
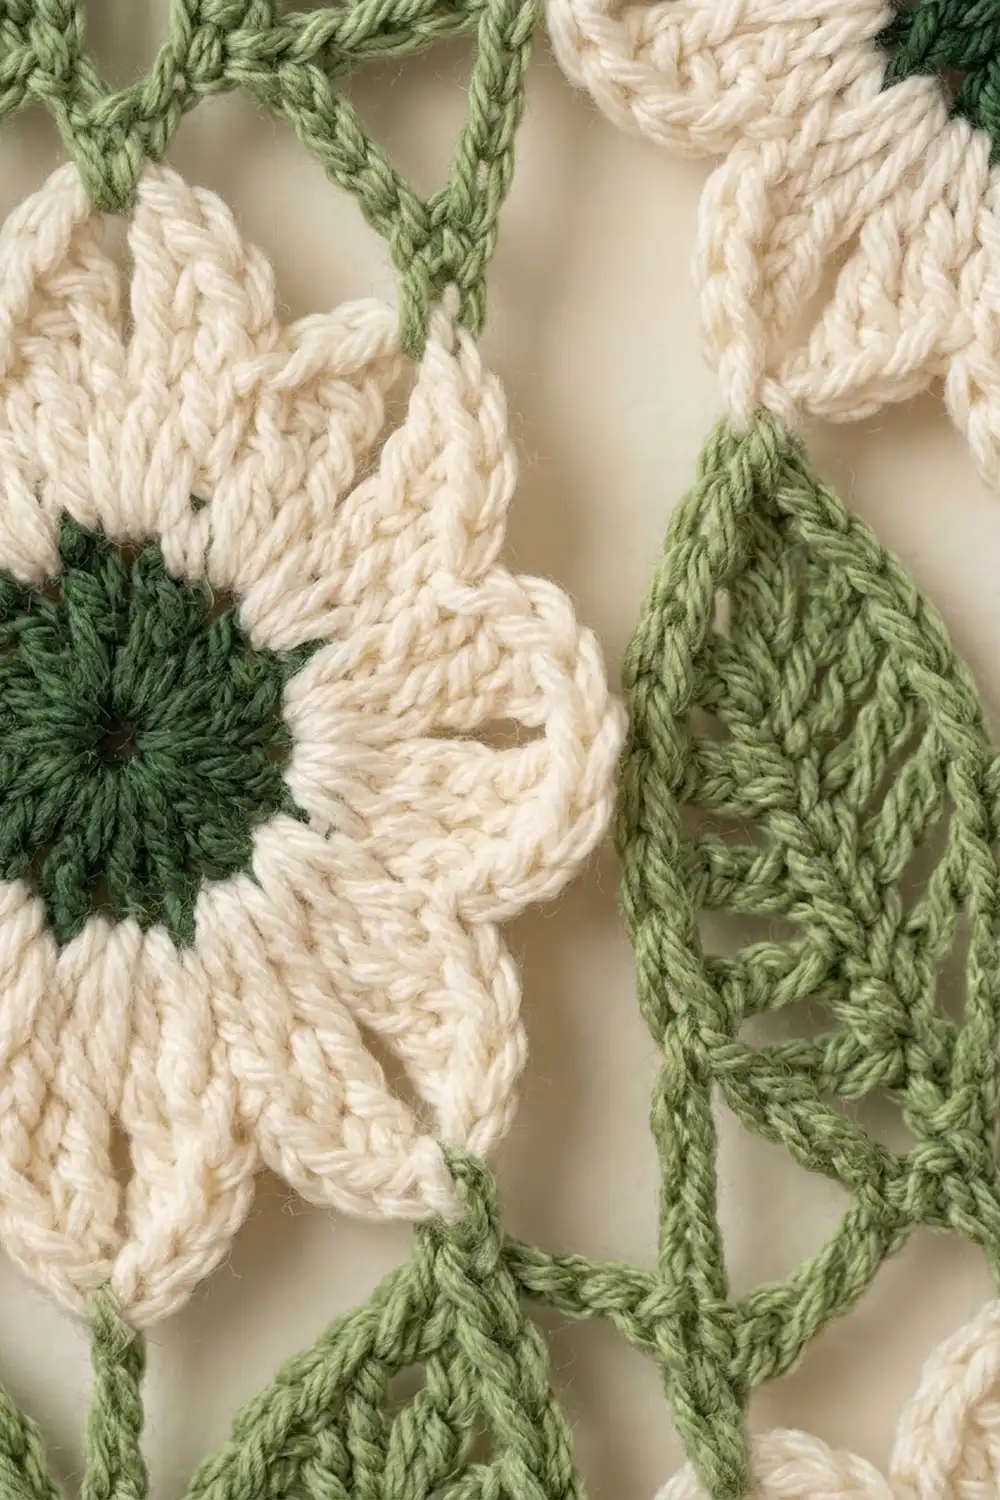
Flower Motif (make 4)
Center (dark green):
Rnd 1: In a MR, work ch 1 and 8 sc. Pull the ring closed and sl st to the first sc. (8 sts)
Rnd 2: Ch 1. Work 2 sc in each st around. Sl st to the first sc. (16 sts)
Rnd 3: Ch 1. Sc in the next st, 2 sc in the next st. Repeat from * 8 times. Sl st to the first sc. (24 sts)
Fasten off dark green. Checkpoint: 1.25 in (3.2 cm).
Petal base (cream):
Rnd 4: Join cream in any st. Ch 1 and sc in the same st. Ch 2 and sk the next st. Sc in the next st, ch 2, sk the next st. Repeat from * around. Sl st to the first sc.
This is a conversion round, not a growth round. You work 1 sc into every other existing st, so 12 of the 24 sts are used and 12 are skipped. (12 sc, 12 ch-2 sps)
Checkpoint: 1.75 in (4.4 cm).
Rnd 5: Sl st into the first ch-2 sp. Ch 1. Work 1 petal in each ch-2 sp around. Sl st to the first sc. (12 petals; 12 × 7 = 84 sts)
Fasten off and weave in the ends. Checkpoint: 3 in (7.6 cm).
The short hdc and dc stitches, packed into each small space, make firm, rounded petals with a clear gap between them.
Mark the flower: Place a marker on one petal tip and call it Petal 1 (12 o’clock). Count clockwise from there. Petal 5 sits at 4 o’clock, Petal 7 at 6 o’clock, and Petal 9 at 8 o’clock.
Leaf Pair Motif (make 4)
Work with sage green throughout. Both leaves are made in one continuous piece.
Leaf 1, Rnd 1: Ch 14. The working chains are numbered 1–13, counting from the hook.
Side 1:
– Sc in the 2nd ch from the hook (ch 1).
– Hdc in ch 2.
– Dc in ch 3.
– Ch 1, sk ch 4. Tr in ch 5.
– Ch 1, sk ch 6. Tr in ch 7.
– Ch 1, sk ch 8. Tr in ch 9.
– Ch 1, sk ch 10. Dc in ch 11.
– Hdc in ch 12.
Tip: Work (sc, ch 2, sc) in ch 13.
Side 2: Rotate and work along the opposite side of the foundation chain.
– Hdc in ch 12.
– Dc in ch 11.
– Ch 1, sk ch 10. Tr in ch 9.
– Ch 1, sk ch 8. Tr in ch 7.
– Ch 1, sk ch 6. Tr in ch 5.
– Ch 1, sk ch 4. Dc in ch 3.
– Hdc in ch 2.
– Sc in ch 1.
Sl st to the first sc.
Count: 8 sts + 4 ch-1 sps on each side, 2 tip sc, and 1 ch-2 tip. That is 18 sts, 8 ch-1 sps, and 1 ch-2 sp in total.
The ch-1 gaps between the tall stitches create the open, veined look.
Leaf 1, Rnd 2 (outline): Ch 1.
– Side 1: Sc in each st and in each ch-1 sp up Side 1. (12 sc)
– Tip: Sc in the tip sc. Work (sc, ch 2, sc) in the ch-2 sp. Sc in the next tip sc.
– Side 2: Sc in each st and ch-1 sp down Side 2. (12 sc)
Sl st to the first sc. (12 + 1 + 2 + 1 + 12 = 28 sc, plus 1 ch-2 tip)
Leaf 2: Do not fasten off. Ch 14 and repeat Rnds 1–2 on this new chain. Side 1 starts at the hook end, so Leaf 2’s base sits right next to Leaf 1’s base.
After the final sl st of Leaf 2, sl st once more into the first sc of Leaf 1’s Rnd 2. This locks the two bases together into a single base point. Fasten off.
Open the leaves into a V. The tips should sit about 3 in (7.6 cm) apart.
Make All Pieces
- Cream + dark green: 4 flower motifs
- Sage green: 4 leaf pair motifs, plus the connectors and ring (made later)
Layout grid (top to bottom):
TOP:    HANGING RING (SAGE)
ROW 1:  LEAF PAIR (SAGE)
ROW 2:  FLOWER (CREAM/GREEN)
ROW 3:  LEAF PAIR (SAGE)
ROW 4:  FLOWER (CREAM/GREEN)
ROW 5:  LEAF PAIR (SAGE)
ROW 6:  FLOWER (CREAM/GREEN)
ROW 7:  LEAF PAIR (SAGE)
ROW 8:  FLOWER (CREAM/GREEN)
Length: (4 flowers × 3 in) + (4 leaf sections × 2.5 in) = 22 in (55.9 cm) before the border.
Joining
Method: Use sage chain connectors anchored with sl sts. Lay the pieces out flat in grid order, right sides up, with every Petal 1 pointing toward the top.
Join from the bottom up. The leaf pairs in Rows 3, 5, and 7 each connect to a flower below (B) and a flower above (A).
1. Stem:
– Join sage with a sl st in Petal 1’s tip on flower B.
– Ch 4 (about 0.75 in / 1.9 cm). Sl st through the leaf pair’s base point.
– Ch 9 (about 1.75 in / 4.4 cm). Sl st in Petal 7’s tip on flower A.
– Fasten off.
The leaf section now spans 0.75 + 1.75 = 2.5 in (6.4 cm).
2. Right leaf:
– Join sage in the right leaf’s ch-2 tip.
– Ch 3 and sl st in Petal 5’s tip on flower A.
– Fasten off.
3. Left leaf:
– Join sage in the left leaf’s ch-2 tip.
– Ch 3 and sl st in Petal 9’s tip on flower A.
– Fasten off.
Stitch logic: Every connection lands on a petal tip, the center dc. That keeps each flower symmetrical. Petals 5 and 9 are equally spaced from Petal 7 (2 petals each way), so the leaf pair sits centered.
Row 1’s leaf pair is joined the same way, using Petal 1 of the flower in Row 2. Its stem and tips attach to the hanging ring in the Border section.
Tension: Make the connector chains at your normal chain tension. Lay each one flat to check it. A chain pulled tight will pucker the petals, and a loose one lets the leaves droop.
Size checkpoint: Rows 2–8 should measure 19.5 in (49.5 cm). Adding Row 1 brings the total to 22 in (55.9 cm).
Border (Hanging Ring)
Border gauge: The ring is worked tighter than the motifs, at about 6.4 sc per in compared with 5 sc per in. The extra density is intentional. Sc packed into a chain ring sits close, which keeps the ring firm enough to hang the full weight of the garland.
Ring foundation: With sage, ch 10. Sl st to the first ch to form a ring.
Rnd 1: Ch 1. Work 20 sc into the ring. Sl st to the first sc. (20 sc: 10 on the left half, 10 on the right half)
The finished ring is 1 in (2.5 cm) across.
Mark three points on the ring:
– sc 1 at the bottom
– sc 6 at 3 o’clock
– sc 16 at 9 o’clock
Attach the top leaf pair (Row 1):
– Stem: Join sage at the Row 1 base point. Ch 9 and sl st in ring sc 1. Fasten off.
– Right leaf: Join sage in the right leaf’s ch-2 tip. Ch 3 and sl st in ring sc 6. Fasten off.
– Left leaf: Join sage in the left leaf’s ch-2 tip. Ch 3 and sl st in ring sc 16. Fasten off.
Why the math works: sc 6 is 5 sts clockwise from sc 1. sc 16 is 5 sts counterclockwise from sc 1, because 16 → 20 → 1 is 5 steps. The leaf tips are therefore mirrored exactly, just as Petals 5 and 9 mirror around Petal 7 on each flower.
The ring adds 1 in (2.5 cm), bringing the total to 22 + 1 = 23 in (58.4 cm).
Final Blocking
- Weave in all ends along same-color stitches. Do not trim them yet.
- Spray the garland until it is evenly damp, but not dripping.
- Lay it flat on the mat in a straight line, 23 in (58.4 cm) long.
- Pin each flower to 3 in (7.6 cm), with one pin in every petal tip.
- Pin each leaf to 2.75 in (7.0 cm), pinning the tip and base. Open each V so the tips sit about 3 in (7.6 cm) apart.
- Gently stretch each leaf sideways so the ch-1 holes open fully.
- Straighten every connector chain.
- Let it dry completely, then trim the ends.
Final Quality-Control Checklist
- 4 flowers, each 3 in (7.6 cm) across with 12 petals
- Each flower has 84 sts in Rnd 5
- 4 leaf pairs, with 28 sc plus a ch-2 tip on every leaf
- All leaf holes are open and evenly spaced
- Stems are ch 4 + ch 9; tip connectors are ch 3
- Every join lands on a petal tip (Petals 1, 5, 7, and 9)
- The ring has 20 sc, with attachments at sc 1, sc 6, and sc 16
- Total length is 23 in (58.4 cm) and the garland hangs straight
Troubleshooting
- Petals ruffle: You have too many sts in a petal, or a hook that is too large. Recount 7 sts per petal.
- Petals cup: Your tension is too tight. Go up 0.25 mm.
- Leaf holes closed up: You skipped a ch-1 or worked into a skipped ch. Recheck the Rnd 1 sequence.
- Leaf curls: Your Rnd 2 is too tight. Work the outline looser, then block firmly.
- Garland twists: One Petal 1 was rotated. Re-check the markers and redo that join.
- Leaves droop: The tip connectors are too long. Use ch 2 instead of ch 3.
- Garland is too long or short: Adjust the hook size. Do not change the stitch counts.
Care
Hand wash in cool water with mild soap. Press out the water in a towel, then reshape and dry flat, re-pinning if needed.

Final Notes
The measurement chain is simple:
- Flower center: 1.25 in (3.2 cm)
- Flower petal base: 1.75 in (4.4 cm)
- Finished flower: 3 in (7.6 cm)
- Finished leaf: 2.75 in (7.0 cm)
- Leaf section between flowers: 2.5 in (6.4 cm)
- Assembled strand: 22 in (55.9 cm)
- Hanging ring: 1 in (2.5 cm)
- Finished garland: 23 in (58.4 cm)
Check each stage, and the garland comes together cleanly. Optional: for a longer strand, add matching flower and leaf pairs at the bottom, with each pair adding 5.5 in (14.0 cm).
Happy crocheting!