

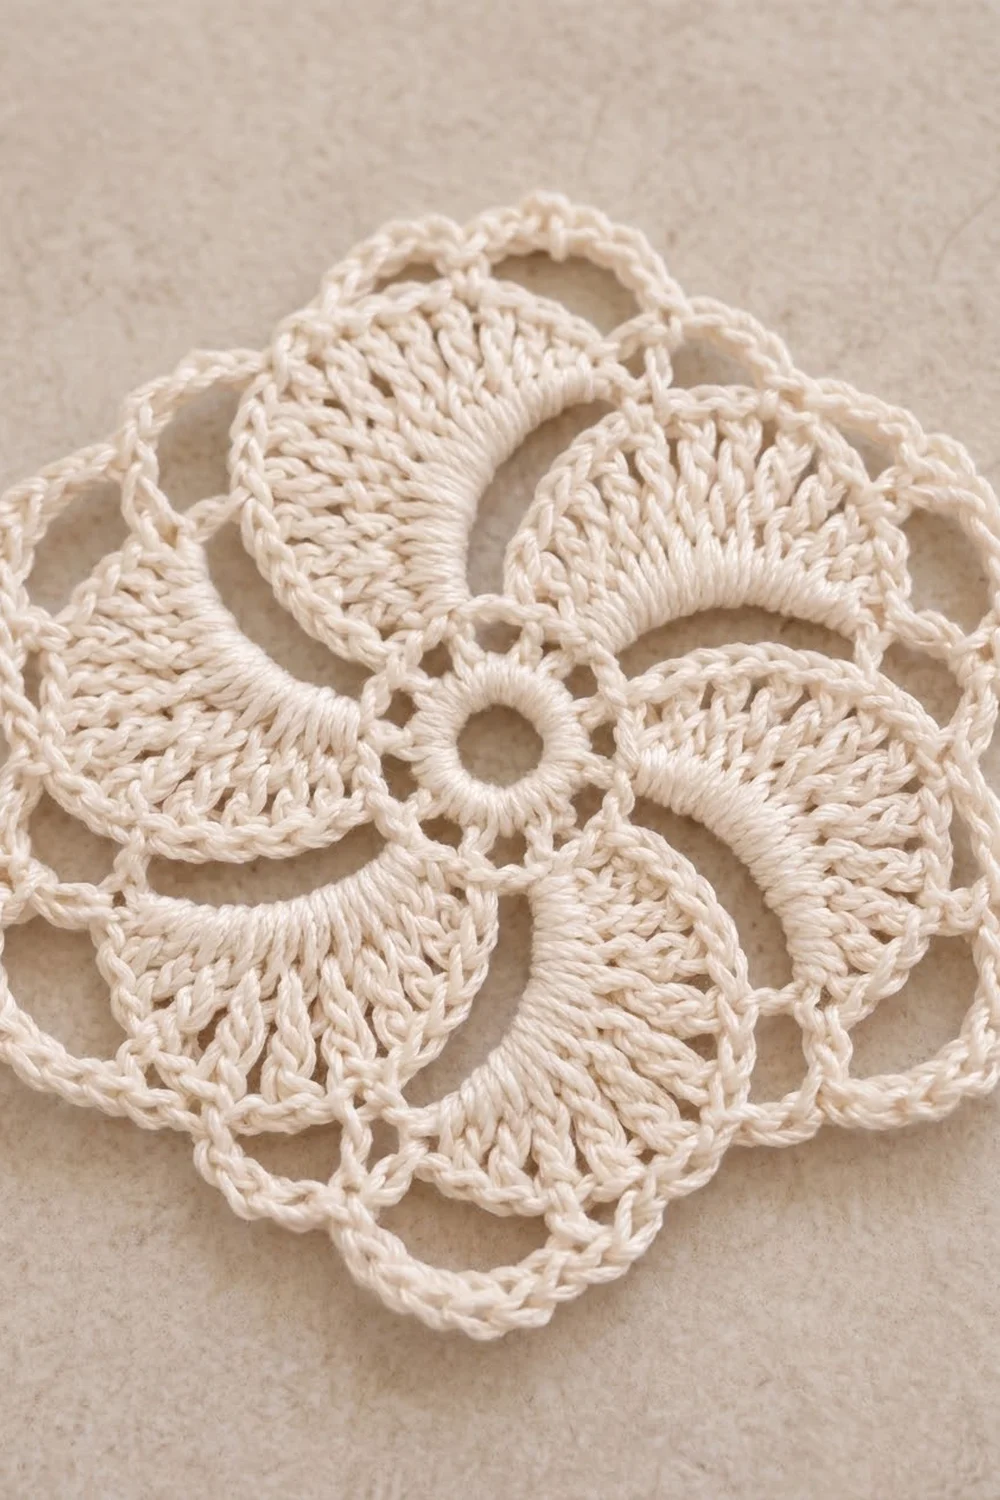
The Whirling Moonflower is a round lace motif that looks like it is turning in place. Six crescent-shaped fans curl around a small open center ring. Each fan sweeps from short stitches up to tall trebles, so the whole motif reads as a pinwheel.
It is worked in one shade of cream cotton, so the texture does the work. A back-loop round lays fine ridges along every crescent. Two rounds of open chain loops finish the edge with a soft, scalloped lace frame. The style is classic thread lace with a slightly modern, graphic swirl.
This pattern uses US crochet terms. The finished, blocked motif measures 6.5 in (16.5 cm) across. It is a single piece, worked in the round from the center out, with no sewing.
The construction is easy to follow: a padded ring, six long chain loops, swirl fans worked into those loops, a back-loop shaping round, and a two-round chain-loop border. Every round has a stitch count and a size checkpoint, so you always know where you stand.
Finished Size and Construction
- Finished size: 6.5 in (16.5 cm) across after blocking
- Skill level: Intermediate
- Terminology: US crochet terms
- Yarn weight: Fingering weight (size 3) mercerized cotton
- Hook: 2.25 mm (US B-1)
- Number of pieces: 1
- Layout: Single round motif, worked in joined rounds
- Piece size: 6.5 in (16.5 cm)
- Size before border (after Round 4): 5 in (12.7 cm)
- Border depth: 0.75 in (1.9 cm) on each side (Rounds 5 and 6)
Materials
Choose a smooth, tightly plied, mercerized cotton. The sheen makes the crescent ridges stand out, and the firm twist keeps the chain loops crisp. Avoid fuzzy or loosely spun yarn because it blurs the lace.
- Cream / ivory: 8 g, about 32 m (fingering weight cotton, size 3 thread)
These amounts include a margin of about 30% for your test motif, tails, and small differences in tension.
Tools:
- 2.25 mm (US B-1) crochet hook
- 1 locking stitch marker
- Tapestry needle
- Small scissors
- Rust-proof pins
- Foam blocking board or folded towel
- Spray bottle with water; light spray starch (optional)
- Ruler or tape measure
Abbreviations (US Terms)
- ch – chain
- sl st – slip stitch
- sc – single crochet
- hdc – half double crochet
- dc – double crochet
- tr – treble crochet (yarn over twice)
- blo – back loop only
- sk – skip
- sp – space
- st(s) – stitch(es)
- rep – repeat
Special stitch – blo: Insert the hook under only the back loop of the stitch (the loop farthest from you). The front loops you leave unworked form the raised ridge lines along each crescent.
Swirl fan: (2 sc, 2 hdc, 3 dc, 9 tr), all worked into one ch-12 loop. The stitches get taller as you go, which creates the curl.
Gauge and Checkpoints
For lace, gauge is measured as the motif’s width across at each stage. Make one test motif before you commit to a larger amount of thread. Measure it lightly flattened and unblocked unless noted.
- After Round 1: 1.25 in (3.2 cm) across
- After Round 2: 3.25 in (8.3 cm) across, loops laid flat
- After Round 3: 3.75 in (9.5 cm) across
- After Round 4: 5 in (12.7 cm) across
- After Round 5: 5.75 in (14.6 cm) across
- After Round 6, blocked: 6.5 in (16.5 cm) across
If your motif is too big: go down to a 2 mm hook, or tighten your chains. Loose chains are the most common cause of oversized lace.
If your motif is too small: go up to a 2.5 mm hook. If only the border is tight, keep the same hook and work the chains a little looser.
If the motif cups: your chain loops are too short for your tension. Add 1 ch to each loop in the round where the cupping starts.
If the motif ruffles: your loops are too long. Remove 1 ch from each loop in that round.
Write down any change you make so a second motif will match the first.
Pattern
Join every round with a sl st to the first st unless told otherwise. Do not turn. The right side faces you throughout.
Center Ring
Ch 8, then sl st to the first ch to form a ring.
Round 1: Ch 1 (does not count as a st), work 18 sc into the ring, sl st to the first sc. (18 sc)
The ring should be firm and round, with an opening about 0.6 in (1.5 cm) across. If the sc crowd together and buckle, slide them evenly around the ring before joining. Work over the starting tail as you go so you have less to weave in later.
Petal Loops
Round 2: Ch 1, sc in the same st as the join, ch 12, sk 2 sts, sc in next st; rep from * 4 more times, ch 12, sk the last 2 sts, sl st to the first sc. (6 sc and 6 ch-12 loops)*
The sc sit in Round 1 stitches 1, 4, 7, 10, 13, and 16. Each repeat uses 3 sts (1 sc plus 2 skipped), and 6 × 3 = 18 matches Round 1. At this stage the piece looks like a simple six-petal chain flower.
Swirl Fans
Round 3: Sl st into the first ch-12 loop, ch 1, work a swirl fan (2 sc, 2 hdc, 3 dc, 9 tr) into the ch-12 loop, sc in the next sc of Round 2; rep from * 5 more times. The last sc goes into the sc where the round began. Sl st to the first sc of the round. (102 sts: 6 fans of 16 sts, plus 6 divider sc)*
Each fan is 17 sts including its divider sc, and 6 × 17 = 102.
As you work, push the stitches toward the start of each loop. The 9 tr will bunch at the tall end and bend the loop outward into a crescent. All six fans lean the same way, which creates the whirl. If one fan looks flatter than the others, spread its stitches along the loop again before you move on.
Keep your trebles a steady height. Pull up each loop to the same length before you yarn over, so all six fans match.
Crescent Ridges
This round adds height to the tall side of every fan and creates the ridges. Work every st in blo.
Round 4: Sl st in blo of the next sc (you are now on the second sc of the first fan). Hdc blo in each of the next 2 hdc, dc blo in each of the next 3 dc, 2 tr blo in each of the next 9 tr, ch 4, sk the divider sc and the first 2 sc of the next fan; rep from * 5 more times. On the first repeat, replace the first hdc with ch 2 (counts as hdc). Sl st to the top of the beginning ch-2. (138 sts and 6 ch-4 sps)*
Each fan has 2 hdc + 3 dc + 18 tr = 23 sts, and 6 × 23 = 138. Each ch-4 bridges 3 skipped sts (1 divider sc plus 2 sc), so it lies flat.
The doubled trebles flare the outer edge of each crescent. The unworked front loops run as fine lines along the swirl. Measure now: the motif should be 5 in (12.7 cm) across. This is your size before the border.
Border
The border is two rounds of chain loops. Because the motif is round, counts are given per fan section instead of per side. There are 6 equal sections.
Border gauge: In Round 6, each section covers about 3.4 in (8.6 cm) of the outer edge and holds 7 ch-6 loops. That is about 2 loops per 1 in (2.5 cm).
Round 5: Ch 1, sc in the same st as the join (the beginning ch-2), [ch 5, sk 3 sts, sc in next st] 5 times, ch 5, sk the last 2 sts of the fan, sc in the ch-4 sp, ch 5, sc in the first hdc of the next fan; rep from * 4 more times, then rep from * to ** once more, sl st to the first sc. (42 sc and 42 ch-5 loops)*
In each section, the sc go into fan sts 1, 5, 9, 13, 17, and 21 (6 sc), plus 1 sc in the ch-4 sp. That makes 7 sc and 7 ch-5 loops per section, and 6 × 7 = 42.
Check: the 5 spaced repeats use sts 1 through 21, and sts 22 and 23 are the 2 skipped before the ch-4 sp. That accounts for all 23 sts in the section. Measure: 5.75 in (14.6 cm) across.
Round 6: Sl st in each of the first 3 ch of the next ch-5 loop, ch 1, sc in the same loop, ch 6, sc in the next ch-5 loop; rep from * 40 more times, ch 6, sl st to the first sc. (42 sc and 42 ch-6 loops; 7 loops per section)*
Each sc sits at the center of a Round 5 loop, so the two rounds are staggered and form a double lace frame. Fasten off and weave in the ends.
Why the math works: After Round 4, the outer edge is about 15.7 in (39.9 cm) around (5 in × 3.14). After Round 6, it is about 20.4 in (51.8 cm) around (6.5 in × 3.14). Spreading 42 loops around that circle gives each ch-6 loop about 0.49 in (1.2 cm) of edge. That is close to the natural length of 6 ch in this cotton, so the motif lies flat instead of cupping or rippling. Going from ch-5 in Round 5 to ch-6 in Round 6 adds the extra length the bigger circle needs.
Final Blocking
- Weave in all ends along the back of the fans, following the direction of the stitches. Do not trim yet.
- Soak the motif in cool water for 10 minutes, then press out the water in a towel. Do not wring it.
- Lay it right side up on a foam board. Use a ruler to mark a 6.5 in (16.5 cm) circle, or pin it over a drawn circle template.
- Pin the center ring open to about 0.6 in (1.5 cm).
- Pin the 6 ch-4 bridges evenly so each fan section takes up one-sixth of the circle.
- Pin the tip of every ch-6 loop on the outer line, using 42 pins in total. Work on opposite sides in turn so the motif stays centered.
- Gently shape each crescent with your fingers so the tall end of every fan curls the same way.
- Spray lightly with starch if you want a crisp finish. Let the motif dry completely, for at least 12 hours.
- Unpin it, then trim the woven ends close.
Final Quality-Control Checklist
- The motif measures 6.5 in (16.5 cm) across in every direction.
- The center ring is open and round, with 18 sc.
- There are 6 crescent fans, all curling the same way.
- Each fan has 23 sts in Round 4, with visible front-loop ridges.
- All 6 ch-4 bridges lie flat.
- Round 5 has 42 ch-5 loops, and Round 6 has 42 ch-6 loops.
- The motif lies flat, with no cupping or ruffling.
- All ends are woven in and can’t be seen from the front.
Troubleshooting
The fans don’t curl. You probably spread the stitches evenly along the ch-12 loop. Pack the short stitches near the start and let the 9 tr bunch at the end.
The center hole closed up. Your Round 1 sc are too tight. Remake the ring with ch 9 instead of ch 8.
Round 4 ruffles. Your trebles are tall and loose. Work 2 dc in each of the first 3 tr and 2 tr in each of the remaining 6. The count stays at 23 sts per fan.
The border cups. Loosen the chains, or add 1 ch to each Round 6 loop.
The counts are off in Round 5. Before you start, place a marker in the first hdc of each fan in Round 4. Each section must start on a marked st.
The motif blocks into a hexagon. That is the 6-fan structure showing through. Pin every loop on the circle line, not just the bridges.
The ridges are hard to see. Check that Round 4 is worked in the back loop only, not both loops, and that the right side is facing you.
Care
Hand wash in cool water with mild soap, press out the water in a towel, and lay flat to dry, pinning again if needed. Don’t iron the lace directly; press it under a cloth on a low setting.

Final Notes
Here is the full measurement chain. Round 1 makes an 18-st ring 1.25 in (3.2 cm) across. Round 2 opens six loops to 3.25 in (8.3 cm). Round 3 fills them with swirl fans, giving 102 sts at 3.75 in (9.5 cm). Round 4 grows each fan to 23 sts, for 138 sts at 5 in (12.7 cm). The two border rounds add 0.75 in (1.9 cm) on each side with 42 loops, so the blocked motif measures 6.5 in (16.5 cm).
This pattern makes one motif, and that is the whole project: a small, flat lace pinwheel you can use as a doily, a coaster, or a practice piece for getting your tension right. The 42 even outer loops also give you neat points to connect to if you ever want to use it in a larger lace piece.
Check each checkpoint, trust the counts, and let blocking do the final shaping.
Happy crocheting!