

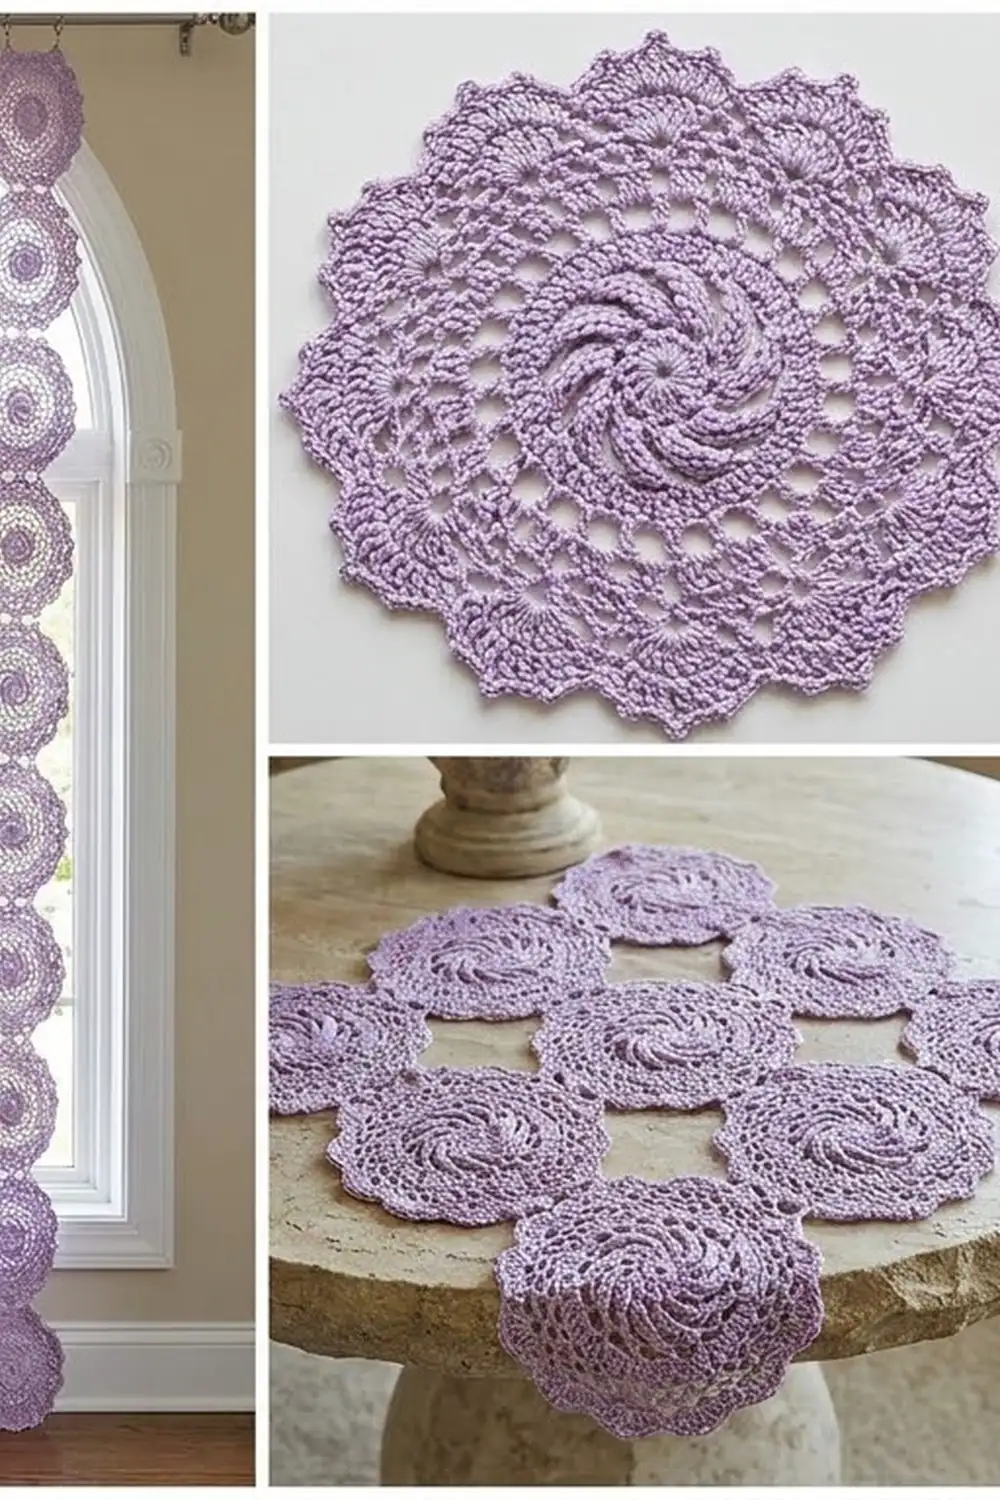
This lace curtain panel is made from round motifs with swirled centers, joined in a simple grid. Each circle has a raised spiral, a ring of eyelets, a ring of fans and 12 soft scallops. Where the circles meet, open diamond gaps let the light through.
The sample uses one dusty lavender cotton, so the texture does all the work. The post-stitch swirl catches the light, and the scallops make a gentle wave along the hem. It’s a romantic, vintage look that suits a bedroom or a sunny window seat.
The pattern uses US crochet terms. One finished panel is 32 in (81.3 cm) wide and 82 in (208.3 cm) long, including a 2 in (5.1 cm) rod-pocket header. Make two panels for a pair.
You crochet 40 identical motifs and join them as you go in the last round. Last, you make a double crochet header, join it to the top row of motifs and fold it over to form the rod pocket.
Finished Size and Construction
- Finished size: 32 in (81.3 cm) x 82 in (208.3 cm)
- Skill level: Intermediate (post stitches, join-as-you-go)
- Terminology: US
- Yarn weight: DK (#3) cotton
- Hook: 4.5 mm (US 7)
- Number of pieces: 40 round motifs + 1 header strip
- Layout: 4 motifs wide x 10 motifs tall
- Motif size: 8 in (20.3 cm) across, tip to tip
- Size before border: 32 in (81.3 cm) x 80 in (203.2 cm)
- Border (header) depth: 4 in (10.2 cm) flat, 2 in (5.1 cm) once folded
Materials
Use a smooth, mercerized or combed DK cotton. Cotton shows off the swirl, holds the scallops after blocking and doesn’t stretch much over a long drop. Fuzzy yarns will hide the texture.
- Lavender: 600 g, about 1,350 m (1,476 yd) per panel, based on a yarn with about 225 m per 100 g. Each motif uses about 12 g (27 m), and the header uses about 35 g (79 m).
These quantities include a margin of about 15% for swatching, ends and differences in tension. Double them for a pair.
Tools: 4.5 mm (US 7) hook, tapestry needle, locking stitch markers, rustproof pins, blocking mats or towels, spray bottle, measuring tape, scissors.
Abbreviations (US Terms)
ch = chain; sl st = slip stitch; sc = single crochet; dc = double crochet; FPdc = front post double crochet; sk = skip; sp = space; st(s) = stitch(es); RS/WS = right side/wrong side; rep = repeat.
FPdc: Yarn over, insert the hook from front to back to front around the post of the stitch given, yarn over and pull up a loop, then (yarn over, pull through 2 loops) twice.
Swirl pair: Dc in the top of the next FPdc, then FPdc around the post of that same FPdc. Each new ridge sits one stitch past the dc you just made, so the ridges shift a little each round and form the spiral.
Gauge and Checkpoints
Make one complete motif and block it before you make the other 39. Over 10 rows of motifs, a small difference adds up to several inches.
- Header gauge: 16 dc and 10 rows = 4 in (10.2 cm)
- After Round 1: 1 in (2.5 cm) across
- After Round 6: 5 in (12.7 cm)
- After Round 7: 5 3/4 in (14.6 cm)
- After Round 8: 6 3/4 in (17.1 cm)
- After Round 9: 8 in (20.3 cm) tip to tip, blocked
If your motif is too big: Go down to a 4 mm hook. A motif that’s 1/4 in (0.6 cm) too wide makes the panel 1 in (2.5 cm) too wide and 2 1/2 in (6.4 cm) too long.
If it’s too small: Go up to a 5 mm hook. If Round 6 cups, pull each FPdc up to the full height of the round.
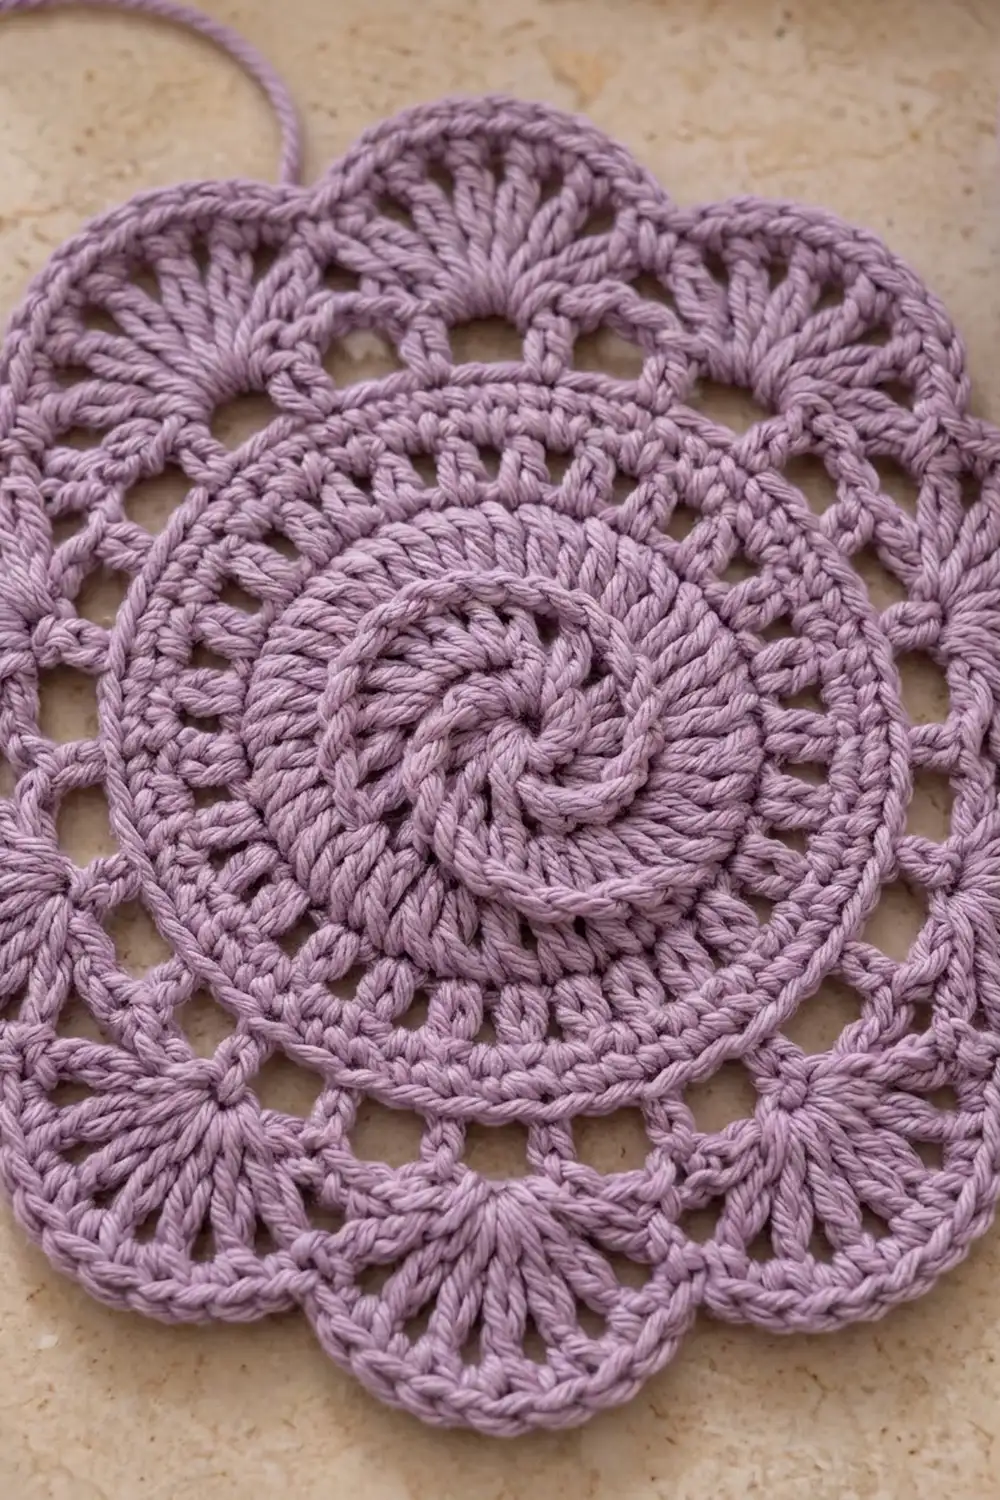
Motif (make 40)
Work in joined rounds with the RS facing; don’t turn. The beginning ch 3 counts as a dc throughout.
Round 1: Magic ring, ch 3, 11 dc in the ring, sl st to the top of the ch 3. (12 dc)
Round 2: Ch 3, FPdc around the st at the base of the ch 3, dc in next st, FPdc around the same st; rep from * 10 more times, sl st to the top of the ch 3. (24 sts: 12 dc, 12 FPdc)*
Round 3: Ch 3, swirl pair, dc in next dc, swirl pair; rep from * 10 more times, sl st to the top of the ch 3. (36 sts: 24 dc, 12 FPdc)*
Round 4: Ch 3, dc in next dc, swirl pair, dc in next 2 dc, swirl pair; rep from * 10 more times, sl st to the top of the ch 3. (48 sts: 36 dc, 12 FPdc)*
Round 5: Ch 3, dc in next 2 dc, swirl pair, dc in next 3 dc, swirl pair; rep from * 10 more times, sl st to the top of the ch 3. (60 sts: 48 dc, 12 FPdc)*
Round 6: Ch 3, dc in next 3 dc, swirl pair, dc in next 4 dc, swirl pair; rep from * 10 more times, sl st to the top of the ch 3. (72 sts: 60 dc, 12 FPdc)*
Checkpoint: 12 ridges spiral out from the center, all leaning the same way. The circle lies flat and measures 5 in (12.7 cm).
Round 7 (eyelets): Ch 5 (counts as dc + ch 2), sk next st, dc in next st, ch 2, sk next st; rep from * 34 more times, sl st to the 3rd ch of the ch 5. (36 dc, 36 ch-2 sps; 108 sts including chains)* That gives 3 sps for each of the 12 repeats.
Round 8 (fans): Sl st into the first ch-2 sp, ch 1. Sc in this ch-2 sp, 5 dc in next ch-2 sp, sc in next ch-2 sp, ch 3, then move on to the next ch-2 sp; rep from * 11 more times, sl st to the first sc. (12 fans; 120 sts: 24 sc, 60 dc, 36 ch)*
Round 9 (scallops): Sl st in each of the next 5 dc and the next sc, then sl st into the ch-3 sp, ch 1. Call the 5 dc of each fan dc 1 to dc 5. Sc in the ch-3 sp, sk sc, dc in dc 1, 2 dc in dc 2, (2 dc, ch 2, 2 dc) in dc 3, 2 dc in dc 4, dc in dc 5, sk sc; rep from * 11 more times, sl st to the first sc. Fasten off. (12 scallops; 156 sts: 12 sc, 120 dc, 24 ch)*
Each scallop has 10 dc and a ch-2 tip. Number the scallops 1 to 12 in the order you work them. With scallop 1 at 12 o’clock, scallop 7 is at 6 o’clock, and scallops 4 and 10 are at 3 and 9 o’clock. These four are the joining tips. On the top-row motifs, scallops 12, 1 and 2 also attach to the header.
Make All Pieces
- Lavender: 40 motifs (finish the first one; join the other 39 in Round 9)
- Lavender: 1 header strip, worked after joining
[ header: 128 sts ]
Row 1:  M  M  M  M
Row 2:  M  M  M  M
Row 3:  M  M  M  M
Row 4:  M  M  M  M
Row 5:  M  M  M  M
Row 6:  M  M  M  M
Row 7:  M  M  M  M
Row 8:  M  M  M  M
Row 9:  M  M  M  M
Row 10: M  M  M  M
Place every motif with scallop 1 pointing up toward the header, so all the swirls turn the same way.
Joining
Method: Join-as-you-go at the ch-2 tips in Round 9. Each motif touches a neighbor at one tip per side and nowhere else.
Joined tip: Instead of ch 2 at the tip, work ch 1, sl st into the neighbor’s ch-2 tip, ch 1. The stitch count doesn’t change.
Stitch-to-stitch logic:
- Side by side: the side tip (scallop 4 or 10) joins the facing side tip (10 or 4) of the neighbor.
- Above and below: scallop 1 of the new motif joins scallop 7 of the motif above.
- Inside motifs join at two tips as you work them. The motifs made later join to their other two tips.
- Where four motifs meet, nothing is joined, which leaves the open diamond.
Lay each motif RS up before you join it, and check that the swirl direction matches.
Tension: Make each joining sl st the height of a normal ch. If it’s tight, the tips pucker and the panel pulls in. If it’s loose, the gaps grow.
Size checkpoint: One row of 4 motifs measures 32 in (81.3 cm) across. Two rows measure 16 in (40.6 cm) tall, and all ten measure 80 in (203.2 cm). If the width is off by more than 1/2 in (1.3 cm), measure each motif again.
Border (Header and Rod Pocket)
The border goes only along the top. The sides and hem keep their natural scallops.
Border gauge: 16 dc and 10 rows = 4 in (10.2 cm).
Foundation: Ch 130.
Row 1: Dc in the 4th ch from the hook and in each ch across. (128 dc; the skipped ch 3 counts as the first dc)
Rows 2–10: Ch 3 (counts as dc), turn, sk first st, dc in each st across, ending in the top of the turning ch. (128 dc)
Edging row: Don’t fasten off. Ch 1, then work along the short end: 2 sc in the side of each row. (20 sc) Ch 1 at the corner, then 1 sc in each foundation loop along the bottom of Row 1. (128 sc) Ch 1 at the corner, then 2 sc in the side of each row along the other end. (20 sc) Fasten off. (168 sc + 2 corner ch)
Joining row: Place the header above the top row of motifs. With RS facing, join the yarn to the first sc of the 128-sc edge. For each of the 4 top motifs, work across 32 sts like this:
Sc in next 8 sts; sc in next st, ch 2, sl st in scallop 12 tip, ch 2, sl st in the sc just made; sc in next 7 sts; sc in next st through the scallop 1 tip at the same time; sc in next 7 sts; sc in next st, ch 2, sl st in scallop 2 tip, ch 2, sl st in the sc just made; sc in next 7 sts. Fasten off after the 4th motif. (128 sc)
The ch-2 links make up the drop of about 1/2 in (1.3 cm) between the top tip and the two side tips. Each link loops back to its own sc, so the chains don’t add to the count.
Why the math works: At 4 sts per inch, an 8 in (20.3 cm) motif takes 32 sts: 8 + 1 + 7 + 1 + 7 + 1 + 7 = 32. Four motifs x 32 sts = 128, which matches the header exactly. Nothing is added at the seams, because the motifs touch only at their side tips, which aren’t part of the header.
Rod pocket: Fold Rows 6–10 to the WS along the line between Rows 5 and 6, so the top of Row 10 meets the bottom edge of Row 1. Whipstitch Row 10 to the back of the joining row across all 128 sts. You get a 2 in (5.1 cm) header that fits a rod up to 1 in (2.5 cm) across. Leave the ends open.
Final Blocking
- Weave in the ends through the dc rounds, never through the eyelets or chain links.
- Soak the panel in cool water for 15 minutes. Press out the water; don’t wring it.
- Roll it in towels to take out more water.
- Lay it flat RS up. If you’re short on space, block one half at a time.
- Pin it to 32 in (81.3 cm) x 80 in (203.2 cm), not counting the header.
- Pin each tip along the sides and hem so the scallops are even.
- Smooth each swirl flat with your fingers.
- Pin the header straight and mist it.
- Let it dry for at least 24 hours.
Final Quality-Control Checklist
- 40 motifs, each 8 in (20.3 cm) tip to tip
- Each motif has 12 ridges, 36 eyelets, 12 fans and 12 scallops
- All swirls turn the same way
- Joins only at scallops 1, 4, 7 and 10
- No puckered or twisted joins
- Header has 128 sts and is joined at 3 tips on each top motif
- Panel measures 32 in (81.3 cm) x 82 in (208.3 cm)
- All ends woven in
Troubleshooting
The swirl cups: The FPdc stitches are too short. Pull them up taller, or go up half a hook size for Rounds 2–6.
The swirl ruffles: Count each round: 24, 36, 48, 60, 72.
The ridges don’t spiral: Work the dc into the top of the FPdc first, then the FPdc around it.
The scallops are uneven: Check that each fan in Round 8 has exactly 5 dc.
The panel slants: One motif was joined at the wrong scallop. Count from scallop 1 to find it.
The header ripples: Rework the joining row with a smaller hook, keeping 32 sts per motif.
The panel grows when hung: Block it again and dry it flat. Try a firmer, mercerized cotton for the next panel.
Care
Hand wash in cool water, or machine wash on a gentle cycle in a mesh bag. Reshape the panel and dry it flat; never hang it up wet.
Final Notes
Here’s the measurement chain. Round 6 is 5 in (12.7 cm), Round 8 is 6 3/4 in (17.1 cm) and the finished motif is 8 in (20.3 cm). Four motifs across make 32 in (81.3 cm), and ten down make 80 in (203.2 cm). The 128-st header folds to 2 in (5.1 cm), for a total length of 82 in (208.3 cm).
If your first motif matches the checkpoints, the rest of the panel will line up. Take your time with the joins, check every swirl and block carefully.
Happy crocheting!