

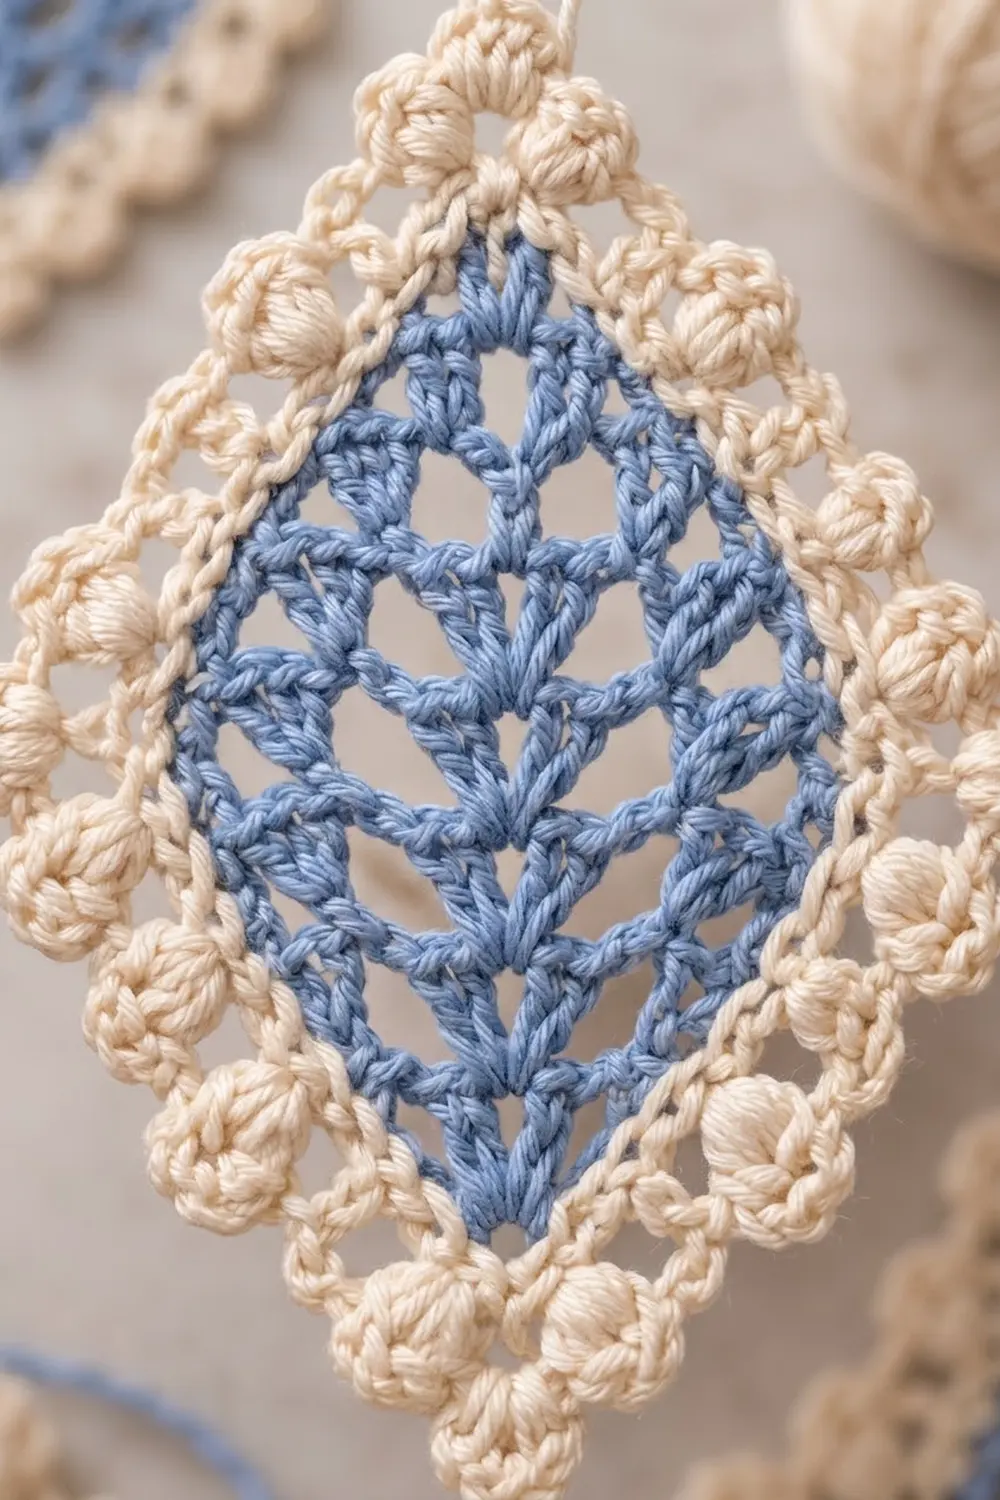
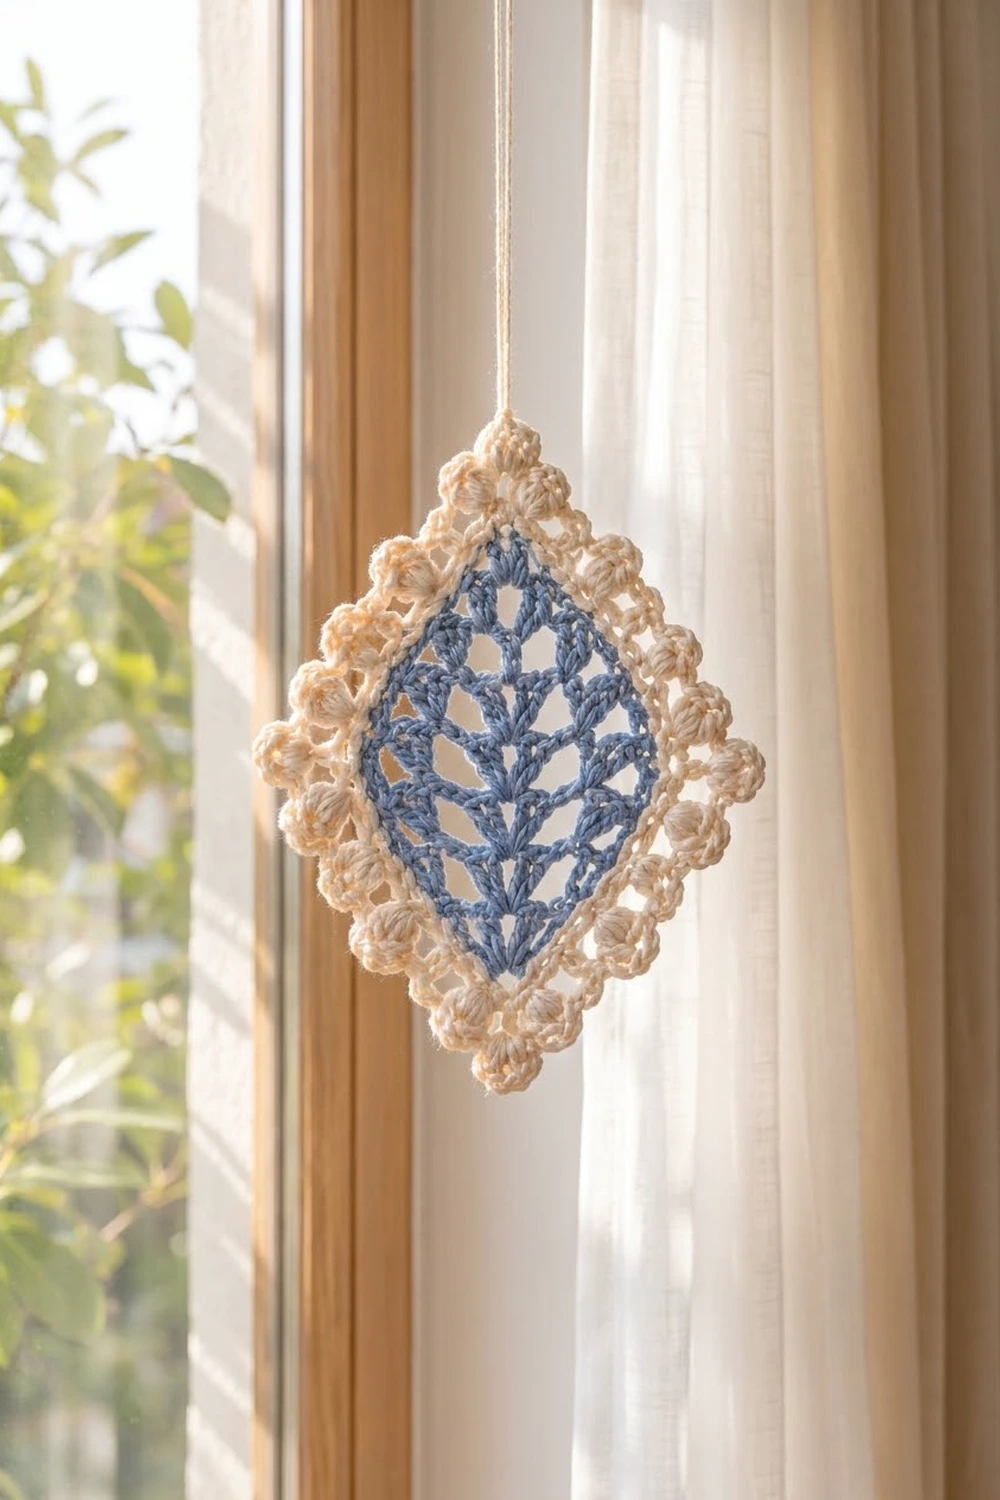
The Bluebell Leaf Diamond is a single lace motif shaped like a long, elegant diamond. A soft cornflower blue center holds a leaf design: a spine of stacked V-stitches runs straight up the middle, and open chevron rows branch out from it like the veins of a leaf.
A cream border frames the blue. A solid band of double crochet comes first, followed by a round of plump puff stitches with chain-2 spaces between them. The puffs give the outline a beaded, scalloped look, and a corner puff sits exactly on each of the four points of the diamond.
The style is soft vintage cottage: two colors, crisp lace, and a lot of texture in a small piece. All instructions use US crochet terms. Once blocked, the motif measures 5.5 in (14.0 cm) wide and 7 in (17.8 cm) tall from point to point.
Construction is simple. You work the blue center in turned rows, starting at the bottom point. Every row adds a V-stitch at the center, so the rows form chevrons and the piece grows into a square on point. One round of blue single crochet neatens the edges. Then two cream rounds build the border, and blocking stretches the piece into its taller diamond shape.
Finished Size and Construction
- Finished size: 5.5 in (14.0 cm) wide x 7 in (17.8 cm) tall, point to point
- Skill level: Intermediate (you need to be comfortable with turned rows, working into row ends, and puff stitches)
- Terminology: US crochet terms
- Yarn weight: DK (light, #3), cotton or a cotton blend
- Hook: 4.0 mm (US G-6)
- Number of pieces: 1
- Layout: One single motif, presented on point as a diamond
- Piece size (blue center after the edging round, blocked): 3.5 in (8.9 cm) wide x 4.5 in (11.4 cm) tall
- Size before border: 3.5 in (8.9 cm) x 4.5 in (11.4 cm)
- Border depth: 0.75 in (1.9 cm), measured straight out from each edge
Materials
Yarn advice: Use a smooth, tightly plied DK cotton. It shows the lace lines clearly and helps the puffs hold their shape. Fuzzy or very soft acrylic will blur the vein pattern. Choose a blue with enough contrast against the cream that the outline stays clear from a distance.
- Blue (cornflower / periwinkle): 8 g, about 19 m (21 yd)
- Cream (ivory / natural): 10 g, about 24 m (26 yd)
These quantities include a margin of about 25% for your gauge check and for weaving in ends.
Tools:
- 4.0 mm (US G-6) crochet hook
- Tapestry needle
- 4 locking stitch markers
- Scissors
- Blocking mat, rustproof pins, and a spray bottle
- Ruler or measuring tape
Abbreviations (US Terms)
- ch – chain
- sl st – slip stitch
- sc – single crochet
- dc – double crochet
- sp(s) – space(s)
- sk – skip
- st(s) – stitch(es)
- rep – repeat
- RS / WS – right side / wrong side
- tch – turning chain
Special stitches:
- V-st (V-stitch): (dc, ch 2, dc) in the same st or sp.
- Puff (puff stitch): (Yo, insert hook in st or sp, yo, pull up a loop to about 0.5 in / 1.3 cm tall) 4 times. You now have 9 loops on the hook. Yo and draw through all 9 loops, then ch 1 to lock the puff. The locking ch 1 is part of the puff and does not count as a separate stitch.
- Ch 4 at the start of a row: counts as dc + ch 1 throughout.
Gauge and Checkpoints
Make one full motif before you start anything larger. A finished motif is the most accurate gauge swatch you can make, because lace and puffs both change size when you block them.
Row gauge: 5 rows of the blue center = 2 in (5.1 cm), measured along a lower edge. Each row adds about 0.4 in (1.0 cm) to the lower edges.
Checkpoints:
- After Row 4: each lower edge measures about 1.6 in (4.1 cm).
- After Row 7: each lower edge measures about 2.8 in (7.1 cm). Unblocked, the piece is roughly a square on point.
- After Edging Round 1: lightly pinned, the blue center measures 3.5 in (8.9 cm) wide x 4.5 in (11.4 cm) tall, and each edge is about 2.85 in (7.2 cm).
- After Border Round 2: about 4.4 in (11.2 cm) wide x 5.6 in (14.2 cm) tall.
- After Border Round 3 and blocking: 5.5 in (14.0 cm) wide x 7 in (17.8 cm) tall.
Too big? Go down to a 3.5 mm (US E-4) hook. Too small? Go up to a 4.5 mm (US 7) hook. If only the border is off, change hooks for the cream rounds alone. Always measure flat, without stretching, except at the blocking checkpoints.
Blue Leaf Center
Use Blue. You work in turned rows from the bottom point upward. Each V-st goes into the ch-2 sp of the V-st below it, and each dc goes into a dc. Because the increase is only at the center, every row bends into a chevron, and those chevrons form the leaf veins.
Row 1 (RS): Ch 6, dc in 6th ch from hook. The first 5 ch count as dc + ch 2, so you have made one V-st. Turn.
(2 dc, 1 ch-2 sp)
Row 2 (WS): Ch 4, V-st in ch-2 sp, ch 1, dc in 3rd ch of tch. Turn.
(4 dc, 2 ch-1 sps, 1 ch-2 sp)
Row 3: Ch 4, dc in next dc, ch 1, V-st in ch-2 sp, ch 1, dc in next dc, ch 1, dc in 3rd ch of tch. Turn.
(6 dc, 4 ch-1 sps, 1 ch-2 sp)
Rows 4–7: Ch 4, dc in next dc, ch 1; rep from * until you reach the V-st ch-2 sp, V-st in ch-2 sp, *ch 1, dc in next dc; rep from ** to tch, ch 1, dc in 3rd ch of tch. Turn after Rows 4–6. Do not turn after Row 7.
- Row 4: 8 dc, 6 ch-1 sps, 1 ch-2 sp
- Row 5: 10 dc, 8 ch-1 sps, 1 ch-2 sp
- Row 6: 12 dc, 10 ch-1 sps, 1 ch-2 sp
- Row 7: 14 dc, 12 ch-1 sps, 1 ch-2 sp
Each row has 2 more dc than the row before, so every row has 2 x its row number in dc. In Row 7, each half of the chevron has 7 dc and 6 ch-1 sps, and the shared ch-2 sp sits at the top point. The last dc of Row 7 becomes a side corner.
Tip: The two dc of each new V-st become the first dc of the next chevron arms. If your spine starts to drift sideways, you have worked a V-st into a ch-1 sp instead of the ch-2 sp. Pull back and fix it right away.
Edging Round 1 (RS, Blue): Ch 1, 3 sc in top of last dc made (side corner). Work 2 sc in the end of each of Rows 6 down to 1 (12 sc). Work 3 sc in the free loop of the foundation ch (bottom corner). Work 2 sc in the end of each of Rows 1 up to 6 (12 sc). Work 3 sc in 3rd ch of Row 7 tch (side corner). Sc in next ch-1 sp, (sc in next dc, sc in next ch-1 sp) 5 times, sc in next V-st dc (12 sc). Work 3 sc in the V-st ch-2 sp (top corner). Sc in next V-st dc, (sc in next ch-1 sp, sc in next dc) 5 times, sc in last ch-1 sp (12 sc). Join with sl st to first sc. Fasten off.
(60 sc: 12 sc along each of the 4 sides + 4 corner groups of 3 sc)
Put a marker in the middle sc of each corner group. Each side has 14 sts, counting the 2 corner middles. All four sides now match, even though two are made of row ends and two are made of stitch tops.
Border
Border gauge: One puff + ch-2 repeat in Round 3 spans about 0.65 in (1.7 cm). The two cream rounds together add 0.75 in (1.9 cm) of depth.
Border Round 2 (Cream): Join Cream with sl st in the middle sc of the top corner. Ch 5 (counts as dc + ch 2), dc in same st. *Dc in each sc to next marked corner sc, (dc, ch 2, dc) in marked sc; rep from * 2 more times, dc in each sc to end. Join with sl st in 3rd ch of beg ch-5.
- This is a conversion round: 60 dc worked 1 per existing st + 4 extra corner dc = 64 dc, plus 4 ch-2 corner sps.
- Per side: 16 dc. That is 1 corner dc + 14 dc worked into the 14 sts between the corner spaces + 1 corner dc.
Border Round 3 (Cream, puffs): Sl st in next ch-2 corner sp. Ch 1, puff in same sp (corner puff). *Ch 2, puff in next dc (1st dc of side), (ch 2, sk 2 dc, puff in next dc) 5 times, ch 2, puff in next ch-2 corner sp; rep from * 3 more times, but on the last repeat stop after the final ch 2 and don’t work the corner puff. Join with sl st to top of first puff. Fasten off.
- Per side: 6 puffs, worked in dc 1, 4, 7, 10, 13, and 16 of that side, with 7 ch-2 sps (5 between the side puffs + 1 at each end next to the corner puffs).
- Totals: 24 side puffs + 4 corner puffs = 28 puffs, and 4 x 7 = 28 ch-2 sps.
Why the math works: Each side of Round 2 has 16 dc. Puffs every third stitch, starting at dc 1, fill the side exactly: 1 + (5 x 3) = 16. That puts a puff on both end stitches of every side, so each side is symmetrical. The five inner ch-2s each bridge 2 skipped dc, so they match the length of the edge below. The two end ch-2s skip nothing. They add a little length at each point, which an outer edge needs to turn a corner without cupping. That is why the points stay sharp and flat.
Final Blocking
- Weave in all ends on the WS. Run blue tails through blue stitches and cream tails through cream stitches.
- Soak the motif in cool water for 10 minutes. Roll it in a towel and press out the water without wringing.
- Pin the top and bottom points 7 in (17.8 cm) apart along a straight line.
- Pin the side points 5.5 in (14.0 cm) apart, centered on that line.
- Check that each outer edge is about 4.5 in (11.4 cm) long. Pin every corner puff right at its point.
- Pin open the chevron mesh so the V-st spine runs straight, and pin each puff so it sits rounded.
- Let the motif dry completely, at least 12 hours, before you unpin it.
Final Quality-Control Checklist
- Row 7 has 14 dc, 12 ch-1 sps, and 1 ch-2 sp.
- The V-sts stack in one straight vertical line from the bottom point to the top point.
- Edging Round 1 has 60 sc, with 12 sc between corner groups on every side.
- Border Round 2 has 64 dc, 16 per side, and 4 ch-2 corners.
- Border Round 3 has 28 puffs and 28 ch-2 sps.
- No blue shows through the cream rounds on the RS.
- The blocked size is 5.5 in (14.0 cm) x 7 in (17.8 cm).
- All four points are sharp, and all four sides are the same length.
Troubleshooting
The center curls into a cone. Your V-st chains are too tight. Work the ch-2 in each V-st more loosely, or go up a hook size for the blue rows only.
The center ruffles. Your ch-1 sps are too loose, or you added a dc. Recount: every row should have exactly 2 x its row number in dc.
The lower edges look gappy after Round 1. Work the 2 sc around the post of each row-end dc, not into a single strand.
The border cups. Check that you made the ch-2 at both ends of every side in Round 3. Leaving them out takes length away from the outer edge.
The border ruffles. Your puff loops are too tall. Keep them at about 0.5 in (1.3 cm), or pull up 3 loops per puff instead of 4.
The puffs lean or flatten. Close every puff with its locking ch 1, and pull the yarn snug.
One side is longer. Recount Round 2. Every side must have exactly 16 dc.
Care
Hand wash in cool water with a mild detergent, then reshape and dry flat. If needed, hold a steam iron above the motif without letting it touch the puffs.
Final Notes
The measurement chain is short. Seven blue rows give lower edges of 2.8 in (7.1 cm). The edging round adds up to 60 sc and a center that blocks to 3.5 in (8.9 cm) x 4.5 in (11.4 cm). Round 2 builds that into 64 dc, 16 per side. Round 3 turns each 16-dc side into 6 puffs and 7 ch-2 sps. The finished motif blocks to 5.5 in (14.0 cm) x 7 in (17.8 cm). If you hit each checkpoint, the motif will come out true to size and every point will stay crisp.
Happy crocheting!